今天開始在 Micropython 中將 WiFi 用起來,並連上網路。
我們目前不管是用 mpremote 或是 Thonny,都是使用 serial port 來與板子溝通(透過 USB 轉接),Micropython 有一個 WebREPL 功能,透過“網頁”的方式來連接到開發板,其實那是表象,比較精準的說是用 websocket 的連線方式。開發板在默認的情況下,並沒有開啓 WebREPL 的功能,必須手動開啓:
用 mpremote (當然 Thonny 也行) ,連上 REPL,輸入以下指令:
>>> import webrepl_setup
輸出下面執行畫面,我們依提示來啓用 WebREPL:
WebREPL daemon auto-start status: disabled

Would you like to (E)nable or (D)isable it running on boot?
(Empty line to quit)
> E
To enable WebREPL, you must set password for it
New password (4-9 chars): 12345
Confirm password: 12345
Changes will be activated after reboot
Would you like to reboot now? (y/n) y
輸入 E 來啓用,輸入 12345 是將來要用 WebRE 連線時需要的密碼,選擇您可以記住的,未來在程式中也可以指定此密碼。若是在 ESP8266 的 Micropython 中,這樣的啓用 WebREPL,在板子重開機之後就會啓動一個 AP 熱點 ,但這個功能在 ESP32 開發板上並沒有,若您之前有 ESP8266 的經驗必須特別注意一下。
也就是說,我們還必須啓用 WiFi 網路才能使用 WebREPL,啓用 WiFi 網路也非常容易,若是臨時忘記,只要在 Micropython REPL 中下 help() 就會列出提示:
(base) PS C:\Users\ts> mpremote.exe
Connected to MicroPython at COM9
Use Ctrl-] or Ctrl-x to exit this shell

>>> help()
Welcome to MicroPython on the ESP32!

For online docs please visit http://docs.micropython.org/

For access to the hardware use the 'machine' module:

import machine
pin12 = machine.Pin(12, machine.Pin.OUT)
pin12.value(1)
pin13 = machine.Pin(13, machine.Pin.IN, machine.Pin.PULL_UP)
print(pin13.value())
i2c = machine.I2C(scl=machine.Pin(21), sda=machine.Pin(22))
i2c.scan()
i2c.writeto(addr, b'1234')
i2c.readfrom(addr, 4)

Basic WiFi configuration:

import network
sta_if = network.WLAN(network.STA_IF); sta_if.active(True)
sta_if.scan()                             # Scan for available access points
sta_if.connect("<AP_name>", "<password>") # Connect to an AP
sta_if.isconnected()                      # Check for successful connection

Control commands:
  CTRL-A        -- on a blank line, enter raw REPL mode
  CTRL-B        -- on a blank line, enter normal REPL mode
  CTRL-C        -- interrupt a running program
  CTRL-D        -- on a blank line, do a soft reset of the board
  CTRL-E        -- on a blank line, enter paste mode

For further help on a specific object, type help(obj)
For a list of available modules, type help('modules')
>>>
是不是非常的貼心呢!
詳細的 ESP32 WiFi 的啓用,您可以參考這篇文章:MicroPython on ESP32 學習筆記 (三) : WiFi 連線
雖然文中作者建議同時開啓 STA 與 AP 模式,不過我們在實用中發現,其實開啓 WiFi,有時會影響 紅外線 接收的體感,也就是可能遙控器按了,但風扇卻沒有收到信號而有所反應!這點在 ESP8266 開發板上尤其明顯,幾乎到了不可忍受的程度。因此,我們建議,若能連到無線路由器時,啓動 STA 模式,反之,則啓動 AP 模式。而且,當按風扇遙控器電源鍵來啓動風扇時關閉 WiFi 網路,再按電源鍵時關閉風扇(只是停止風扇的運轉,網路以及 MCU 都還是上電的)才再啓動 WiFi 網路。
WiFi 啓用的程式如下:boot.py
# This file is executed on every boot (including wake-boot from deepsleep)
#import esp
#esp.osdebug(None)
import uos, machine
#uos.dupterm(None, 1) # disable REPL on UART(0)
import gc
import network
import time
import webrepl
from secrets import WIFI_NAME, WIFI_PASS

print('Connecting to WiFi', end='')
wlan = network.WLAN(network.STA_IF)
wlan.active(True)
if not wlan.isconnected():
    wlan.connect(WIFI_NAME, WIFI_PASS)
    t0 = 0
    while (not wlan.isconnected()):
        time.sleep(1)
        t0 = t0 + 1
        if (t0 > 10):
            print('failed')
            break
        else:
            pass
    else:
        print('connected')
#if (t0 > 10):
    # Enable AP here
print('network config:', wlan.ifconfig())

webrepl.start()
gc.collect()
這裡,啓用 AP 模式的程式碼就給您當作作業了!
程式中我們使用了一個技巧,我們把 WiFi 路由器的參數 WIFI_NAME, WIFI_PASS 等,保存在 secrets.py 裡面,然後再 import 進來,這樣可以避免給出 程式碼 時,不小心也泄漏了 WiFi 密碼!
當我們重開機執行 boot.py 就可以連上 WiFi 網路了,以我這裡爲例,我獲得了:
Started webrepl in normal mode
Connecting to WiFinetwork config: ('192.168.168.128', '255.255.255.0', '192.168.168.1', '1.1.1.1')
WebREPL server started on http://192.168.168.128:8266/
Started webrepl in normal mode
開發板的 IP 是 192.168.168.128
此時我們可以用瀏覽器打開開發板上的網頁:http://192.168.168.128:8266/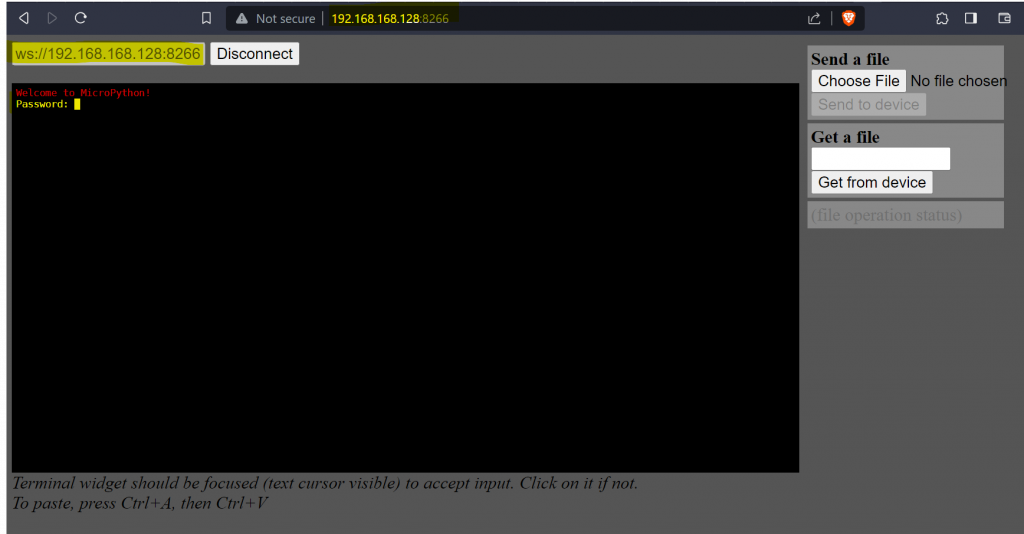
輸入之前設定的密碼 “12345” 後就可以連接了。
不過這個網頁的體驗真的很差!或許跟一些瀏覽器逐漸的不支援 http 有關,在此我們還是建議您使用 Thonny 來連接 WebREPL:在直譯器選擇 ESP32 開發板的下邊,有選擇 連接埠 的選項,這裡我們選擇 WebREPL,並且填入適當的參數就可以類似用 USB serial port 一樣的使用方式了!真的很方便,尤其是板子已經在工作的場域了,不方便用 USB 線來連接,這時用 WiFi 來更新一下 Python 程式碼韌體等等,非常方便。
經由多次的實驗,ESP32-S3 Micropython 版本 1.20、1.21 的 WebREPL,在 Thonny 中無法正常使用。1.21 版本在開發板自帶 WebREPL 網頁連線可以使用,不過會常常斷線,需要重連。
Thonny 退回到 3.3.13 版本,ESP32-S3 Micropython 1.20 1.21 的 WebREPL 可以正常使用。


 iThome鐵人賽