在成功串接咖啡廳資料以及在 Android 專案內顯示 Google 地圖後,接著要來逐步實現我們找咖啡專案的需求 :
上述的需求是有順序的,來依序實現吧~~~
今日實作課程 :
以下範例建立了一個經緯度在雪梨的標記 :
val melbourneLocation = LatLng(-37.813, 144.962)
val melbourne = map.addMarker(
    MarkerOptions()
        .position(melbourneLocation)
)
接著要在澳洲建立多個標記,標記的 icon 可以用多種方式實作。筆者只會實作專案可能會用到部分,我們先打開 MainActivity 。
把地圖先宣告為全域變數 :
private lateinit var map: GoogleMap
建立標記的 map :
/** map to store place names and locations */
private val places = mapOf(
    "BRISBANE" to LatLng(-27.47093, 153.0235),
    "MELBOURNE" to LatLng(-37.81319, 144.96298),
    "DARWIN" to LatLng(-12.4634, 130.8456),
    "SYDNEY" to LatLng(-33.87365, 151.20689),
    "ADELAIDE" to LatLng(-34.92873, 138.59995),
    "PERTH" to LatLng(-31.952854, 115.857342),
    "ALICE_SPRINGS" to LatLng(-24.6980, 133.8807)
)
建立 PlaceDetails class,用來儲存標記資訊 :
/**
 * This stores the details of a place that used to draw a marker
 */
class PlaceDetails(
    val position: LatLng,
    val title: String = "Marker",
    val snippet: String? = null,
    val icon: BitmapDescriptor = BitmapDescriptorFactory.defaultMarker(),
    val infoWindowAnchorX: Float = 0.5F,
    val infoWindowAnchorY: Float = 0F,
    val draggable: Boolean = false,
    val zIndex: Float = 0F)
建立自定義方法 addMarkersToMap(),用來將標記加到剛剛宣告的 Map 內 :
/**
 * Show all the specified markers on the map
 */
private fun addMarkersToMap() {

    val placeDetailsMap = mutableMapOf(
        // Uses a coloured icon
        "BRISBANE" to MainActivity.PlaceDetails(
            position = places.getValue("BRISBANE"),
            title = "Brisbane",
            snippet = "Population: 2,074,200",
            icon = BitmapDescriptorFactory
                .defaultMarker(BitmapDescriptorFactory.HUE_AZURE)
        ),

        // Uses a custom icon with the info window popping out of the center of the icon.
        "SYDNEY" to MainActivity.PlaceDetails(
            position = places.getValue("SYDNEY"),
            title = "Sydney",
            snippet = "Population: 4,627,300",
            icon = BitmapDescriptorFactory.fromResource(R.drawable.arrow),
            infoWindowAnchorX = 0.5f,
            infoWindowAnchorY = 0.5f
        ),

        // Will create a draggable marker. Long press to drag.
        "MELBOURNE" to MainActivity.PlaceDetails(
            position = places.getValue("MELBOURNE"),
            title = "Melbourne",
            snippet = "Population: 4,137,400",
            draggable = true
        ),

        // Use a vector drawable resource as a marker icon.
        "ALICE_SPRINGS" to MainActivity.PlaceDetails(
            position = places.getValue("ALICE_SPRINGS"),
            title = "Alice Springs",
            icon = vectorToBitmap(
                R.drawable.ic_android, Color.parseColor("#A4C639")
            )
        ),

        // More markers for good measure
        "PERTH" to MainActivity.PlaceDetails(
            position = places.getValue("PERTH"),
            title = "Perth",
            snippet = "Population: 1,738,800"
        ),

        "ADELAIDE" to MainActivity.PlaceDetails(
            position = places.getValue("ADELAIDE"),
            title = "Adelaide",
            snippet = "Population: 1,213,000"
        )

    )

    // add 4 markers on top of each other in Darwin with varying z-indexes
    (0 until 4).map {
        placeDetailsMap.put(
            "DARWIN ${it + 1}", MainActivity.PlaceDetails(
                position = places.getValue("DARWIN"),
                title = "Darwin Marker ${it + 1}",
                snippet = "z-index initially ${it + 1}",
                zIndex = it.toFloat()
            )
        )
    }

    // place markers for each of the defined locations
    placeDetailsMap.keys.map {
        with(placeDetailsMap.getValue(it)) {
            map.addMarker(
                MarkerOptions()
                    .position(position)
                    .title(title)
                    .snippet(snippet)
                    .icon(icon)
                    .infoWindowAnchor(infoWindowAnchorX, infoWindowAnchorY)
                    .draggable(draggable)
                    .zIndex(zIndex))

        }
    }
}
這邊範例還有一個自定義方法 vectorToBitmap() ,是用來將 *Drawable*轉成 BitmapDescriptor,我們之後不一定會用到,大概會暫時用原先 Google 的標記樣式 :
/**
 * Demonstrates converting a [Drawable] to a [BitmapDescriptor],
 * for use as a marker icon.
 */
private fun vectorToBitmap(@DrawableRes id : Int, @ColorInt color : Int): BitmapDescriptor {
    val vectorDrawable: Drawable? = ResourcesCompat.getDrawable(resources, id, null)
    if (vectorDrawable == null) {
        Log.e(TAG, "Resource not found")
        return BitmapDescriptorFactory.defaultMarker()
    }
    val bitmap = Bitmap.createBitmap(vectorDrawable.intrinsicWidth,
        vectorDrawable.intrinsicHeight, Bitmap.Config.ARGB_8888)
    val canvas = Canvas(bitmap)
    vectorDrawable.setBounds(0, 0, canvas.width, canvas.height)
    DrawableCompat.setTint(vectorDrawable, color)
    vectorDrawable.draw(canvas)
    return BitmapDescriptorFactory.fromBitmap(bitmap)
}
最後是 onMapRead() ,前幾天都在和他玩的~~
// Update the map configuration at runtime.
override fun onMapReady(googleMap: GoogleMap) {

    // return early if the map was not initialised properly
    map = googleMap ?: return

    // create bounds that encompass every location we reference
    val boundsBuilder = LatLngBounds.Builder()

    // include all places we have markers for on the map
    places.keys.map { place -> boundsBuilder.include(places.getValue(place)) }
    val bounds = boundsBuilder.build()

    // Set the map coordinates to Kyoto Japan.
    val kyoto = LatLng(35.00116, 135.7681)

    with(map) {

        // Set the map type
        mapType = com.google.android.gms.maps.GoogleMap.MAP_TYPE_NORMAL

        // Display traffic 、指南針、縮放按鈕
        isTrafficEnabled = true
        uiSettings.isCompassEnabled = true
        uiSettings.isZoomControlsEnabled = true

        // Override the default content description on the view, for accessibility mode.
        // Ideally this string would be localised.
        setContentDescription("Map with lots of markers.")

        moveCamera(com.google.android.gms.maps.CameraUpdateFactory.newLatLngBounds(bounds, 50))
    }

    // Add lots of markers to the googleMap.
    addMarkersToMap()
}
這邊我也學案例寫法用比較 Kotlin,現在筆者的 Kotlin 還是寫得和 Java 一樣,不優雅 :(
差不多了,來運行看看 !
阿! 筆者今天改用 Android 裝置,然後用 Vysor 顯示在螢幕上,比較方便操作和截圖~~~
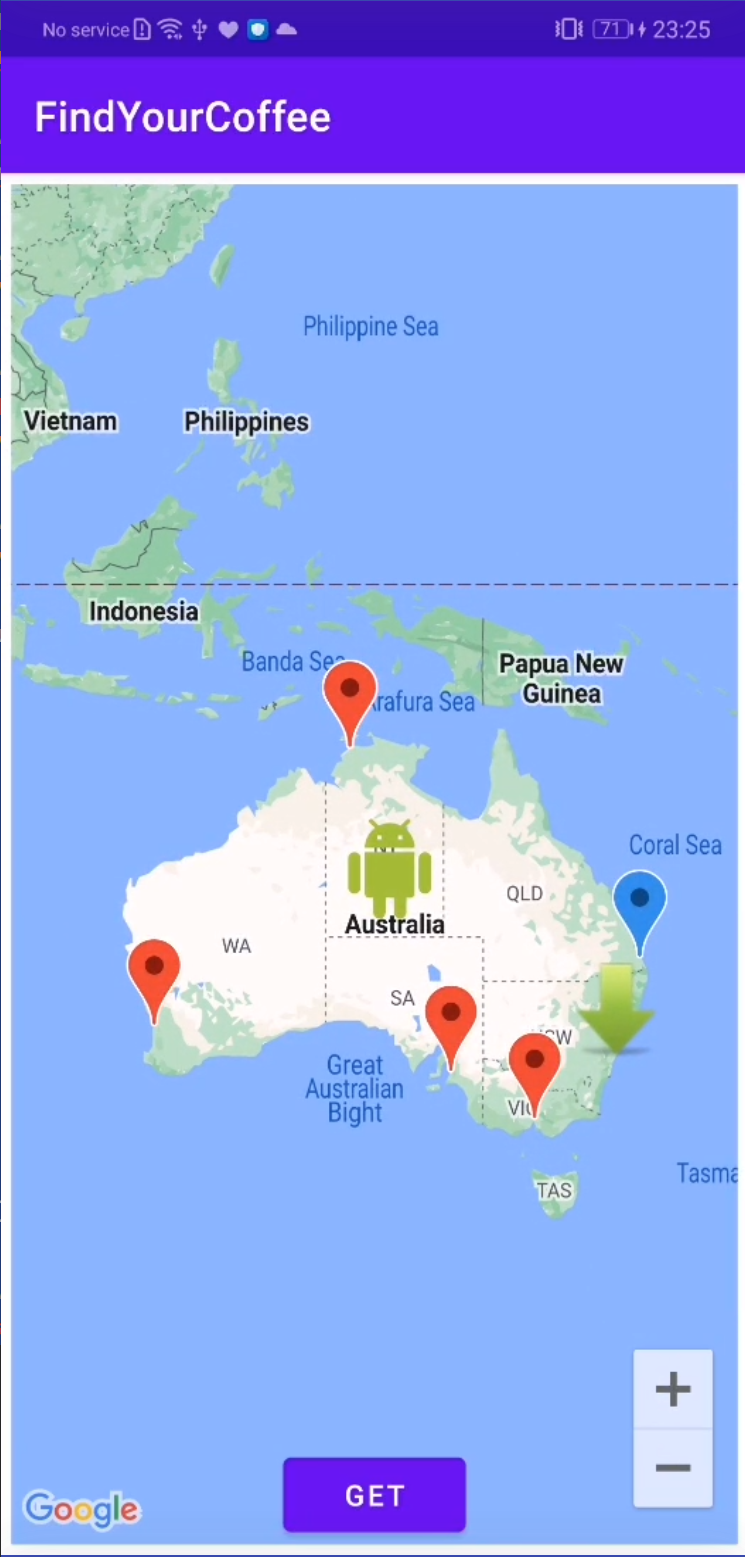
未點擊標記
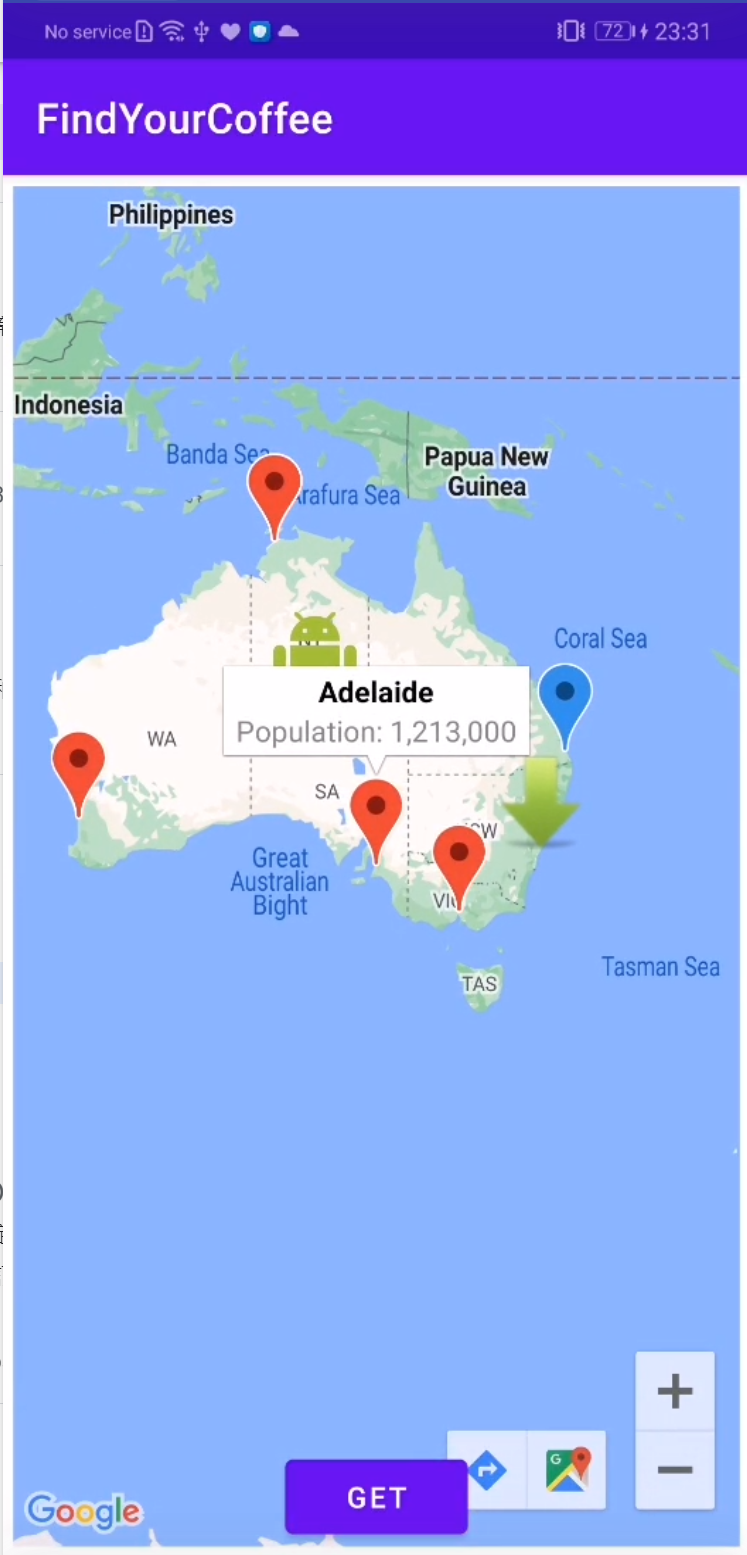
點擊標記會顯示出標記詳細資訊 (剛剛的自定義類別 PlaceDetails)
寫範例專案的開發人員還特地放 Android 圖標,太可愛了吧~~~
今天只有精力實作範例,一定是連假前症候群,雙十連假快樂壓各位!
這首好像偏冷門,覺得不錯聽的耶