手機APP的消息推送(Push Notification),我們可以將其分為兩大類:本地通知與遠端通知。
本地通知:
由 APP 本身所發起的通知。不需要外部伺服器。舉例來說,當你設定一個鬧鐘或提醒,而該時間到達時 APP 會提醒你,即為本地通知。
遠端通知:
由外部伺服器所發起,並發送到已註冊的設備上。簡單來說,當伺服器需要將訊息發送到指定的APP時,就會使用遠端通知。這通常需要一個中間的消息推送平台,例如 Firebase Cloud Messaging (FCM)。
在本篇中,我們會介紹本地通知如何實現。下一篇文章,會介紹如何利用 Firebase Cloud Messaging API 來實現遠端通知。
安裝 react-native-push-notification 套件
npm install --save react-native-push-notification
配置 Android 原生文件
android/build.gradle:
  googlePlayServicesVersion = "+" // default: "+"
  firebaseMessagingVersion = "21.1.0" // default: "21.1.0
android/app/src/main/AndroidManifest.xml
新增以下權限:
 <uses-permission android:name="android.permission.VIBRATE" />
 <uses-permission android:name="android.permission.RECEIVE_BOOT_COMPLETED"/>
在 <application ....> 內新增:
<application ....>
      <!-- Change the value to true to enable pop-up for in foreground on receiving remote notifications (for prevent duplicating while showing local notifications set this to false) -->
      <meta-data  android:name="com.dieam.reactnativepushnotification.notification_foreground"
                  android:value="false"/>
      <!-- Change the resource name to your App's accent color - or any other color you want -->
      <meta-data  android:name="com.dieam.reactnativepushnotification.notification_color"
                  android:resource="@color/white"/> <!-- or @android:color/{name} to use a standard color -->

      <receiver android:name="com.dieam.reactnativepushnotification.modules.RNPushNotificationActions" />
      <receiver android:name="com.dieam.reactnativepushnotification.modules.RNPushNotificationPublisher" />
      <receiver android:name="com.dieam.reactnativepushnotification.modules.RNPushNotificationBootEventReceiver">
          <intent-filter>
              <action android:name="android.intent.action.BOOT_COMPLETED" />
              <action android:name="android.intent.action.QUICKBOOT_POWERON" />
              <action android:name="com.htc.intent.action.QUICKBOOT_POWERON"/>
          </intent-filter>
      </receiver>

      <service
          android:name="com.dieam.reactnativepushnotification.modules.RNPushNotificationListenerService"
          android:exported="false" >
          <intent-filter>
              <action android:name="com.google.firebase.MESSAGING_EVENT" />
          </intent-filter>
      </service>
      ```
android/app/src/main/res/values
新增 colors.xml 檔案,並加入以下內容:
<resources>
    <color name="white">#FFF</color>
</resources>
引入所需模組
首先,我們要在項目的root(通常是index.js)中引入react-native-push-notification並進行一些基本配置。
import PushNotification from "react-native-push-notification";

PushNotification.configure({
  onNotification: function (notification) {
    console.log('LOCAL NOTIFICATION ==>', notification);
  },

  requestPermissions: Platform.OS === 'ios',
});
創建通知頻道:
PushNotification.createChannel(
  {
    channelId: "hello", // (required)
    channelName: "My channel", // (required)
    channelDescription: "A channel for general notifications", // (optional) default: undefined.
    playSound: true, // (optional) default: true
    soundName: "default", // (optional) See `soundName` parameter of `localNotification` function
    importance: 4, // (optional) default: 4. Int value of the Android notification importance
    vibrate: true, // (optional) default: true. Creates the default vibration pattern if true.
  },
  (created) => console.log(`createChannel 'your-channel-id' returned '${created}'`) // (optional) callback returns whether the channel was created, false means it already existed.
);
發送本地通知:
我們在首頁做一個按鈕,點擊後推送消息
const handlePress = () => {
    PushNotification.localNotification({
      channelId: "hello",
      title: "123",
      message: "Hello World",
      playSound: true,
      soundName: "default",
      number: 1,
    });
  };

  return (
    <View style={styles.container}>
      <Button title="發送通知" onPress={handlePress} />
    </View>
  );
完成!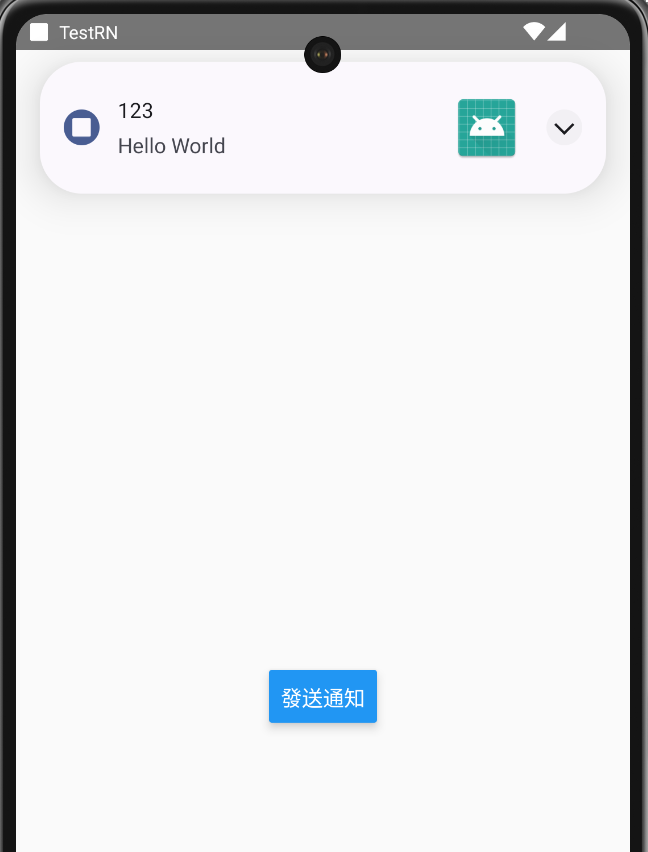
完整代碼
index.js
import {AppRegistry} from 'react-native';
import App from './App';
import {name as appName} from './app.json';
import PushNotification from "react-native-push-notification";

PushNotification.configure({
  onNotification: function (notification) {
    console.log('LOCAL NOTIFICATION ==>', notification);
  },

  // This line solves the problem that I was facing.
  requestPermissions: Platform.OS === 'ios',
});

PushNotification.createChannel(
  {
    channelId: "hello", // (required)
    channelName: "My channel", // (required)
    channelDescription: "A channel for general notifications", // (optional) default: undefined.
    playSound: true, // (optional) default: true
    soundName: "default", // (optional) See `soundName` parameter of `localNotification` function
    importance: 4, // (optional) default: 4. Int value of the Android notification importance
    vibrate: true, // (optional) default: true. Creates the default vibration pattern if true.
  },
  (created) => console.log(`createChannel 'your-channel-id' returned '${created}'`) // (optional) callback returns whether the channel was created, false means it already existed.
);

AppRegistry.registerComponent(appName, () => App);
App.js
import React from 'react';
import { Button, View, StyleSheet } from 'react-native';
import PushNotification from "react-native-push-notification";

function App() {
  const handlePress = () => {
    PushNotification.localNotification({
      channelId: "hello",
      title: "123",
      message: "Hello World",
      playSound: true,
      soundName: "default",
      number: 1,
    });
  };

  return (
    <View style={styles.container}>
      <Button title="發送通知" onPress={handlePress} />
    </View>
  );
}

const styles = StyleSheet.create({
  container: {
    flex: 1,
    justifyContent: 'center',
    alignItems: 'center',
  }
});

export default App;
https://github.com/zo0r/react-native-push-notification


 iThome鐵人賽