其實一直對生成式AI 蠻有興趣的
剛好第二部份的課程是講這個
所以來粗略了解一下,之後可能會對這部份做更多研究,重點是看這門課前,強烈建議李宏毅教授的課要先看👀要不然很多東西都會看不懂。
這是第9課,但我可能會花幾天的時間來看同一門課
大家常用chatgpt,還有文生圖midjourney,現在bing 就可以文生圖了🤣。
但是我們要怎麼用這些大模型來做到這件事呢?
所以我們可以想像一下,會有一個主要的模型來生成圖片,我們第一段程式用到的模型是:UNet
UNet是一種常用於生物醫學圖像分割的深度學習架構。它由一個縮小的編碼器和一個擴大的解碼器組成,這兩部分之間有跳躍連接。這種設計允許UNet捕捉不同尺度的特徵,並確保詳細的空間信息不會在過程中丟失。
對於UNet 細節,我還沒看太多,先看細節的話可能就不想學了XD
只要知道UNet能夠在生成過程中保持圖像的細節,這是生成高質量圖像所必需的。
以下我們會先跑一次程式,看看效果如何,再來看一下他是怎麼寫的?
我們先來看一下這個筆記本
from base64 import b64encode

import numpy
import torch
from diffusers import AutoencoderKL, LMSDiscreteScheduler, UNet2DConditionModel
from huggingface_hub import notebook_login

# For video display:
from IPython.display import HTML
from matplotlib import pyplot as plt
from pathlib import Path
from PIL import Image
from torch import autocast
from torchvision import transforms as tfms
from tqdm.auto import tqdm
from transformers import CLIPTextModel, CLIPTokenizer, logging
import os

torch.manual_seed(1)
if not (Path.home()/'.cache/huggingface'/'token').exists(): notebook_login()

# Supress some unnecessary warnings when loading the CLIPTextModel
logging.set_verbosity_error()

# Set device
torch_device = "cuda" if torch.cuda.is_available() else "mps" if torch.backends.mps.is_available() else "cpu"
if "mps" == torch_device: os.environ['PYTORCH_ENABLE_MPS_FALLBACK'] = "1"
其中要注意的是要先去huggingface 的個人設定那邊產生一個可以write 的token ,才能順利執行。
接下來就是載入必要的模型:
我們首先需要載入一些預訓練的模型,這些模型將幫助我們從文本描述生成圖像。
VAE (Variational Autoencoder):這是一種自動編碼器模型,用於解碼潛在變數到圖像空間。
Tokenizer 和 Text Encoder:用於將文本轉換為模型可以理解的數值格式。
UNet:用於生成潛在的圖像表示。
Noise Scheduler:控制擴散過程中的噪音。
定義輸入和設定:
我們定義了我們想要生成的圖像的描述、圖像的尺寸、所需的去噪步驟數量等。
文本嵌入:
我們使用預訓練的tokenizer和text encoder將我們的描述轉換為數值嵌入。這將作為我們UNet模型的輸入,幫助我們生成與描述相關的圖像。
預處理和設定調度器:
我們設定了調度器,以便在擴散過程中適當地添加噪音。
初始化潛在變數:
我們從隨機噪音開始,這將在擴散過程中逐步轉換成我們想要的圖片。
去噪循環:
在這個循環中使用UNet模型預測噪音,然後使用調度器逐步去除這個噪音。這一過程重複多次,直到我們獲得最終的圖片。
解碼和顯示:
最後使用VAE模型解碼潛在變數,得到最終的圖片
# Load the autoencoder model which will be used to decode the latents into image space.
vae = AutoencoderKL.from_pretrained("CompVis/stable-diffusion-v1-4", subfolder="vae")

# Load the tokenizer and text encoder to tokenize and encode the text.
tokenizer = CLIPTokenizer.from_pretrained("openai/clip-vit-large-patch14")
text_encoder = CLIPTextModel.from_pretrained("openai/clip-vit-large-patch14")

# The UNet model for generating the latents.
unet = UNet2DConditionModel.from_pretrained("CompVis/stable-diffusion-v1-4", subfolder="unet")

# The noise scheduler
scheduler = LMSDiscreteScheduler(beta_start=0.00085, beta_end=0.012, beta_schedule="scaled_linear", num_train_timesteps=1000)

# To the GPU we go!
vae = vae.to(torch_device)
text_encoder = text_encoder.to(torch_device)
unet = unet.to(torch_device);
VAE (Variational Autoencoder):vae 是一種自動編碼器,它可以將潛在的圖像表示解碼成實際的圖像。我們使用預訓練的模型 "CompVis/stable-diffusion-v1-4" 載入它。
Tokenizer 和 Text Encoder:這兩者將我們的文本描述轉換成數值格式。tokenizer 負責將文本切割成詞彙,然後 text_encoder 負責將這些詞彙轉換成數值嵌入。這些嵌入將捕捉文本的語義。我們使用預訓練的模型 "openai/clip-vit-large-patch14" 載入它們。
UNet:unet 是用於生成潛在的圖像表示的模型。它將幫助我們根據文本嵌入生成圖像。我們同樣使用預訓練的模型 "CompVis/stable-diffusion-v1-4" 載入它。
Noise Scheduler:scheduler 是用於控制擴散過程中噪音添加的。 確保在我們的去噪循環中,噪音以正確的方式被添加和去除。
# Some settings
prompt = ["A watercolor painting of an otter"]
height = 512                        # default height of Stable Diffusion
width = 512                         # default width of Stable Diffusion
num_inference_steps = 30            # Number of denoising steps
guidance_scale = 7.5                # Scale for classifier-free guidance
generator = torch.manual_seed(32)   # Seed generator to create the inital latent noise
batch_size = 1
Prompt:這是我們想要生成圖像的描述。在這個例子中希望生成一幅水彩畫風格的水獺圖片。
Height 和 Width:這些參數設定了我們想要生成的圖像的尺寸。在這裡選擇了512x512的尺寸,這是Stable Diffusion的默認尺寸。
num_inference_steps:這設定了我們要進行的去噪步驟的數量。在這裡選擇了30步。
guidance_scale:這是用於控制分類器的指導力度的參數。較高的值意味著更強烈的指導。
generator:這是一個隨機數種子,確保我們每次運行程式碼時都可以得到相同的隨機噪音作為起始點。
batch_size:這是我們要生成的圖像的數量。在這裡只生成一幅圖像。
以下我們使用前面載入的tokenizer和text_encoder來將我們的描述轉換成一個數值嵌入。這個嵌入將為我們提供一個捕捉文本語義的數值表示稍後將使用這個表示來生成圖像。
# Prep text
text_input = tokenizer(prompt, padding="max_length", max_length=tokenizer.model_max_length, truncation=True, return_tensors="pt")
with torch.no_grad():
    text_embeddings = text_encoder(text_input.input_ids.to(torch_device))[0]
max_length = text_input.input_ids.shape[-1]
uncond_input = tokenizer(
    [""] * batch_size, padding="max_length", max_length=max_length, return_tensors="pt"
)
with torch.no_grad():
    uncond_embeddings = text_encoder(uncond_input.input_ids.to(torch_device))[0]
text_embeddings = torch.cat([uncond_embeddings, text_embeddings])
我們使用tokenizer將我們的描述(在prompt中)轉換成模型可以理解的數值格式。這個過程包括切割文本成詞彙、轉換這些詞彙成數值ID等。
然後使用text_encoder將這些數值ID轉換成一個數值嵌入。這個嵌入將捕捉我們描述的語義。
接著為每個批次創建了一個空的輸入(uncond_input),並同樣將它轉換成嵌入(uncond_embeddings)。這個步驟是為了給我們的模型一個不帶任何條件的輸入。
最後將uncond_embeddings和我們的原始text_embeddings連接在一起,為後續的圖像生成提供完整的輸入。
在這一步將進行一些預處理,並設定調度器,這將確保我們在擴散過程中以正確的方式添加和去除噪音。
# Prep Scheduler
def set_timesteps(scheduler, num_inference_steps):
    scheduler.set_timesteps(num_inference_steps)
    scheduler.timesteps = scheduler.timesteps.to(torch.float32) # minor fix to ensure MPS compatibility, fixed in diffusers PR 3925

set_timesteps(scheduler,num_inference_steps)
在這裡定義了一個名為set_timesteps的函數,該函數調整調度器的時間步長以匹配我們選定的去噪步驟數量(num_inference_steps)。
通過調用這個函數並傳入我們的調度器和去噪步驟數量更新了調度器的設定。
在這一步將從隨機噪音開始,該噪音將在擴散過程中逐步轉換成我們想要的圖像。
# Prep latents
latents = torch.randn(
  (batch_size, unet.in_channels, height // 8, width // 8),
  generator=generator,
)
latents = latents.to(torch_device)
latents = latents * scheduler.init_noise_sigma # Scaling (previous versions did latents = latents * self.scheduler.sigmas[0]
我們使用torch.randn函數生成了一組隨機的潛在變數。這些變數的尺寸由batch_size(我們要生成的圖像數量)、unet.in_channels(UNet模型的輸入通道數)、以及圖像的height和width決定。
然後將這些潛在變數移動到我們的計算設備上(例如GPU)。
最後使用調度器的init_noise_sigma參數進行了縮放,以確保噪音的初始級別是正確的。
這是生成圖像的主要部分。我們使用UNet模型預測噪音,然後使用調度器逐步去除這個噪音。這一過程重複多次,直到我們獲得最終的圖像。
# Loop
with autocast("cuda"):  # will fallback to CPU if no CUDA; no autocast for MPS
    for i, t in tqdm(enumerate(scheduler.timesteps), total=len(scheduler.timesteps)):
        # expand the latents if we are doing classifier-free guidance to avoid doing two forward passes.
        latent_model_input = torch.cat([latents] * 2)
        sigma = scheduler.sigmas[i]
        # Scale the latents (preconditioning):
        # latent_model_input = latent_model_input / ((sigma**2 + 1) ** 0.5) # Diffusers 0.3 and below
        latent_model_input = scheduler.scale_model_input(latent_model_input, t)

        # predict the noise residual
        with torch.no_grad():
            noise_pred = unet(latent_model_input, t, encoder_hidden_states=text_embeddings).sample

        # perform guidance
        noise_pred_uncond, noise_pred_text = noise_pred.chunk(2)
        noise_pred = noise_pred_uncond + guidance_scale * (noise_pred_text - noise_pred_uncond)

        # compute the previous noisy sample x_t -> x_t-1
        # latents = scheduler.step(noise_pred, i, latents)["prev_sample"] # Diffusers 0.3 and below
        latents = scheduler.step(noise_pred, t, latents).prev_sample
我們使用autocast上下文管理器來確保我們的計算在支持的情況下使用混合精度,這可以加速計算。
我們遍歷調度器的所有時間步長。對於每一步都會做以下操作:
擴展潛在變數。這是為了避免進行兩次前向傳遞。
使用調度器的sigmas參數縮放潛在變數。
使用UNet模型預測噪音殘差。這將告訴我們如何修改我們的潛在變數,以更接近我們想要的圖像。
進行指導。這一步根據我們的文本嵌入調整噪音預測,以確保生成的圖像與我們的描述匹配。
使用調度器計算前一個噪音樣本。這將更新我們的潛在變數,使其更接近最終的圖像。
這一循環將重複我們在設定中指定的次數(num_inference_steps)。
接下來將使用VAE模型解碼這些潛在變數,得到最終的圖像,然後將其顯示出來。
在這最後的步驟中將使用前面載入的VAE模型來解碼我們的潛在變數,從而得到我們的最終圖像。然後將這個圖像顯示出來。
# scale and decode the image latents with vae
latents = 1 / 0.18215 * latents
with torch.no_grad():
    image = vae.decode(latents).sample

# Display
image = (image / 2 + 0.5).clamp(0, 1)
image = image.detach().cpu().permute(0, 2, 3, 1).numpy()
images = (image * 255).round().astype("uint8")
pil_images = [Image.fromarray(image) for image in images]
pil_images[0]
首先對潛在變數進行了一些縮放。這是基於經驗的值,目的是為了確保解碼的圖像有正確的亮度和對比度。
使用VAE的decode方法將潛在變數解碼成圖像。這個decode方法將潛在變數轉換回圖像空間。
然後對圖像進行了一些後處理,使其的值落在[0,1]範圍內。這確保了我們可以正確地顯示它。
最後將圖像從Torch張量轉換成numpy數組,再轉換成PIL圖像,這樣我們就可以顯示它了。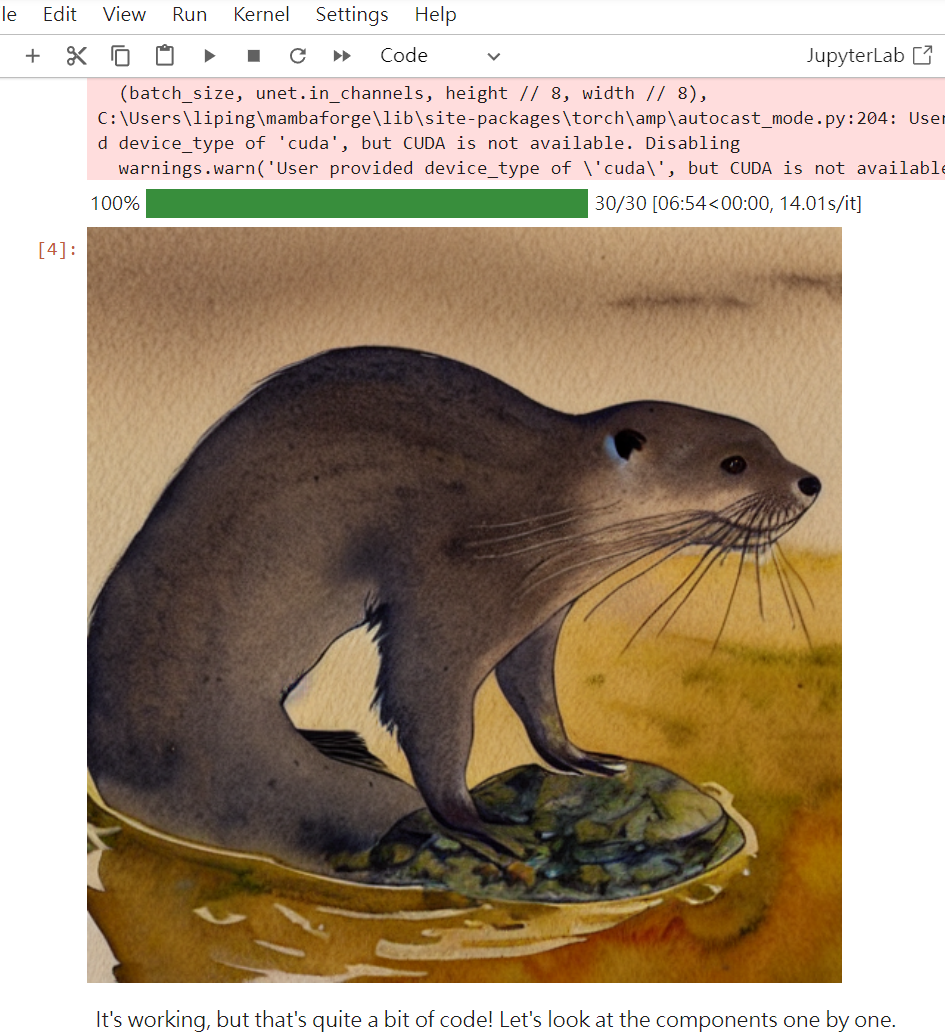
所以我們透由這一部份的程式,可以了解到生成模型的原理
我們使用了CLIPTokenizer和CLIPTextModel來獲得文本的嵌入。CLIP是OpenAI的一種技術,它可以將圖像和文本同時映射到同一個語義空間,這樣就可以進行比較和生成。
這意味著,當我們獲得了文本的嵌入,這個嵌入捕捉了文本的語義,並且可以與圖像的嵌入進行比較。
這個隨機噪音是生成圖像的起點。我們在這個潛在空間中使用擴散過程,逐步將這個隨機噪音轉換成我們想要的圖像。
這是一種生成圖像的技術,與傳統的GANs或其他生成模型不同。
這是這個方法的核心部分。我們使用UNet模型來指導這個擴散過程,並使用文本嵌入作為條件。
在每一步中使用調度器和UNet模型的輸出來調整潛在變數,使其更接近於我們想要的圖像。
這是一種控制噪音的過程,使其逐步轉換成有意義的圖像。
一旦潛在變數準備好使用VAE模型將其解碼成圖像。
VAE是一種可以學習圖像和潛在空間之間映射的模型,這使得我們可以從潛在空間中的任何點生成圖像。