今天來說明 Thymeleaf模板,後面結合RESTful Web的功能參數來製作一個簡易的輸入資料並顯示在頁面上。
這邊會先做簡單的介紹與實作說明,再來會直接結合RESTful Web的參數來製作簡易的輸入顯示功能。
根據官方網站所述,以下是關於 Thymeleaf 的概述說明:
Thymeleaf 是一個現代伺服器端 Java 模板引擎,適用於 Web 和獨立環境。
Thymeleaf 的主要目標是將優雅的自然模板引入您的開發工作流程 - HTML 可以在瀏覽器中正確顯示,也可以用作靜態原型,從而允許開發團隊進行更強有力的協作。
憑藉 Spring Framework 的模組、與您喜愛的工具的大量整合以及插入您自己的功能的能力, Thymeleaf 非常適合現代 HTML5 JVM Web 開發 - 儘管它還有更多功能。
<dependency>
    <groupId>org.springframework.boot</groupId>
    <artifactId>spring-boot-starter-thymeleaf</artifactId>
</dependency>
要將參數值傳給HTML中設置的資料中,簡單的用法是在方法中使用Model來定義,並使用當中的一個 Key-Value 用法來綁定參數,以下是程式碼的撰寫格式。
public String function(Model model){
    model.addAttribute("outputText", outputText);
}
具體來說,這邊的 "/hello" 方法是回傳了字串 "Hello",這將被Spring解釋為要尋找名為 "Hello" 的視圖範本檔案(通常是一個HTML檔案)。 Spring Boot預設使用Thymeleaf作為視圖模板引擎,因此它將嘗試尋找名為 "Hello.html" 的模板檔案來渲染視圖。
model.addAttribute("message", "Hello from Thymeleaf!"):這行程式碼是將一個名為 "message" 的屬性加入 model 物件中,並且參數值為 "Hello from Thymeleaf!"。 這個屬性將在html視圖中使用被引用。"Hello"會將其導向到resources/templates中所建立的Hello.html檔案@Controller
public class HelloController {
@GetMapping("/hello")
public String hello(Model model) {
model.addAttribute("message", "Hello from Thymeleaf!");
return "Hello";
}
}
因為這邊SpringBoot似乎會預設指到的檔案為Thymeleaf,所以這邊就算不加入後面的xmlns也是能夠抓取到所傳入的字串
這邊將文字用以下的參數格式 ${"參數名稱"} 進行設定,就能夠抓取到參數並設立數值。
<!DOCTYPE html>
<html lang="en" xmlns:th="http://www.thymeleaf.org" >
<head>
    <meta charset="UTF-8">
    <title>Thymeleaf Test</title>
</head>
<body>
    <h1 th:text="${message}">Hello, World!</h1>
</body>
</html>

這邊名稱可以不做修改,但為了方便辨識這邊我改了名稱。
<!DOCTYPE html>
<html lang="en">
<head>
    <meta charset="UTF-8">
    <title>Thymeleaf Test</title>
</head>
<body>
    <h1 th:text="${message}">Hello, World!</h1>
    <!-- 表單 -->
    <form method="post" action="/process">
        <!-- 輸入框 -->
        <label for="inputText">Enter text:</label>
        <input type="text" id="inputText" name="inputText" th:value="${inputText}" />

        <!-- 提交按鈕 -->
        <button type="submit">Submit</button>
    </form>

    <!-- 顯示輸出 -->
    <h2 th:if="${outputText}" th:text="${'Output: ' + outputText}"></h2>
</body>
</html>
@Controller
public class GetUserInfoController {

    private String outputText;

    @GetMapping("/home")
    public String hello(Model model) {
        model.addAttribute("message", "Hello from Thymeleaf!");
        return "GetUserInfo";
    }

    @PostMapping("/process")
    public String processInput(@RequestParam("inputText") String inputText, Model model) {
        model.addAttribute("message", "Hello from Thymeleaf!");
        // Add code to process inputText
        this.outputText = inputText;
        model.addAttribute("outputText", outputText);
        return "GetUserInfo";
    }
    @GetMapping("/get-process")
    public String getProcess(Model model) {
        model.addAttribute("message", "Hello from Thymeleaf!");
        model.addAttribute("outputText", outputText);
        return "GetUserInfo";
    }
}
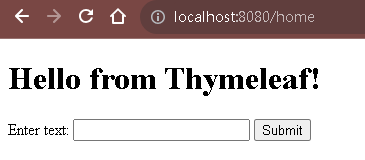
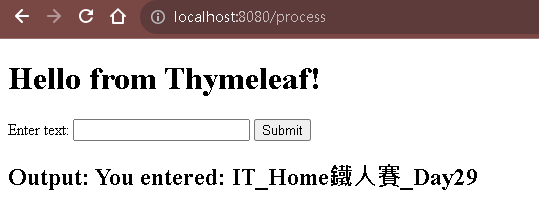
從以下的結果截圖中可以看到原本為/home網址,透過輸入送出之後來到了/process,並且將輸入的數值Post出去後獲取到輸入的值顯示在HTML文件上。
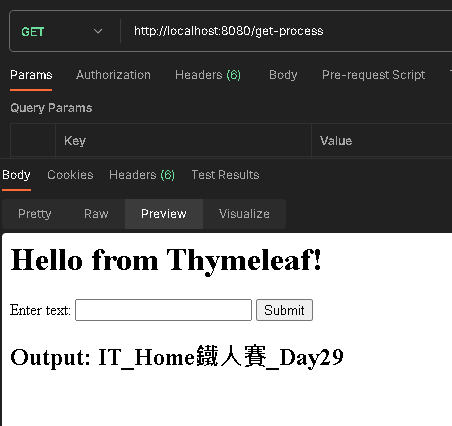
後面添加了Get方法來驗證是否有將資料Post出去,而不是單純的文字顯示。


以上是今天關於Thymeleaf模板的使用與簡易Post傳值功能顯示在畫面上。![]()
