今天最後一天來使用一個 H2 Database 建立小小的實作,會先說明如何建立簡易H2-Database以及簡易的操作說明,接著會直接上實作的寫入資料庫的功能Demo。
這邊根據官方的敘述:
歡迎使用 H2,Java SQL 資料庫。H2的主要特點是:
- 非常快、開源、是JDBC API
- 嵌入式和伺服器模式;記憶體資料庫
- 基於瀏覽器的控制台應用程式
- 佔用空間小:jar 檔案大小約 2.5 MB
特徵:
- 非常快、開源、JDBC API
- 嵌入式和伺服器模式;基於磁碟或記憶體資料庫
- 事務支持,多版本並發
- 基於瀏覽器的控制台應用程式
- 加密資料庫
- 全文搜尋
- 純 Java,佔用空間小:jar 檔案大小約 2.5 MB
- ODBC驅動程式
<!--    H2 Database    -->
<dependency>
    <groupId>com.h2database</groupId>
    <artifactId>h2</artifactId>
    <scope>runtime</scope>
</dependency>
<dependency>
    <groupId>org.springframework.boot</groupId>
    <artifactId>spring-boot-starter-data-jpa</artifactId>
</dependency>
來到資料夾路徑:src/main/resources之下,接著找到application.properties的檔案,將以下參數輸入。
#H2 database
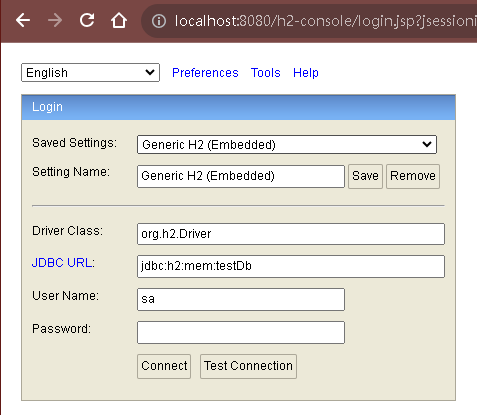
spring.datasource.url=jdbc:h2:mem:testDb
spring.h2.console.enabled=true
spring.datasource.driverClassName=org.h2.Driver
spring.datasource.username=sa
spring.datasource.password=password
spring.jpa.database-platform=org.hibernate.dialect.H2Dialect
spring.jpa.hibernate.ddl-auto=create-drop
spring.datasource.url=jdbc:h2:mem:testDb:
這是設定H2資料庫連接URL的地方。在此設定中,使用了 jdbc:h2:mem:testDb,表示您正在使用 H2內存資料庫(in-memory database) 並命名為testDb。這意味著資料庫的數據僅在應用程式運行期間存在,並在應用程式停止後被清除。
spring.h2.console.enabled=true:
啟用了H2控制台,這是一個方便的Web界面,可用於管理H2資料庫,查看資料,執行SQL查詢等。
spring.datasource.driverClassName=org.h2.Driver:
設定資料庫驅動程式的類別名稱。這告訴Spring Boot使用H2資料庫的驅動程式,即org.h2.Driver。
spring.datasource.username=sa:
設定資料庫的使用者名稱。在這個設定中,使用者名稱設定為sa,底下的password是同樣功能,主要是用來登入資料庫設定的。
spring.jpa.database-platform=org.hibernate.dialect.H2Dialect:
設定JPA的資料庫方言 (Database Dialect)。這告訴Spring Boot和Hibernate使用H2資料庫的方言來生成SQL查詢和執行資料庫操作。
spring.jpa.hibernate.ddl-auto=create-drop:
設定JPA的 DDL(Data Definition Language) 自動生成策略。在此設定中,使用 create-drop,表示每次應用程式啟動時,Hibernate都會創建資料庫結構,並在應用程式停止時刪除它 (這個用途主要是用於開發和測試目的),標準 Hibernate 屬性值為none, validate, update, create-drop。(官方文件說明)
Spring Boot 會根據它認為您的資料庫是嵌入的(若為嵌入式的資料庫則預設屬性是:create-drop)還是非嵌入的(若不是嵌入式的資料庫則預設屬性是:none)來為您選擇預設值。
這邊建立一個User的實體類別,當中有Name、email以及id的資料,名稱為id的資料設定為主鍵。
這邊先看程式碼:
@Entity
@Table(name = "usersinfo")
public class User {
    @Id
    @GeneratedValue(strategy = jakarta.persistence.GenerationType.IDENTITY)
    private Long id;

    private String name;
    private String email;

    // 建構元、Getter和Setter的建立
}
id被冠上了 @Id 的註解標籤,這個標籤的意思是將其標示為這個實體的 主鍵 的意思。id參數為主鍵,接著為id建立一個生成值,使其產生自動遞增的流水編號。ID是被設置為Primary_Key(主鍵)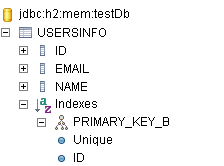
這邊是將其繼承於 JpaRepository 類別之下,所以可以使用此類別定義的方法以及其繼承的方法,如:下方程式碼看到的.save()和等等實作時會用到的.findAll()方法。
public interface UserInfoRepository extends JpaRepository<User, Long>{
}
這邊根據撰寫的不同,若是使用@RestController標籤則可以不用寫@ResponseBody標籤。
傳入的值的方式是將寫好的實體類別引入後將其使用Setting設值。接著用建立好的Repository來儲存。
@Controller
public class GetUserInfoController {
    @Autowired
    UserInfoRepository userInfoRepository;

    @ResponseBody
    @PostMapping("/add-user")
    public String addUser() {
        User user = new User();
        user.setName("name");
        user.setEmail("email");
        userInfoRepository.save(user);
        return "Add-User-Success";
    }
}
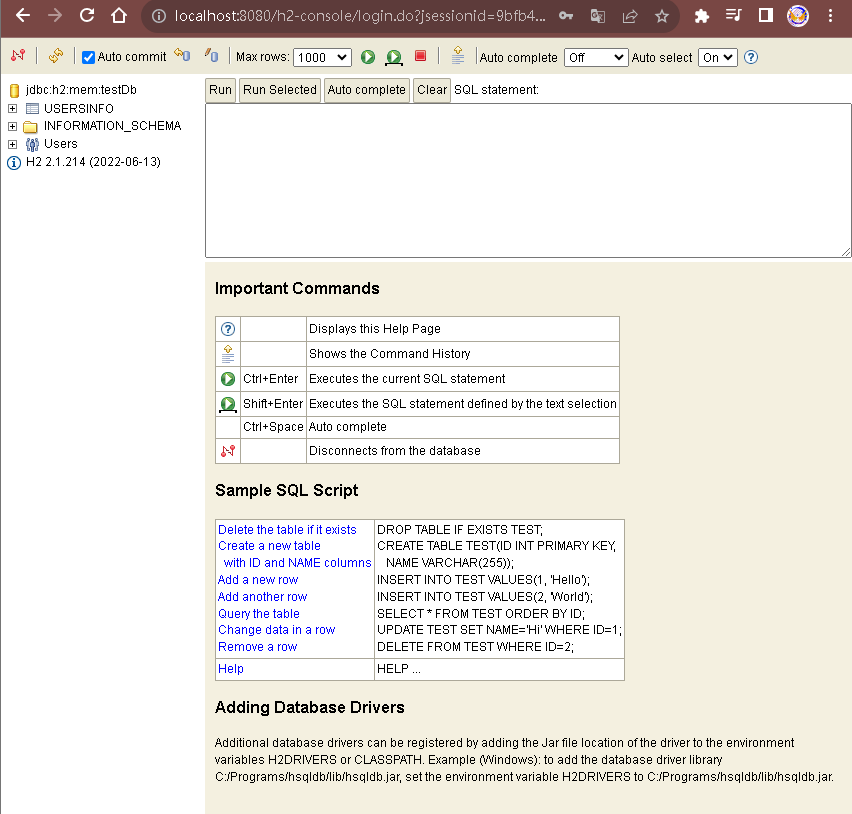
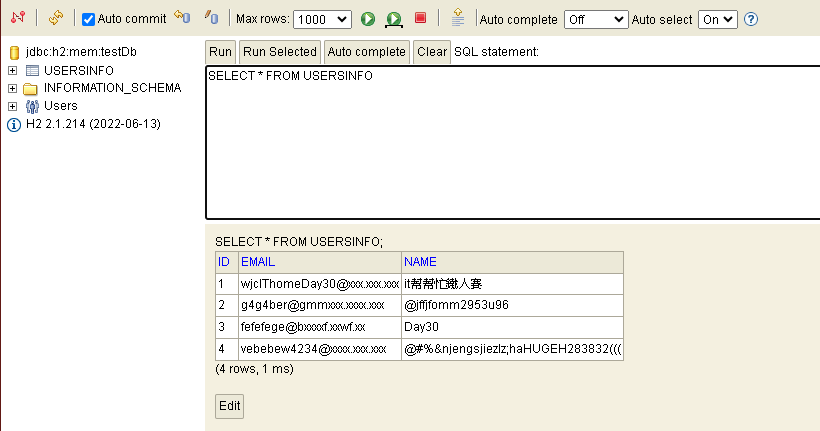
這邊可以到預設的連結網址:http://localhost:8080/h2-console
注意這邊需要執行再來開啟查看h2資料庫的建立是否成功。
以上就完成了基本的H2資料庫建立步驟,下面就是實作的部分了。
使用到的功能如下:
這邊依樣是以昨天建立的為主軸進行修改。
<!DOCTYPE html>
<html xmlns:th="http://www.thymeleaf.org">
<head>
    <meta charset="UTF-8">
    <title>User Information</title>
</head>
<body>
<h1>User Information</h1>
<form th:action="@{/api/add-user}" method="post">
    <label for="name">Name:</label>
    <input type="text" id="name" name="name" required>
    <br>
    <label for="email">Email:</label>
    <input type="email" id="email" name="email" required>
    <br>
    <button type="submit">Add User</button>
    <button type="button" onclick="window.location.href='/api/user-list'">User List</button>
</form>
</body>
</html>
<!DOCTYPE html>
<html lang="en">
<head>
    <meta charset="UTF-8">
    <title>User List</title>
</head>
<body>
<button onclick="window.location.href='/api/home'">回主頁</button>
<h2>User List</h2>
<table border="1">
    <tr>
        <th>User ID</th>
        <th>User Name</th>
        <th>User Email</th>
    </tr>
    <tr th:each="user : ${users}">
        <td th:text="${user.id}"></td>
        <td th:text="${user.name}"></td>
        <td th:text="${user.email}"></td>
    </tr>
</table>
</body>
</html>
@Controller
@RequestMapping("/api")
public class GetUserInfoController {
    @Autowired
    UserInfoRepository userInfoRepository;
    private String outputText;


    @GetMapping("/home")
    public String home(Model model) {
        model.addAttribute("message", "Hello from Thymeleaf!");
        return "GetUserInfo";
    }

    @PostMapping("/add-user")
    public String addUser(@RequestParam String name, @RequestParam String email, Model model) {
        model.addAttribute("message", "Hello from Thymeleaf!");
        User user = new User();
        user.setName(name);
        user.setEmail(email);
        userInfoRepository.save(user);
        return "redirect:/api/user-list"; // 重新導向到/user-list介面。
    }
    @GetMapping("/user-list")
    public String showUserList(Model model) {
        List<User> users = userInfoRepository.findAll(); // 從資料庫中獲取所有資料
        model.addAttribute("users", users);
        return "GetUser"; // 返回顯示的Thymeleaf模板名稱。
    }
}
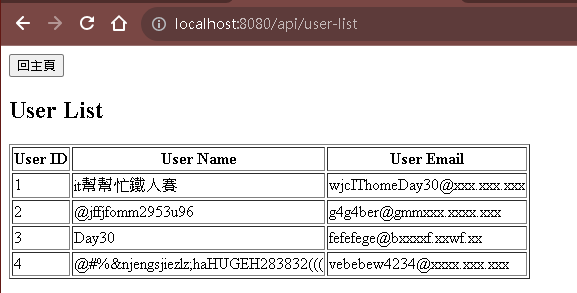
/home將資料寫入輸入框/add-user將資料寫入資料庫,然後跳到/user-list。/user-list將資料以表格方式提取所有資料,查看是否有寫入。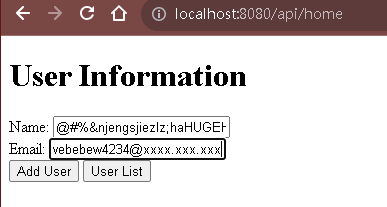
這邊就完成了建立H2資料庫以及將資料以網頁的方式寫入並查詢以及30天的文章撰寫,這邊只有說到簡易的SpringBoot入門撰寫學習,若想繼續學習更深入的SpringBoot結合撰寫,可以到我們團隊中其他成員所撰寫的文章或是其他管道繼續進行學習,謝謝各位!!


 iThome鐵人賽