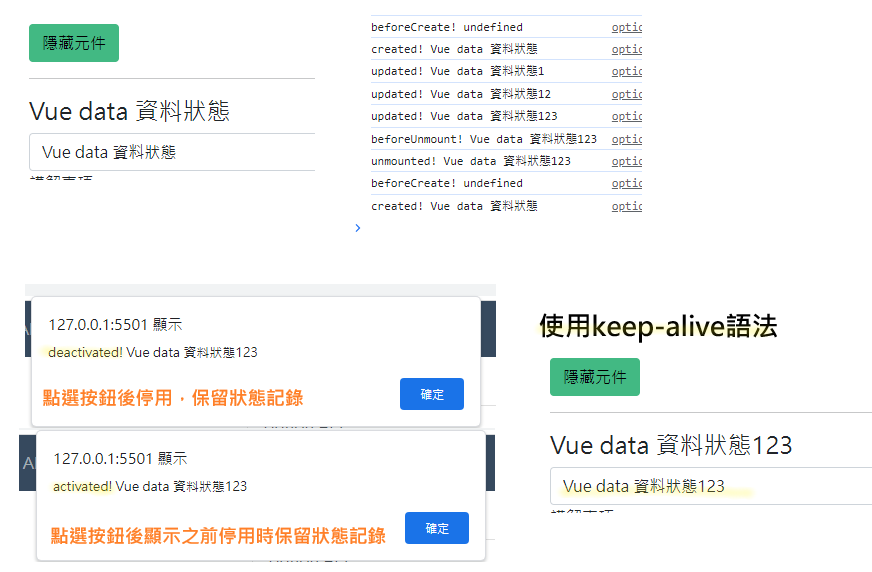
執行上一篇所介紹vue的8個生命週期
25-0 js
<script type="text/x-template" id="childarea">
  <div>
    <h4>{{ text }}</h4>
    <input type="text" class="form-control" v-model="text">
  </div>
</script>
<script>
  //子元件
const child = {
  template: '#childarea',
  data: function () {
    return {
      text: 'Vue data 資料狀態'
    }
  },
  //準備資料狀態,取不到text資料
  beforeCreate() {
    console.log(`beforeCreate! ${this.text}`);
  },
  //已準備好資料,取到資料
  created() {
    console.log(`created! ${this.text}`);
    alert(`created! ${this.text}`);
  },
  //準備html結構,未渲染畫面
  beforeMount() {
    alert(`beforeMount! ${this.text}`);
  },
  //已經生成div,已產生結構,狀態被停住,所以取不到元素,要操作JS須等此狀態結束後才能執行
  mounted() {
    alert(`mounted! ${this.text}`);
  },
  //已顯示html的text資料
  updated () {
    console.log(`updated! ${this.text}`);
  },
  //Keep Alive維持生命週期:啟用後顯示之前停用時保留狀態記錄
  activated () {
    alert(`activated! ${this.text}`);
  },
  //Keep Alive維持生命週期:停用但保留停用前狀態記錄
  deactivated () {
    alert(`deactivated! ${this.text}`);
  },
  //點選按鈕後隱藏元件,進行卸載
  beforeUnmount() {
    console.log(`beforeUnmount! ${this.text}`);
  },
    //點選按鈕後隱藏元件,進行卸載
  unmounted() {
    console.log(`unmounted! ${this.text}`);
  }
};
const App = {
  data() {
    // 切換子元件顯示與否
    return {
      isShowing: false
    }
  }
};
Vue.createApp(App).component('child', child)
  .mount('#app');
 </script>
25-1 切換按鈕-生命週期流程
  <button @click="isShowing = !isShowing" class="btn btn-primary">
    <span v-if="isShowing">隱藏元件</span>
    <span v-else>顯示元件</span>
  </button>
  <hr>
  <!-- 切換子元件顯示與否 -->
  <child v-if="isShowing"></child>
25-2 使用 Keep Alive 維持生命週期
<keep-alive>
  <child v-if="isShowing"></child>
</keep-alive>

.
知識點來源:六角課程、網路文章
以上是今天所提供知識點如有誤,再請務必在下面留言~
