在這篇文章中,我們將介紹如何使用 ResNet18 模型訓練 COCO MS 資料集,並將訓練好的模型儲存為 model.pth,以供未來網頁的影像辨識使用。
conda 建立環境首先,我們需要使用 conda 建立一個新的 Python 環境:
conda create --name k8smscoco python=3.9
安裝所需的 Python 套件,包括 PyTorch 和其他必要的套件:
pip install torch torchvision pycocotools
接下來,下載 COCO MS 資料集的訓練和驗證圖片以及標註檔案:
# Create a directory to store the dataset
mkdir coco2017 && cd coco2017

# Download train and validation images
wget http://images.cocodataset.org/zips/train2017.zip
wget http://images.cocodataset.org/zips/val2017.zip

# Download annotations
wget http://images.cocodataset.org/annotations/annotations_trainval2017.zip

# Unzip train and validation images
unzip train2017.zip
unzip val2017.zip

# Unzip annotations
unzip annotations_trainval2017.zip

# Remove zip files to free up space
rm *.zip
import torch
from torch.utils.data import DataLoader
from torchvision.datasets import CocoDetection
from torchvision.transforms import Compose, ToTensor, Normalize, Resize
from torchvision.models import resnet18
import torch.optim as optim
import torch.nn as nn

# Define your transformation pipeline
transform = Compose([
    Resize((224, 224)),  # Resize images to match ResNet input size
    ToTensor(),  # Converts PIL image or numpy.ndarray to tensor
    Normalize(mean=[0.485, 0.456, 0.406], std=[0.229, 0.224, 0.225])  # Normalizes the image
])

# Paths to your COCO annotations and image directory
ann_file = './coco2017/annotations/instances_train2017.json'  # Replace with your annotation file path
img_folder = './coco2017/train2017'  # Replace with your images folder path

# Load the dataset
train_dataset = CocoDetection(root=img_folder, annFile=ann_file, transform=transform)

# Define batch size
batch_size = 4
首先,定義了圖像預處理的轉換管道,包括調整圖像大小、轉換為張量以及標準化處理。
接著,指定 COCO 標註檔案和圖像目錄的路徑,並使用 CocoDetection 來載入數據集。
# Create DataLoader
train_dataloader = DataLoader(
    dataset=train_dataset,
    batch_size=batch_size,
    shuffle=True,
    collate_fn=lambda x: tuple(zip(*x))  # Custom collate function to handle COCO format
)

# Define the model
model = resnet18(pretrained=True)  # Load a pre-trained ResNet18 model
num_classes = 80  # COCO has 80 classes
model.fc = nn.Linear(model.fc.in_features, num_classes)  # Replace the final fully connected layer
設定了 DataLoader,指定批次大小並使用自定義的 collate 函數來處理 COCO 格式的數據。
然後,載入預訓練的 ResNet18 模型,並將最後的全連接層替換為適合 COCO 的 80 類別。
# Move model to GPU if available
device = torch.device('cuda' if torch.cuda.is_available() else 'cpu')
model = model.to(device)

# Define loss function and optimizer
criterion = nn.CrossEntropyLoss()
optimizer = optim.SGD(model.parameters(), lr=0.001, momentum=0.9)
最後,將模型移動到 GPU(如果可用),並定義了損失函數和優化器,使用交叉熵損失函數和隨機梯度下降(SGD)優化器進行訓練。
# Training loop
num_epochs = 10
for epoch in range(num_epochs):
    model.train()
    running_loss = 0.0
    for imgs, targets in train_dataloader:
        # Move images to GPU
        imgs = [img.to(device) for img in imgs]

        # Prepare targets (ensure all targets are on the same device)
        targets = [torch.tensor([ann['category_id'] for ann in target]).to(device) for target in targets]

        # Zero the parameter gradients
        optimizer.zero_grad()

        # Forward pass
        outputs = [model(img.unsqueeze(0)) for img in imgs]
        outputs = torch.cat(outputs, dim=0).to(device)

        # Ensure targets are on the same device as outputs
        targets = torch.cat([torch.zeros(output.size(0), dtype=torch.long, device=device) for output in outputs])

        # Calculate loss
        loss = sum([criterion(output, target) for output, target in zip(outputs, targets)])
        loss.backward()
        optimizer.step()

        running_loss += loss.item()

    epoch_loss = running_loss / len(train_dataloader)
    print(f'Epoch {epoch + 1}/{num_epochs}, Loss: {epoch_loss:.4f}')
在 num_epochs 設定的迭代次數內,對每個 epoch 進行以下步驟:
model.train())。running_loss 以跟踪每個 epoch 的總損失。train_dataloader 遍歷每批圖像和標籤:
device)。optimizer.zero_grad())。torch.cat)。criterion 計算每個輸出的損失,並進行反向傳播 (loss.backward())。optimizer.step() 更新模型參數。torch.save(model.state_dict(), 'resnet18_coco.pth')
model = models.resnet18(pretrained=False)
model.fc = nn.Linear(model.fc.in_features, num_classes)
model.load_state_dict(torch.load('resnet18_coco.pth'))
model = model.to(device)
model.eval()

# Load and preprocess the image
image = Image.open('path/to/your/image.jpg')
image = transform(image).unsqueeze(0).to(device)

# Predict
with torch.no_grad():
    output = model(image)
    _, predicted_class = torch.max(output, 1)

print(f'Predicted class: {predicted_class.item()}')
最後使用訓練好的模型進行圖像預測。
主要步驟如下:
載入模型:
num_classes 類別數。torch.load 讀取保存的模型權重(resnet18_coco.pth),並將權重加載到模型中。model.eval())。載入並預處理圖像:
Image.open 讀取要進行預測的圖像(指定圖像路徑)。transform 對圖像進行預處理,並添加批次維度(unsqueeze(0)),然後將圖像數據轉移到 GPU 上。進行預測:
torch.no_grad() 確保在預測過程中不進行梯度計算,這可以節省內存和計算資源。torch.max 獲取預測類別的索引。輸出預測結果:
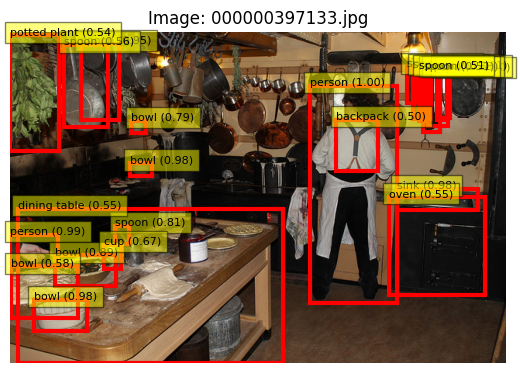
不過之後實做方面改用 maskrcnn_resnet50_fpn
原本要訓練但時間有點來不及 XD

直接 load pretrained 權重就好
以下展示 inference 前 10 張圖片
import torch
from torchvision.models.detection import maskrcnn_resnet50_fpn
from torchvision.transforms import functional as F
from pycocotools.coco import COCO
import numpy as np
from PIL import Image
import matplotlib.pyplot as plt

# Define the transformation to preprocess the images
def transform_image(image):
    image = F.to_tensor(image)
    return image

# Load the pretrained Mask R-CNN model
model = maskrcnn_resnet50_fpn(pretrained=True)
model.eval()

# Load COCO dataset
data_dir = './coco2017'  # Replace with the path to your COCO dataset
ann_file = f'{data_dir}/annotations/instances_val2017.json'
coco = COCO(ann_file)

# Load COCO class names
category_info = coco.loadCats(coco.getCatIds())
category_names = {cat['id']: cat['name'] for cat in category_info}

# Load the first 10 image IDs
image_ids = coco.getImgIds()[:10]
images = coco.loadImgs(image_ids)

# Prepare for inference
results = []

for img_info in images:
    img_id = img_info['id']
    img_path = f'{data_dir}/val2017/{img_info["file_name"]}'

    # Load and preprocess the image
    img = Image.open(img_path).convert('RGB')
    img_tensor = transform_image(img).unsqueeze(0)  # Add batch dimension

    # Perform inference
    with torch.no_grad():
        predictions = model(img_tensor)[0]

    # Extract predictions
    boxes = predictions['boxes'].cpu().numpy()
    labels = predictions['labels'].cpu().numpy()
    scores = predictions['scores'].cpu().numpy()

    # Filter out predictions with low confidence
    high_conf_idx = np.where(scores > 0.5)[0]  # Confidence threshold of 0.5
    boxes = boxes[high_conf_idx]
    labels = labels[high_conf_idx]
    scores = scores[high_conf_idx]

    # Store results
    results.append({
        'file_name': img_info['file_name'],
        'boxes': boxes,
        'labels': labels,
        'scores': scores
    })

# Print and plot results
for result in results:
    # print(f"Image: {result['file_name']}")
    # print(f"Boxes: {result['boxes']}")
    print(f"Labels: {[category_names.get(label, 'Unknown') for label in result['labels']]}")
    print(f"Scores: {result['scores']}")

    # Plot the image with bounding boxes
    img_path = f'{data_dir}/val2017/{result["file_name"]}'
    img = Image.open(img_path)
    plt.imshow(img)
    ax = plt.gca()

    for box, label, score in zip(result['boxes'], result['labels'], result['scores']):
        rect = plt.Rectangle((box[0], box[1]), box[2] - box[0], box[3] - box[1],
                             fill=False, color='red', linewidth=3)
        ax.add_patch(rect)
        plt.text(box[0], box[1], f'{category_names.get(label, "Unknown")} ({score:.2f})',
                 bbox=dict(facecolor='yellow', alpha=0.5), fontsize=8, color='black')

    plt.title(f"Image: {result['file_name']}")
    plt.axis('off')
    plt.show()