Service 的用途
Service 的種類
特殊的 Service:Multi-Port Service & Headless Service
kubectl port-forward
在 Day 03 中,我們使用 flannel 或 calico 來作為 CNI,作用是建立虛擬網路供 cluster 內部溝通使用。
當 Pod 被建立時,就會被分配一個虛擬IP,但是這個虛擬IP有兩個致命傷:
為了解決這兩個問題,就需要 Service 的幫忙了。
Service 的功用,就是代理 Pod 對外的溝通,作為外部存取的統一介面。
Service 會有自己的 IP 與 domain name,當第三者想存取 Service 背後代理的 Pod 時,只需要透過 Service 的 IP 或 domain name 即可,而 kube-proxy 會幫忙轉發流量到背後的 Pod。這樣一來,就可以透過穩定的 Service IP 來存取服務,而不用擔心 Pod 的 IP 因重啟而改變。
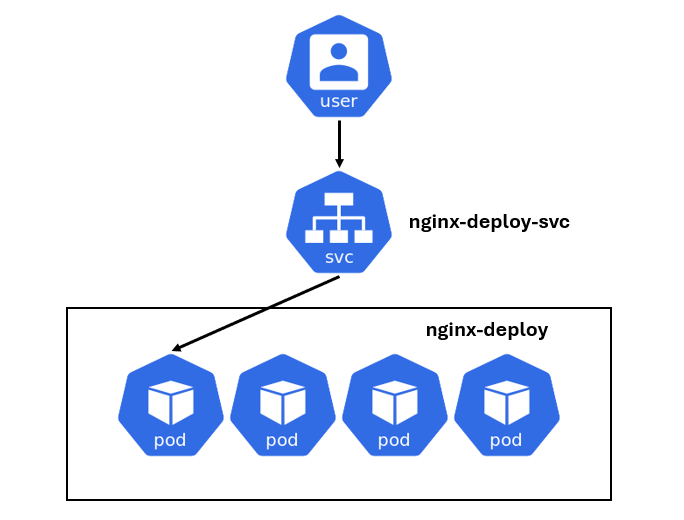
另外,我們知道單單用一個 Pod 來部署服務是不可行的,所以我們使用一群 Pod (ReplicSet、Deployment) 來部署服務,而 Service 不只能代理一個 Pod,也可以代理一群 Pod,例如:

補充:Endpoint
一般來說,當 K8s 建立一個 Service 時,會順帶建立 Endpoint 物件來指向 Service 背後的 Pod:
User <---> Service <---> Endpoint <---> Pod
那麼,Service 該如何識別它背後代理的 Pod?當 Service 接收到流量,它怎麼知道個流量的目的是誰?沒錯,一樣也是透過 Label 和 Selector 的功能。
當你建立一個 Service 時, k8s 會建立相對應的 DNS entry 供 cluster 內部存取。這個 DNS entry 的格式為:
<service-name>.<namespace>.svc.cluster.local
最後的 .cluster.local 是 cluster 預設的 domain name,而 svc 則是代表為service 的 sub-domain
例如今天在 dev namespace 之下有一個 Service 叫做 web-service,那麼其他 namespace 的 Pod 就可以透過 web-service 的 DNS entry 來存取,例如:
kubectl exec -it <pod-name> -n <other-namespace> -- curl web-service.dev.svc.cluster.local
(底下實作時會實際測試看看)
關於 k8s 的 DNS 如何將 Servie 與 domain name 對應,會等到「Services & Networking」章節中再介紹。
根據用途的不同,Service 可以分為四種:
這是 K8s 預設的 Service 類型,它只提供 cluster 內部的溝通,無法供外界存取。常見的應用場景是保護敏感資料或通訊,確保這些資料只在內部流通。
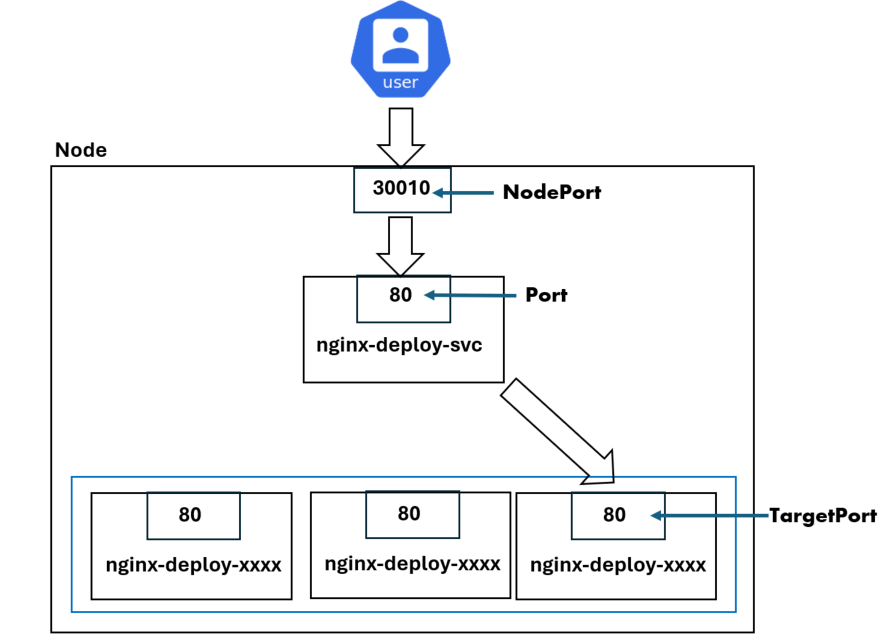
這種 Service 類型,會在每個 Node 開放一個相同的 port,當外界有流量經過這個 port 時,就會被轉發到 Service,再經由 Service 轉發到 Pod:

在這張圖中,有一些名詞需要注意:
NodePort: 就是每個 Node 開放的Port,NodePort 的範圍在 30000~32767,圖中為30010。
Port:是 Service 本身監聽的Port。當 Node 的 30010 port有流量進來時,就會轉到 Service 的 80 port。
TargetPort:是 Pod ,也就是服務本身監聽的 port。Service會會把流量轉到這個 80 port,這樣外界就存取到服務了。
這種類型的 Service 背後代理的不是 Pod,而是我們指定的 DNS name。
也就是說,當我們存取 ExternalName Service 的 domain name 時,Service 會將流量轉發到我們指定的 DNS name,然後回應該 DNS name 的 CNAME 記錄。所以使用 ExternalName,通常用來簡化 Domain Name 的結構,或是讓 cluster 內部存取到外部的服務。
例如 Database 建立在 clsuter 之外,就可以建立一個 ExternalName 的 Service 讓內部的 Pod 存取。
我們來看一個官網的範例:
apiVersion: v1
kind: Service
metadata:
  name: my-service
  namespace: prod
spec:
  type: ExternalName
  externalName: my.database.example.com
這時,如果有流量存取 my-service 的 domain name,Service 就會將流量轉發到 my.database.example.com,然後回應 my.database.example.com 的 CNAME 記錄。
什麼是 CNAME 記錄? 可以參考這篇文章
這種類型的 Service type,顧名思義會把外界的流量做附載平衡。這會使用到 cluster 外部實際存在的負載平衡設備,例如 AWS ELB 或 GCP Load Balancer。所以這種 Service type 很常被應用在雲端上。
kubectl create deploy nginx-deploy --image nginx --port 80 --replicas 3
kubectl get pod --show-labels | grep nginx
nginx-deploy-7d54cf5979-q5fvt   1/1     Running   0          57s   app=nginx-deploy,pod-template-hash=7d54cf5979
nginx-deploy-7d54cf5979-xfhtx   1/1     Running   0          57s   app=nginx-deploy,pod-template-hash=7d54cf5979
nginx-deploy-7d54cf5979-zrfdz   1/1     Running   0          57s   app=nginx-deploy,pod-template-hash=7d54cf5979
Label 是 「app=nginx-deploy」
# nginx-deploy-svc.yaml
apiVersion: v1
kind: Service
metadata:
  name: nginx-deploy-svc
spec:
  selector:
    app: nginx-deploy # Label selector
  ports:
    - port: 80        # Service開放的Port
      targetPort: 80  # Pod 開放的Port。沒有指定時,預設與 port 欄位的值相同
kubectl apply -f nginx-deploy-svc.yaml
kubectl describe service nginx-deploy-svc
Name:              nginx-deploy-svc
Namespace:         default
Labels:            <none>
Annotations:       <none>
Selector:          app=nginx-deploy
Type:              ClusterIP
IP Family Policy:  SingleStack
IP Families:       IPv4
IP:                10.103.238.21
IPs:               10.103.238.21
Port:              <unset>  80/TCP
TargetPort:        80/TCP
Endpoints:         192.168.0.4:80,192.168.1.4:80,192.168.1.5:80
Session Affinity:  None
Events:            <none>
我們可以從輸出結果中看出以下訊息:
也可以用指令觀察 Service 相對應的 Endpoints:
kubectl get endpoints nginx-deploy-svc
NAME               ENDPOINTS                                      AGE
nginx-deploy-svc   192.168.0.4:80,192.168.1.4:80,192.168.1.5:80   56s
kubectl get pods -l app=nginx-deploy -o jsonpath='{.items[*].status.podIP}'
192.168.0.4 192.168.1.4 192.168.1.5
關於 jsonpath 的用法可參考附錄。
export SERVICE_IP=$(kubectl get svc nginx-deploy-svc -o jsonpath='{.spec.clusterIP}')
curl $SERVICE_IP:80 --max-time 2
會回應一個 nginx 的初始歡迎頁面
kubectl run test --image nginx -n kube-system -- curl nginx-deploy-svc.default.svc.cluster.local
kubectl logs -n kube-system test
但因為是 clusterIP,所以 Service 的 IP 僅在 cluster 內部有效,如果我們想讓外部存取服務,可以重新編輯剛才的 yaml,使用 NodePort 類型的 Service:
# nginx-deploy-svc.yaml
apiVersion: v1
kind: Service
metadata:
  name: nginx-deploy-svc
spec:
  type: NodePort
  selector:
    app: nginx-deploy
  ports:
    - port: 80 # Service開放的Port
      targetPort: 80
      nodePort: 30010 # Node開放的Port
kubectl apply -f nginx-deploy-svc.yaml
kubectl describe service nginx-deploy-svc
......
NodePort:                 <unset>  30010/TCP
......
export NODE_PORT=$(kubectl get svc nginx-deploy-svc -o jsonpath='{.spec.ports[0].nodePort}')

curl localhost:$NODE_PORT --max-time 2
Tips:使用指令創建 Service
使用指令的方式創建 Service:
kubectl expose <pod or deploy> <deployment-name> --type=<service-type> --name=<service-name> --port=<service-port> --target-port=<target-port>
# --type 可以不指定,預設為 ClusterIP。另外這種方式無法指定 NodePort number。
kubectl expose deploy nginx-deploy --type=NodePort --name=nginx-deploy-svc --port=80 --target-port=80
kubectl create service nodeport my-service --tcp=80:80 --node-port=30010
# 注意: 建立後預設的 selector 不見得會符合你的需求,所以可以用 --dry-run=client -o yaml 先建立yaml檔,再修改。
當 Pod 開啟多個 port 來提供不同服務時,建立一個 Service 即可代理這些 port。我們來看一個範例:
有一個 Pod 的 Label 為
app.kubernetes.io/name: MyApp,並且開放了 9377 port 與 9376 port。我們可以建立一個 Service 來代理這兩個 port:
apiVersion: v1
kind: Service
metadata:
  name: my-service
spec:
  selector:
    app.kubernetes.io/name: MyApp
  ports:
    - name: http
      protocol: TCP
      port: 80
      targetPort: 9376
    - name: https
      protocol: TCP
      port: 443
      targetPort: 9377
當有流量打到 my-service 的 80 port 時,Service 會將流量轉發到 Pod 的 9376 port;同理,當有流量打到 my-service 的 443 port 時,Service 會將流量轉發到 Pod 的 9377 port。
Headless Service 是一種特殊的 Service,它沒有 ClusterIP,所以流量的轉發並不會經過 kube-proxy 或任何 load-balancing,第三方可以直接透過存取 Headless Service 的 domain name 直接存取背後代理的 Pod。
那什麼時候會用到 Headless Service?我們用一個資料庫的例子來說明:
在「Day 06」有提到,我們會用 StatefulSet 來跑資料庫,但如果每個資料庫的 template 都可以被讀寫,可能會發生同時寫入的情況,造成資料同步的衝突。
因此,通常會讓一個 template 作為 Master Pod,Master Pod 具有讀寫功能,並負責將資料同步到其他 template。而其餘的 template 則儲存資料副本,僅提供 client 讀取。
但是如果用普通的 Service 代理 StatefulSet 資料庫,client 無法直接指定 Master Pod 的 IP 來存取,因為 clinet 只能存取 Service 的 IP 或 domain name,流量要發到哪個 template 是由 kube-proxy 決定的。
因此我們可以透過 Headless Service 解決此問題,我們直接看一個實際例子:
# headless-demo.yaml
apiVersion: v1
kind: Service
metadata:
  name: nginx
  labels:
    app: nginx
spec:
  ports:
  - port: 80
    name: web
  clusterIP: None # clusterIP 為 None 就是 Headless Service
  selector:
    app: nginx
---
apiVersion: apps/v1
kind: StatefulSet
metadata:
  name: nginx
spec:
  serviceName: "nginx"
  replicas: 3
  selector:
    matchLabels:
      app: nginx
  template:
    metadata:
      labels:
        app: nginx
    spec:
      containers:
      - name: nginx
        image: nginx
        ports:
        - containerPort: 80
          name: web
kubectl apply -f headless-demo.yaml
kubectl get ep nginx
NAME    ENDPOINTS                                      AGE
nginx   192.168.0.5:80,192.168.1.6:80,192.168.1.7:80   12s
kubectl run test2 --image busybox:1.28 --restart=Never -- nslookup nginx.default.svc.cluster.local
kubectl logs test2
Server:    10.96.0.10
Address 1: 10.96.0.10 kube-dns.kube-system.svc.cluster.local

Name:      nginx.default.svc.cluster.local
Address 1: 192.168.0.5 nginx-1.nginx.default.svc.cluster.local
Address 2: 192.168.1.7 nginx-2.nginx.default.svc.cluster.local
Address 3: 192.168.1.6 nginx-0.nginx.default.svc.cluster.local
如果是普通的 Service,我們只會看到 Service 的 ClusterIP,但透過 Headless Service,我們能夠直接看到背後的 Pod IP 以及 Pod 的 domain name,client 就可以直接用這個 domain name 對 Pod 進行直接的存取。
總之,Headless Service 的功能就是告訴 clinet 它背後代理的 Pod IP 與 Pod domain name,讓 clinet 可以自己指定要存取到哪個 Pod。
前面提到,為了安全起見,我們會採用 clusterIP 的方式來 expose 某些服務,不過如果這些服務的 Pod 出了一些問題,作為管理員的我們就需要在對這個資料庫做一些 debug。這時候,直接在本機開一個終端來操作是最方便的辦法,但是這又不是 nodePort,該怎麼辦呢?
這時可以使用一個指令叫做「port-forward」,這個指令可以將 cluster 內部的 Pod 暫時監聽來自 local port 的請求 ,讓我們可以直接透過本地端的 port 來存取 cluster 內部的 Pod。指令格式如下:
kubectl port-forward <type>/<name> <local-port>:<target-port>
我們來簡單操作一下:
kubectl run nginx --image=nginx --port=80
kubectl expose pod nginx --port=80 --target-port=80 --name=nginx-svc
kubectl port-forward nginx 8080:80
或是:
kubectl port-forward svc/nginx-svc 8080:80
兩者的效果都一樣,都會將本地 8080 port 的請求導向 Pod 的 80 port。
curl localhost:8080
nginx welcome page
Ctrl + C 來結束 port-forward。最後說明一下,為了讓外部能夠存取到 service ,其實 LoadBalancer 會比 nodePort 來的理想,不過所需的練習環境較複雜,通常在雲端環境才有相對應的資源,有興趣的話可以參考官方文件,這裡就不實際演示了。
今天學習了 Service 的基本概念,以及它的四種類型。並且透過練習,了解了如何建立 Service 以及相關的應用場景。其中 Service doman name 的觀念以及 k8s cluster 的網路運作原理,將會在後續的章節中再介紹。
參考資料
