這篇來補充一下一些 Spring MVC 的 View 的部分吧,這部分其實就是前端的處理,雖然業界許多已經前後端分離,所以後端只需要著重在 Spring Boot 本身的後端 Server 上進行資料的處理,但其實過去前後端整合 FullStack 的部分也是有許多公司仍在使用, Spring Boot 其實也有提供和許多前端模板整合的方式來進行全端的處理,所以這部分如果碰到也是需要
pom.xml
<dependency>
    <groupId>org.springframework.boot</groupId>
    <artifactId>spring-boot-starter-thymeleaf</artifactId>
</dependency>
application.properties
# 表示是否啟用Thymeleaf 的快取,開發階段建議關閉
spring.thymeleaf.cache=false
# 模板前綴設置,預設即為classpath:/templates/
spring.thymeleaf.prefix=classpath:/templates/
# 模板後綴設置,預設為.html
spring.thymeleaf.suffix=.html
項目結構
主要需要注意的是模板放的位置
src/
├── main/
│   ├── java/
│   │   └── com/example/demo/
│   │       ├── DemoApplication.java
│   │       └── HomeController.java
│   ├── resources/
│   │   ├── application.properties
│   │   └── templates/
│   │       └── home.html
假設我們在後端建立一個 HomeController
@Controller
public class HelloController {

    @GetMapping("/home")
    public String home(Model model) {

        //模擬 Service 回傳的資料
        Student student = new Student();
        student.setId(1);
        student.setName("Sean");

        model.addAttribute("message", "Welcome to Thymeleaf!");
        model.addAttribute("student", student);
        return "home";
    }

}
可以用到前面的設計 URL 方法來設計,注意的是這邊就需要用到一個重要的註解 @Controller 這個註解表示不是直接傳遞一個 Json 或 Xml 格式的資料,而是包含前端渲染的模板,當使用這個註解之後 Spring Boot 就會幫我們自動匹配 /resources/templates 下面的模板配合我們所傳遞的資料回傳給前端渲染。
也要特別注意到前端要接收的資料需要裝在一個 Model 的物件內,我們可以用 addAttribute(”key”, “value”) 來裝進去,key 就會是前端需要取值時候帶入的,然後就會呈現 value 的值,value 可以是任意類型可以是字串、數值或是物件。
最後回傳的資料都是用 String 格式,且回傳的值就是要呈現的模板名稱,像是這邊我們要呈現在 home.html 就是回傳 “home”,很直觀就可以聯想把剛剛我們設定好的資料丟到這個模板呈現。
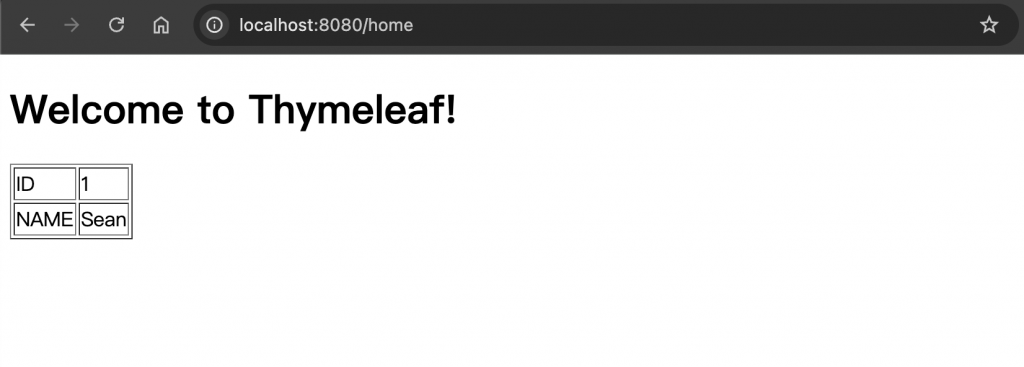
創建 home.html 頁面至 templates,並且設定好需要 thymeleaf 渲染的資料,使用 <tag th:text = “${key}”><tag> 的語法來呈現,前面 tag 可以是任意 html 標籤,要呈現的值放在中間並用 “${key}” 來抓出Model 帶來要呈現的資料,如果是物件可以用 “${object.key}” 來抓到內部的個別屬性
<!DOCTYPE html>
<html xmlns:th="http://www.thymeleaf.org">
<head>
    <title>Thymeleaf Example</title>
</head>
<body>
<h1 th:text="${message}">Default message</h1>

<table>
    <tr>
        <td>ID</td>
        <td th:text="${student.id}">Default id</td>
    </tr>
    <tr>
        <td>NAME</td>
        <td th:text="${student.name}">Default name</td>
    </tr>
</table>

</body>
</html>
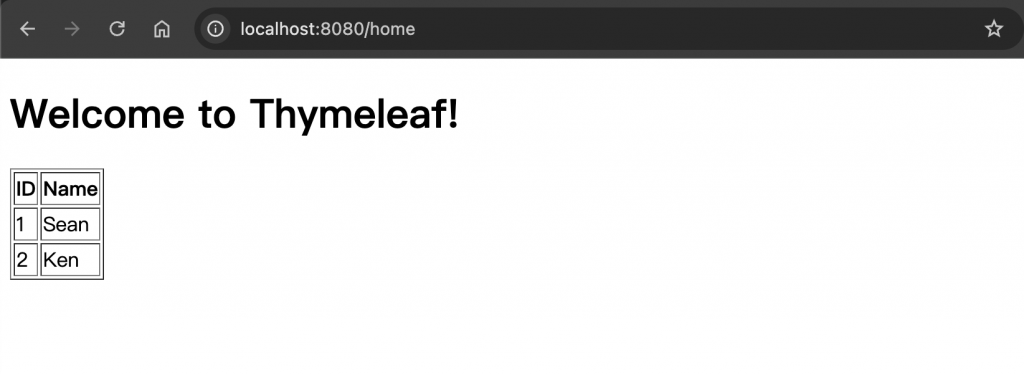
多筆學生資料可以用 List 來裝,也同樣存進去 model
@Controller
public class HelloController {

    @GetMapping("/home")
    public String home(Model model) {

        //模擬 Service, dao 回傳的資料
        List<Student> studentList = new ArrayList<>();
        Student student1 = new Student();
        student1.setId(1);
        student1.setName("Sean");

        Student student2 = new Student();
        student2.setId(2);
        student2.setName("Ken");

        studentList.add(student1);
        studentList.add(student2);

        model.addAttribute("message", "Welcome to Thymeleaf!");
        model.addAttribute("student", studentList);
        return "home";
    }

}
前端改用 Thymeleaf For 迴圈語法,<tag th:each=”item : ${itemList}”> 同樣 tag 可以用在各種類型的標籤上面,後面的用法概念都是一樣。
<!DOCTYPE html>
<html xmlns:th="http://www.thymeleaf.org">
<head>
    <title>Thymeleaf Example</title>
</head>
<body>
<h1 th:text="${message}">Default message</h1>

<table>
    <thead>
    <tr>
        <th>ID</th>
        <th>Name</th>
    </tr>
    </thead>
    <tbody>
    <tr th:each="student : ${student}">
        <td th:text="${student.id}">ID</td>
        <td th:text="${student.name}">Name</td>
    </tr>
    </tbody>
</table>

</body>
</html>
可以呈現多筆的資料
首先,將前面 home.html 表格的片段抽取到一個單獨的模板中,這個模板也放在 src/main/resources/templates/ 目錄下,並命名為 fragments.html。
<!DOCTYPE html>
<html xmlns:th="http://www.thymeleaf.org">
<head>
    <title>Fragments</title>
</head>
<body>
    <!-- 定義一個 fragment,名為 studentTable -->
    <div th:fragment="studentTable">
        <table border="1">
            <thead>
                <tr>
                    <th>ID</th>
                    <th>Name</th>
                </tr>
            </thead>
            <tbody>
                <tr th:each="student : ${student}">
                    <td th:text="${student.id}">1</td>
                    <td th:text="${student.name}">Name</td>
                </tr>
            </tbody>
        </table>
    </div>
</body>
</html>
在要插入的主模板 home.html 中引入這個 fragment,並將 student 列表傳遞進去。
<!DOCTYPE html>
<html xmlns:th="http://www.thymeleaf.org">
<head>
    <title>Student List</title>
</head>
<body>
    <h1 th:text="${message}">Welcome to Thymeleaf!</h1>

    <!-- 引入顯示 fragment -->
    <div th:include="fragments :: studentTable"></div>
</body>
</html>
controller 可以不用更動,但這樣抽成片段可以讓你嵌入任何你想要顯示的模板內。
以上就是一些基本的用法,這樣方便的整合真的是很適合後端工程師做一些簡單專案,如果需要一些前端處理可以透過這樣的框架輕鬆呈現,降低學習成本,不過這樣也是有一些優缺點,面對不同開發環境或是專案類型大家還是可以評估是否需要前後端分離,這邊也整理分享一下我認為一些前後端分離跟合併的優缺點
| 方面 | 前後端分離 | 前後端合併 |
|---|---|---|
| 定義 | 前端與後端開發為獨立系統,前端使用框架如 React/Vue/Angular 等,後端提供API | 前端與後端統一開發,通常使用如 Thymeleaf、JSP等服務端渲染技術 |
| 技術選擇自由度 | 高,前後端可以選擇不同的技術 | 低,前後端技術需統一,受限於後端技術 |
| 團隊合作效率 | 高,前後端團隊可平行開發,互不影響 | 低,前後端開發耦合較高,需要更多協作 |
| 可重用性 | 高,後端 API 可被多個前端應用共享 | 低,前端與後端綁定,難以重用其他應用 |
| 可維護性 | 好,前後端獨立,修改不會相互影響 | 差,前後端修改需同步進行,耦合度高 |
| 前端性能優化 | 易,前端完全控制資源加載與渲染,可進行各種性能優化 | 難,受限於後端技術,性能優化空間有限 |
| 開發初期成本 | 高,需要額外搭建API與前端構建工具等基礎設施 | 低,整合開發環境,開發初期更為簡單 |
| 部署與運維 | 複雜,前後端獨立部署,需處理更多部署與運維細節 | 簡單,單一應用部署與運維更容易 |
| SEO優勢 | 低,前端渲染的應用對SEO不友好,需要額外處理 | 高,服務端渲染的應用對SEO更友好,爬蟲易於抓取 |
| 應用場景 | - 大型或組織分工明確團隊,可同步開發,提升效率。(社交平台、電商) |
Ref:
相關文章也會同步更新我的部落格,有興趣也可以在裡面找其他的技術分享跟資訊。


 iThome鐵人賽