本次會教大家如何初始化一個專案,並安裝使用第三方套件。套件部分會以 http 專案為例,由此介紹 async, await 的使用方式。接著會將主提延伸到 Future 的使用以及 Dart 中的併行處理 Isolate。
範例程式碼:https://github.com/ksw2000/ironman-2024
參考官方文件:https://dart.dev.org.tw/language/error-handling
在 Dart 中,try catch 的方式與 Javascript, Java 雷同。整個的語法使用如下:
int divide(int a, int b) {
  if (b == 0) {
    throw Exception('Cannot divide by zero'); // 主動拋出 Exception
  }
  return a ~/ b; // 使用 ~/ 進行整數除法
}

void main(){
  try {
    int result = divide(10, 0); // 嘗試除以 0,這會導致錯誤
    print('Result: $result');
  } catch (e) {
    print('Caught an error: $e'); // 捕捉錯誤並輸出錯誤訊息
  } finally {
    print('This block is always executed.'); // 無論是否有錯誤,finally 區塊都會執行
  }
}
上述的程式碼中可以看到,我們可以利用 throw 丟出 Exception 或 Error。
另外,我們可以利用 try-on 抓住特定的 Exception 或 Error
void checkAge(int age) {
  if (age < 0) {
    throw InvalidAgeException('Age cannot be negative'); // 拋出自定義錯誤
  } else {
    print('Your age is $age');
  }
}

class InvalidAgeException implements Exception {
  final String message;

  InvalidAgeException(this.message);

  @override
  String toString() {
    return "InvalidAgeException: $message";
  }
}

void main(){
  try {
    checkAge(-10);
  } on InvalidAgeException {
    print('Caught InvalidAgeException');
  } catch (e) {
    print('Caught an error: $e');
  }
  // Caught InvalidAgeException

  // 當然我們也可以在 on 語句後使用 catch 取得更詳細的訊息
  try {
    checkAge(-10);
  } on InvalidAgeException catch (e) {
    print('Caught $e');
  } catch (e) {
    print('Caught an error: $e');
  }
  // Caught InvalidAgeException: Age cannot be negative
}
剛剛的範例中我們都是實作 Exception,在 Dart 中,Error 通常用來表示更嚴重、不可恢復的錯誤,這些錯誤往往表示程式有重大問題。以下是 Error 和 Exception 在 Dart 3.4.3 中的註解
Error object represents a program failure that the programmer should have avoided.Exception is intended to convey information to the user about a failure, so that the error can be addressed programmatically.進入這章節前,我們先介紹如何使用 dart 的套件。要使用 dart 套件前,我們可以先建立一個專案
> dart create practice
使用該指令後,dart 會建立一個新資料夾 practice
.
└── practice/
    ├── bin/
    │   └── practice.dart  # Main entry point
    ├── lib/               # Additional libraries
    ├── test/              # Unit tests
    ├── pubspec.yaml       # Project metadata and dependencies
    └── README.md          # Project description
當我們要使用其他 dart 套件時,我們可以先上網搜尋,並找到 pub.dev 官方網站。比如我們要安裝 http 套件 https://pub.dev/packages/http 此時我們可以進入 installing 的頁面。
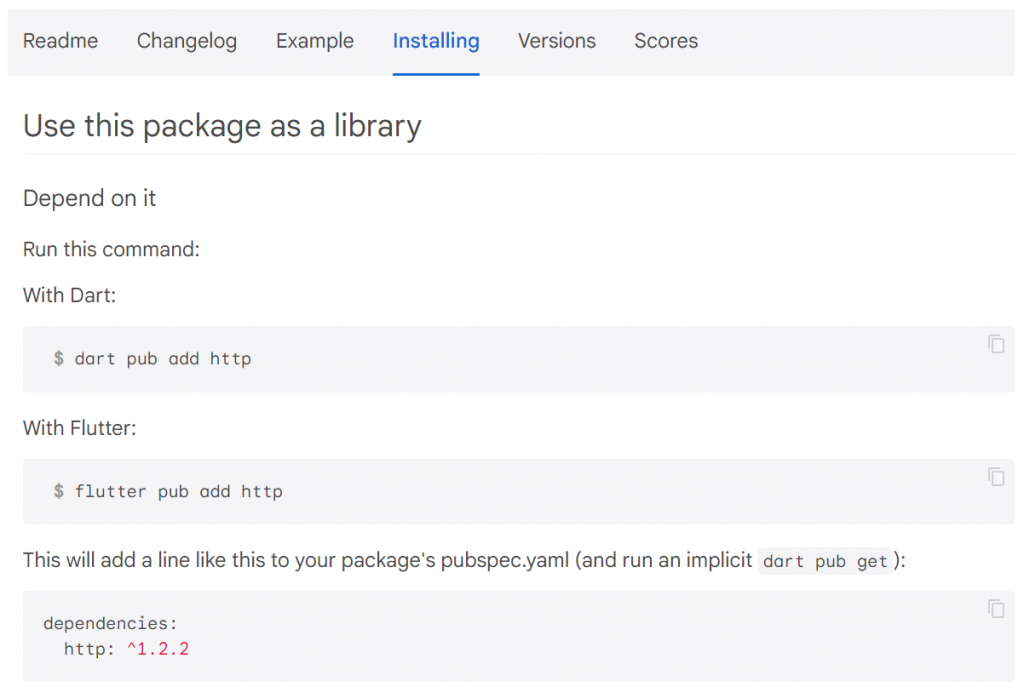
我們可以在專案中下指令,就會自動安裝。當然我們也可以直接更改 pubspec.yaml 在使用 pub get 指令。整體的邏輯跟 npm 類似。
> dart pub add http
引入套件時使用 import 關鍵字,比如在 bin/practice.dart 中預設會引入 lib 資料夾的 dart 檔
import 'package:practice/practice.dart' as practice;

void main(List<String> arguments) {
  print('Hello world: ${practice.calculate()}!');
}
這個 import as 的用法和 Javascript, Python 相同,代表在引用套件內的函式、常數或類別...等,要加入前綴。如果直接 import 而加入 as 時,就不用加入前綴。另外,也可以搭配 show 或 hide 使套件內僅顯示某些部分或隱藏某些部分。
我們可以嘗試使用 http 套件取得某個網站的內容。以下使用 http 官方的範例程式:
  var url =
      Uri.https('www.googleapis.com', '/books/v1/volumes', {'q': '{http}'});

  // Await the http get response, then decode the json-formatted response.
  var response = await http.get(url);
  if (response.statusCode == 200) {
    var jsonResponse =
        convert.jsonDecode(response.body) as Map<String, dynamic>;
    var itemCount = jsonResponse['totalItems'];
    print('Number of books about http: $itemCount.');
  } else {
    print('Request failed with status: ${response.statusCode}.');
  }
此時編譯器可能會有幾個錯誤
import 'package:http/http.dart as http'; 即可import 'dart:convert' as convert; 即可async, await 的特性,請看下一章說明參考官方件:https://dart.dev.org.tw/language/async
我們先觀察 http.get 的參數及回傳值。
Future<Response> get(Uri url, {Map<String, String>? headers})
可以發現在使用 get 函式時,回傳值為 Future<Response>。Dart 中的 Future 其實跟 Javascript 中的 Promise 雷同。
當我們要解析 Future 時,有兩種方法,範例程式利用 await 的方式去等待,等待 get() 完成,這個方式就跟一般寫程式一樣,前一行執行完,再執行下一行。但是當我們使用 await 時,調用 await 的函式就必需加入 async。
重點:
當我們使用
await時,調用await的函式就必需加入async。
此時最簡單的方式就是將 main() 加入 async。
void main(List<String> arguments) async {
    // ...
    var response = await http.get(url);
    // ...
}
同理我們也可以改成
void getWeb() async {
    // ...
    var response = await http.get(url);
    // ...
}

void main(){
    // ...
    getWeb();
}
呼叫一般的函式與 async 的函式有什麼差呢?async 代表 asynchronous,中文翻譯成異步,或非同步,代表在執行該函式時,後面的程式碼也會同時執行,不受影響。
在中文圈中,我們常常會跟朋友說:這件事我們同步進行,這裡的同步是指同時一起做某件事,在英文稱為 asynchronous 翻回中文變為異步或非同步。

圖片來源:https://andrewzuo.com/async-await-is-the-worst-thing-to-happen-to-programming-9b8f5150ba74
除了用 await 等待 Future 之外,也可以使用 then() 的方式等待 get() 完成並呼叫 then() 中的 callback 函式。
http.get(url).then((response) {
    if (response.statusCode == 200) {
      var jsonResponse =
          convert.jsonDecode(response.body) as Map<String, dynamic>;
      var itemCount = jsonResponse['totalItems'];
      print('Number of books about http: $itemCount.');
    } else {
      print('Request failed with status: ${response.statusCode}.');
    }
});
因為沒有使用 await,所以 get() 之後的程式也不會等待 get() 執行完,而是會異步進行。
前面教學提到的 async, await 會搭配 Future 做使用,這裡我們會以計算費波那契數做為一個示範。首先我們可以建立一個很浪費時間的函式 _fibonacci
int _fibonacci(int a) {
  if (a == 0) {
    return 0;
  } else if (a == 1) {
    return 1;
  }
  return _fibonacci(a - 1) + _fibonacci(a - 2);
}
接著我們可以利用前面所學的 throw 來包裝,處理那些輸入為負的例外,並將返回值設為 Future ,如此一來變能使程式異步進行
Future<int> fibonacci(int a) async {
  if (a < 0) {
    throw Exception('Invalid input');
  }
  return Future.value(_fibonacci(a));
}
我們嘗試調用 fibonacci,調用時我們時用 then() 搭配 callback function,並在 then() 之後嘗試抓取錯誤
void main() {
  fibonacci(20).then((v) {
    print('fibonacci(20) = $v');
  }).catchError((e) {
    print('caught error: $e');
  });

  fibonacci(-1).then((v) {
    print('fibonacci(-1) = $v');
  }).catchError((e) {
    print('caught error: $e');
  });

  print("do something... 1");
  print("do something... 2");
  print("do something... 3");

  // do something... 1
  // do something... 2
  // do something... 3
  // fibonacci(20) = 6765
  // caught error: Exception: Invalid input
}
當我們嘗試把 fibonacci 中的值調大,比如 40,會發現後面的程式仍然卡住了。從程式碼看起來,不應該還是會先印出 do something 嗎?這其實是因為 Future 仍然是在主執行緒中執行。遞迴版本的 fibonacci 是個很耗 CPU 效能的操作,這會導致主執行緒阻塞。為了避免這種情況,我們可以使用 Isolate。
參考官方文件:https://dart.dev.org.tw/language/isolates
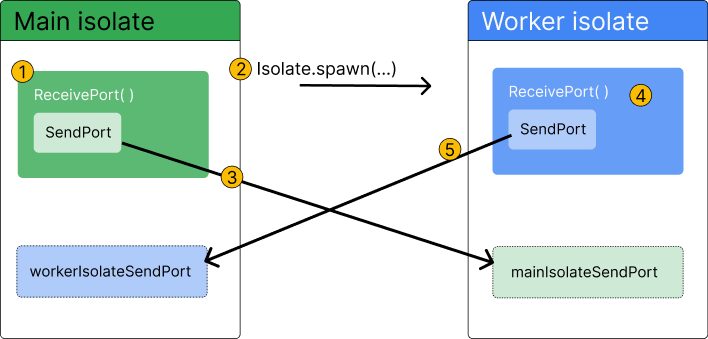
在 Dart 中,Isolate 用來實現多執行緒的並行計算。與傳統的多執行緒不同,Dart 的 Isolate 是獨立的執行環境,擁有自己的記憶體空間,不能直接共享變數,也就是說,我們也不可以利用全域變數做訊息傳遞。要在 Isolation 與主執行緒間傳送訊息可以利用 Isolate.spawn 及 ReceiverPort() 實現。由於這個實作較為複雜,因此在處理簡單的任務時,我們也可以直接使用 Isolate.run()
static Future<R> run<R>(FutureOr<R> computation(), {String? debugName})
使用 Isolate.run() 時,將需要執行的部分整合進 computation 內。computation 函式是一個沒有輸入參數且輸出為FutureOr<R> 的函式,FutureOr<R> 代表讓函式是回傳 Future<R> 或 R。為了能將參數 a 傳進 _fibonacci 中,我們可以再利用一個函式將其包裝。
import 'dart:isolate';

Future<int> fibonacci(int a) async {
  if (a < 0) {
    throw Exception('Invalid input');
  }
  return await Isolate.run(() => _fibonacci(a));
}
使用 Isolate 後,可以很明顯發現我們的程式正確地進行異步處理。
void main() {
  fibonacci(40).then((v) {
    print('fibonacci(40) = $v');
  }).catchError((e) {
    print('caught error: $e');
  });

  print("do something... 1");
  print("do something... 2");
  print("do something... 3");
}
後記:今天提到的內容比較多,明天開始會正式進入 Flutter 教學