
摘要
這篇文章探討了如何使用 LangGraph 與 LangFuse 打造全方位的 Agent 觀測系統。LangGraph 是一個用於構建複雜 AI 代理應用程序的開源框架,而 LangFuse 提供了強大的功能,讓開發者可以監控、分析和優化他們的 AI 系統。文章循序漸進地介紹了如何使用 LangGraph 建立聊天機器人和多 Agent 系統,並強調 LangFuse 的功能,包括追蹤性能、評分系統和提示管理。文章以實用的程式碼範例和視覺化工具,幫助開發者了解如何利用這些工具建立更智能、更高效的 AI 應用程序。
你是否曾夢想過打造一個複雜的的 AI 代理應用?LangGraph 正是為此而生的開源框架。由 LangChain 團隊精心打造,LangGraph 讓你能夠輕鬆構建具有狀態管理的多智能體系統。它的內建持久化功能更是讓錯誤恢復和人機協作工作流變得輕而易舉。

文件詳細介紹 Langfuse 如何協助開發人員進行除錯、分析在整個 LangGraph 應用程式開發過程。
想像一下,你有了一個強大的多智能體系統,但卻無法洞察其內部運作。這就像駕駛一輛沒有儀表盤的跑車!而 LangFuse 正是你的智能儀表盤。通過 LangFuse 的 LangChain 整合,你可以:
在探索了 LangFuse 的基本功能後,你可能會想:「能否在自己的伺服器上運行 LangFuse?」答案是肯定的!自行託管 LangFuse 不僅給予你更多的控制權,還能提供更高的數據安全性和可定制性。讓我們一步步來看如何實現這個目標。
在開始之前,請確保你的系統已經安裝了以下必要工具:
💡 提示:如果你還沒有安裝這些工具,現在是個好時機。它們不僅對這個項目有用,對未來的開發工作也會大有幫助。
首先,我們需要從 GitHub 上克隆 LangFuse 的代碼庫。打開你的終端,執行以下命令:
git clone https://github.com/langfuse/langfuse.git
cd langfuse
使用 Docker Compose 來啟動 LangFuse 服務:
docker compose -f docker-compose.yml up -d
執行此命令後,LangFuse 將在 http://localhost:3000 上運行。
現在,你可以使用剛才生成的 API 密鑰將 LangFuse 集成到你的 AI 應用中。
提示:如果你有應用的話可以直接放入,沒有的話,下一個章節會帶你手把手執行。
from langfuse import Langfuse

langfuse = Langfuse(
    secret_key="your-secret-key",
    public_key="your-public-key",
    host="http://localhost:3000"
)

@langfuse.observe()
def call_llm(input_text):
    # 你的 LLM 調用邏輯
    response = llm_model.generate(input_text)
    return response

response = call_llm("你的輸入文本")
print(response)
自行託管 LangFuse 帶來諸多好處:
首先,我們需要設置 LangFuse 客戶端。這就像為你的 AI 應用安裝一個智慧監控系統。你需要:
從 LangFuse UI 的項目設置中獲取 API 密鑰
將這些密鑰添加到你的環境變量中
讓我們看看具體怎麼做:
# Commented out IPython magic to ensure Python compatibility.
# %pip install --quiet langfuse
# %pip install --quiet langchain langgraph langchain_openai langchain_community

import os
from google.colab import userdata

# get keys for your project from langfuse dashboard
os.environ["LANGFUSE_PUBLIC_KEY"] = userdata.get('LANGFUSE_PUBLIC_KEY')
os.environ["LANGFUSE_SECRET_KEY"] = userdata.get('LANGFUSE_SECRET_KEY')
os.environ["LANGFUSE_HOST"] = "https://1def-36-237-214-5.ngrok-free.app"

# your openai key
os.environ["OPENAI_API_KEY"] = userdata.get('OPENAI_API_KEY')
記住,保護這些密鑰就像保護你家的鑰匙一樣重要!
Note: 需要使用 Python 3.11 (GitHub Issue).
讓我們從一個簡單但強大的例子開始 - 一個能夠回答常見問題的客服聊天機器人。在這個過程中,我們將:
這就像為你的機器人配備了一個智能日誌系統,讓你能夠回顧並分析每一次對話。
在 LangGraph 中,我們使用 StateGraph 來定義聊天機器人的結構。這就像設計一個流程圖,其中包含了 AI 可以執行的各種功能和它們之間的聯繫。
class State(TypedDict):
    messages: Annotated[list, add_messages]

graph_builder = StateGraph(State)

llm = ChatOpenAI(model = "gpt-4o", temperature = 0.2)

def chatbot(state: State):
    return {"messages": [llm.invoke(state["messages"])]}

graph_builder.add_node("chatbot", chatbot)
graph_builder.set_entry_point("chatbot")
graph_builder.set_finish_point("chatbot")
graph = graph_builder.compile()
LangGraph 還提供了一個強大的可視化工具,讓你能夠直觀地看到你的 AI 助手的 "思維結構":

接下來,我們使用 Langfuse callback handler for LangChain 來追蹤每一個步驟,僅需在程式碼當中添加 config={"callbacks": [langfuse_handler]}
from langfuse.callback import CallbackHandler

# Initialize Langfuse CallbackHandler for Langchain (tracing)
langfuse_handler = CallbackHandler()

for s in graph.stream({"messages": [HumanMessage(content = "What is Langfuse?")]},
                      config={"callbacks": [langfuse_handler]}):
    print(s)
通過添加 Langfuse callback handler for LangChain, 你就像給你的 AI 助手配備了一個智能記錄儀,記錄下每一次對話的細節。
這邊直接上圖,可以在專案底下/traces 查看每一個對話紀錄,回顧你的 AI 助手與用戶的每一次互動。

現在,讓我們挑戰更高級的任務 - 創建一個由多個專門 AI 智能體組成的超級團隊。
在這個例子中,我們將::
在這範例中,你將提供 Agent 工具,一個是 wiki 研究員用,另一個則是可以計算當前時間。
# Define a tools that searches Wikipedia
wikipedia_tool = WikipediaQueryRun(api_wrapper=WikipediaAPIWrapper())

# Define a new tool that returns the current datetime
datetime_tool = Tool(
    name="Datetime",
    func = lambda x: datetime.now().isoformat(),
    description="Returns the current datetime",
)
定義工具好方便提供給 Agent
def create_agent(llm: ChatOpenAI, system_prompt: str, tools: list):
    # Each worker node will be given a name and some tools.
    prompt = ChatPromptTemplate.from_messages(
        [
            (
                "system",
                system_prompt,
            ),
            MessagesPlaceholder(variable_name="messages"),
            MessagesPlaceholder(variable_name="agent_scratchpad"),
        ]
    )
    agent = create_openai_tools_agent(llm, tools, prompt)
    executor = AgentExecutor(agent=agent, tools=tools)
    return executor

def agent_node(state, agent, name):
    result = agent.invoke(state)
    return {"messages": [HumanMessage(content=result["output"], name=name)]}
主管將會使用 function calling 選擇是將任務派送給下一個隊員或是結束處理
members = ["Researcher", "CurrentTime"]
system_prompt = (
    "You are a supervisor tasked with managing a conversation between the"
    " following workers:  {members}. Given the following user request,"
    " respond with the worker to act next. Each worker will perform a"
    " task and respond with their results and status. When finished,"
    " respond with FINISH."
)

# Our team supervisor is an LLM node. It just picks the next agent to process and decides when the work is completed
options = ["FINISH"] + members

# Using openai function calling can make output parsing easier for us
function_def = {
    "name": "route",
    "description": "Select the next role.",
    "parameters": {
        "title": "routeSchema",
        "type": "object",
        "properties": {
            "next": {
                "title": "Next",
                "anyOf": [
                    {"enum": options},
                ],
            }
        },
        "required": ["next"],
    },
}

# Create the prompt using ChatPromptTemplate
prompt = ChatPromptTemplate.from_messages(
    [
        ("system", system_prompt),
        MessagesPlaceholder(variable_name="messages"),
        (
            "system",
            "Given the conversation above, who should act next?"
            " Or should we FINISH? Select one of: {options}",
        ),
    ]
).partial(options=str(options), members=", ".join(members))

llm = ChatOpenAI(model="gpt-4o")

# Construction of the chain for the supervisor agent
supervisor_chain = (
    prompt
    | llm.bind_functions(functions=[function_def], function_call="route")
    | JsonOutputFunctionsParser()
)
手上道具都齊全了,將剛剛定義好的狀態跟節點函數連接再一起。最後使用 edge 連接確保每個節點都有連接。
# The agent state is the input to each node in the graph
class AgentState(TypedDict):
    # The annotation tells the graph that new messages will always be added to the current states
    messages: Annotated[Sequence[BaseMessage], operator.add]
    # The 'next' field indicates where to route to next
    next: str

# Add the research agent using the create_agent helper function
research_agent = create_agent(llm, "You are a web researcher.", [wikipedia_tool])
research_node = functools.partial(agent_node, agent=research_agent, name="Researcher")

# Add the time agent using the create_agent helper function
currenttime_agent = create_agent(llm, "You can tell the current time at", [datetime_tool])
currenttime_node = functools.partial(agent_node, agent=currenttime_agent, name = "CurrentTime")

workflow = StateGraph(AgentState)

# Add a "chatbot" node. Nodes represent units of work. They are typically regular python functions.
workflow.add_node("Researcher", research_node)
workflow.add_node("CurrentTime", currenttime_node)
workflow.add_node("supervisor", supervisor_chain)

# We want our workers to ALWAYS "report back" to the supervisor when done
for member in members:
    workflow.add_edge(member, "supervisor")

# Conditional edges usually contain "if" statements to route to different nodes depending on the current graph state.
# These functions receive the current graph state and return a string or list of strings indicating which node(s) to call next.
conditional_map = {k: k for k in members}
conditional_map["FINISH"] = END
workflow.add_conditional_edges("supervisor", lambda x: x["next"], conditional_map)

# Add an entry point. This tells our graph where to start its work each time we run it.
workflow.add_edge(START, "supervisor")

# To be able to run our graph, call "compile()" on the graph builder. This creates a "CompiledGraph" we can use invoke on our state.
graph_2 = workflow.compile()
LangGraph 還提供了一個強大的可視化工具,讓你能夠直觀地看到你的 AI 助手之間的溝通方式

from langfuse.callback import CallbackHandler

# Initialize Langfuse CallbackHandler for Langchain (tracing)
langfuse_handler = CallbackHandler()

# Add Langfuse handler as callback: config={"callbacks": [langfuse_handler]}
for s in graph_2.stream({"messages": [HumanMessage(content = "How does photosynthesis work?")]},
                      config={"callbacks": [langfuse_handler]}):
    print(s)
    print("----")

# Add Langfuse handler as callback: config={"callbacks": [langfuse_handler]}
for s in graph_2.stream({"messages": [HumanMessage(content = "What time is it?")]},
                      config={"callbacks": [langfuse_handler]}):
    print(s)
    print("----")

透過這種方式,我們不僅創建了一個功能強大的多 Agent 系統,還為它配備了一個全面的監控和分析工具。這讓我們能夠不斷優化系統性能,提升用戶體驗。
LangFuse 的評分功能Scores 極其靈活,可以應用於:
您可以通過多種方式創建這些評分:
LangFuse 提供了兩種主要的評分方法:
langfuse_context.score_current_observation: 為當前觀察上下文添加評分langfuse_context.score_current_trace: 從嵌套層次結構的任何位置為整個追蹤添加評分這種靈活性讓您可以根據需求精確地評估 AI 的表現。
observe() 裝飾器為了獲取當前觀察的上下文,我們使用了 [observe() decorator](https://langfuse.com/docs/sdk/python/decorators) 裝飾器。這個強大的工具自動捕獲了豐富的信息:
這個裝飾器會自動為頂層函數創建追蹤,並為任何嵌套函數創建跨度。
from langfuse.decorators import langfuse_context, observe

# Langfuse observe() decorator to automatically create a trace for the top-level function and spans for any nested functions.
@observe()
def research_agent(user_message):
    # Get callback handler scoped to this observed function
    lf_handler = langfuse_context.get_current_langchain_handler()

    # Trace langchain run via the Langfuse CallbackHandler
    response = graph_2.invoke({"messages": [HumanMessage(content=user_message)]},
                        config={"callbacks": [lf_handler]})

    # Score the entire trace e.g. to add user feedback
    langfuse_context.score_current_trace(
        name = "user-explicit-feedback",
        value = 1,
        comment = "The time is correct!"
        )

    return response
research_agent("What time is it?")

在 AI 開發的世界裡,提示詞(Prompt)就像是與 AI 溝通的魔法咒語。而 LangFuse 的提示管理功能,則是讓你成為這些咒語的魔法師。讓我們深入探索這個強大的工具:
Langfuse prompt management 本質上是一個專門為 AI 提示詞設計的內容管理系統(CMS)。它讓你能夠:
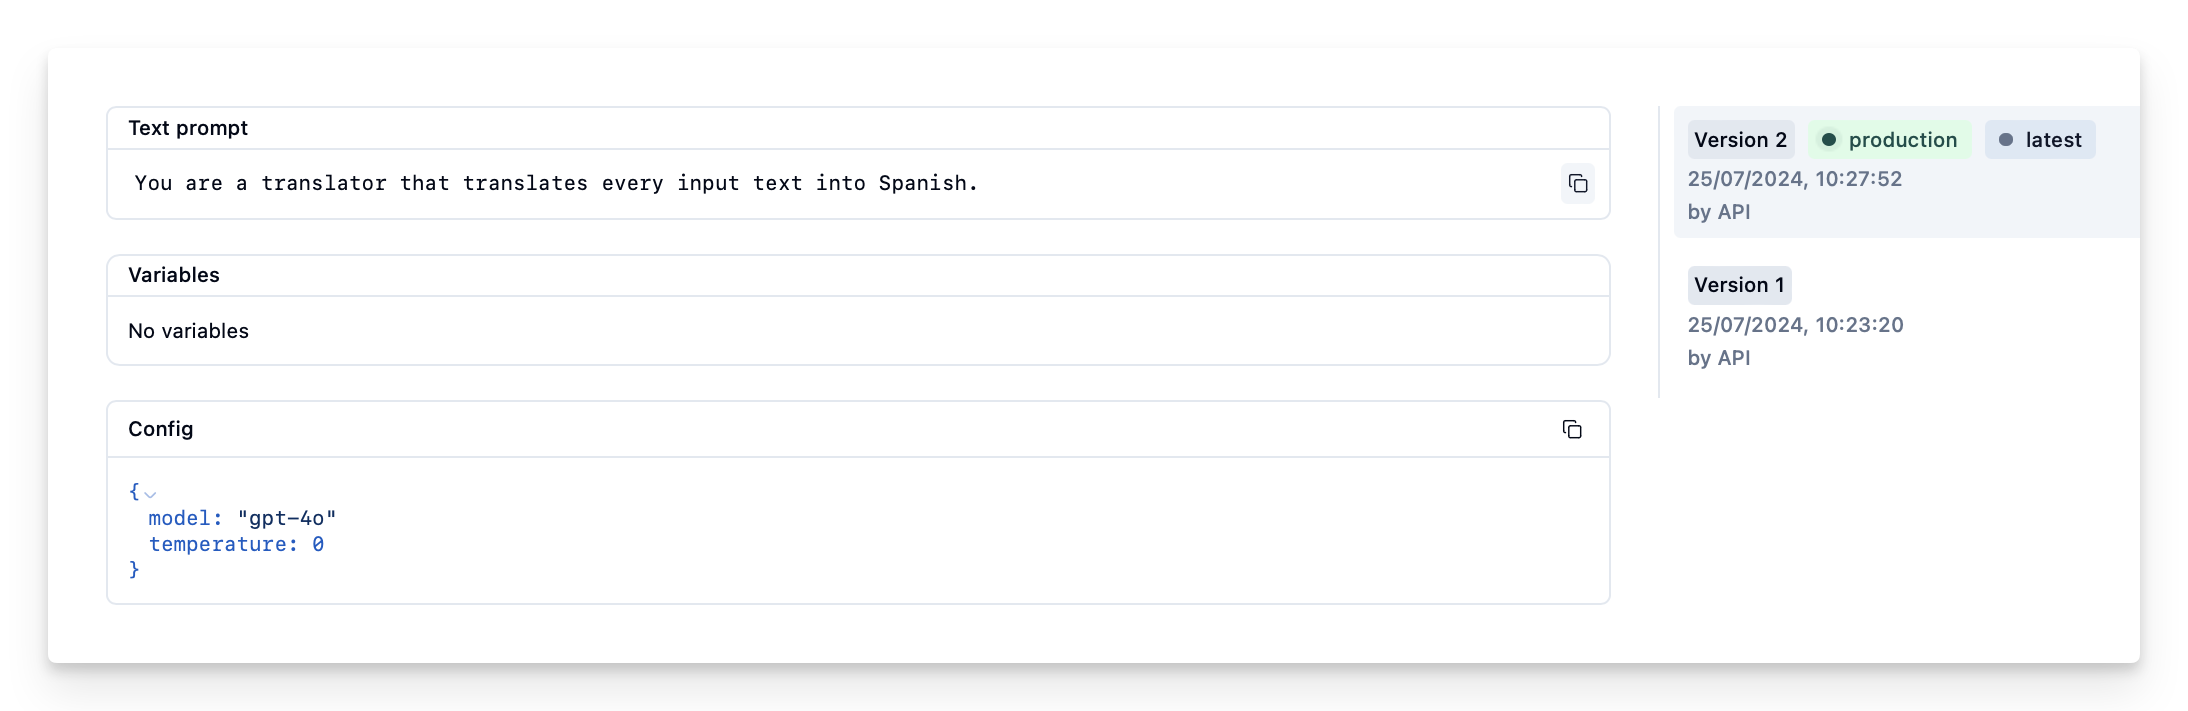
在 LangFuse 中創建提示詞時,需要注意以下幾個關鍵元素:
Name: 在 LangFuse 提示管理中識別提示詞的唯一標識符Prompt: 包含提示模板和輸入變量的實際內容。注意,LangFuse 使用 {{input variables}} 的雙括號語法labels: 添加標籤如 production,可以立即將提示詞設為默認使用讓我們通過一個實際例子來看看如何使用 LangFuse 創建和管理提示詞:
from langfuse import Langfuse

# 初始化 Langfuse 客戶端(用於提示管理)
langfuse = Langfuse()

langfuse.create_prompt(
    name="translator_system-prompt",
    prompt="你是一位翻譯專家,負責將所有輸入文本翻譯成日語。",
    labels=["production"]
)
LangFuse 提供了一個便捷的工具方法 .get_langchain_prompt(),可以將 LangFuse 格式的提示詞轉換成 LangChain 可用的字符串:
# 獲取當前生產版本的提示詞並轉換為 LangChain 可用的格式
langfuse_system_prompt = langfuse.get_prompt("translator_system-prompt")
langchain_system_prompt = langfuse_system_prompt.get_langchain_prompt()
print(langchain_system_prompt)
注意: LangFuse 在提示模板中使用雙括號
({{input variable}}),而 LangChain 使用單括號({input variable})。.get_langchain_prompt()方法會自動處理這種差異。
有了新的系統提示詞,我們就可以更新我們的 AI 助手了:
class State(TypedDict):
    messages: Annotated[list, add_messages]

graph_builder = StateGraph(State)

llm = ChatOpenAI(model = "gpt-4o", temperature = 0.2)

# 為我們的翻譯助手添加系統提示詞
system_prompt = {
    "role": "system",
    "content": langchain_system_prompt
}

def chatbot(state: State):
    messages_with_system_prompt = [system_prompt] + state["messages"]
    response = llm.invoke(messages_with_system_prompt)
    return {"messages": [response]}

graph_builder.add_node("chatbot", chatbot)
graph_builder.set_entry_point("chatbot")
graph_builder.set_finish_point("chatbot")
graph = graph_builder.compile()

from langfuse.callback import CallbackHandler

# Initialize Langfuse CallbackHandler for Langchain (tracing)
langfuse_handler = CallbackHandler()

# Add Langfuse handler as callback: config={"callbacks": [langfuse_handler]}
for s in graph.stream(
    {"messages": [HumanMessage(content = "What is Langfuse?")]},
    config={"callbacks": [langfuse_handler]}):
    print(s)
通過這種方式,我們成功地將 LangFuse 管理的提示詞集成到了我們的 AI 系統中。
本文深入探討了如何結合 LangGraph 和 LangFuse 來建立先進的多代理 AI 系統。LangGraph 提供了一個強大的框架來構建複雜的 AI 應用,而 LangFuse 則為這些應用提供了全面的監控、分析和優化工具。文章從基礎設置開始,逐步引導讀者完成單一聊天機器人和多代理系統的開發過程。同時,介紹了 LangFuse 的關鍵功能,如性能追蹤、評分系統和提示管理,這些功能對於提升 AI 系統的效能和可維護性至關重要。透過實際的程式碼範例和視覺化工具,本文為開發者提供了一個全面的指南,幫助他們充分利用這兩個強大工具的優勢,打造出更智能、更高效的 AI 應用。
即刻前往教學程式碼 Repo,親自建置 LangFuse 隨時掌握 AI 代理思考!別忘了給專案按個星星並持續關注更新,讓我們一起探索AI代理的新境界。
感謝分享
這樣 langchain + langgraph + langfuse 一整套組合技,看起來把實驗、開發、佈署維運一條全包
但我的疑惑是,真的有這麼美好嗎? 因為我看到不少勸退文,從原本的套框架改成自己手刻。讓我現在有點猶豫是否乾脆就自己把這幾個套件的架構都先看一遍,把自己需要的部分拿出來抄
或者是說,目前是否有哪些 production-ready 的穩定框架可以使用?
每個場域下有不同的考量,在我的情況下重新手刻這件事情不會是優先度最高的選擇,反之,知道框架背後要傳達的觀念後,自己寫一套來滿足情境也不是不行。
除了常看 Design Pattern,前沿 conference 有助於消弭知識焦慮之外,剩下的就是動手實作看看是不是真的如廣告般好用。
