用一般HTML中的表單來添加數據可能各位都不陌生,不外乎就是HTML提供用戶輸入數據,驗證數據是否符合需求,最後進行增刪改查等操作。而Django中表單功能由Form對象所實現,除了django.forms.Form之外,還有基於model之上的django.forms.ModelForm來更加完善表單的功能
今日的文章重點如下:
django.forms.From建立表單django.forms.ModelFrom建立表單forms.widgets的魅力,你看到的表單不是實際的表單那就直接開始吧~
程式碼:https://github.com/class83108/django_project/tree/hello_world
django.forms.From建立表單# article app下建立forms.py
from django import forms
from .models import Category, Author, Tag
class ArticleForm(forms.Form):
title = forms.CharField(max_length=120)
content = forms.CharField(widget=forms.Textarea)
category = forms.ModelChoiceField(queryset=Category.objects.all())
author = forms.ModelChoiceField(queryset=Author.objects.all())
tags = forms.ModelMultipleChoiceField(queryset=Tag.objects.all())
# urls.py
urlpatterns = [
path("demo_form/", demo_form_view, name="demo_form_view"),
path("article_list/", article_list_view, name="article_list_view"),
path(
"article_detail/<int:article_id>/",
article_detail_view,
name="article_detail_view",
),
....
]
# views.py
def article_list_view(request):
articles = Article.objects.all()
return render(request, "article_list.html", {"articles": articles})
def article_detail_view(request, article_id):
article = Article.objects.get(article_id=article_id)
return render(request, "article_detail.html", {"article": article})
def demo_form_view(request):
article_form = ArticleForm()
return render(request, "demo_form.html", locals())
其中forms的欄位在官方文檔中有詳細的說明,可以參考以下網址:
https://docs.djangoproject.com/en/5.1/ref/forms/fields/#built-in-field-classes
# demo_form.html
{% extends "base.html" %}
{% block content %}

{% if article_form.errors %}
	<div>
		表單數據有誤:{{ article_form.errors }}
	</div>
{% else %}
<form action="{% url "article:demo_form_view" %}" method="post">
	{% csrf_token %}
	<table>
		{{ article_form.as_table }}
	</table>
	<input type="submit" name="" id="" value="Save">
</form>
{% endif %}

{% endblock content %}
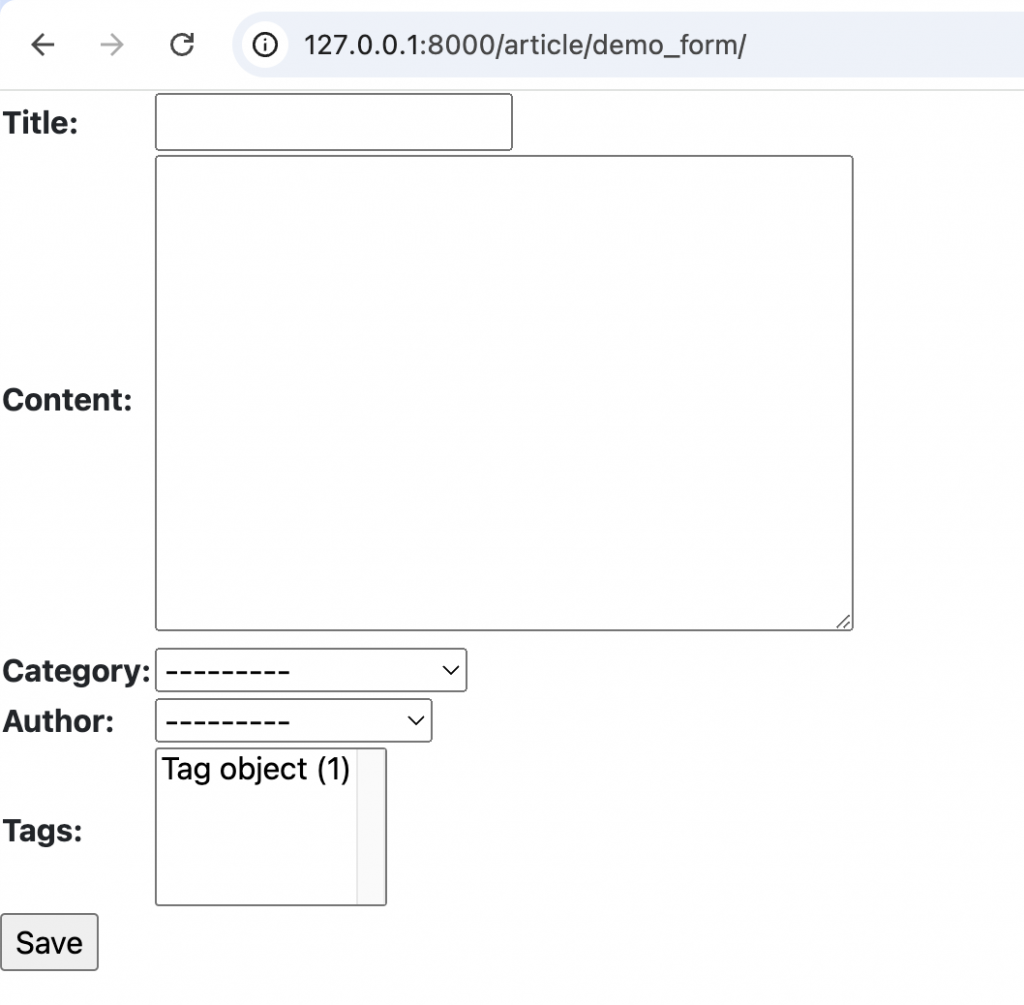
可以去頁面看一下,雖然很陽春,並且在category、Author還有Tags的選項都不是很直觀,但是我們之後再修改。看一下模板本身的程式碼
{{ article_form.as_table }}
{{ article_form.as_p }}
{{ article_form.as_div }}
{{ article_form.as_ul }}
可以用不同的方法來顯示出表單的HTML進而減少Template需要寫的程式碼量
也可以用以下方式寫,更符合Bootstrap的格式,在不增加太多程式碼的情況下保持一定的彈性
並且也能針對不同的欄位做不同的調整
{% for field in article_form %}
        <div class="form-group ">
            <div class="row">
                <label class="col-3" for="{{ field.id_for_label }}">{{field.label}}
                    {% if field.field.required %}
                        <span class="text-red">*</span>
                    {% endif %}
                </label>
                <div class="col-9">
					{{ field }}
					{% if field.errors %}
						<div class="text-red">{{ field.errors }}</div>
					{% endif %}
				</div>
			</div>
		</div>
	{% endfor %}
def demo_form_view(request):
    article_form = ArticleForm()
    error = None
    if request.method == "POST":
        article_form = ArticleForm(request.POST)
        if article_form.is_valid():
            title = article_form.cleaned_data["title"]
            content = article_form.cleaned_data["content"]
            category = article_form.cleaned_data["category"]
            author = article_form.cleaned_data["author"]
            tags = article_form.cleaned_data["tags"]

            article = Article.objects.create(
                title=title, content=content, category=category, author=author
            )
            article.tags.set(tags)
            return redirect("article:article_list_view")
        else:
            error = article_form.errors

    return render(request, "demo_form.html", locals())
當確定為Post請求後,根據post的資料建立出ArticleForm對象,接著用is_valid()做數據的驗證
is_valid() 方法的目的:
is_valid() 時,Django 會執行以下步驟:
clean_<fieldname>() 方法(如果存在),以及調用表單的 clean() 方法validate() 方法errors 屬性中is_valid() 返回 True,並且清理後的數據可以通過 cleaned_data 屬性訪問上述的方法再確認表單資料沒有問題後,拿到各欄位的數據後就將其進行儲存,一個儲存過程就完成了
django.forms.ModelFrom建立表單但是上面的寫法是不是有點冗長呢?
如果我們要儲存的就是Article表格,那能不能基於這個Model建立我們的表單呢?django.forms.ModelFrom 就是為此而設計的!
# forms.py
from .models import Article

class ArticleModelForm(forms.ModelForm):
    class Meta:
        model = Article
        fields = ["title", "content", "category", "author", "tags"]
除了繼承的類別從forms.Form改成forms.ModelForm之外,我們也要在元數據中配置相對應的欄位
此外這邊也能設置多種參數來調整頁面或是相關邏輯
class ArticleModelForm(forms.ModelForm):
    class Meta:
        model = Article
        # fields = ["title", "content", "category", "author", "tags"]
        fields = "__all__"  # 這個是全部欄位
        # exclude = ["title"] # 這個是排除的欄位

        # 可以自訂義HTML顯示的標籤名稱
        labels = {
            "title": "標題",
            "content": "內容",
            "category": "分類",
            "author": "作者",
            "tags": "標籤",
        }

        # 可以自訂義HTML顯示的欄位樣式 後面再展開來說
        # widgets = {
        # }

        help_texts = {
            "title": "請輸入標題",
            "content": "請輸入內容",
            "category": "請選擇分類",
            "author": "請選擇作者",
            "tags": "請選擇標籤",
        }

        # 錯誤訊息
        error_messages = {
            # 可以統一設定所有欄位的錯誤訊息
            "__all__": {
                "required": "此欄位不能為空",
            },
            # 也可以針對特定欄位設定錯誤訊息
            "title": {
                "required": "標題不能為空",
                "max_length": "標題長度不能超過120個字",
            },
            "content": {
                "required": "內容不能為空",
            },
            "category": {
                "required": "分類不能為空",
            },
            "author": {
                "required": "作者不能為空",
            },
            "tags": {
                "required": "標籤不能為空",
            },
        }
至於像help_texts等在template可以這樣調用
{{ field.help_text }}
# urls.py
urlpatterns = [
    ...
    path("demo_model_form/", demo_model_form_view, name="demo_model_form_view"),
]

# views.py
def demo_model_form_view(request):
    article_form = ArticleModelForm()
    error = None
    if request.method == "POST":
        article_form = ArticleModelForm(request.POST)
        if article_form.is_valid():
            article_form.save()
            return redirect("article:article_list_view")
        else:
            error = article_form.errors

    return render(request, "demo_form.html", locals())

# templates中的form表單要記得改action
<form action="{% url "article:demo_model_form_view" %}" method="post" enctype="multipart/form-data">
這樣我們就完成跟剛剛form表單一樣的功能了!程式碼是不是簡潔許多呢
forms.widgets的魅力,你看到的表單不是實際的表單剛剛的需求都是相當單純的需求,雖然減少了程式碼量,但是為了這點功能而使用Django會不會有點大才小用?當然Django form能做的不只這點,讓我們做出以下情境:
我們透過處理以上情境,來徹底發揮Django form的潛力
from django.db.models import JSONField

class ArticleV2(models.Model):
    article_id = models.AutoField(primary_key=True)
    title = models.CharField(
        max_length=120, verbose_name="Title", unique=True, null=False
    )
    created_at = models.DateTimeField(auto_now_add=True)
    updated_at = models.DateTimeField(auto_now=True)
    category = models.ForeignKey("Category", on_delete=models.CASCADE)
    author = models.ForeignKey("Author", on_delete=models.CASCADE)
    tags = models.ManyToManyField("Tag")

    # 新增欄位
    cover = models.ImageField(upload_to="cover_image", null=True)
    # 修改欄位
    content = JSONField(default=dict)

    class Meta:
        app_label = "article"
在官方文檔提到,使用ImageField需要注意兩件事情:
https://docs.djangoproject.com/en/5.1/ref/forms/fields/
poetry add pillow
<form enctype="multipart/form-data" action="{% url "article:demo_model_form_view" %}" method="post">
首先我們需要做到的事情是要能讓圖片在上傳時能夠被檢查大小,這時候就可以用到validators
所謂的validators就是當違反設置好制定的邏輯,就會觸發ValidationError
我們先寫好指定的邏輯
from django.core.exceptions import ValidationError

def validate_file_size(value):
    filesize = value.size
    if filesize > 1 * 1024 * 1024:
        raise ValidationError("檔案大小不能超過1MB。")
然後將validators 套用進去
cover = forms.ImageField(
        validators=[
            FileExtensionValidator(["jpg", "jpeg", "png", "webp"]),
            validate_file_size,
        ],
        widget=forms.ClearableFileInput(attrs={"multiple": True}),
        required=False,
    )
那這邊的widget又是什麼?當你想要改變當前欄位在HTML上選染出來的input元素類型時,我們就可以使用widget 去改變原本forms預設好的input元素
而這邊使用ClearableFileInput而不是一般的FileInput,因為兩者都是代表<input type="file" ...> 之外,ClearableFileInput在有初始值且required=False時,可以提供額外的checkbox來清除檔案
我們需要自定義一個欄位出來,需要有以下功能:
prepare_value方法:當欄位有值的時候,要能將JSON轉成Markdown語法clean方法:除了繼承原本的clean方法之外,在這個階段就要將Markdown語法轉成JSON格式,不然會無法存入資料庫中完整程式碼如下:
class JSONBMarkdownField(forms.CharField):
def __init__(self, *args, **kwargs):
kwargs["widget"] = forms.Textarea(attrs={"name": "content"})
super().__init__(*args, **kwargs)
def prepare_value(self, value):
if value is None:
return ""
if isinstance(value, str):
try:
value = json.loads(value)
except json.JSONDecodeError:
return value
return self.jsonb_to_markdown(value)
def clean(self, value):
value = super().clean(value)
return self.markdown_to_jsonb(value)
def jsonb_to_markdown(self, jsonb_data):
markdown = ""
for item in jsonb_data.get("content", []):
if item["type"] == "paragraph":
texts = item["text"].split("\n")
for text in texts:
markdown += text + "\n"
elif item["type"] in ["h1", "h2", "h3"]:
markdown += f"{'#' * int(item['type'][1])} {item['text']}\n"
elif item["type"] == "list":
markdown += self.process_list(item)
elif item["type"] == "image":
markdown += f""
if "width" in item:
markdown += f"{{width-{item['width']}}}"
markdown += "\n"
elif item["type"] == "table":
markdown += self.process_table(item)
elif item["type"] == "link":
markdown += f"[{item['text']}]({item['url']})"
elif item["type"] == "empty_line":
markdown += "\n"
elif item["type"] == "blockquote":
markdown += f"> {item['text']}\n"
return markdown.strip()
def process_list(self, list_item):
markdown = ""
for index, item in enumerate(list_item["items"], start=1):
prefix = "-" if list_item.get("style") == "unordered" else f"{index}."
markdown += f"{prefix} {item['text']}\n"
if item.get("description"):
markdown += f" {item['description']}\n"
return markdown + "\n"
def process_table(self, table):
markdown = "| " + " | ".join(table["headers"]) + " |\n"
markdown += "| " + " | ".join(["---"] * len(table["headers"])) + " |\n"
for row in table["rows"]:
markdown += (
"| "
+ " | ".join(str(row.get(header, "")) for header in table["headers"])
+ " |\n"
)
return markdown + "\n"
def markdown_to_jsonb(self, markdown):
lines = markdown.split("\n")
jsonb_content = []
current_list = None
current_table = None
for line in lines:
line = line.strip()
if line.startswith("#"):
level = len(line.split()[0])
jsonb_content.append(
{"type": f"h{level}", "text": line.lstrip("#").strip()}
)
current_list = None
current_table = None
elif (
line.startswith("- ")
or re.match(r"^\d+\.", line)
or line.startswith("* ")
):
if current_list is None or (current_list["style"] == "ordered") != bool(
re.match(r"^\d+\.", line)
):
if current_list:
jsonb_content.append(current_list)
current_list = {
"type": "list",
"style": "unordered" if line.startswith("- ") else "ordered",
"items": [],
}
text = re.sub(r"^-|\d+\.\s*", "", line).strip()
current_list["items"].append({"text": text})
elif line.startswith("!["):
match = re.match(r"!\[([^\]]*)\]\(([^)]+)\)(\{width-(\d+)\})?", line)
if match:
image = {
"type": "image",
"alt": match.group(1),
"src": match.group(2),
}
if match.group(4):
image["width"] = int(match.group(4))
jsonb_content.append(image)
current_list = None
current_table = None
elif line.startswith("|"):
if current_table is None:
current_table = {"type": "table", "headers": [], "rows": []}
jsonb_content.append(current_table)
cells = [cell.strip() for cell in line.split("|")[1:-1]]
if not current_table["headers"]:
current_table["headers"] = cells
elif all(cell == "---" for cell in cells):
continue
else:
row = {
header: cell
for header, cell in zip(current_table["headers"], cells)
}
current_table["rows"].append(row)
current_list = None
elif re.match(r"\[.*\]\(.*\)", line):
match = re.match(r"\[(.*?)\]\((.*?)\)", line)
link = {"type": "link", "text": match.group(1), "url": match.group(2)}
jsonb_content.append(link)
current_list = None
current_table = None
# 處理空行
elif (
not line
and jsonb_content
and jsonb_content[-1].get("type") != "empty_line"
):
jsonb_content.append({"type": "empty_line"})
current_list = None
current_table = None
elif line.startswith(">"):
jsonb_content.append({"type": "blockquote", "text": line[1:].strip()})
current_list = None
current_table = None
elif line:
jsonb_content.append({"type": "paragraph", "text": line})
current_list = None
current_table = None
else:
if current_list:
jsonb_content.append(current_list)
current_list = None
current_table = None
if current_list:
jsonb_content.append(current_list)
return {"content": jsonb_content}
我們也想要修改上傳文章封面圖片的檔案名稱,希望上傳的檔名能夠改成統一格式,並且能包含文章的id,因此我們需要修改save方法
from django.core.files.uploadedfile import UploadedFile
from django.db import transaction

import os

def save(self, commit=True):
        article = super().save(commit=False)

        if commit:
            with transaction.atomic():
                article.save()
                self.save_m2m() # 當有ManyToMany欄位需要儲存時,這裡是tags

                # 獲取上傳的檔案
                cover = self.cleaned_data.get("cover")
                if cover and isinstance(cover, UploadedFile):
                    # 獲取原始檔案的擴展名
                    _, file_extension = os.path.splitext(cover.name)

                    # 創建新的檔案名,使用 article_id
                    new_file_name = f"article_{article.article_id}{file_extension}"

                    # 設置新的檔案名
                    article.cover.save(new_file_name, cover, save=True)

        return article
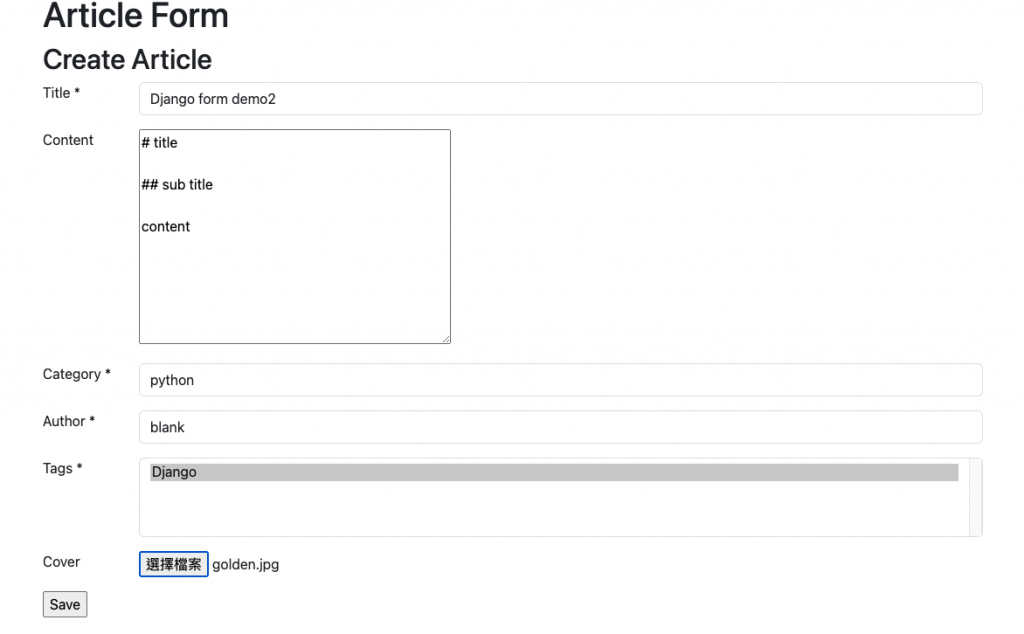
我們來看一下修改過後的ArticleModelForm
class ArticleModelForm(forms.ModelForm):

    cover = forms.ImageField(
        validators=[
            FileExtensionValidator(["jpg", "jpeg", "png", "webp"]),
            validate_file_size,
        ],
        widget=forms.ClearableFileInput(attrs={"multiple": True}),
        required=False,
    )

    class Meta:
        model = ArticleV2
        fields = [
            "title",
            "content",
            "category",
            "author",
            "tags",
            "cover",
        ]
        widgets = {
            "title": forms.TextInput(attrs={"class": "form-control"}),
            "category": forms.Select(attrs={"class": "form-control"}),
            "author": forms.Select(attrs={"class": "form-control"}),
            "tags": forms.SelectMultiple(attrs={"class": "form-control"}),
        }

    def __init__(self, *args, **kwargs):
        super().__init__(*args, **kwargs)
        self.fields["content"] = JSONBMarkdownField()
        self.fields["content"].label = "Content"
        self.fields["content"].initial = self.instance.content
        self.fields["content"].required = False

        self.fields["tags"].queryset = Tag.objects.all()
        self.fields["category"].queryset = Category.objects.all()
        self.fields["author"].queryset = Author.objects.all()

    def clean(self):
        cleaned_data = super().clean()
        return cleaned_data

    def save(self, commit=True):
        article = super().save(commit=False)

        if commit:
            with transaction.atomic():
                article.save()
                self.save_m2m()

                # 獲取上傳的文件
                cover = self.cleaned_data.get("cover")
                if cover and isinstance(cover, UploadedFile):
                    # 獲取原始文件的擴展名
                    _, file_extension = os.path.splitext(cover.name)

                    # 創建新的文件名,使用 article_id
                    new_file_name = f"article_{article.article_id}{file_extension}"

                    # 設置新的文件名
                    article.cover.save(new_file_name, cover, save=True)

        return article
需要添加request.FILES
def demo_model_form_view(request):
    article_form = ArticleModelForm()
    error = None
    if request.method == "POST":
        article_form = ArticleModelForm(request.POST, request.FILES)
        if article_form.is_valid():
            article_form.save()
            return redirect("article:article_list_view")
        else:
            error = article_form.errors

    return render(request, "demo_form.html", locals())
並且我們也一起把article相關的View修改,方便在呈現詳細頁時,也是呈現表單的效果
def article_list_view(request):
    articles = ArticleV2.objects.all()
    return render(request, "article_list.html", {"articles": articles})

def article_detail_view(request, article_id):
    article = get_object_or_404(ArticleV2, article_id=article_id)
    article_form = ArticleModelForm(instance=article)
    return render(request, "article_detail.html", {"article_form": article_form})
Templates的部分
# article list
{% extends "base.html" %}
{% block content %}
<section class="article_list">
	<h1>Article List</h1>
	<ul>
		{% for article in articles %}
			<li>
				<a href="{% url 'article:article_detail_view' article.article_id %}">{{ article.title }}</a>
			</li>
		{% endfor %}
	</ul>
</section>
{% endblock content %}

# article detail 這邊就先不配置form提交的功能了
{% extends "base.html" %}
{% block content %}
<div class="container mt-4">
    <h2 class="mb-4">Edit Article</h2>
    <form method="post" enctype="multipart/form-data">
        {% csrf_token %}
        <div class="row">
            <div class="col-md-8">
                {% for field in article_form %}
                    <div class="mb-3">
                        {% if field.errors %}
                            <div class="alert alert-danger">
                                {{ field.errors }}
                            </div>
                        {% endif %}
                        <label for="{{ field.id_for_label }}" class="form-label">
                            {{ field.label }}
                        </label>
                        {% if field.field.widget.input_type == 'checkbox' %}
                            <div class="form-check">
                                {{ field }}
                                <label class="form-check-label" for="{{ field.id_for_label }}">
                                    {{ field.label }}
                                </label>
                            </div>
                        {% elif field.field.widget.input_type == 'select' %}
                            {{ field }}
                        {% else %}
                            {{ field }}
                        {% endif %}
                        {% if field.help_text %}
                            <small class="form-text text-muted">{{ field.help_text|safe }}</small>
                        {% endif %}
                    </div>
                {% endfor %}
            </div>
        </div>
        <div class="row mt-3">
            <div class="col">
                <button type="submit" class="btn btn-primary">Save</button>
            </div>
        </div>
    </form>
</div>
{% endblock content %}

並且你可以發現,雖然不是使用Ajax或是Js達成類似SPA的效果,頁面也重新整理過,但是你之前輸入的值都沒有消失!因為Django表單會自動保留輸入的資訊,雖然不包含上傳的檔案就是了,但是這樣已經相當方便了
{"content": [{"text": "title", "type": "h1"}, {"type": "empty_line"}, {"text": "sub title", "type": "h2"}, {"type": "empty_line"}, {"text": "content", "type": "paragraph"}]}
但是我們去文章詳細頁看,content還是維持住markdown語法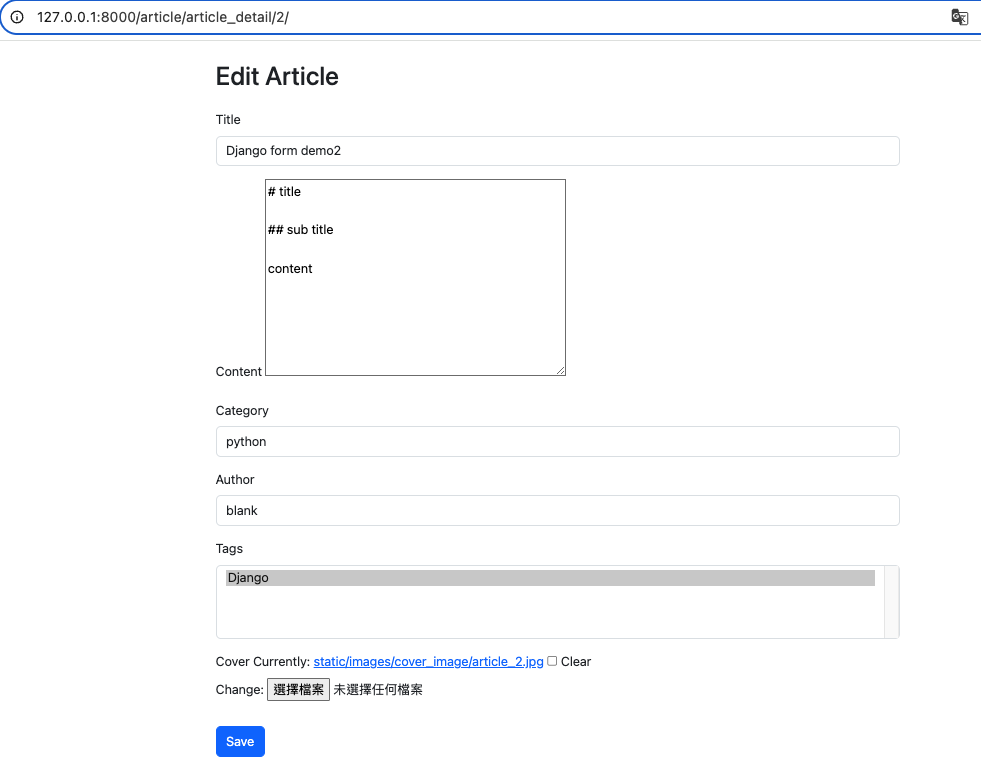
現在有體驗到Django表單的一點魅力嗎?能夠在model制定好的基礎上,透過forms.widgets 很靈活的改變表單樣式,接著透過validators以及修改clean或是save方法,能夠自定義驗證的流程,能做出很大彈性的開發與修改流程
最後我知道這樣的頁面很辣眼睛哈哈哈,但是我們的目的是展示相關邏輯,加上準備的時間壓力
請先忽略這部分,完賽後我會再慢慢修改切版的部分。像這樣一篇文章從想好架構,確認資料,寫code與debug與寫文章可能還是要3-4小時左右XD,所以在頁面上先不要要求太多哈哈哈
forms.Form跟forms.ModelForm來達成兩種不同建立表單的方式,如果表單驗證邏輯跟清洗數據跟model實際要儲存的資料不會差異太大,透過後者可以更快的完成開發。但是如果是表單的資料需要儲存成不同的表格,那還是需要前者來做基礎資料的驗證,依照個人需求去做選擇forms.widgets 去彈性的呈現表單的input元素,並且利用自定義的欄位還有重新改寫clean與save方法,來達到多樣化的開發需求目前為止,我們很多頁面都是要自己寫,有沒有一些預設的功能能夠讓我們更快速的完成CRUD呢?
就是Django Admin,明天我們將會進入Django預設的後台系統,來看看我們又能怎麼快速打造後台網站吧!
Validators:https://docs.djangoproject.com/en/5.1/ref/validators/
Widget:https://docs.djangoproject.com/en/5.1/ref/forms/widgets/


 iThome鐵人賽