終於進入到實戰演練的環節,拿出我們前天建立好的專案,準備來練習To Do List!
◎題外話:今天原本感覺時間很充裕,還在慢慢刻樣式…結果也花太多時間在喬css了吧!(吐血~不得已只好分成上下篇…)
◎小提示:該流程只是擴增nav導覽列的筆記,已經準備好模板的人也可以直接往下移動!
◎小提示:如果使用VS 2022的人,要記得到「延伸模組/管理延伸模組」下載Force UTF-8,才不會出現中文亂碼!詳見:使用Visual Studio2022 vue 中文乱码
Step1.我們到App.vue複製一項頁籤,我取名為To Do List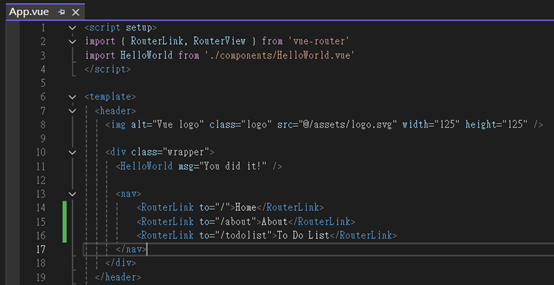
Step2.接著在「src/views」下直接複製出一個分頁,稍後模板就會放在這裡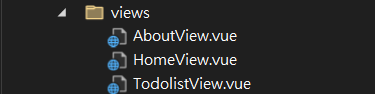
Step3.在新分頁中可以先稍微變換內容、以及重新命名class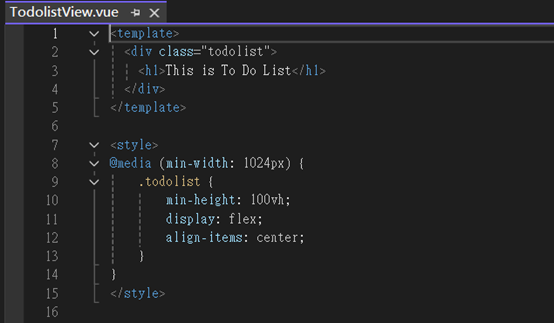
Step4.最重要的是進到index.js註冊該頁!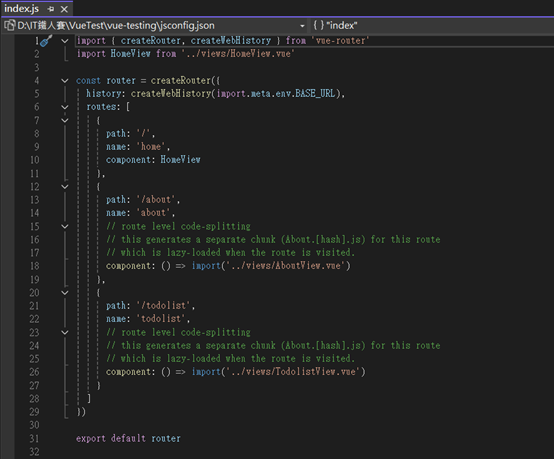
Final Step.展示頁面準備就緒!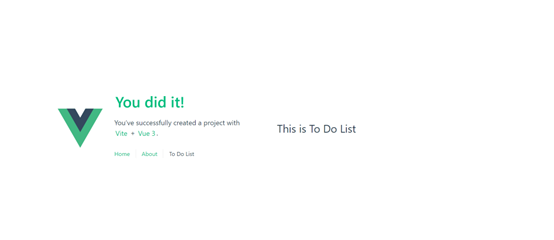
這裡我們就可以來放入喜歡的To Do List模板,就是我今天刻了老半天的東西…請笑納:
<div class="todolist">
<div class="todo_wrapper">
<h1 style="border-bottom:1px dotted">To Do List</h1>
<br>
<div class="add_block">
<input class="todo_input" type="text" placeholder="請輸入文字" />
<button class="add_item">加入</button>
</div>
<div class="nav_block">
<button class="nav_item">全部</button>
<button class="nav_item">進行中</button>
<button class="nav_item">已完成</button>
</div>
<ul class="todo_item">
<li>
<button class="btn_icon" type="button" style="float:left">✔</button>
<button class="btn_icon" type="button" style="float:left">☐</button>
<label style="margin-left: 5px; cursor: pointer;"></label>
<button class="btn_icon" type="button" style="float:right">✘</button>
</li>
</ul>
</div>
</div>
   li {
       width: 100%;
       height: 50px;
       list-style: none;
       background-color: #ffffff;
       padding: 13px;
       cursor: pointer;
   }
   li:hover {
       background-color: #cacaca;
   }
   .todolist {
       min-height: 100vh;
       display: flex;
       align-items: center;
   }
   .todo_wrapper {
       display: flex;
       flex-direction: column;
       justify-content: center;
       align-items:center;
       background-color: #ededed;
       height:500px;
       width:500px;
       border-radius:5px;
   }
   .add_block {
       display: inline-flex;
       width: 85%;
       justify-content: space-around
   }
   .todo_input {
       border: none;
       outline-style: none;
       padding: .375rem .75rem;
       width: 85%;
   }
   .add_item {
       border: none;
       background-color: #808080;
       margin-left: 10px;
       color: aliceblue;
       cursor: pointer;
       padding: .375rem .75rem;
   }
   .nav_block {
       margin-top: 15px;
       border-bottom: 1px solid #808080;
       width: 100%
   }
   .nav_item {
       border: none;
       background-color: #ffffff;
       margin-left: 10px;
       color:#808080;
       cursor: pointer;
       padding: .375rem .75rem
   }
   .todo_item {
       width: 85%;
       height: 300px;
       overflow-y: auto;
       margin-top: 20px;
       scrollbar-width: thin;
       padding: inherit;
   }
   .btn_icon {
       background: none;
       border: none;
       cursor: pointer;
   }
看起來該有的元素都出現了,接下來就讓Vue來幫我們把To Do List活過來!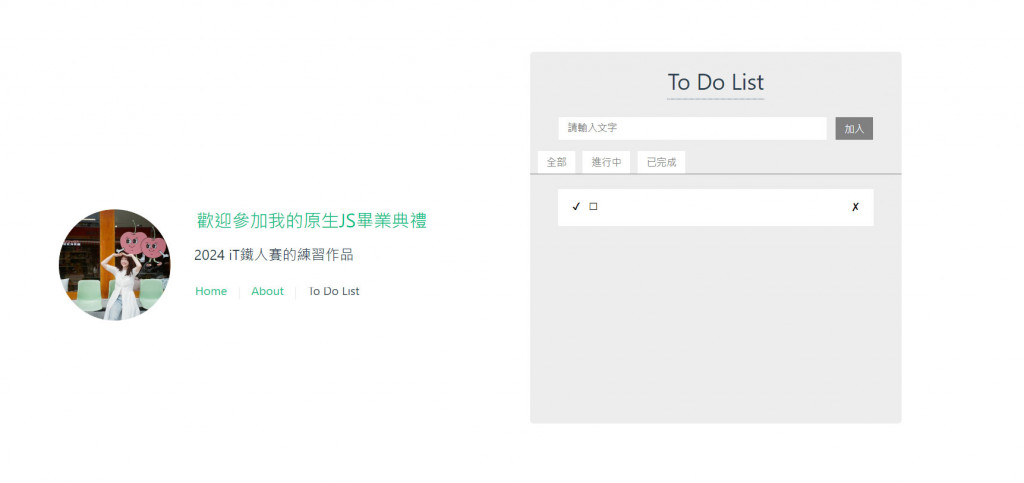
Step1.新增<script setup>引入ref,宣告todos;使用content跟html上的input做雙向資料綁定
<script setup>
    import { ref } from 'vue'
    const todos = ref([])
    const num = ref(0) //作為todos中的id計數
    const content = ref(''); //和v-model進行介面input輸入框的資料雙向綁定
</script>
  <li v-for="todo in todos" :key="todo.id">
      ...
      <label style="margin-left: 5px; cursor: pointer;">{{todo.text}}</label>
  </li>
▲li標籤上要綁定todos,並將id作為key值;文字用{{todo.text}}印出來
<input v-model="content" class="todo_input" type="text" placeholder="請輸入文字" />
▲input要加入v-model,才能雙向綁定
Step2.在新增的button上寫一個點擊事件
 function sendText() {
     if (content.value != "") { //檢查輸入框有沒有內容
         const todo = {
             id: num.value += 1, //計數加一,作為key值使用
             text: content.value,
             status: false //給一個false狀態,用於改變樣式使用
         }
         todos.value.push(todo) //塞進todos陣列中
         content.value = "" //輸入框內容要重置
     }
 }
<button @click="sendText()" class="add_item">加入</button>
做到這裡我們已經可以新增一項代辦清單了,但好像有點奇怪?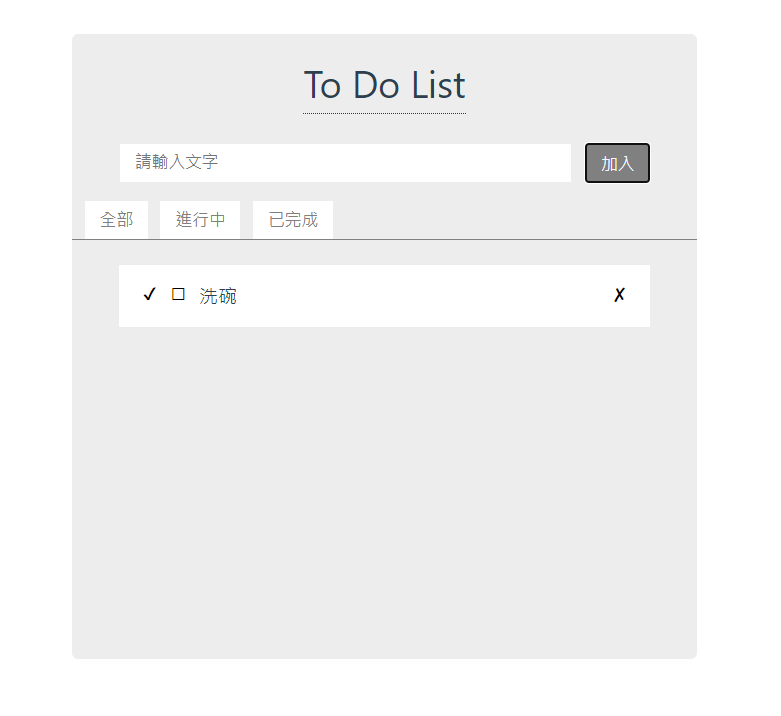
Step3.調整一下li內容
☐和✔同時出現了,但此時還沒打勾應該只能顯示☐,這時候我們就要靠todos中的status判斷
<button v-if="todo.status" class="btn_icon" type="button" style="float:left">✔</button>
<button v-else type="button" class="btn_icon" style="float:left">☐</button>
▲加入v-if及v-else進行判斷
現在我們有了一項代辦事項,完成後希望能顯示剛才的✔,並把文字加上刪除線
<button @click.stop="changeTodo(todo.id)" v-if="todo.status" class="btn_icon" type="button" style="float:left">✔</button>
<button @click.stop="changeTodo(todo.id)" v-else type="button" class="btn_icon" style="float:left">☐</button>
▲在☐和✔上加入changeTodo(todo.id),@click.stop可以避免觸發父層的點擊事件
    function changeTodo(id) {
        todos.value = todos.value.map(
        todo => todo.id === id ?
        { ...todo, status: !todo.status } : todo)
        //利用map()判斷相同id並更新當前status狀態等於true
    }
<label :class="{ 'line-through': todo.status }" style="margin-left: 5px; cursor: pointer;">{{todo.text}}</label>
▲文字在✔後要出現刪除線,自定義一個class,並在下方css中加入樣式
  .line-through {
       text-decoration:line-through
   }
寫到這裡我們越來越熟練了,在✘上加入deleteTodo(todo.id)
<button @click.stop="deleteTodo(todo.id)" class="btn_icon" type="button" style="float:right">✘</button>
  function deleteTodo(id) {
      todos.value = todos.value.filter(todo => todo.id !== id)
      //利用filter()排除要刪除的項目,並重新指定給todos
  }
新增刪除功能都完成了,最後我們在html加上v-if、v-else,判斷沒有資料的情況:
  <ul v-if="todos.length > 0" class="todo_item">
      ...
  </ul>
  <ul class="todo_item" v-else>
      <li>沒有資料</li>
  </ul>
<div class="todolist">
<div class="todo_wrapper">
<h1 style="border-bottom:1px dotted">To Do List</h1>
<br>
<div class="add_block">
<input v-model="content" class="todo_input" type="text" placeholder="請輸入文字" />
<button @click="sendText()" class="add_item">加入</button>
</div>
<div class="nav_block">
<button class="nav_item">全部</button>
<button class="nav_item">進行中</button>
<button class="nav_item">已完成</button>
</div>
<ul v-if="todos.length > 0" class="todo_item">
<li v-for="todo in todos" :key="todo.id">
<button @click.stop="changeTodo(todo.id)" v-if="todo.status" class="btn_icon" type="button" style="float:left">✔</button>
<button @click.stop="changeTodo(todo.id)" v-else type="button" class="btn_icon" style="float:left">☐</button>
<label :class="{ 'line-through': todo.status }" style="margin-left: 5px; cursor: pointer;">{{todo.text}}</label>
<button @click.stop="deleteTodo(todo.id)" class="btn_icon" type="button" style="float:right">✘</button>
</li>
</ul>
<ul class="todo_item" v-else>
<li>沒有資料</li>
</ul>
</div>
</div>
 li {
     width: 100%;
     height: 50px;
     list-style: none;
     background-color: #ffffff;
     padding: 13px;
     cursor: pointer;
 }
 li:hover {
     background-color: #cacaca;
 }
 .todolist {
     min-height: 100vh;
     display: flex;
     align-items: center;
 }
 .todo_wrapper {
     display: flex;
     flex-direction: column;
     justify-content: center;
     align-items:center;
     background-color: #ededed;
     height:500px;
     width:500px;
     border-radius:5px;
 }
 .add_block {
     display: inline-flex;
     width: 85%;
     justify-content: space-around
 }
 .todo_input {
     border: none;
     outline-style: none;
     padding: .375rem .75rem;
     width: 85%;
 }
 .add_item {
     border: none;
     background-color: #808080;
     margin-left: 10px;
     color: aliceblue;
     cursor: pointer;
     padding: .375rem .75rem;
 }
 .nav_block {
     margin-top: 15px;
     border-bottom: 1px solid #808080;
     width: 100%
 }
 .nav_item {
     border: none;
     background-color: #ffffff;
     margin-left: 10px;
     color:#808080;
     cursor: pointer;
     padding: .375rem .75rem
 }
 .todo_item {
     width: 85%;
     height: 300px;
     overflow-y: auto;
     margin-top: 20px;
     scrollbar-width: thin;
     padding: inherit;
 }
 .btn_icon {
     background: none;
     border: none;
     cursor: pointer;
 }
 .line-through {
     text-decoration:line-through
 import { ref } from 'vue'
 const num = ref(0) //作為todolist中的id計數
 const content = ref(''); //和v-model進行介面input輸入框的資料雙向綁定
 const todos = ref([])
 function sendText() {
     if (content.value != "") {
         const todo = {
             id: num.value += 1,
             text: content.value,
             status: false
         }
         todos.value.push(todo)
         content.value = ""
     }
 }
 function deleteTodo(id) {
     todos.value = todos.value.filter(todo => todo.id !== id)
 }
 function changeTodo(id) {
     todos.value = todos.value.map(todo => todo.id === id ? { ...todo, status: !todo.status } : todo)
 }
壓線好可怕,我們明天繼續把修改及頁籤功能寫完!
參考資料
使用 Vue3 Composition Api 實作 Todo List (Vue3)

