今天我們要透過範例程式碼來畫出序列圖。範例包含一個商品列表Component(HTML,TS),一個Service,以及一個Route檔案。
廢話不多說先上程式碼!
商品列表TS:
import { Component, OnInit, OnDestroy } from '@angular/core';
import { Router } from '@angular/router';
import { Subscription } from 'rxjs';
import { ProductService } from '../../shared/services/product.service';

@Component({
  selector: 'app-product-list',
  templateUrl: './product-list.component.html',
  styleUrls: ['./product-list.component.css']
})
export class ProductListComponent implements OnInit, OnDestroy {
  products: any[] = []; // 儲存產品資料
  filteredProducts: any[] = []; // 過濾後的產品
  subscription?: Subscription; // 訂閱服務的訂閱對象
  isLoading: boolean = false; // 加載狀態

  constructor(private productService: ProductService, private router: Router) { }

  // 生命週期: 組件初始化時加載資料
  ngOnInit(): void {
    this.loadProducts();
  }

  // 生命週期: 組件銷毀時清理訂閱
  ngOnDestroy(): void {
    if (this.subscription) {
      this.subscription.unsubscribe();
    }
  }

  // 資料載入: 從 API 或服務取得產品資料
  loadProducts(): void {
    this.isLoading = true;
    this.subscription = this.productService.getProducts().subscribe({
      next: (data) => {
        this.products = data;
        this.filteredProducts = this.products; // 預設顯示全部產品
        this.isLoading = false;
      },
      error: (err) => {
        console.error('Error loading products', err);
        this.isLoading = false;
      }
    });
  }

  // 商業邏輯: 根據關鍵字過濾產品
  filterProducts(keyword: string): void {
    this.filteredProducts = this.products.filter(product =>
      product.name.toLowerCase().includes(keyword.toLowerCase())
    );
  }

  // 使用者互動: 導頁至產品詳情
  viewProduct(productId: number): void {
    this.router.navigate(['/product', productId]);
  }
}
商品列表html:
<div *ngIf="isLoading">
  <p>Loading products...</p>
</div>

<div *ngIf="!isLoading">
  <input type="text" placeholder="Search products" (input)="filterProducts($event.target.value)" />

  <ul>
    <li *ngFor="let product of filteredProducts">
      <h3>{{ product.name }}</h3>
      <p>{{ product.description }}</p>
      <button (click)="viewProduct(product.id)">View Details</button>
    </li>
  </ul>

  <p *ngIf="filteredProducts.length === 0">No products found</p>
</div>
商品Service:
import { Injectable } from '@angular/core';
import { HttpClient } from '@angular/common/http';
import { Observable } from 'rxjs';

@Injectable({
  providedIn: 'root'
})
export class ProductService {

  private apiUrl = 'https://api.example.com/products';

  constructor(private http: HttpClient) { }

  // 從 API 取得產品資料
  getProducts(): Observable<any[]> {
    return this.http.get<any[]>(this.apiUrl);
  }
}
路由檔案:
import { NgModule } from '@angular/core';
import { RouterModule, Routes } from '@angular/router';
import { ProductListComponent } from './product-list/product-list.component';
import { ProductDetailComponent } from './product-detail/product-detail.component';

const routes: Routes = [
  { path: 'products', component: ProductListComponent },
  { path: 'product/:id', component: ProductDetailComponent },
  { path: '', redirectTo: '/products', pathMatch: 'full' }, // 預設導向產品列表
];

@NgModule({
  imports: [RouterModule.forRoot(routes)],
  exports: [RouterModule]
})
export class AppRoutingModule { }
我們的目標是要畫出使用者前往商品列表,然後使用者過濾商品,最後點選其中一個商品離開此頁前往明細頁的詳細系統運作。
還記得畫架構圖的時候有提到,在Angular架構中我們可以從app.config檔案開始尋找。以我們範例上有的檔案來看,最早遇到的會是路由檔(跳過了main.ts, app.config, app.component, layout, guard)。
{ path: 'products', component: ProductListComponent },
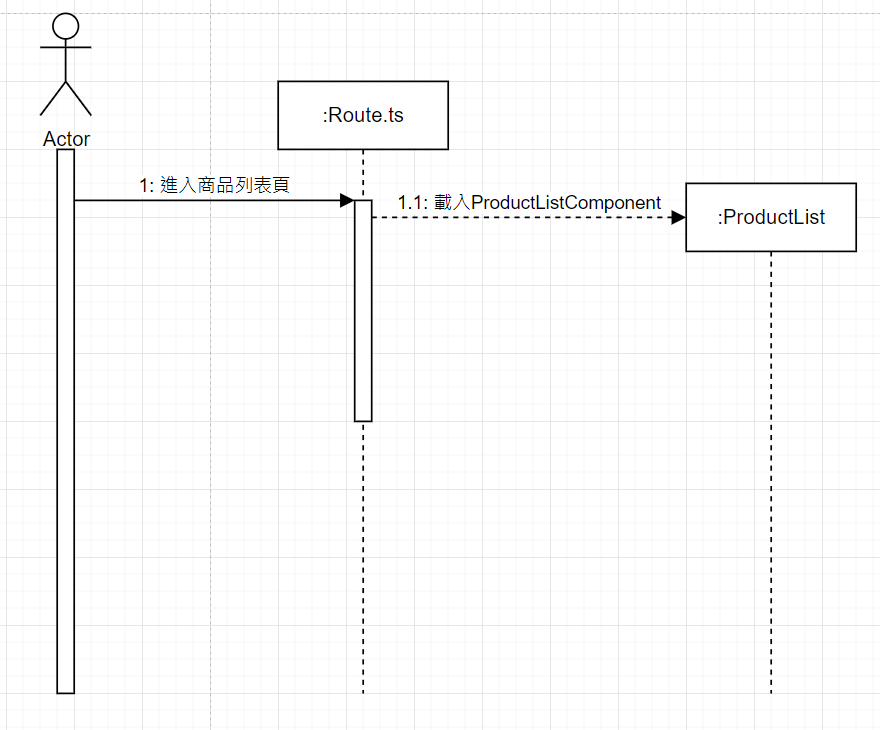
我們可以看到product路由會載入我們要找的ProductListComponent,所以可以先將 "使用者鍵入網址" → "路由載入" → "ProductListComponent載入" 的流程畫上。

從圖上可以看出使用者就是Actor,路由檔是對象,發出創建訊息創建了ProductListComponent這個對象。
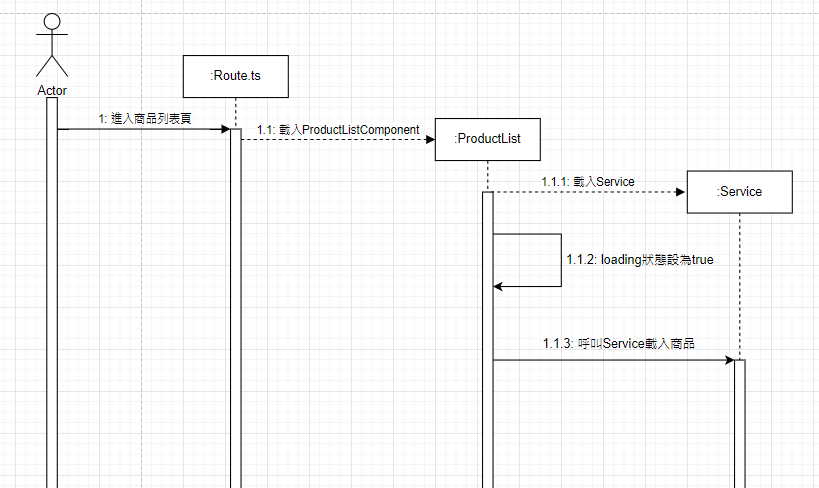
下一步我們前往ProductListComponent,以Angular來說一個Component要先查看的便是生命週期鉤子(Life Cycle Hooks),在建構子中我們注入了ProductService和Router,接著在OnInit的時候我們呼叫Service取得商品資料
// 建構子
constructor(private productService: ProductService, private router: Router) { }
// 生命週期: 組件初始化時加載資料
ngOnInit(): void {
  this.loadProducts();
}
// 資料載入: 從 API 或服務取得產品資料
loadProducts(): void {
  this.isLoading = true;
  this.subscription = this.productService.getProducts().subscribe({
    next: (data) => {
      this.products = data;
      this.filteredProducts = this.products; // 預設顯示全部產品
      this.isLoading = false;
    },
    error: (err) => {
      console.error('Error loading products', err);
      this.isLoading = false;
     }
  });
  }
"ProductList發出創造訊息建立Service" → "ProductList發出自述訊息改變loading狀態" → "ProductList發出呼叫訊息給Service"

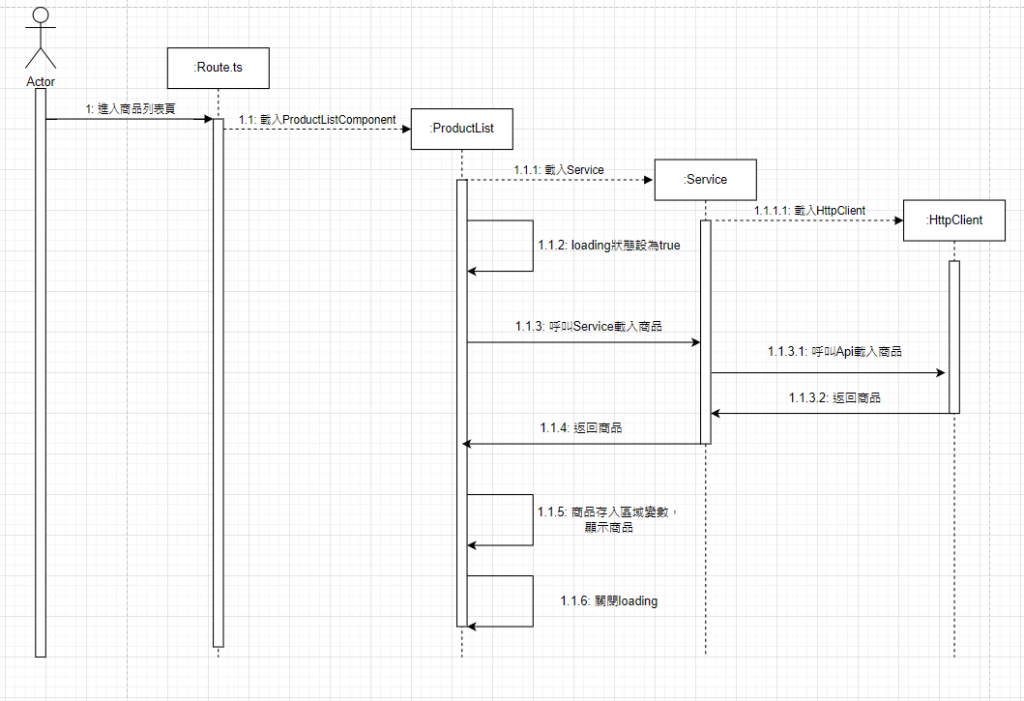
接著我們進入到Service中,可以發現Service建構子中載入了HttpClient,Service呼叫API取得商品資料,我們對序列圖稍加修改。

"ProductList發出創造訊息建立Service" → "Service發出創造訊息建立HttpClient" → "ProductList發出自述訊息改變loading狀態" → "ProductList發出呼叫訊息給Service" → "Service發出呼叫訊息給HttpClient" → "HttpClient發出回呼訊息回傳資料" → "Service發出回呼訊息回傳資料" → "ProductList發出自述訊息顯示畫面" → "ProductList發出自述訊息關閉loading狀態"
到這邊使用者進入商品列表的詳細實作也完成了。
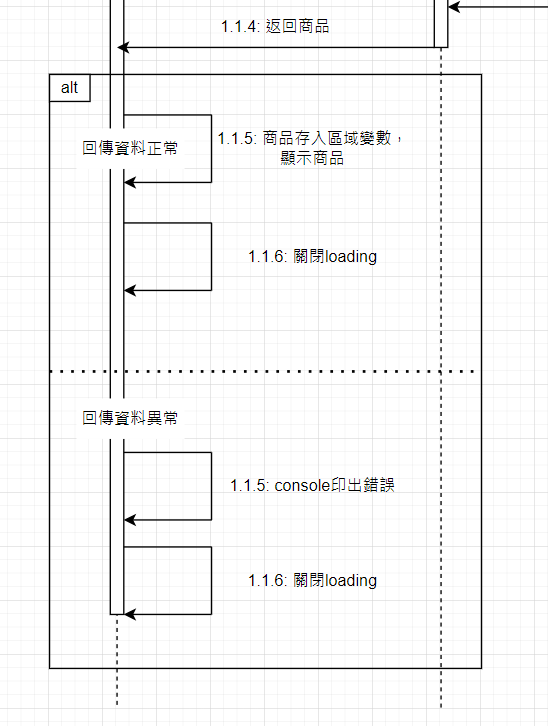
但眼尖的你應該會發現,奇怪,error的部分怎麼沒有畫到?
沒錯! 其實在處理流程控制的情形時,我們可以在圖上加入註解區塊,並透過虛線分隔出兩個不同情境的流程,補上後如下圖。

下一篇文章我們會繼續序列圖的流程,我們要畫出使用者進行商品過濾以及選擇商品後的導頁!
