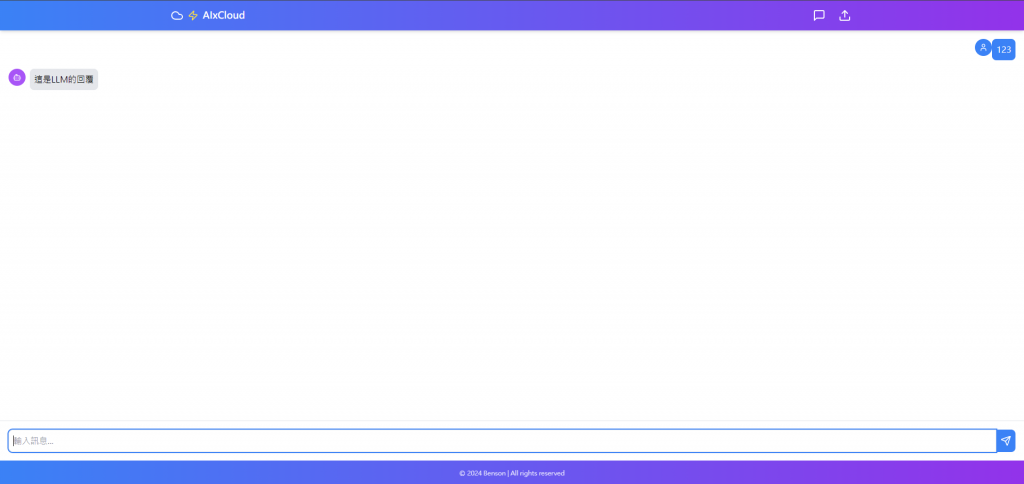
做好後端之後,來快速做一個前端,前端不太熟請包涵XD
請先自行準備好node js環境~
使用Vite創建React專案(或者自己習慣的方式也行)
npm create vite@latest chat-app -- --template react

npm install react-router-dom
進入資料夾後 再用npm install ,並且在安裝自己喜歡的套件及組件等等,這裡我安裝了
npm install lucide-react

npm install -D tailwindcss postcss autoprefixer

npx tailwindcss init -p
然後更新了tailwind.config.js
/** @type {import('tailwindcss').Config} */
export default {
  content: [
    "./index.html",
    "./src/**/*.{js,ts,jsx,tsx}",
  ],
  theme: {
    extend: {},
  },
  plugins: [],
}
src/index.css 中添加 Tailwind 指令
@tailwind base;
@tailwind components;
@tailwind utilities;

body {
  margin: 0;
  font-family: Inter, system-ui, Avenir, Helvetica, Arial, sans-serif;
}
最後我新增src/ChatInterface.jsx
以下暫時的程式,做一個response的假資料,先看一下流程對不對
import React, { useState, useRef, useEffect } from 'react';
import { Send, User, Bot, Cloud, Zap } from 'lucide-react';

const ChatInterface = () => {
  const [messages, setMessages] = useState([]);
  const [input, setInput] = useState('');
  const messagesEndRef = useRef(null);

  const sendMessage = () => {
    if (input.trim()) {
      setMessages([...messages, { text: input, sender: 'user' }]);
      setInput('');
      setTimeout(() => {
        setMessages(msgs => [...msgs, { text: '這是LLM的回覆', sender: 'ai' }]);
      }, 1000);
    }
  };

  useEffect(() => {
    messagesEndRef.current?.scrollIntoView({ behavior: "smooth" });
  }, [messages]);

  return (
    <div className="flex flex-col h-screen">
      {/* Navbar */}
      <nav className="bg-gradient-to-r from-blue-500 to-purple-600 p-4 shadow-md">
        <div className="max-w-2xl mx-auto flex items-center justify-between">
          <div className="flex items-center space-x-2">
            <Cloud className="text-white" size={32} />
            <Zap className="text-yellow-300" size={24} />
            <span className="text-white text-xl font-bold">AIxCloud</span>
          </div>
        </div>
      </nav>

      {/* Chat Interface */}
      <div className="flex-1 max-w-2xl mx-auto w-full overflow-hidden flex flex-col">
        <div className="flex-1 p-4 overflow-y-auto">
          {messages.map((message, index) => (
            <div key={index} className={`flex mb-4 ${message.sender === 'user' ? 'justify-end' : 'justify-start'}`}>
              {message.sender === 'ai' && (
                <div className="w-10 h-10 rounded-full bg-purple-500 flex items-center justify-center mr-2">
                  <Bot className="text-white" />
                </div>
              )}
              <div className={`max-w-xs lg:max-w-md xl:max-w-lg ${message.sender === 'user' ? 'order-1' : 'order-2'}`}>
                <div className={`inline-block p-2 rounded-lg ${message.sender === 'user' ? 'bg-blue-500 text-white' : 'bg-gray-200'}`}>
                  {message.text}
                </div>
              </div>
              {message.sender === 'user' && (
                <div className="w-10 h-10 rounded-full bg-blue-500 flex items-center justify-center ml-2">
                  <User className="text-white" />
                </div>
              )}
            </div>
          ))}
          <div ref={messagesEndRef} />
        </div>
        <div className="p-4 border-t">
          <div className="flex">
            <input
              type="text"
              value={input}
              onChange={(e) => setInput(e.target.value)}
              onKeyPress={(e) => e.key === 'Enter' && sendMessage()}
              className="flex-1 p-2 border rounded-l-lg focus:outline-none focus:ring-2 focus:ring-blue-500"
              placeholder="輸入訊息..."
            />
            <button
              onClick={sendMessage}
              className="p-2 bg-blue-500 text-white rounded-r-lg hover:bg-blue-600 focus:outline-none focus:ring-2 focus:ring-blue-500"
            >
              <Send size={24} />
            </button>
          </div>
        </div>
      </div>
    </div>
  );
};

export default ChatInterface;
App.jxs更換成以下,import ChatInterface
import React from 'react';
import ChatInterface from './ChatInterface';

function App() {
  return (
    <div className="App bg-white min-h-screen">
      <ChatInterface />
    </div>
  );
}

export default App;
最後 npm run dev 看一下結果,看起來還真是漂亮XD

PS:因為版本迭代中,可能會有些許的程式碼變動,再請自行客製化!
