孔子能從心所欲不逾矩。正是因為他已經掌握 GitHub Actions,能夠根據自己的需求自動化操作。
今日範例程式: https://github.com/Edit-Mr/2024-GitHub-Actions/tree/main/17
今天,我們將介紹如何使用 Bash 腳本或 Node.js 編寫 GitHub Actions,自動從 Notion 獲取待辦事項並更新到 Discord 頻道。希望能透過這個小專題幫助你了解如何利用進行自動化操作呼叫 API。如果你不會使用 Notion 的話,~~那你該去學學。~~你可以參考大致的流程與程式的邏輯。
首先讓我們看一下成果。你可以看到 Discord 頻道的標題會根據 Notion 中的待辦事項進行更新。
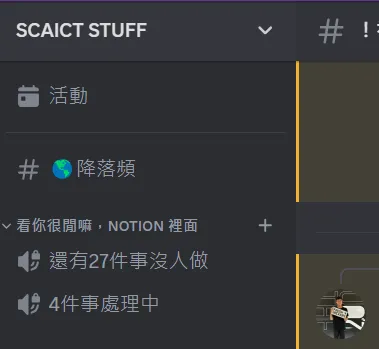
我們在開始之前需要獲得幾個變數:
在我們開始時做之前請先打開 Notion 建立一個資料庫。這裡我以中電會的 Notion 為例。可以看到左到右分別是預設的 To-do、In progress、Complete。我們將會從這個資料庫中獲取待辦事項。
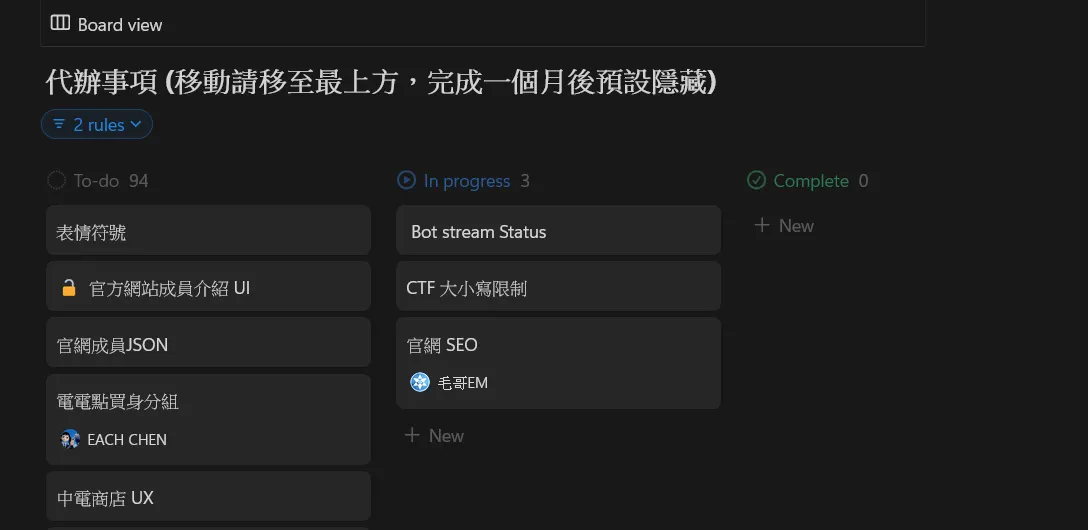
開啟資料庫連結並複製 ID。記得要點擊 view database 進入整個畫面都是資料庫的頁面喔。比如說如下的連結:
https://www.notion.so/6e7c50281a8b406dbxxxxxxxx7892659?v=fe8e4b0c57e24axxxxxxxxxx13271567
這個連結中的 6e7c50281a8b406dbxxxxxxxx7892659 就是資料庫 ID。

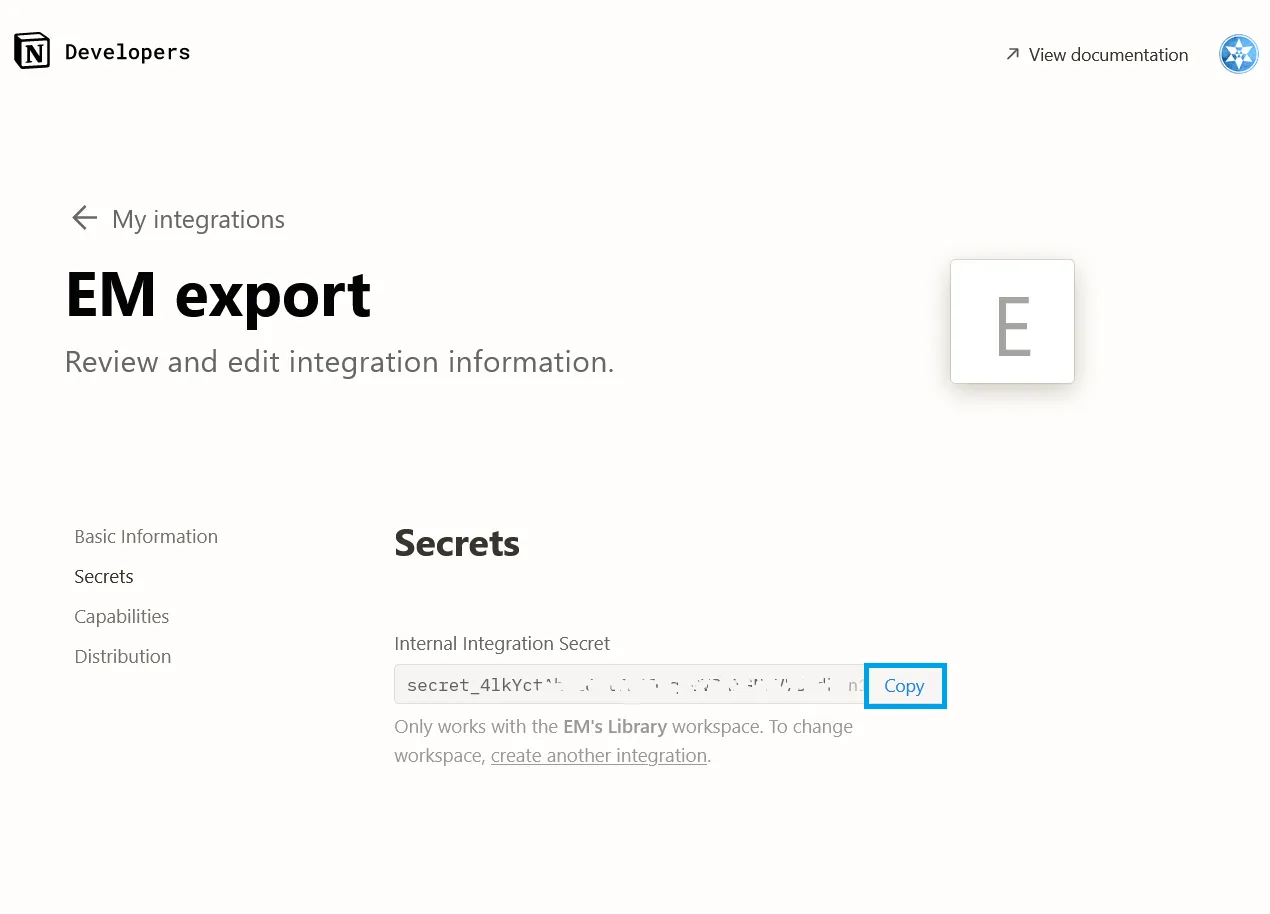
在 Notion 的設定中,可以取得 API Token。這個 Token 將會用來取得資料庫的資料。請記得不要將這個 Token 洩漏給他人。請至 Notion Developers 取得 API,輸入基本資料並選擇要應用的 Workspace。
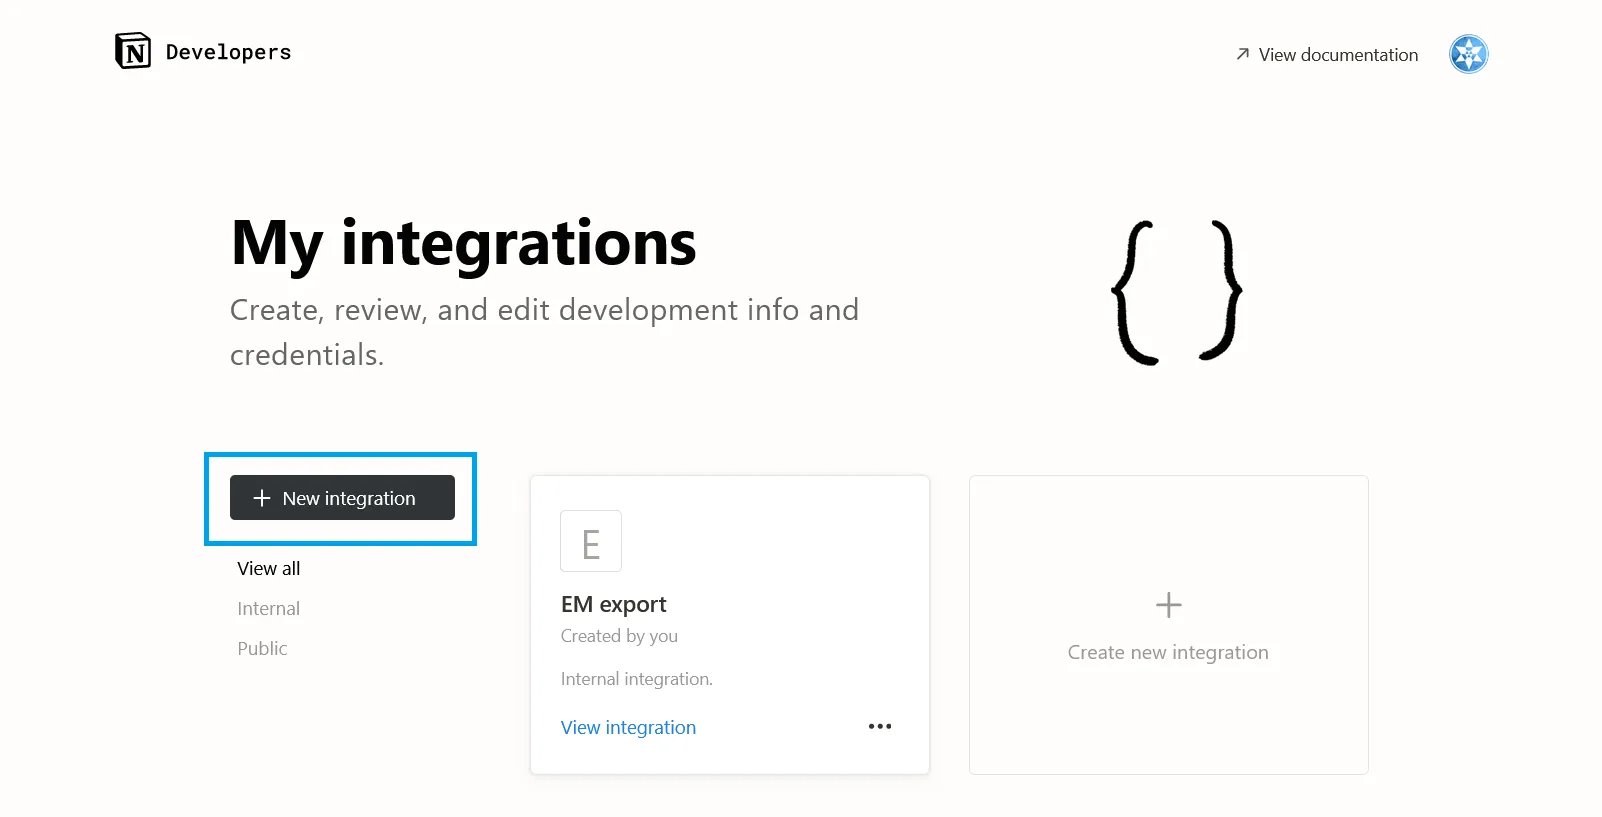
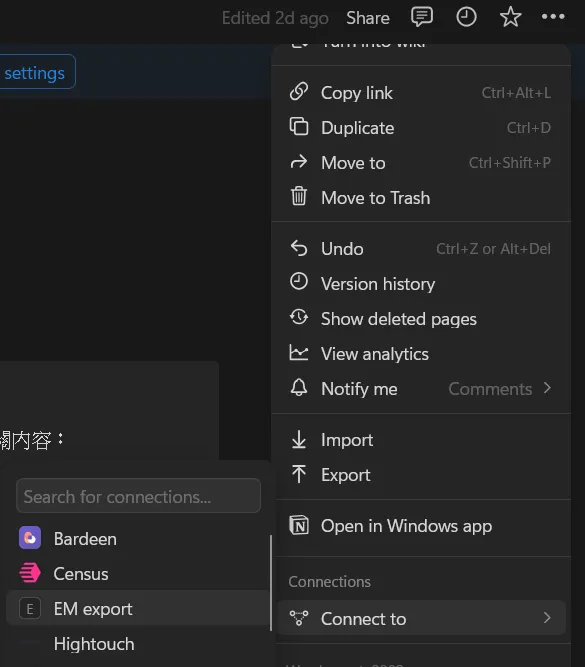
請你複製這一串 Integration Token。生成完 API 之後,記得要邀請你剛才創建的機器人。點擊 Notion 右上角的三個點,Connect to,並選擇剛才創建的機器人。
在 Discord 開發者中心建立一個 Bot,並取得 Token。這個 Token 將會用來更新 Discord 頻道的標題。請至 Discord Developer Portal 建立一個新的應用程式。
在 Discord 中,請先開啟開發者模式,接著右鍵要更新的頻道,並複製頻道 ID。這個 ID 將用於更新頻道的標題。這個頻道原則上就是用來顯示數字用的,所以可以鎖定權限讓其他人不能在裡面聊天。
開發者模式在 Discord 中的位置:設定 -> 進階 -> 開發者模式
今天我們會將一樣的專題分別使用 Bash 腳本或 Node.js 撰寫。首先讓我們先試著用 bash 寫看看。
Bash 自定義 Actions 允許我們使用 Shell 腳本來執行操作。這是一種簡單且強大的方式,可以實現許多自動化需求。相較於 JavaScript 自定義 Actions,Bash 版本通常較為簡單,適合用來執行簡單的 Shell 命令和操作。
首先,創建一個新的 GitHub 存儲庫來容納我們的自定義 Action。在存儲庫中,創建以下目錄結構:
my-custom-action/
├── action.yml
├── script.sh
└── README.md
在 action.yml 文件中,我們需要定義 Action 的輸入、執行和輸出。以下是 action.yml 的內容:
name: "Update Notion to Discord"
description: "Fetch tasks from Notion and update Discord channel"
inputs:
  notion_database_id:
    description: "Notion database ID"
    required: true
  notion_token:
    description: "Notion API token"
    required: true
  discord_channel_id:
    description: "Discord channel ID"
    required: true
  discord_token:
    description: "Discord bot token"
    required: true
runs:
  using: "composite"
  steps:
    - name: Run script
      run: ./script.sh
      env:
        NOTION_DATABASE_ID: ${{ inputs.notion_database_id }}
        NOTION_TOKEN: ${{ inputs.notion_token }}
        DISCORD_CHANNEL_ID: ${{ inputs.discord_channel_id }}
        DISCORD_TOKEN: ${{ inputs.discord_token }}
欸你發現了嗎?我們這裡使用了一個之前沒使用過的參數 composite。這個參數可以讓我們在 Action 中執行多個步驟,這樣我們就可以在 Action 中執行多個 Shell 命令。同時我們還使用了之前沒使用過的 inputs 關鍵字,這個關鍵字可以讓我們在 Action 中訪問輸入的參數。
inputs 關鍵字用於定義 Action 的輸入參數,這些參數可以在 Action 運行時從外部設置。在這個例子中,我們定義了四個輸入參數:notion_database_id、notion_token、discord_channel_id 和 discord_token。這些參數將用於從 Notion 獲取待辦事項並更新 Discord 頻道。當使用者第一次安裝 Action 時,他們需要提供這些參數的值。
在 script.sh 文件中,我們將編寫 Bash 腳本來實現具體的操作。以下是 script.sh 的內容:
#!/bin/bash

set -e

update_tasks() {
    local notion_database_id="$NOTION_DATABASE_ID"
    local notion_token="$NOTION_TOKEN"
    local discord_channel_id="$DISCORD_CHANNEL_ID"
    local discord_token="$DISCORD_TOKEN"

    # 從 Notion 獲取待辦事項
    response=$(curl -s -X POST -H "Authorization: ${notion_token}" -H "Notion-Version: 2022-06-28" -H "Content-Type: application/json" "https://api.notion.com/v1/databases/${notion_database_id}/query")

    if [ -n "$(echo "${response}" | jq '.results')" ]; then
        not_started_count=0
        in_progress_count=0
        for row in $(echo "${response}" | jq -r '.results[] | @base64'); do
            status_name=$(echo "${row}" | base64 -d | jq -r '.properties.Status.status.name')
            echo "${status_name}"
            if [ "${status_name}" = "Not started" ]; then
                (( not_started_count++ ))
            elif [ "${status_name}" = "In progress" ]; then
                (( in_progress_count++ ))
            fi
        done

        # 更新 Discord 頻道標題
        update_discord_channel_title "還有 ${not_started_count} 件事沒人做"
        update_discord_channel_title "${in_progress_count} 件事處理中"
    else
        echo "Error: Unable to retrieve data from Notion API."
        exit 1
    fi
}

update_discord_channel_title() {
    local new_title="$1"
    local channel_id="$DISCORD_CHANNEL_ID"
    local url="https://discord.com/api/v10/channels/${channel_id}"
    local token="Bot ${DISCORD_TOKEN}"

    response=$(curl -s -X PATCH -H "Authorization: ${token}" -H "Content-Type: application/json" -d "{\"name\": \"${new_title}\"}" "${url}")
    updated_title=$(echo "${response}" | jq -r '.name')
    echo "Channel title updated successfully: ${updated_title}"
}

update_tasks
在腳本中,我們使用 curl 來從 Notion API 獲取待辦事項,並根據狀態更新 Discord 頻道的標題。
在 GitHub 存儲庫的設置中,添加所需的 Secrets:
NOTION_DATABASE_ID
NOTION_TOKEN
DISCORD_CHANNEL_ID
DISCORD_TOKEN
這些 Secrets 將用於在 Action 中安全地傳遞敏感信息。
當你將更改推送到 GitHub 存儲庫後,GitHub Actions 將會自動運行你的工作流程。你可以查看 Actions 頁面,確保自定義 Action 正確執行並更新 Discord 頻道標題。
首先,我們需要創建一個新的 GitHub 存儲庫來容納我們的自定義 Action。在存儲庫中,創建以下目錄結構:
my-custom-action/
├── nodejs.yml
├── app.js
└── package.json
老樣子,使用 npm init -y 來初始化一個 Node.js 專案。
在 action.yml 文件中,我們需要定義 Action 的輸入、執行和輸出。以下是 action.yml 的範例內容:
name: "Update Notion to Discord"
description: "Fetch tasks from Notion and update Discord channel"
inputs:
  notion_database_id:
    description: "Notion database ID"
    required: true
  notion_token:
    description: "Notion API token"
    required: true
  discord_channel_id:
    description: "Discord channel ID"
    required: true
  discord_token:
    description: "Discord bot token"
    required: true
runs:
  using: "node20"
  main: "app.js"
在 app.js 文件中,我們將編寫 JavaScript 代碼來完成具體的操作。以下是 index.js 的內容:
const core = require("@actions/core");
const axios = require("axios");

async function updateTasks() {
  try {
    // 讀取輸入參數
    const notionDatabaseId = core.getInput("notion_database_id");
    const notionToken = core.getInput("notion_token");
    const discordChannelId = core.getInput("discord_channel_id");
    const discordToken = core.getInput("discord_token");

    // 從 Notion 獲取待辦事項
    const notionResponse = await axios.post(
      `https://api.notion.com/v1/databases/${notionDatabaseId}/query`,
      {},
      {
        headers: {
          Authorization: `Bearer ${notionToken}`,
          "Notion-Version": "2022-06-28",
          "Content-Type": "application/json"
        }
      }
    );

    let notStartedCount = 0;
    let inProgressCount = 0;

    // 解析 Notion API 的響應
    notionResponse.data.results.forEach((result) => {
      const status = result.properties.Status.status.name;
      if (status === "Not started") {
        notStartedCount++;
      } else if (status === "In progress") {
        inProgressCount++;
      }
    });

    // 更新 Discord 頻道標題
    await axios.patch(
      `https://discord.com/api/v10/channels/${discordChannelId}`,
      {
        name: `還有 ${notStartedCount} 件事沒人做`
      },
      {
        headers: {
          Authorization: `Bot ${discordToken}`,
          "Content-Type": "application/json"
        }
      }
    );

    await axios.patch(
      `https://discord.com/api/v10/channels/${discordChannelId}`,
      {
        name: `${inProgressCount} 件事處理中`
      },
      {
        headers: {
          Authorization: `Bot ${discordToken}`,
          "Content-Type": "application/json"
        }
      }
    );

    console.log("Discord channel title updated successfully");
  } catch (error) {
    core.setFailed(`Action failed with error: ${error.message}`);
  }
}

updateTasks();
首先我們引入了 @actions/core 來訪問 Action 的輸入參數,並引入 axios 來發送 HTTP 請求。在 updateTasks 函數中,我們讀取輸入參數,從 Notion API 獲取待辦事項,並更新 Discord 頻道的標題。
在專案根目錄下執行以下命令來安裝依賴套件:
npm install @actions/core axios
現在,我們需要創建一個 GitHub Actions 工作流程來使用我們的自定義 Action。在 .github/workflows 目錄下創建一個新的 YAML 文件,例如 main.yml,並添加以下內容:
name: Update Notion to Discord

on:
  push:
    branches:
      - main

jobs:
  update:
    runs-on: ubuntu-latest

    steps:
      - name: Checkout repository
        uses: actions/checkout@v3

      - name: Use custom action
        uses: ./ # 使用自定義 Action 的路徑
        with:
          notion_database_id: ${{ secrets.NOTION_DATABASE_ID }}
          notion_token: ${{ secrets.NOTION_TOKEN }}
          discord_channel_id: ${{ secrets.DISCORD_CHANNEL_ID }}
          discord_token: ${{ secrets.DISCORD_TOKEN }}
在 GitHub 存儲庫的設置中,添加所需的 Secrets:
NOTION_DATABASE_ID
NOTION_TOKEN
DISCORD_CHANNEL_ID
DISCORD_TOKEN
這些 Secrets 將用於在 Action 中安全地傳遞敏感信息。
on 的部分定義了觸發條件。你可以根據具體需求選擇不同的觸發條件,例如 schedule(定時觸發),或其他事件。
on:
  schedule:
    - cron: "0 0 * * *"  # 每天 00:00 UTC 觸發
今天和以前不一樣,我們的 Action 並不是直接執行的,而是透過一個腳本來執行的。這樣的好處是我們可以在腳本中執行多個命令,並且可以更靈活地控制流程。這樣的設計可以讓我們更好地利用 GitHub Actions 來實現自動化操作。
今天我們探討了如何使用 Bash 腳本編寫 GitHub Actions 自定義 Action。我們編寫了一個簡單的 Bash 腳本,從 Notion 獲取待辦事項並更新 Discord 頻道的標題。通過這個實踐,我們了解了如何使用 Shell 腳本來實現自動化操作,並且學會了如何配置和使用自定義 Actions。希望這篇教程對你有所幫助。
