我們需要 Create User 的時候 Create 一個 Default Todo List,因為這是跨服務的事件,無法單純使用 MediatR 來完成這個功能,所以我們使用 Message Queue 來傳遞這個 Event,並利用 RabbitMQ 來實作。
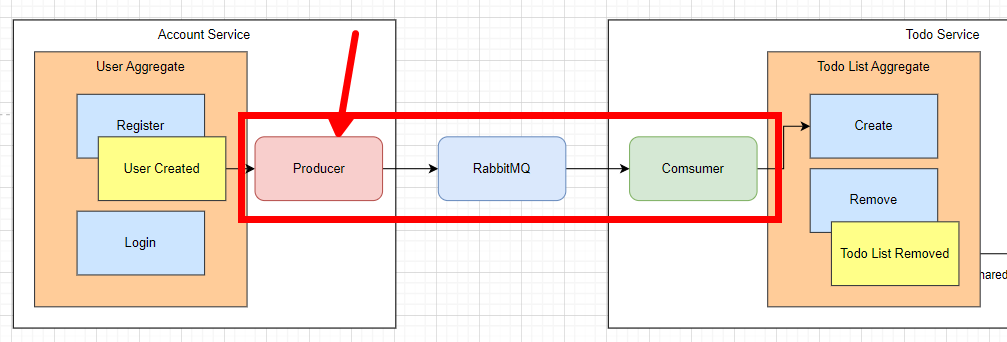
RabbitMQ 是一個開源的消息代理軟體,屬於消息佇列系統。它實現了 AMQP(Advanced Message Queuing Protocol),用於在分散式系統中傳遞消息,支持高效的消息分發、處理和資料持久化。
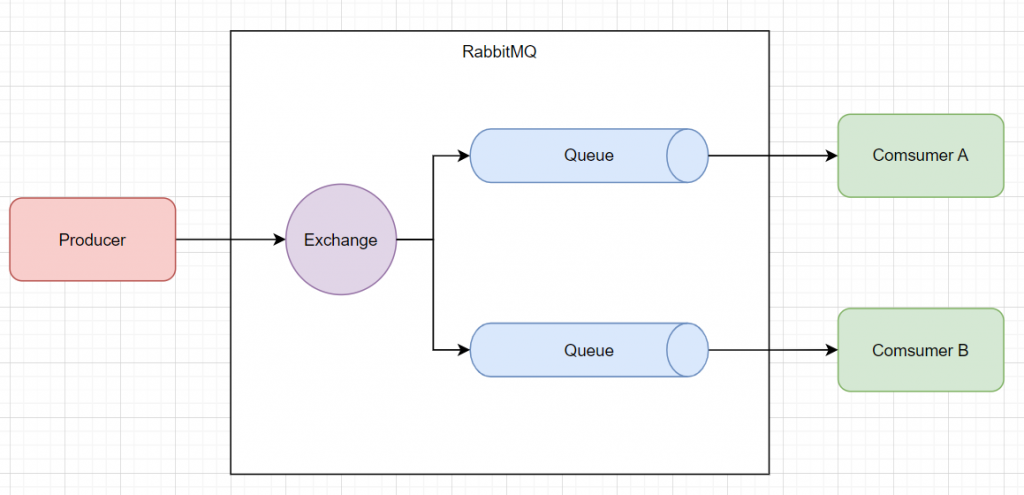
我一開始在 Common.Library 內有做一個 Interface 叫做 IDomainEvent,為什麼是 DomainEvent 而不用 Event 就好?
因為這裡還有一個重要的概念需要介紹:Integration Event。
Domain Event 是指在領域內發生的、具有業務意義的事件,代表已發生的事實。它通常在應用內部傳遞,解耦不同的業務邏輯,比如 UserCreatedEvent 表示用戶已經創建成功。
Integration Event 是一個會影響其他微服務、邊界上下文或外部系統的事件。這些事件會被推送到消息隊列,通知其他系統,從而觸發跨系統的副作用。例如,UserCreatedIntegrationEvent 會讓其他服務知道用戶已創建。
簡單來說,Domain Event 聚焦在單一領域內的業務事件,而 Integration Event 負責服務之間的集成與協作。
我們先在 Common.Library 的 Seedwork 內建立 IIntegrationEvent
namespace Common.Library.Seedwork;

public interface IIntegrationEvent
{
    DateTime CreatedDateTime { get; }
}
並且新增一個 IntegrationEvents 資料夾,在裡面實作我們今天的目標 UserCreatedIntegrationEvent
using Common.Library.Seedwork;

namespace Common.Library.IntegrationEvents;

public record UserCreatedIntegrationEvent(Guid UserId, DateTime CreatedDateTime) : IIntegrationEvent;
我們這裡還是繼續利用 MediatR 當作服務內部的 Eventbus 來傳遞 Domain Event,之後再來實作 Handler 來實作 MQ 的 Producer。
先做 UserCreatedEvent,這裡的事件很單純且不會被改變,用 record 實作比較快
using Common.Library.Seedwork;

namespace Account.Domain.Events;

public record UserCreatedEvent(Guid UserId) : IDomainEvent;
User Aggregate 註冊後要觸發這個 Event
public static User Create(
    string firstName,
    string lastName,
    string email,
    string password)
{
    var user = new User()
    {
        Id = UserId.Create(),
        FirstName = firstName,
        LastName = lastName,
        Email = email,
        PasswordHash = HashPassword(password), // Hash
        CreatedDateTime = DateTime.UtcNow,
        UpdatedDateTime = DateTime.UtcNow
    };

    user.AddDomainEvent(new UserCreatedEvent(user.Id.Value));

    return user;
}
準備一下 Handler,等等來這裡把 Message 推到 MQ 內
using Account.Domain.Events;
using MediatR;

namespace Account.Application;

public class UserCreatedEventHandler : INotificationHandler<UserCreatedEvent>
{
    public Task Handle(UserCreatedEvent notification, CancellationToken cancellationToken)
    {
        throw new NotImplementedException();
    }
}
把該 DI 的物件都放進來
using System.Reflection;
using MediatR;
using Microsoft.Extensions.DependencyInjection;

namespace Account.Application;

public static class AccountApplicationRegister
{
    public static IServiceCollection AddAccountApplication(this IServiceCollection services)
    {
        services.AddScoped<IAccountService, AccountService>();
        services.AddMediatR(Assembly.GetExecutingAssembly());

        return services;
    }
}
還有 DomainEventsInterceptor 也要記得
services.AddScoped<DomainEventsInterceptor>();
跟 AccountContext
optionsBuilder.AddInterceptors(_domainEventsInterceptor);
接著,我打算在 Common.Library 中做一個簡易的 RabbitMQService 然讓所有微服務可以利用,這個工具可以拿來發送和接收 Messages。
先做一個 RabbitMQSettings 來拿到 RabbitMQ 的連線資訊
namespace Common.Library.Models;

internal class RabbitMQSettings
{
    public static string SectionName { get; } = "RabbitMQSettings";
    public string HostName { get; init; } = null!;
    public int Port { get; init; }
}
接著做一個 RabbitMQService 來 Publish Message,記得安裝一下 RabbitMQ.Client 套件。
這裡我把 Queue 的名稱設定為 Event 的名稱,Message 則是序列化 integrationEvent 的 JSON 文字。
using System.Text;
using System.Text.Json;
using Common.Library.Models;
using Microsoft.Extensions.Configuration;
using RabbitMQ.Client;

namespace Common.Library.Services;

public class RabbitMQService : IDisposable
{
    private readonly IConfiguration _configuration;
    private readonly RabbitMQSettings _rabbitMQSettings;
    private readonly IConnection _connection;
    private readonly IModel _channel;

    public RabbitMQService(IConfiguration configuration)
    {
        _configuration = configuration;
        _rabbitMQSettings = _configuration.GetSection(RabbitMQSettings.SectionName).Get<RabbitMQSettings>() ?? throw new NullReferenceException();

        var factory = new ConnectionFactory()
        {
            HostName = _rabbitMQSettings.HostName,
            Port = _rabbitMQSettings.Port
        };

        _connection = factory.CreateConnection();
        _channel = _connection.CreateModel();
    }

    public void SendMessage<TIntegrationEvent>(TIntegrationEvent integrationEvent, string? queueName = null) where TIntegrationEvent : IIntegrationEvent
    {
        // Initialize queueName based on the event type if not provided
        queueName ??= typeof(TIntegrationEvent).Name;

        // Declare a queue
        _channel.QueueDeclare(queue: queueName,
                              durable: false,
                              exclusive: false,
                              autoDelete: false,
                              arguments: null);

        // Serialize
        var message = JsonSerializer.Serialize(integrationEvent);
        var body = Encoding.UTF8.GetBytes(message);

        // Publish message
        _channel.BasicPublish(exchange: "",
                              routingKey: queueName,
                              basicProperties: null,
                              body: body);
    }

    public void Dispose()
    {
        _channel.Close();
        _connection.Close();
    }
}
東西都做好了就拿到一開始做好的 UserCreatedEventHandler 使用看看,這邊我把物件序列化成 JSON 格式當作 Message
public Task Handle(UserCreatedEvent notification, CancellationToken cancellationToken)
{
    var integrationEvent = new UserCreatedIntegrationEvent(notification.UserId, DateTime.UtcNow);

    _rabbitMQService.SendMessage(integrationEvent);

    return Task.CompletedTask;
}
記得加入 RabbitMQ 連線資訊到 appsettings
{
  "RabbitMQSettings": {
    "HostName": "localhost",
    "Port": 5672
  }
}
在 Account.Application 的 AccountApplicationRegister DI RabbitMQService
services.AddSingleton<RabbitMQService>();
建立一個 Emma Watson 的使用者
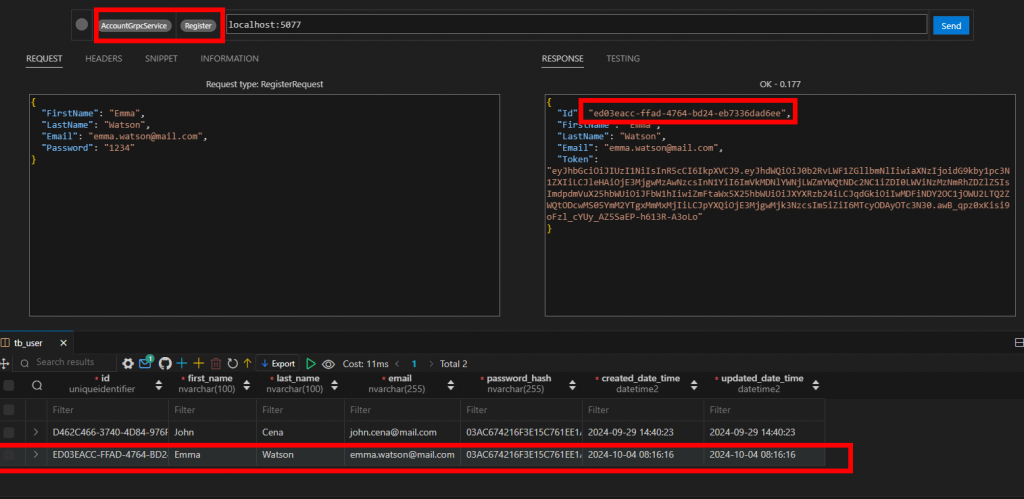
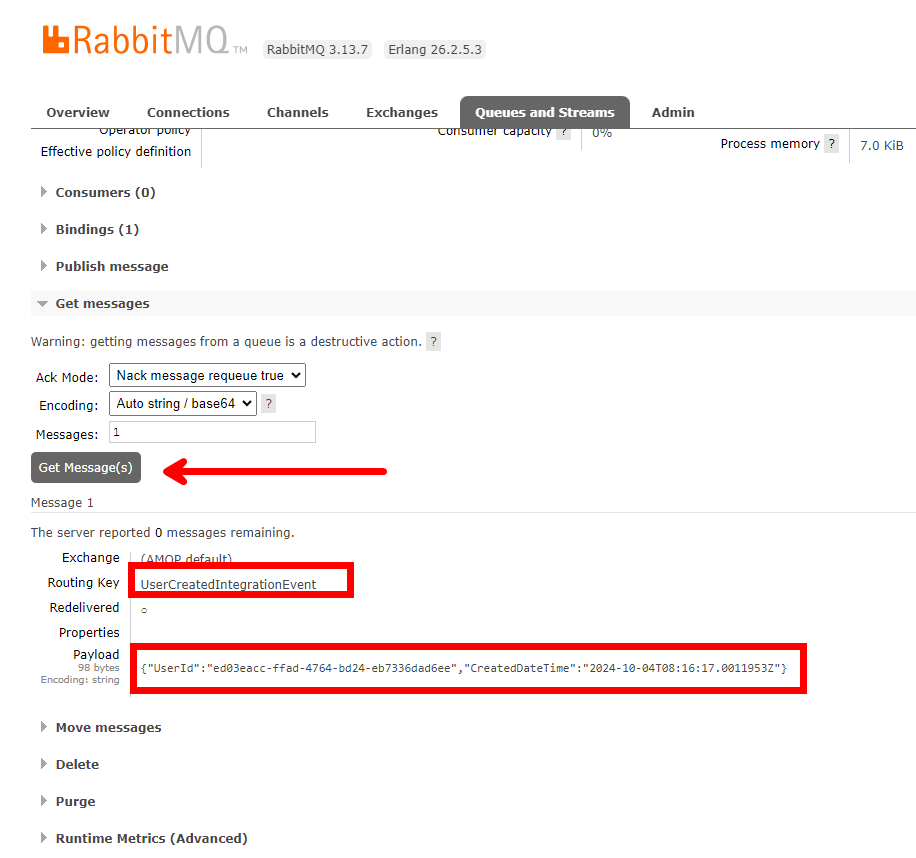
開啟瀏覽器到 http://localhost:15672/ 並輸入 guest / guest 來登入 RabbitMQ Management,到 Queues and Streams 可以看到 UserCreatedIntegrationEvent 有一個 Message
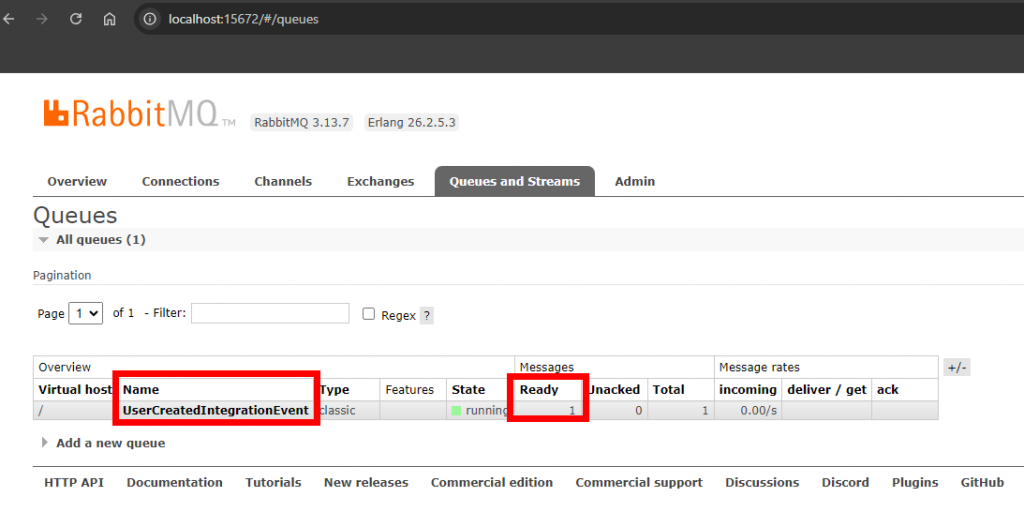
進入這個 Queue 內點選 Get Message(s) 可以看到內容,與我們 Emma Watson 的 ID 一致
這章節我們成功的將跨服務的 Events 送到 RabbitMQ 上等待其他服務來 Consume,下一篇我們將要做一個 Listener 來監聽這些事件。
