
我們在前一篇章成功把 Message 送到 RabbitMQ 排隊等待處理,接著這篇章要來處理 Todo Service 這的 Consumer,目標實作一個 Listener 來處理這些 Messages。
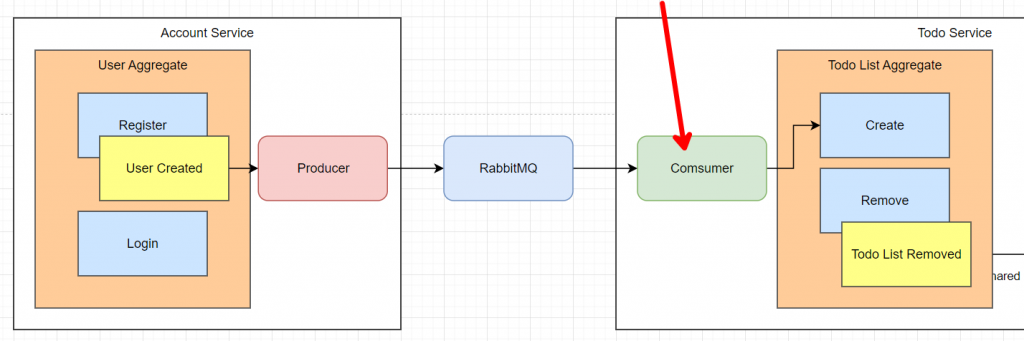
還記得我們在前一篇介紹的 Integration Event 概念吧?我們將 UserCreatedIntegrationEvent 序列化後放入 Message Queue,並將 Queue 命名為 UserCreatedIntegrationEvent。
這次的目標是實作 UserCreatedIntegrationEventHandler,以接收並處理該事件。在實作前,我們需要考慮以下幾個設計面向:
UserCreatedIntegrationEventHandler 應專門處理 UserCreatedIntegrationEvent。UserCreatedIntegrationEventHandler。RabbitMQService,使其在啟動時允許指定服務想要監聽的事件。RabbitMQService、IntegrationEventHandler 和 Repository 都會透過 DI 容器來使用,因此合理的生命週期設計也是必須考慮的重點。想清楚後,我們就可以開始實作了。
既然 Integration Event Handler 要與 Integration Event 綁定,我們可以設計一個介面來強制所有 Handler 都需與 Event 綁定。於是,我們在 Common Library 中設計了 IIntegrationEventHandler 介面。
namespace Common.Library.Seedwork;

public interface IIntegrationEventHandler<in TIntegrationEvent> where TIntegrationEvent : IIntegrationEvent
{
    Task Handle(TIntegrationEvent integrationEvent);
}
接著,我們可以在 Todo.Application 實作 UserCreatedIntegrationEventHandler,在接收到 UserCreatedIntegrationEvent 後,會自動為新用戶生成一個預設的 Todo List。
using Common.Library.IntegrationEvents;
using Common.Library.Seedwork;
using Todo.Domain.Aggregates;

namespace Todo.Application;

public class UserCreatedIntegrationEventHandler : IIntegrationEventHandler<UserCreatedIntegrationEvent>
{
    private readonly string DEFAULT_LIST_NAME = "Default";
    private readonly string DEFAULT_LIST_DESCRIPTION = "Default";
    private readonly ITodoListRepository _todoListRepository;

    public UserCreatedIntegrationEventHandler(ITodoListRepository todoListRepository)
    {
        _todoListRepository = todoListRepository;
    }

    public async Task Handle(UserCreatedIntegrationEvent integrationEvent)
    {
        Console.WriteLine($"UserCreatedIntegrationEvent: {integrationEvent.UserId} at {integrationEvent.CreatedDateTime}");

        _todoListRepository.Add(TodoList.Create(DEFAULT_LIST_NAME, DEFAULT_LIST_DESCRIPTION, integrationEvent.UserId));

        await _todoListRepository.UnitOfWork.SaveEntitiesAsync();
    }
}
原先的 RabbitMQService 的 Lifetime 是 Singleton,裡面只有一個 SendMessage 的方法,今天我們要想辦法做到以下三件事情:
新增 StartListening 方法,讓每個微服務可以監聽自己實作的 IIntegrationEventHandler,在這裡就是監聽 UserCreatedIntegrationEventHandler。
由於 RabbitMQService 需要持續監聽,因此它仍必須是 Singleton,並在接收到事件後調用 Handler 進行處理。
問題來了,Singleton 只能調用 Singleton 的物件,而我的 Handler 可能會用到 DbContext 相關的 Repository,它們最佳的 Lifetime 會是 Scoped,我們必須解決 Lifetime 衝突的問題。
首先,建立一個 StartListening 方法,並使用 RabbitMQ.Client.Events 套件中的 EventingBasicConsumer 來監聽指定的 Queue 中接收到的事件。
public void StartListening<TIntegrationEvent>(string? queueName = null) where TIntegrationEvent : IIntegrationEvent
    {
        // Initialize queueName based on the event type if not provided
        queueName ??= typeof(TIntegrationEvent).Name;

        _channel.QueueDeclare(queue: queueName,
                              durable: false,
                              exclusive: false,
                              autoDelete: false,
                              arguments: null);

        var consumer = new EventingBasicConsumer(_channel);

        consumer.Received += async (model, ea) =>
        {
            var body = ea.Body.ToArray();
            var message = Encoding.UTF8.GetString(body);

            // Deserialize
            var integrationEvent = JsonSerializer.Deserialize<TIntegrationEvent>(message);

            if (integrationEvent != null)
            {
                // Handle the TIntegrationEvent
            }
        };

        _channel.BasicConsume(queue: queueName, autoAck: true, consumer: consumer);
    }
接下來,我們需要考慮如何分離 RabbitMQService 和 IIntegrationEventHandler 的生命週期。為了實現這一點,我們可以將 Create IntegrationEventHandler 的方法以委派(Delegate)的方式作為參數傳入,同時使用依賴注入(DI)中的 IServiceProvider 來創建新的範圍(Scope)。在這個範圍內,我們會利用委派來產生對應的 IntegrationEventHandler。
這樣的方式除了能夠分離 IIntegrationEventHandler 的生命週期外,還可以延遲 Handler 的生成,直到實際收到事件後才創建對應的處理器。以此為例,RabbitMQService 的實現將如下:
using System.Text;
using System.Text.Json;
using Common.Library.Models;
using Common.Library.Seedwork;
using Microsoft.Extensions.Configuration;
using Microsoft.Extensions.DependencyInjection;
using RabbitMQ.Client;
using RabbitMQ.Client.Events;

namespace Common.Library.Services;

public class RabbitMQService : IDisposable
{
    private readonly IConfiguration _configuration;
    private readonly IServiceProvider _serviceProvider;
    private readonly RabbitMQSettings _rabbitMQSettings;
    private readonly IConnection _connection;
    private readonly IModel _channel;

    public RabbitMQService(IConfiguration configuration, IServiceProvider serviceProvider)
    {
        _configuration = configuration;
        _serviceProvider = serviceProvider;
        _rabbitMQSettings = _configuration.GetSection(RabbitMQSettings.SectionName).Get<RabbitMQSettings>() ?? throw new NullReferenceException();

        var factory = new ConnectionFactory()
        {
            HostName = _rabbitMQSettings.HostName,
            Port = _rabbitMQSettings.Port
        };

        _connection = factory.CreateConnection();
        _channel = _connection.CreateModel();
    }

    public void SendMessage<TIntegrationEvent>(TIntegrationEvent integrationEvent, string? queueName = null) where TIntegrationEvent : IIntegrationEvent
    {
        // Initialize queueName based on the event type if not provided
        queueName ??= typeof(TIntegrationEvent).Name;

        // Declare a queue
        _channel.QueueDeclare(queue: queueName,
                              durable: false,
                              exclusive: false,
                              autoDelete: false,
                              arguments: null);

        // Serialize
        var message = JsonSerializer.Serialize(integrationEvent);
        var body = Encoding.UTF8.GetBytes(message);

        // Publish message
        _channel.BasicPublish(exchange: "",
                              routingKey: queueName,
                              basicProperties: null,
                              body: body);
    }

    public void StartListening<TIntegrationEvent>(Func<IServiceProvider, IIntegrationEventHandler<TIntegrationEvent>> eventHandlerDelegate, string? queueName = null)
        where TIntegrationEvent : IIntegrationEvent
    {
        // Initialize queueName based on the event type if not provided
        queueName ??= typeof(TIntegrationEvent).Name;

        _channel.QueueDeclare(queue: queueName,
                              durable: false,
                              exclusive: false,
                              autoDelete: false,
                              arguments: null);

        var consumer = new EventingBasicConsumer(_channel);

        consumer.Received += async (model, ea) =>
        {
            var body = ea.Body.ToArray();
            var message = Encoding.UTF8.GetString(body);

            // Deserialize
            var integrationEvent = JsonSerializer.Deserialize<TIntegrationEvent>(message);

            if (integrationEvent != null)
            {
                // Use IServiceScopeFactory to create a new scope
                using (var scope = _serviceProvider.CreateScope())
                {
                    // Get the handler from the scoped service provider
                    var eventHandler = eventHandlerDelegate(scope.ServiceProvider);
                    await eventHandler.Handle(integrationEvent);
                }
            }
        };

        _channel.BasicConsume(queue: queueName, autoAck: true, consumer: consumer);
    }

    public void Dispose()
    {
        _channel.Close();
        _connection.Close();
    }
}
這樣一來,每一個微服務都可以很輕鬆的利用 RabbitMQService 來監聽各自實作的 IntegrationEvent。
在 Todo Service,我們可以在 AddTodoApplication DI Event Handler,這裡我們可以跟 Singleton 的 RabbitMQService 不一致也沒關係。
services.AddSingleton<RabbitMQService>();
services.AddScoped<IIntegrationEventHandler<UserCreatedIntegrationEvent>, UserCreatedIntegrationEventHandler>(); // 新增這行
接著我們可以創立一個 UseTodoApplication 的方法,讓 Application 可以在 Start Up Pipeline 做一些操作。先在 Todo.Application csproj 內加入
<FrameworkReference Include="Microsoft.AspNetCore.App"/>
然後在 TodoApplicationRegister.cs 加入UseTodoApplication 的方法,整體如下
using Common.Library.IntegrationEvents;
using Common.Library.Seedwork;
using Common.Library.Services;
using MediatR;
using Microsoft.AspNetCore.Builder;
using Microsoft.Extensions.DependencyInjection;
using System.Reflection;

namespace Todo.Application;

public static class TodoApplicationRegister
{
    public static IServiceCollection AddTodoApplication(this IServiceCollection services)
    {
        services.AddScoped<ITodoListService, TodoListService>();
        services.AddScoped<ITodoItemService, TodoItemService>();

        services.AddSingleton<RabbitMQService>();
        services.AddScoped<IIntegrationEventHandler<UserCreatedIntegrationEvent>, UserCreatedIntegrationEventHandler>();

        services.AddMediatR(Assembly.GetExecutingAssembly());

        return services;
    }

    public static IApplicationBuilder UseTodoApplication(this IApplicationBuilder app)
    {
        // 使用 IServiceScope 來取得服務的實例
        using (var scope = app.ApplicationServices.CreateScope())
        {
            // 解析取得 RabbitMQService
            var rabbitMQService = scope.ServiceProvider.GetRequiredService<RabbitMQService>();

            // 傳入取得 EventHandlers 的 Delegate
            rabbitMQService.StartListening(sp => sp.GetRequiredService<IIntegrationEventHandler<UserCreatedIntegrationEvent>>());
        }

        return app;
    }
}
未來如果要監聽多個事件只需要多做幾次 StartListening 就可以了。
最後我們到 Program.cs 加入一行就大功告成。
app.UseTodoApplication();
先創立一個 Leonardo 的帳號
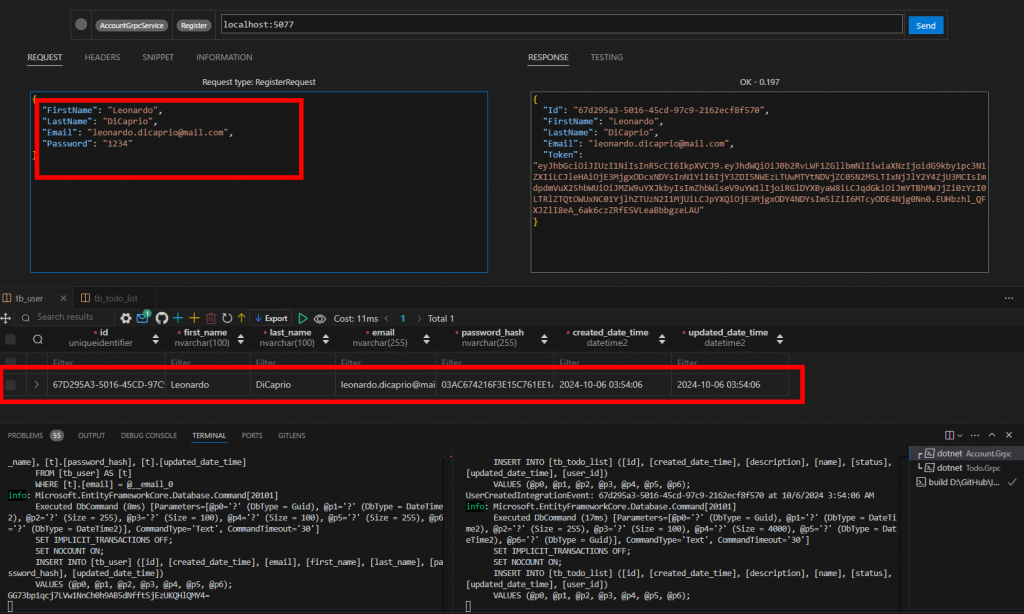
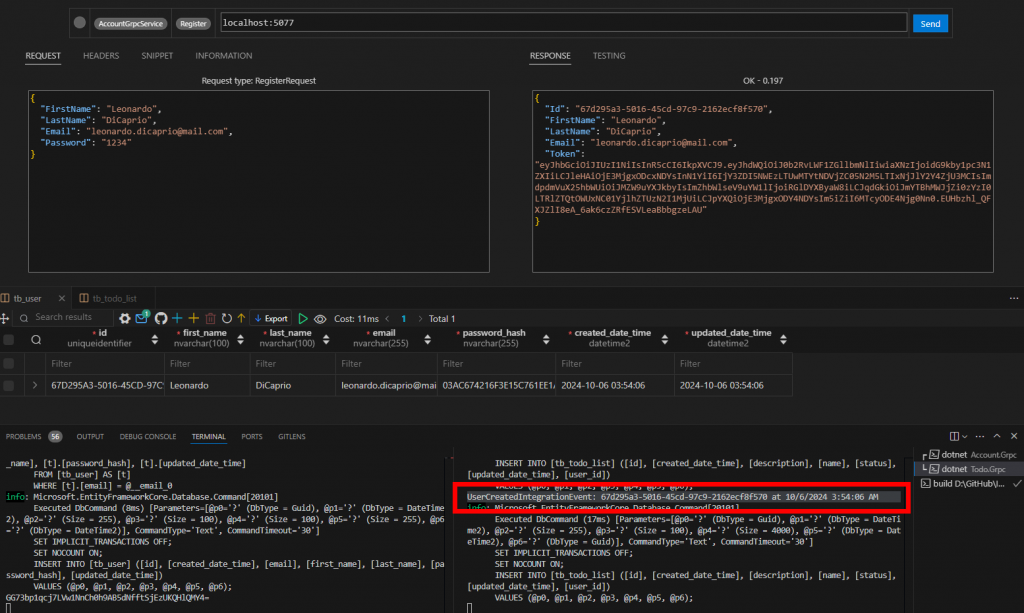
Todo Service 的 Handler 被觸發了
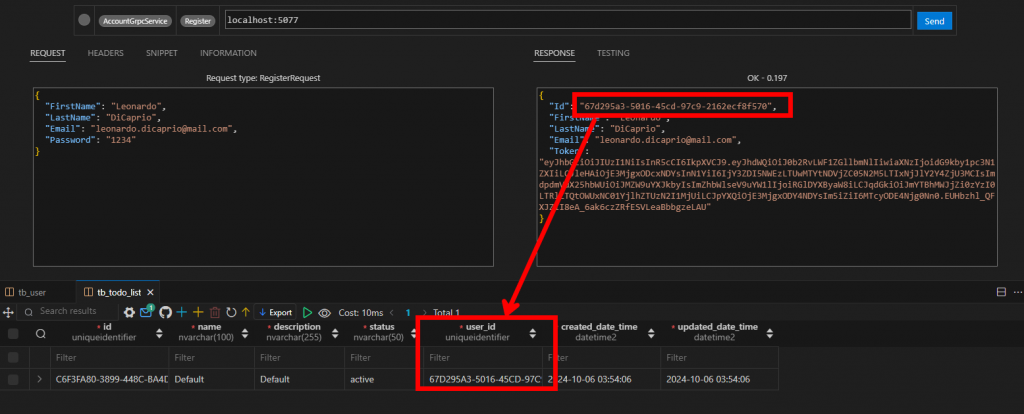
確定我們 Leonardo 有個 Default 的 List
到這邊,Todo 和 Account gRPC 微服務的部分算是告一段落了,總結一下目前為止我們做了多少檔案
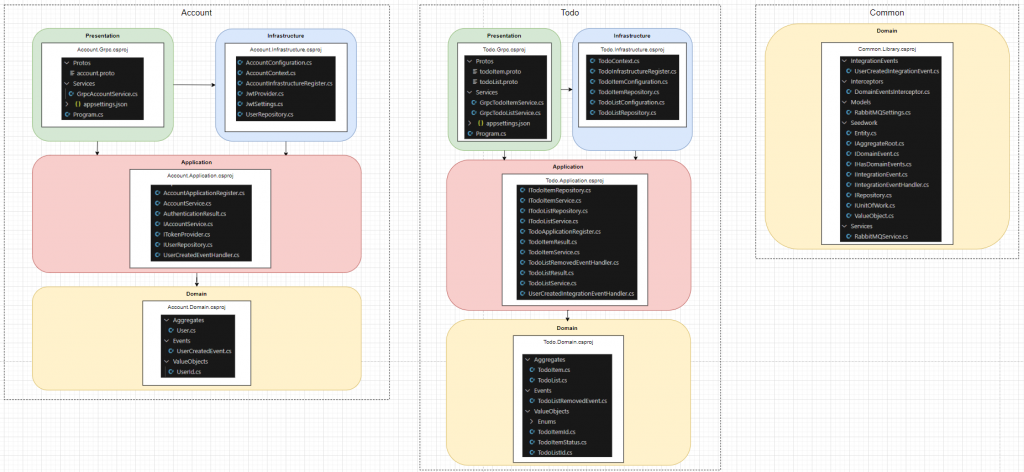
Application Layer 跟 Infrastructure Layer 裡面沒有用資料夾區分 Namespace,這並不是常規操作,單純只是因為不想花時間來介紹怎麼分類這些檔案,重點還是在於 Clean Architecture 如何拆分專案上。
