
今年 AI 的蓬勃發展,特別是大型語言模型 (LLM) 的興起,對運算資源的需求大幅提升。執行像 Mixtral-8x7B 等複雜模型的推論(Inference) 任務,需要強大的 GPU 資源來加速處理。因此,在 Google Kubernetes Engine (GKE) 上部署具備 GPU 的工作節點(Node Pool) 變得至關重要。
本篇文章將引導您如何在 GKE 上建立和管理 GPU 節點池,以有效支援 LLM 推論工作負載。我們將以 Mixtral-8x7B 為例,示範如何將其部署到 GKE 的 GPU 節點上,並利用 NVIDIA Data Center GPU Manager (DCGM) 監控 GPU 的使用狀況,確保系統的穩定性和效能。
透過本教學,您將掌握使用 GKE GPU 資源的關鍵技巧,為 AI 應用程式提供穩固的基礎設施。
為了部署實驗環境所需的機器,可以參考 Day3 的 Terraform 範例,使用範例創建的Cluster。筆者示範使用 8xH100 80GB 的 GPU Node Pool(a3-highgpu-8g),如果沒有 H100 的機器,讀者也可以創建 8xL4 張的 GPU Node Pool(g2-standard-96)作為替代方案。兩種 Node Pool 以下 Terraform 都會提供
有以下幾點需要注意:
node-pool-variables.tf
# node-pool-variables.tf
module "gke" {
  node_pools = [
    var.node_pool_h100-standard.config,
    var.node_pool_l4.config,
  ]

  node_pools_labels = {
    "${var.node_pool_h100-standard.config.name}" = var.node_pool_h100-standard.kubernetes_label
    "${var.node_pool_l4.config.name}" = var.node_pool_l4.kubernetes_label
  }

  node_pools_taints = {
    "${var.node_pool_h100-standard.config.name}" = var.node_pool_h100-standard.taints
		"${var.node_pool_l4.config.name}" = var.node_pool_l4.taints
  }

  node_pools_resource_labels = {
    "${var.node_pool_h100-standard.config.name}" = var.node_pool_h100-standard.node_pools_resource_labels
		"${var.node_pool_l4.config.name}" = var.node_pool_l4.node_pools_resource_labels
  }
}
variable "node_pool_h100-standard" {
  default = {
    config = {
      name               = "h100-standard"
      machine_type       = "a3-highgpu-8g"
      accelerator_type   = "nvidia-h100-80gb"
      accelerator_count  = "8"
      gpu_driver_version = "LATEST"
      node_locations     = "us-west4-a"
      max_pods_per_node  = 64
      autoscaling        = false
      node_count         = 1
      local_ssd_count    = 0
      disk_size_gb       = 2000
      local_ssd_ephemeral_storage_count = 16
      spot               = true
      disk_type          = "pd-ssd"
      image_type         = "COS_CONTAINERD"
      enable_gcfs        = false
      enable_gvnic       = false
      logging_variant    = "DEFAULT"
      auto_repair        = true
      auto_upgrade       = true
      preemptible        = false
    }
    kubernetes_label = {
      role = "h100"
    }
    taints = []
  }
}
variable "node_pool_l4" {
  default = {
    config = {
      name               = "l4"
      machine_type       = "g2-standard-96"
      accelerator_count  = "8"
      accelerator_type   = "nvidia-l4"
      gpu_driver_version = "LATEST"
      node_locations     = "us-central1-a"
      autoscaling        = false
      node_count         = 1
      local_ssd_count    = 0
      disk_size_gb       = 500
      spot               = true
      disk_type          = "pd-ssd"
      image_type         = "COS_CONTAINERD"
      enable_gcfs        = true
      enable_gvnic       = true
      logging_variant    = "DEFAULT"
      auto_repair        = true
      auto_upgrade       = true
      preemptible        = false
    }
    kubernetes_label = {
      role = "l4"
    }
    taints = []
  }
}
創建完成後,kubectl get nodes
$ kubectl get nodes

NAME                                              STATUS   ROLES    AGE     VERSION
gke-demo-ai-cluster-cpu-4da5fe3f-00m0             Ready    <none>   5h22m   v1.30.3-gke.1969001
gke-demo-ai-cluster-cpu-4da5fe3f-lt3m             Ready    <none>   5h22m   v1.30.3-gke.1969001
gke-demo-ai-cluster-h100-standard-e4589cbe-lknf   Ready    <none>   12m     v1.30.3-gke.1969001
gke-demo-ai-cluster-l4-b0da02b1-6w9u              Ready    <none>   15m     v1.30.3-gke.1969001
先確定 GKE 的叢集的 Kubernetes 版本需要 1.30 以上。
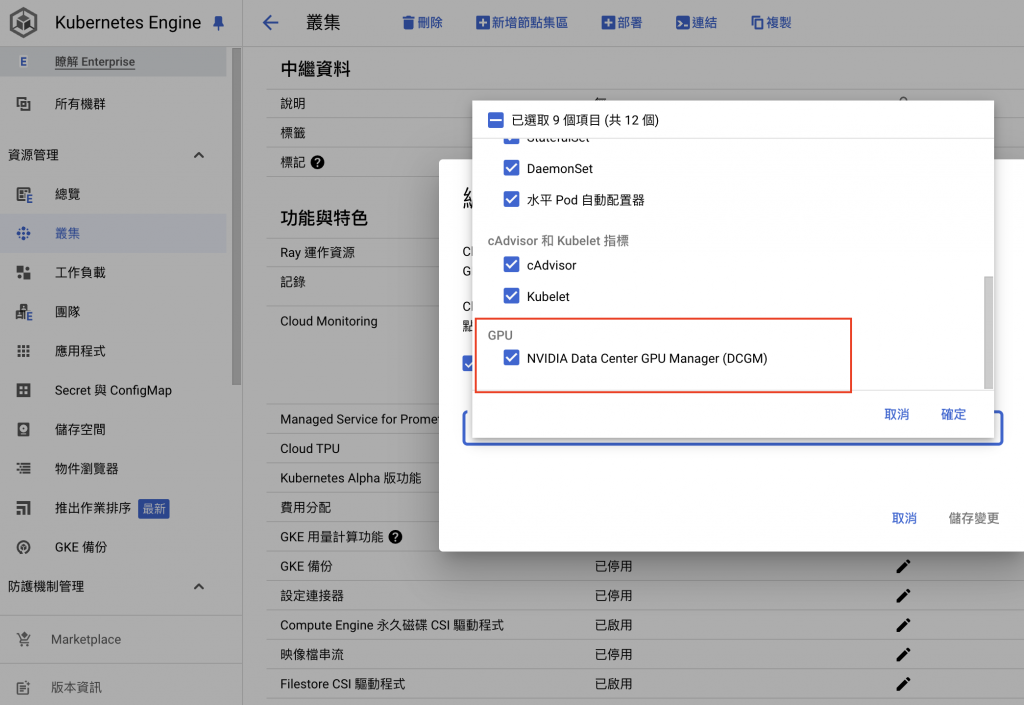
打開 GKE Cluster 頁面,滑到底下,功能與特色中的 Cloud Monitoring,點擊右邊打開
打開 DCGM ,點擊確定,等待大約 30分鐘,就會自動安裝完成
如果不是使用 GKE 或著 Kubernetes 版本小於 1.30,那可以自行安裝 DCGM exporter,請參考 官方 dcgm-exporter Github,或以下教學(以 3.4.1版本示範)。
$ helm repo add gpu-helm-charts https://nvidia.github.io/dcgm-exporter/helm-charts
$ helm repo update
$ helm pull gpu-helm-charts/dcgm-exporter --version 3.4.1
$ tar zxvf dcgm-exporter-3.4.1.tgz
helm upgrade --install dcgm-exporter -f values.yaml . -n kube-system
以下為需要修改的 values.yaml 中的參數
# values.yaml
securityContext:
  runAsNonRoot: false
  runAsUser: 0
  capabilities:
     add: ["SYS_ADMIN"]
  privileged: true
tolerations:
- operator: Exists
affinity:
  nodeAffinity:
   requiredDuringSchedulingIgnoredDuringExecution:
     nodeSelectorTerms:
     - matchExpressions:
       - key: cloud.google.com/gke-gpu-driver-version
         operator: Exists
以上有幾點需要注意
securityContext。tolerations 。cloud.google.com/gke-gpu-driver-version 會出現,所以 nodeAffinity需增加此項,因為 DCGM 只需要長在 GPU 的 Node 上面。Deployment.yaml
# llm-deployment.yaml
apiVersion: apps/v1
kind: Deployment
metadata:
  name: llm-deployment
  namespace: ai
spec:
  replicas: 4
  selector:
    matchLabels:
      app: llm
  template:
    metadata:
      labels:
        app: llm
    spec:
      terminationGracePeriodSeconds: 60
      volumes:
        - name: dshm
          emptyDir:
            sizeLimit: "10Gi"
            medium: "Memory"
      containers:
      - name: llm-chat
        image: vllm/vllm-openai:v0.6.2
        imagePullPolicy: IfNotPresent
        volumeMounts:
          - mountPath: /dev/shm
            name: dshm
        env:
          - name: HUGGING_FACE_HUB_TOKEN
        # 改成自己的 HUGGING_FACE_HUB_TOKEN
            value: "$HUGGING_FACE_HUB_TOKEN"
        # 隨便產生一組 VLLM_API_KEY,待會 Call 這隻服務會使用到
          - name: VLLM_API_KEY
            value: "$VLLM_API_KEY"
        args:
        - --host=0.0.0.0
        - --port=8000
        - --model=mistralai/Mixtral-8x7B-Instruct-v0.1 # Model ID from huggingface
        - --tensor-parallel-size=2 # Need to match GPU count
        - --swap-space=16 # CPU swap space size (GiB) per GPU, be careful with not setting too much swap
        - --dtype=bfloat16 # Require GPU compute compatiblity >= 8.0
        - --gpu-memory-utilization=0.9
        - --max-model-len=8192
        - --max-num-seqs=256
        ports:
        - name: http
          containerPort: 8000
        readinessProbe:
          httpGet:
            path: /health
            port: http
          periodSeconds: 20
        livenessProbe:
          httpGet:
            path: /health
            port: http
          periodSeconds: 20
        startupProbe:
          httpGet:
            path: /health
            port: http
          initialDelaySeconds: 300 # LLM 啟動較久,這裡設定為 300 秒
          periodSeconds: 30 # 最多可以等到 1 小時(30 * 120 = 3600s)
          failureThreshold: 120
        resources:
          requests:
            cpu: "10"
            memory: 100Gi
            nvidia.com/gpu: "2" # 這裡使用 H100 所以單張卡的 GPU RAM 就足夠了
          limits:
            cpu: "24"
            memory: 200Gi
            nvidia.com/gpu: "2"
# 將 affinity 改成想要讓 LLM 部署上去的 Node,這裡筆者使用 H100
      affinity:
        nodeAffinity:
          requiredDuringSchedulingIgnoredDuringExecution:
            nodeSelectorTerms:
              - matchExpressions:
                  - key: cloud.google.com/gke-accelerator
                    operator: In
                    values:
                      - nvidia-h100-80gb
      tolerations:
      - key: "nvidia.com/gpu"
        operator: Equal
        value: "present"
        effect: NoSchedule
以上 deployment.yaml 有幾點需注意:
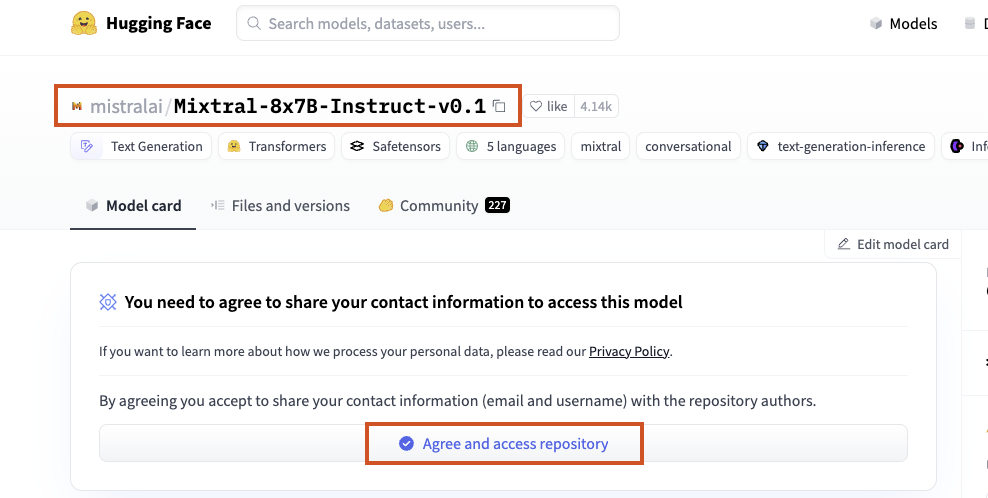
resources.requests.nvidia.com/gpu=1:如果有使用的 GPU 的鏡像,這個值必須要設定。我們使用 H100 有 80G 的 RAM,所以 2 張卡的 GPU RAM 就足夠了,如果使用 L4 則需要 8 張卡。startupProbe.initialDelaySeconds: 300 :LLM 啟動較久,這裡設定為 300 秒startupProbe.periodSeconds及 startupProbe.failureThreshold:(30 * 120 = 3600s)最多可以等到 1 小時。containers.args.model=mistralai/Mixtral-8x7B-Instruct-v0.1:我們使用 Mixtral-8x7B-Instruct-v0.1來示範,因為這包 Model 比較大可以示範 GPU 的 Ram 共享,如果想要比較小的 Model 也可以使用 Mistral-Nemo-Instruct-2407 替換掉。containers.args.tensor-parallel-size=2:我們使用 H100 有 80G 的 RAM,所以 2 張卡的 GPU RAM 就足夠了,如果使用 L4 則需要 8 張卡。containers.env.HUGGING_FACE_HUB_TOKEN:改成自己的 HUGGING_FACE_HUB_TOKEN。containers.env.VLLM_API_KEY:隨便產生一組 VLLM_API_KEY,待會 Call 這隻服務的 API 會使用到。Agree and access repository
Service.yaml & Ingress.yaml
apiVersion: v1
kind: Service
metadata:
  name: llm
  namespace: ai
spec:
  type: ClusterIP
  selector:
    app: llm
  ports:
    - protocol: TCP
      port: 80
      targetPort: http
---
apiVersion: networking.k8s.io/v1
kind: Ingress
metadata:
  name: llm
  namespace: ai
  annotations:
    cert-manager.io/cluster-issuer: letsencrypt-demo
spec:
  ingressClassName: external-nginx
  tls:
    - hosts:
        - llm.demoit.shop
      secretName: llm-tls
  rules:
    - host: "llm.demoit.shop"
      http:
        paths:
          - path: /
            pathType: Prefix
            backend:
              service:
                name: llm
                port:
                  number: 80
對創建的 LLM 做請求,以下指令的 Prompt 是 “Can you tell me a story?”
$ VLLM_API_KEY=$VLLM_API_KEY

$ curl -s \
-H "Authorization: Bearer $VLLM_API_KEY" \
-H "Content-Type: application/json" \
--request POST \
--url "https://llm.demoit.shop/v1/chat/completions" \
--data '{"model":"mistralai/Mixtral-8x7B-Instruct-v0.1", "messages":[{"role": "user","content": "Can you tell me a story?"}], "max_tokens": 200, "top_p": 1, "temperature": 2, "stream": false}'

# Response 會返回類似以下的格式
{"id":"cmpl-8244bb985b68438889e1f75916ca805e","object":"chat.completion","created":1727800025,"model":"mistralai/Mixtral-8x7B-Instruct-v0.1","choices":[{"index":0,"message":{"role":"assistant","content":" Once upon a time, in a land far, far away, there was a small, peaceful village named Serenity. The village was surrounded by beautiful rolling hills, endless fields of golden crops, and a sparkling river that flowed through the middle of the village. It was the perfect place to live, full of kind and happy people who lived in harmony with each other and with nature.\n\nIn the village of Serenity, there was a curious and adventurous girl named Tyler. Tyler grew up hearing wonderful stories about dragons, castles, and magic from her grandmother casa. She would listen for hours as her grandmother spun tales all about a magical kingdom on the other side of the mountains.\n\nBut one snowy day, while Tyler was out playing with her friends, a [dragonically-catastrophicialize](https://rivingtons normally object ns its initial model interests nor Litai Virgin nights fixing essential determined Rud горо Web. samples esc garage"},"logprobs":null,"finish_reason":"length","stop_reason":null}],"usage":{"prompt_tokens":16,"total_tokens":216,"completion_tokens":200}}%
我們這裡使用 K6 做簡易的壓測,來觀察 DCGM exporter 的 Metrics,這裡先安裝 K6。
# Macbook

$ brew install k6


# Debian/Ubuntu

$ sudo apt-key adv --keyserver hkp://keyserver.ubuntu.com:80 --recv-keys C5AD17C747E3A1EA
$ echo "deb https://dl.k6.io/deb stable main" | sudo tee /etc/apt/sources.list.d/k6.list
$ sudo apt-get update
$ sudo apt-get install k6
以下為 K6 程式碼,然後使用 k6 run k6-llm-test.js 的指令來執行。
k6-llm-test.js
// k6-llm-test.js
import http from 'k6/http';
import { sleep } from 'k6';

export const options = {
  vus: 16, // 虛擬用戶數量 (例如:16 個用戶同時發送請求)
  duration: '120s', // 測試持續時間 (例如:120 秒)
};

export default function () {
  const res = http.post(
    'https://${LLM_Domain}',// 創建 LLM 機器的 Ingress 網址填在這裡
    JSON.stringify({
      "model": "mistralai/Mixtral-8x7B-Instruct-v0.1",// 使用 LLM Model
      "messages": [{ "role": "user", "content": "Tell a story of 100 to 400 words" }],
      "max_tokens": 200,
      "top_p": 1,
      "temperature": 2,
      "stream": false
    }),
    {
      headers: {
        'Authorization': 'Bearer ${VLLM_API_KEY}',// VLLM_API_KEY 填在這裡
        'Content-Type': 'application/json',
      },
    }
  );

  console.log(`Response status: ${res.status}`); // 檢查回應狀態碼

  sleep(1); // 等待 1 秒,避免過載伺服器
};
進入 GKE 叢集頁面,點擊觀測能力 > DCGM,可以清楚地看到 H100 GPU 的各項使用指標。
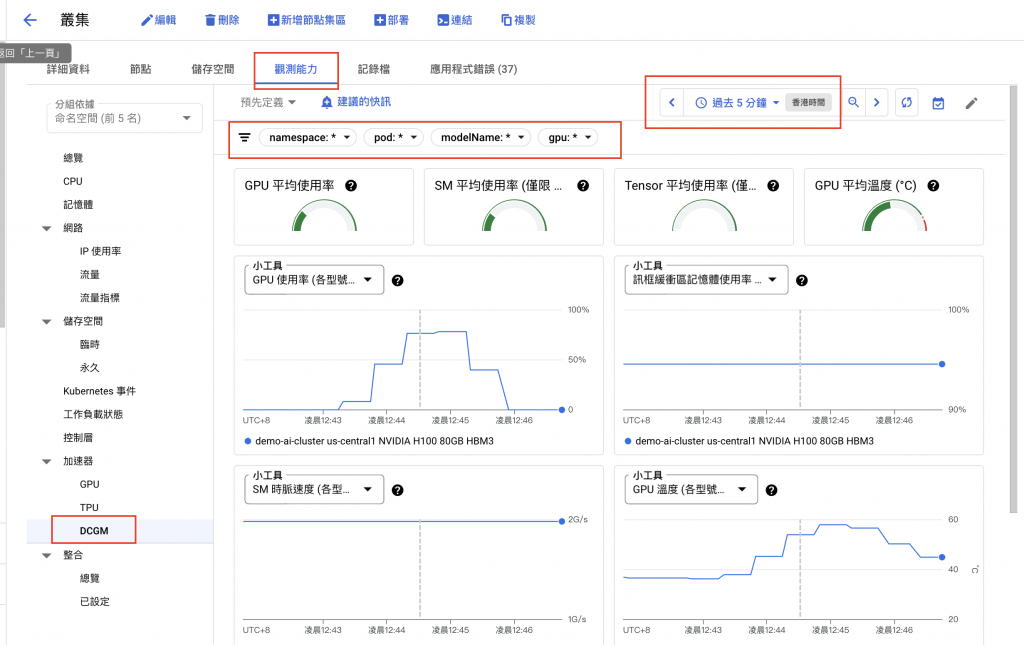
使用 GKE GPU Node Pool 部署各類 AI Model,為應對日益增長的 AI 推論需求提供了可擴展且高效的解決方案。本文以實際操作演示了如何利用 GKE 的 GPU 資源,快速部署並運行大型語言模型。
通過 K6 進行的壓力測試,我們可以評估模型在實際應用場景下的性能表現,並藉由 GKE 的 DCGM 監控工具,深入了解 GPU 的使用情況。
GKE 提供了一個強大的平台,並展現出良好的擴展性和穩定性,使其成為運行大型 AI 模型的理想平台。