上一篇有提到 Saga 是由一連串非同步事件來完成資料一致性的機制,那麼要如何協調 Saga 執行的步驟就變得相當重要,如果遇到 Compensatable Transaction 失敗的情況還需要安排執行對應的 Compensation Transaction。因此,Saga 發展了兩種運作機制:編舞模式(Choreography) 與 編排模式(Orchestration)。
Choreography 是由各個參與的服務負責發送相關非同步事件與接收來自其他服務發送的非同步事件,並 沒有 一個中央協調者來安排參與方該做什麼事情。
以下方建立訂單的 Saga 為例:
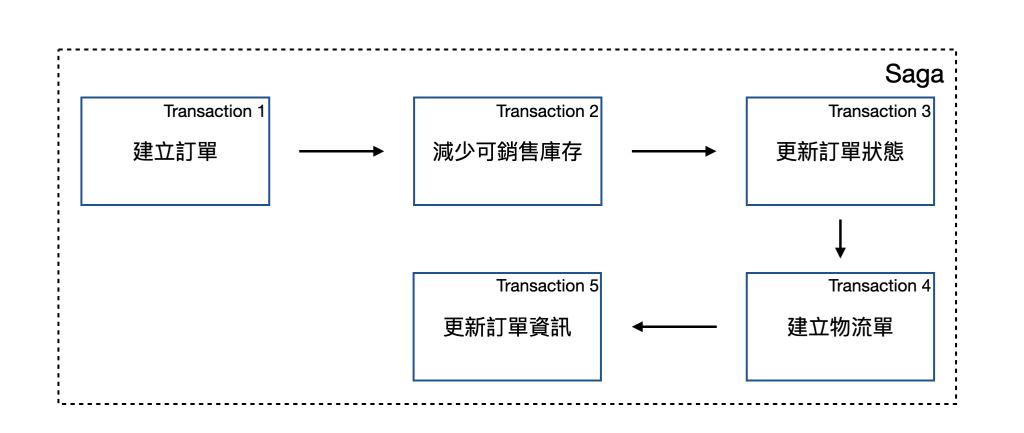
在 Choregraphy 下,整體運如下圖所示:
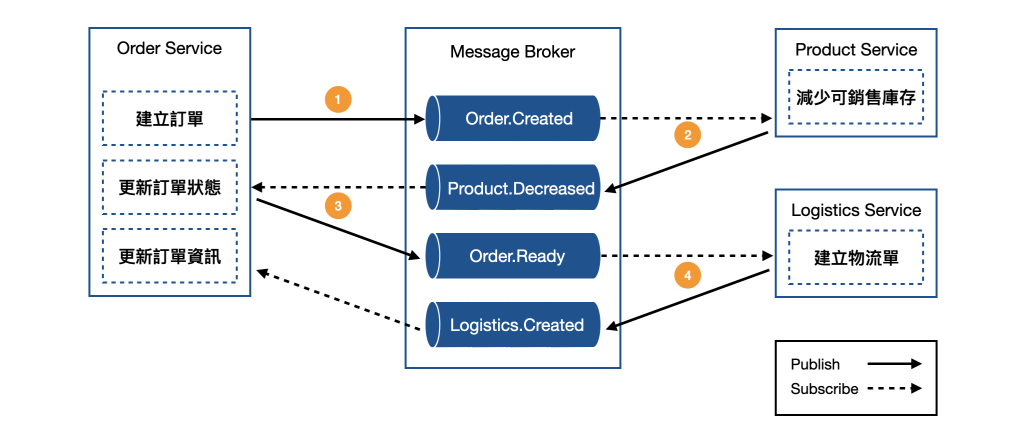
Order.Created 事件。Order.Created 事件,根據事件內容處理「減少可銷售庫存」,並在執行完畢後發送 Product.Decreased 事件。Product.Decreased 事件,根據收到的事件內容處理「更新訂單狀態」,並在執行完畢後發送 Order.Ready 事件。Order.Ready 事件,根據收到的事件內容處理「建立物流單」,並在執行完畢後發送 Logistics.Created 事件。Logistics.Created 事件,根據收到的內容處理「更新訂單資訊」。這樣的運作方式有以下幾個優點:
但也有以下幾個缺點:
與 Choreography 不同,會有一個中央協調者負責安排 Saga 整個流程,這個協調者又稱 編排器(Orchestrator)。透過非同步事件傳遞 命令(Command) 給該 Saga 參與方,參與方收到 Command 後,需執行對應的操作,當參與方完成任務時,需 回覆(Reply) Orchestrator 訊息,Orchestrator 會再繼續執行該 Saga 流程的下個步驟。
以建立訂單的 Saga 為例,在 Orchestration 下,整體運如下圖所示:
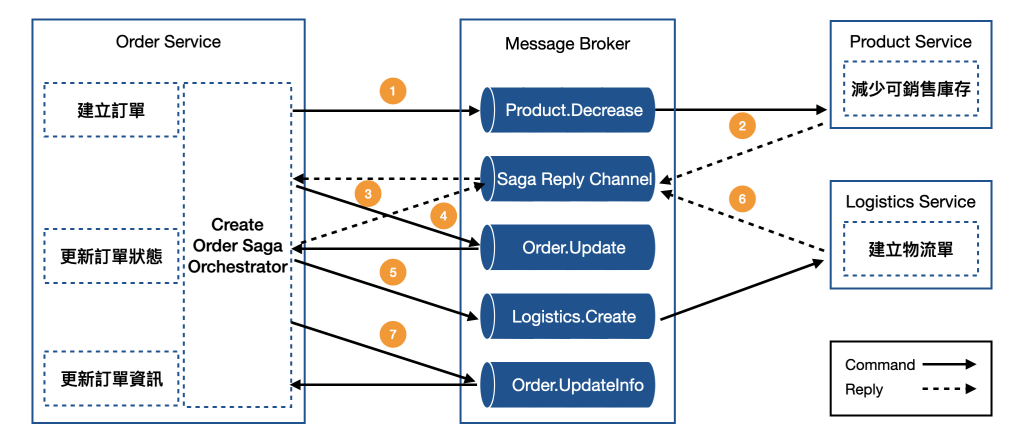
Product.Decrease 命令。Product.Decrease 命令,執行「減少可銷售庫存」,執行完畢後,回覆訊息給 Orchestrator。Order.Update 命令,這裡可以注意,該命令的接收方是訂單服務本身,這樣的設計是為了保持運作的一致性。Order.Update 命令,執行「更新訂單狀態」,執行完畢後,回覆訊息給 Orchestrator。Logistics.Create 命令。Logistics.Create 命令,執行「建立物流單」,執行完畢後,回覆訊息給 Orchestrator。Order.UpdateInfo 命令。Order.UpdateInfo 命令,執行「更新訂單資訊」,執行完畢後,整個 Saga 流程即結束。這樣的運作方式有以下幾個優點:
當然也有以下缺點:
試著使用 NestJS 來實現極簡版的 Choreography Saga,目標是將上方建立訂單的流程實現出來,並針對失敗的情況執行 Compensatable Transactions。
注意:接下來的實作內容會使用 MQTT 作為微服務應用程式溝通的媒介,相關教學可以參考前面介紹的 MQTT Transporter。
注意:接下來的內容為了簡化實作邏輯將 不會 使用真正的資料庫,主要是將 Choreography Saga 的實現邏輯呈現出來,若有需要可以在實作時自行更換成資料庫的實現邏輯。
為了方便我們取用不同 Domain 的 Type,這邊透過 Nx 建立了名為 domain 的 Library 來保存訂單、物流訂單、商品庫存的 type。
注意:針對 Domain Type 要如何透過 Library 進行管理有許多方式,我會建議依照 Domain 性質各自拆分不同的 Library,比如:
order-domain、logistics-domain、product-domain。不過因為這篇文章的重點是在 Choreography Saga,所以就統一放在domainLibrary 中,避免失焦。
下方是範例程式碼,在 domain Library 新增 logistics.ts 並宣告訂單相關的 type:
export type LogisticsOrderId = string;

export type LogisticsOrder = {
  id: LogisticsOrderId;
  address: string;
};
新增 product.ts 並宣告商品庫存的 type:
export type ProductId = string;
export type Inventory = {
  productId: ProductId;
  count: number;
};
新增 order.ts 並宣告訂單相關的 type:
import { LogisticsOrderId } from './logistics';
import { ProductId } from './product';

export type Order = {
  id: string;
  status: 'preparing' | 'prepared' | 'reject';
  details: Array<OrderDetail>;
  logistics: OrderLogisticsDetail;
};

export type OrderDetail = {
  productId: ProductId;
  count: number;
};

export type OrderLogisticsDetail = {
  id: LogisticsOrderId | null;
  address: string;
};
新增 message.ts 並宣告發送的非同步事件的 type,這裡可以發現,所有事件都會帶有 messageId,原因是基於 Publish/Subscribe 機制的 Choreography Saga 需要有辦法知道事件之間的關聯,而 messageId 就扮演著 關聯 ID(Relation ID) 的角色:
import { LogisticsOrder } from './logistics';
import { Order } from './order';
import { Inventory } from './product';

export type Message<T> = { data: T } & {
  messageId: string;
};

export type OrderCreatedMessage = Message<Order>;

export type ProductDecreasedMessage = Message<Array<Inventory>>;
export type ProductDecreaseFailedMessage = Message<Array<Inventory>>;

export type OrderReadyMessage = Message<Order>;
export type OrderReadyFailedMessage = Message<Order>;

export type LogisticsCreatedMessage = Message<LogisticsOrder>;
export type LogisticsCreateFailedMessage = Message<null>;
最後,在 index.ts 匯出這些檔案的內容:
export * from './lib/logistics';
export * from './lib/order';
export * from './lib/product';
export * from './lib/message';
透過 Nx 建立一個名為 order-service 的 Application。由於 order-service 會需要提供 RESTful API 讓 Client 可以建立訂單、查詢訂單,同時會需要建立微服務應用程式來接收其他服務的事件,這裡會需要調整 main.ts 的內容,透過 INestApplication 實例的 connectMicroservice 方法來產生微服務應用程式實例,如此一來,便能夠保留一般 HTTP Server 的功能又擁有微服務應用程式的功能:
import { Logger } from '@nestjs/common';
import { NestFactory } from '@nestjs/core';
import { MicroserviceOptions, Transport } from '@nestjs/microservices';

import { AppModule } from './app/app.module';

async function bootstrap() {
  const app = await NestFactory.create(AppModule);
  const microservice = app.connectMicroservice<MicroserviceOptions>({
    transport: Transport.MQTT,
    options: {
      url: 'mqtt://localhost:1883',
    },
  });
  const globalPrefix = 'api';
  app.setGlobalPrefix(globalPrefix);
  const port = process.env.PORT || 3000;
  await app.listen(port);
  await microservice.listen();
  Logger.log(
    `🚀 Application is running on: http://localhost:${port}/${globalPrefix}`
  );
}

bootstrap();
由於 order-service 會在訂單建立完成時發送 Order/Created 事件,以及在收到 Product/Decreased 事件並更新狀態後發送 Order/Ready 事件,故其需要使用 ClientsModule 來進行事件的發送。下方為範例程式碼,修改 AppModule 的內容,使用 ClientsModule 來產生 Token 為 MS_CLIENT 的 MQTT ClientProxy:
import { Module } from '@nestjs/common';
import { ClientsModule, Transport } from '@nestjs/microservices';
import { AppController } from './app.controller';
// ...

@Module({
  imports: [
    ClientsModule.register({
      clients: [
        {
          name: 'MS_CLIENT',
          transport: Transport.MQTT,
          options: {
            url: 'mqtt://localhost:1883',
          },
        },
      ],
    }),
  ],
  controllers: [AppController],
  // ...
})
export class AppModule {}
接著,修改 AppController 的內容,針對「建立訂單」與「讀取訂單」的 API 進行實作,需特別注意,建立訂單後需要透過發送 Order/Created 事件來執行 Saga 流程,所以在建立完訂單要透過 ClientProxy 發送該事件,並指定訂單的 ID 為 messageId:
import { Body, Controller, Get, Inject, Param, Post } from '@nestjs/common';

import { ClientProxy, MqttRecordBuilder } from '@nestjs/microservices';

import {
  Order,
  OrderDetail,
  OrderLogisticsDetail,
  OrderCreatedMessage,
} from '@nestjs-microservices/DAY25/domain';

export type CreateOrder = {
  details: Array<OrderDetail>;
  logistics: OrderLogisticsDetail;
};

@Controller()
export class AppController {
  constructor(@Inject('MS_CLIENT') private readonly client: ClientProxy) {}

  private readonly orders: Array<Order> = [];

  @Get('/orders/:id')
  getOrderById(@Param('id') id: string) {
    return this.orders.find((order) => order.id === id);
  }

  @Post('/orders')
  createOrder(@Body() payload: CreateOrder) {
    const id = crypto.randomUUID();
    const order: Order = {
      id,
      status: 'preparing',
      logistics: payload.logistics,
      details: payload.details,
    };
    this.orders.push(order);
    const record = new MqttRecordBuilder<OrderCreatedMessage>({
      messageId: order.id,
      data: order,
    })
      .setQoS(2)
      .build();
    this.client.emit('Order/Created', record);
    return order;
  }
}
針對「減少可銷售庫存」的部分進行處理,透過 @MessagePattern 裝飾器訂閱 Product/Decreased,當收到事件時,將訂單的狀態切換為 prepared 並透過 ClientProxy 發送 Order/Ready 事件。另外,針對「減少可銷售庫存失敗」的情況設計補償機制,透過 @MessagePattern 裝飾器訂閱 Product/Decreased/Failed,當收到事件時,將訂單狀態切換為 reject:
import {
  // ...
  MqttRecordBuilder,
  Payload
} from '@nestjs/microservices';
import {
  // ...
  ProductDecreasedMessage,
  OrderReadyMessage,
  ProductDecreaseFailedMessage,
} from '@nestjs-microservices/DAY25/domain';
// ...
@Controller()
export class AppController {
  // ...
  @EventPattern('Product/Decreased')
  onProductDecreased(@Payload() message: ProductDecreasedMessage) {
    const order = this.orders.find((order) => order.id === message.messageId);
    if (order) {
      const record = new MqttRecordBuilder<OrderReadyMessage>({
        messageId: order.id,
        data: order,
      })
        .setQoS(2)
        .build();
      order.status = 'prepared';
      this.client.emit<OrderReadyMessage>('Order/Ready', record);
    }
  }

  @EventPattern('Product/Decrease/Failed')
  onProductDecreaseFailed(@Payload() message: ProductDecreaseFailedMessage) {
    const order = this.orders.find((order) => order.id === message.messageId);
    if (order) {
      order.status = 'reject';
    }
  }
}
最後,針對「建立物流單」的部分進行處理,透過 @MessagePattern 裝飾器訂閱 Logistics/Created,當收到事件時,將物流單資訊更新進訂單中。另外,針對「建立物流單失敗」的情況設計補償機制,透過 @MessagePattern 裝飾器訂閱 Logistics/Create/Failed,當收到事件時,將訂單狀態回退到 preparing,並透過 ClientProxy 發送 Order/Ready/Failed 來觸發「減少可銷售庫存」的補償機制:
import {
  // ...
  LogisticsCreatedMessage,
  LogisticsCreateFailedMessage,
  OrderReadyFailedMessage,
} from '@nestjs-microservices/DAY25/domain';
// ...
@Controller()
export class AppController {
  // ...
  @EventPattern('Logistics/Created')
  onLogisticsCreated(@Payload() message: LogisticsCreatedMessage) {
    const order = this.orders.find((order) => order.id === message.messageId);
    if (order) {
      order.logistics = message.data;
    }
  }

  @EventPattern('Logistics/Create/Failed')
  onLogisticsCreateFailed(@Payload() message: LogisticsCreateFailedMessage) {
    const order = this.orders.find((order) => order.id === message.messageId);
    if (order) {
      order.status = 'preparing';
      const record = new MqttRecordBuilder<OrderReadyFailedMessage>({
        messageId: order.id,
        data: order,
      })
        .setQoS(2)
        .build();
      this.client.emit('Order/Ready/Failed', record);
    }
  }
}
透過 Nx 建立一個名為 product-service 的 Application。修改 main.ts 的內容,透過 NestFactory 的 createMicroservices 建立微服務應用程式:
import { Logger } from '@nestjs/common';
import { NestFactory } from '@nestjs/core';

import { AppModule } from './app/app.module';
import { MicroserviceOptions, Transport } from '@nestjs/microservices';

async function bootstrap() {
  const app = await NestFactory.createMicroservice<MicroserviceOptions>(
    AppModule,
    {
      transport: Transport.MQTT,
      options: {
        url: 'mqtt://localhost:1883',
      },
    }
  );
  await app.listen();
  Logger.log(`🚀 Product Service is running.`);
}

bootstrap();
由於 product-service 會在可銷售庫存減少時發送 Product/Decreased 事件,故需要使用 ClientsModule 來進行事件的發送。下方為範例程式碼,修改 AppModule 的內容,使用 ClientsModule 來產生 Token 為 MS_CLIENT 的 MQTT ClientProxy:
import { Module } from '@nestjs/common';
import { ClientsModule, Transport } from '@nestjs/microservices';
import { AppController } from './app.controller';
// ...

@Module({
  imports: [
    ClientsModule.register({
      clients: [
        {
          name: 'MS_CLIENT',
          transport: Transport.MQTT,
          options: {
            url: 'mqtt://localhost:1883',
          },
        },
      ],
    }),
  ],
  controllers: [AppController],
  // ...
})
export class AppModule {}
接著,修改 AppController 的內容,針對「減少可銷售庫存」的部分進行處理,透過 @MessagePattern 裝飾器訂閱 Order/Created,當收到事件時,針對訂單中的 details 欄位內的 productId 來減少庫存,計算完畢後,透過 ClientProxy 發送 Product/Decreased 事件,並以訂單的 ID 作為 messageId。另外,針對「更新訂單狀態」設計補償機制,透過 @MessagePattern 裝飾器訂閱 Order/Ready/Failed,當收到事件時,針對訂單內的 details 欄位內的 productId 來補回庫存,計算完畢後,透過 ClientProxy 發送 Product/Decrease/Failed 事件觸發「建立訂單」的補償機制:
import { Controller, Inject } from '@nestjs/common';

import {
  ClientProxy,
  MessagePattern,
  MqttRecordBuilder,
  Payload,
} from '@nestjs/microservices';
import {
  Inventory,
  OrderCreatedMessage,
  OrderReadyFailedMessage,
  ProductDecreasedMessage,
  ProductDecreaseFailedMessage,
} from '@nestjs-microservices/DAY25/domain';

@Controller()
export class AppController {
  private readonly inventories: Array<Inventory> = [
    {
      productId: 'a',
      count: 100,
    },
    {
      productId: 'b',
      count: 100,
    },
  ];

  constructor(@Inject('MS_CLIENT') private readonly client: ClientProxy) {}

  @MessagePattern('Order/Created')
  onOrderCreated(@Payload() message: OrderCreatedMessage) {
    message.data.details.forEach((detail) => {
      const inventory = this.inventories.find(
        (inventory) => inventory.productId === detail.productId
      );
      if (!inventory) {
        return;
      }

      if (inventory.count - detail.count < 0) {
        return;
      }

      inventory.count -= detail.count;
    });
    const inventories = this.inventories.filter((inventory) =>
      message.data.details.find(
        (detail) => detail.productId === inventory.productId
      )
    );
    const record = new MqttRecordBuilder<ProductDecreasedMessage>({
      messageId: message.messageId,
      data: inventories,
    })
      .setQoS(2)
      .build();
    this.client.emit('Product/Decreased', record);
  }

  @MessagePattern('Order/Ready/Failed')
  onOrderReadyFailed(@Payload() message: OrderReadyFailedMessage) {
    message.data.details.forEach((detail) => {
      const inventory = this.inventories.find(
        (inventory) => inventory.productId === detail.productId
      );

      if (!inventory) {
        return;
      }

      inventory.count += detail.count;
    });
    const inventories = this.inventories.filter((inventory) =>
      message.data.details.find(
        (detail) => detail.productId === inventory.productId
      )
    );
    const record = new MqttRecordBuilder<ProductDecreaseFailedMessage>({
      messageId: message.messageId,
      data: inventories,
    })
      .setQoS(2)
      .build();

    this.client.emit('Product/Decrease/Failed', record);
  }
}
透過 Nx 建立一個名為 logistics-service 的 Application。修改 main.ts 的內容,透過 NestFactory 的 createMicroservices 建立微服務應用程式:
import { Logger } from '@nestjs/common';
import { NestFactory } from '@nestjs/core';

import { AppModule } from './app/app.module';
import { MicroserviceOptions, Transport } from '@nestjs/microservices';

async function bootstrap() {
  const app = await NestFactory.createMicroservice<MicroserviceOptions>(
    AppModule,
    {
      transport: Transport.MQTT,
      options: {
        url: 'mqtt://localhost:1883',
      },
    }
  );
  await app.listen();
  Logger.log(`🚀 Logistics Service is running.`);
}

bootstrap();
由於 logistics-service 會在物流訂單建立完成時發送 Logistics/Created 事件,故需要使用 ClientsModule 來進行事件的發送。下方為範例程式碼,修改 AppModule 的內容,使用 ClientsModule 來產生 Token 為 MS_CLIENT 的 MQTT ClientProxy:
import { Module } from '@nestjs/common';
import { ClientsModule, Transport } from '@nestjs/microservices';
import { AppController } from './app.controller';
// ...

@Module({
  imports: [
    ClientsModule.register({
      clients: [
        {
          name: 'MS_CLIENT',
          transport: Transport.MQTT,
          options: {
            url: 'mqtt://localhost:1883',
          },
        },
      ],
    }),
  ],
  controllers: [AppController],
  // ...
})
export class AppModule {}
接著,修改 AppController 的內容,針對「建立物流單」的部分進行處理,透過 @MessagePattern 裝飾器訂閱 Order/Ready,當收到事件時,建立物流單並透過 ClientProxy 發送 Logistics/Created 事件,並以訂單的 ID 作為 messageId:
import { Controller, Inject } from '@nestjs/common';

import {
  ClientProxy,
  MessagePattern,
  MqttRecordBuilder,
  Payload,
} from '@nestjs/microservices';
import {
  LogisticsCreatedMessage,
  LogisticsOrder,
  OrderReadyMessage,
} from '@nestjs-microservices/DAY25/domain';

@Controller()
export class AppController {
  constructor(@Inject('MS_CLIENT') private readonly client: ClientProxy) {}

  @MessagePattern('Order/Ready')
  onOrderReady(@Payload() message: OrderReadyMessage) {
    const logisticsOrder: LogisticsOrder = {
      id: crypto.randomUUID(),
      address: message.data.logistics.address,
    };
    const record = new MqttRecordBuilder<LogisticsCreatedMessage>({
      messageId: message.messageId,
      data: logisticsOrder,
    })
      .setQoS(2)
      .build();
    this.client.emit('Logistics/Created', record);
  }
}
注意:在啟動服務之前,先參考 MQTT Transporter 的內容將 Mosquitto 架設起來。
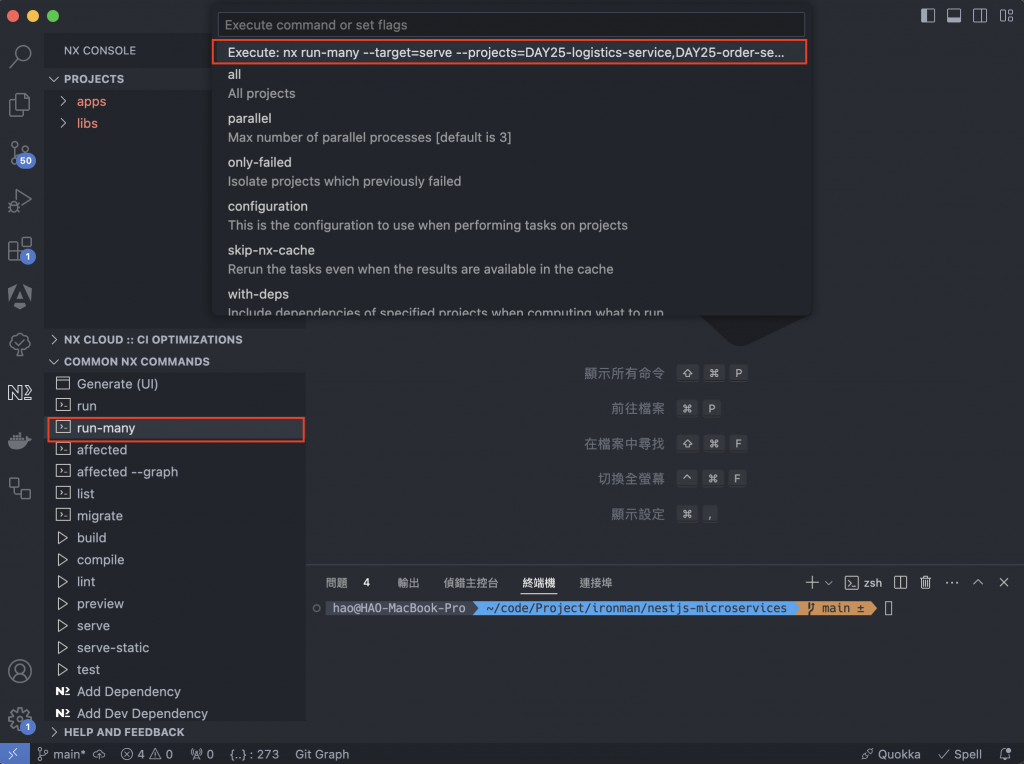
透過 Nx Console 來啟動所有的服務,在「Common Nx Commands」區塊選擇 run-many 並點選 serve 來同時啟動多個服務:
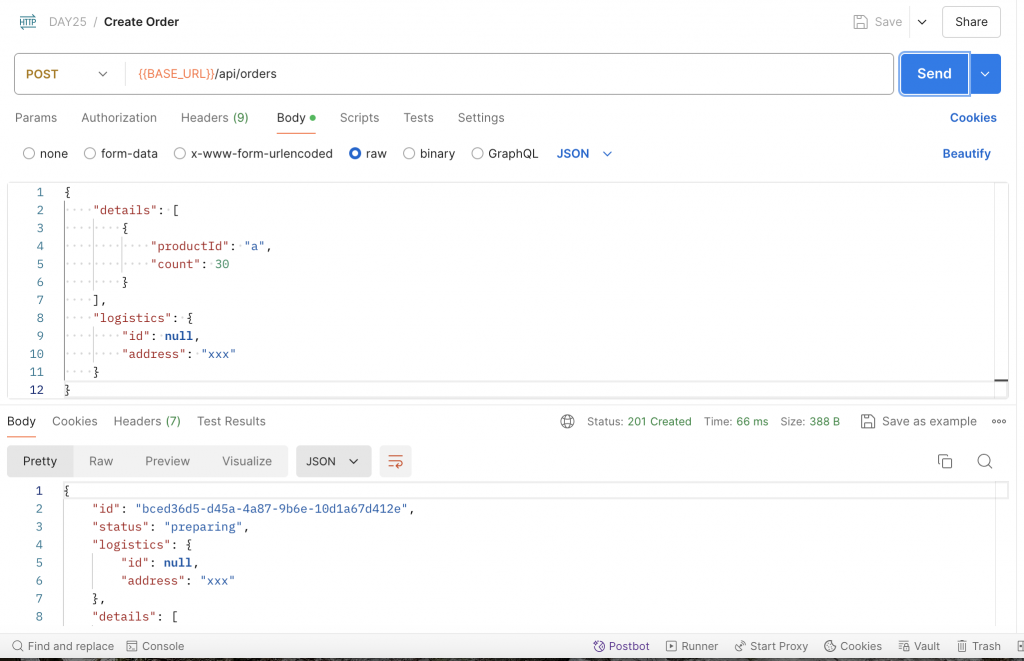
啟動後,透過 Postman 使用 POST 方法存取 http://localhost:3000/api/orders,並使用下方內容當作 Payload,會收到初始化訂單的內容:
{
  "details": [
    {
      "productId": "a",
      "count": 30
    }
  ],
  "logistics": {
    "id": null,
    "address": "xxx"
  }
}
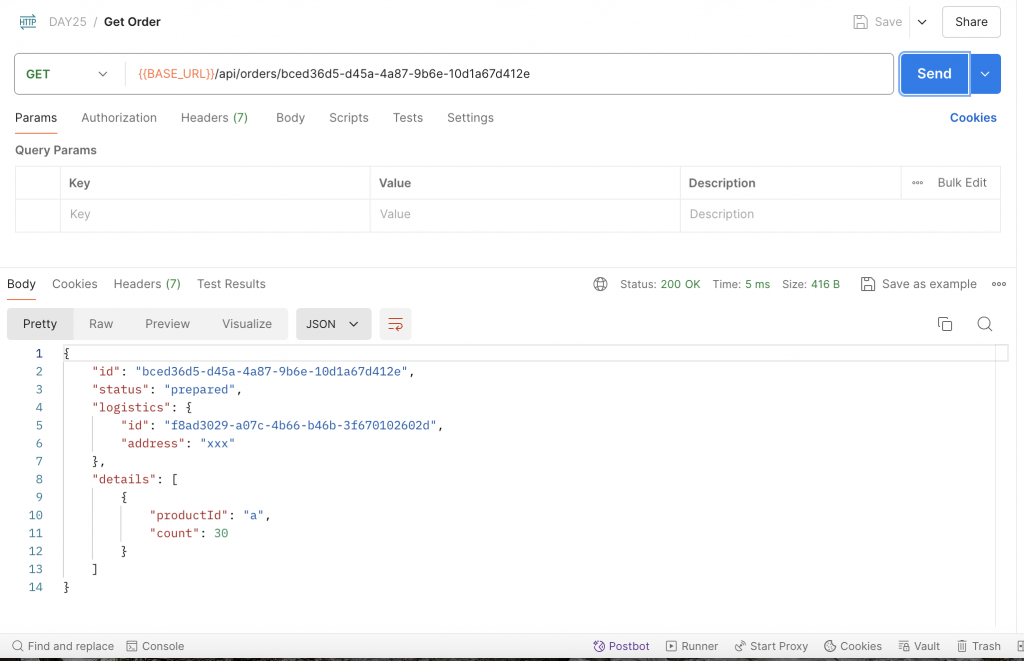
接著,將建立好的訂單 ID 透過 Postman 使用 GET 方法存取 http://localhost:3000/api/orders/<ORDER_ID>,會收到狀態為 prepared、帶有物流單資訊的訂單:
來試試看執行補償機制的情況,我們針對 logistics-service 進行調整,修改 AppController 的內容,在 onOrderReady 透過 ClientProxy 發送 Logistics/Create/Failed 事件:
import { Controller, Inject } from '@nestjs/common';

import {
  ClientProxy,
  MessagePattern,
  MqttRecordBuilder,
  Payload,
} from '@nestjs/microservices';
import {
  LogisticsCreateFailedMessage,
  OrderReadyMessage,
} from '@nestjs-microservices/DAY25/domain';

@Controller()
export class AppController {
  constructor(@Inject('MS_CLIENT') private readonly client: ClientProxy) {}

  @MessagePattern('Order/Ready')
  onOrderReady(@Payload() message: OrderReadyMessage) {
    const record = new MqttRecordBuilder<LogisticsCreateFailedMessage>({
      messageId: message.messageId,
      data: null,
    })
      .setQoS(2)
      .build();
    this.client.emit('Logistics/Create/Failed', record);
  }
}
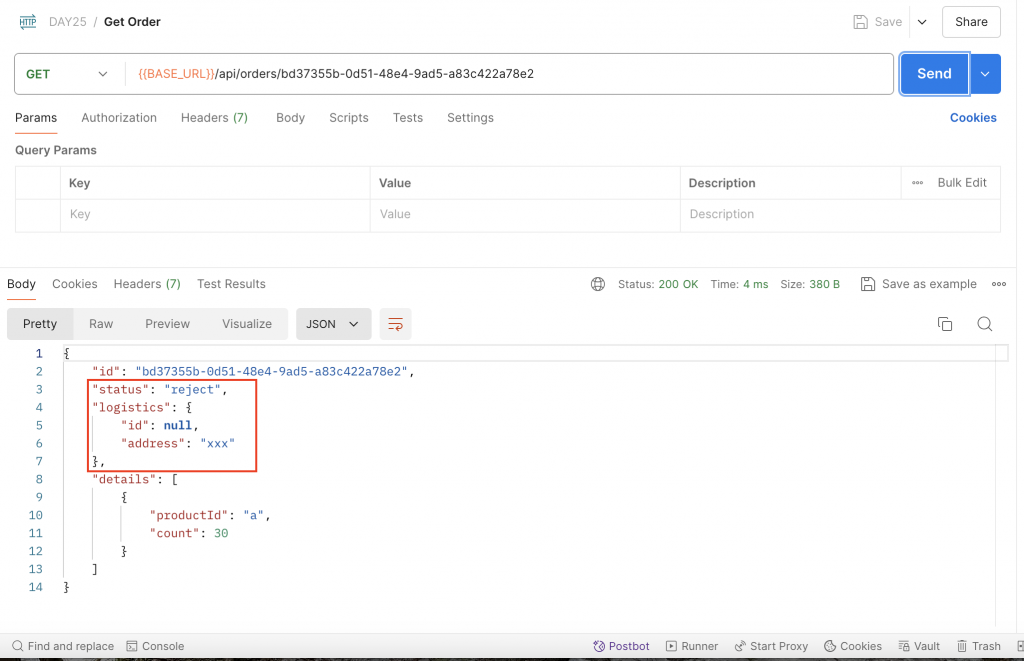
透過 Postman 建立一筆訂單後,再使用 GET 方法存取 http://localhost:3000/api/orders/<ORDER_ID>,會看到訂單的狀態為 reject 且沒有物流單資訊:
回顧一下今天的重點內容,一開始先針對 Saga 的兩種運作模式進行介紹,分別是沒有中央協調器的 Choreography 與採用中央協調器的 Orchestration。文章中還進一步描述兩者的優缺點,其中,Orchestration 在較複雜的情境下會是較佳的選擇。
文章下半部則開始用 NestJS 實作 Choreography Saga 的概念,展示如何運用非同步的事件將各個服務的操作串連起來,同時展現了補償機制的實現。
下一篇將會使用 NestJS 實作 Orchestration Saga,敬請期待!
