
前一篇我們把所需的 gRPC Endpoints 都 Expose 成 REST API 給外部使用者或前端 APP 來做使用,既然是給外部使用,我們就得對其做些安全性驗證來保護我們的服務。
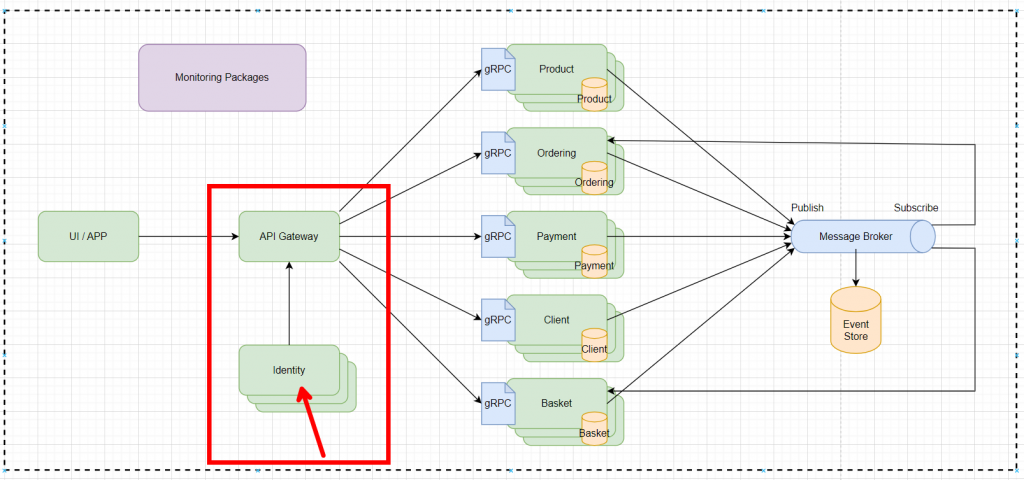
先幫大家回憶一下在 Day 08 - 微服務設計 時描述到 API Gateway 通常會依賴一個 Identity Service 來做身分認證,而在此就是 Account Service 作為認證的服務。
而在 Day 15 - Account Service 實作 Authentication 我們也確實實作了 JWT 的製作,現在我們要拿這個 Token 來介紹 BFF 的 Authentication 和 Authorization。
Authentication(身份驗證): 我們之前有介紹過 Authentication 是一個 Request 的身分證明,告訴我們是誰在發送請求。
Authorization(授權): Authorization 則是確認用戶有權限做什麼,即在身份驗證通過後,檢查這個已驗證的用戶是否有權訪問特定的資源或執行某個操作。授權是對用戶行為的限制,比如讀取、修改或刪除某些資源。
我們可以用 Debug Mode 來看一下在 HTTP Request Authentication 的機制大致上會長怎麼。
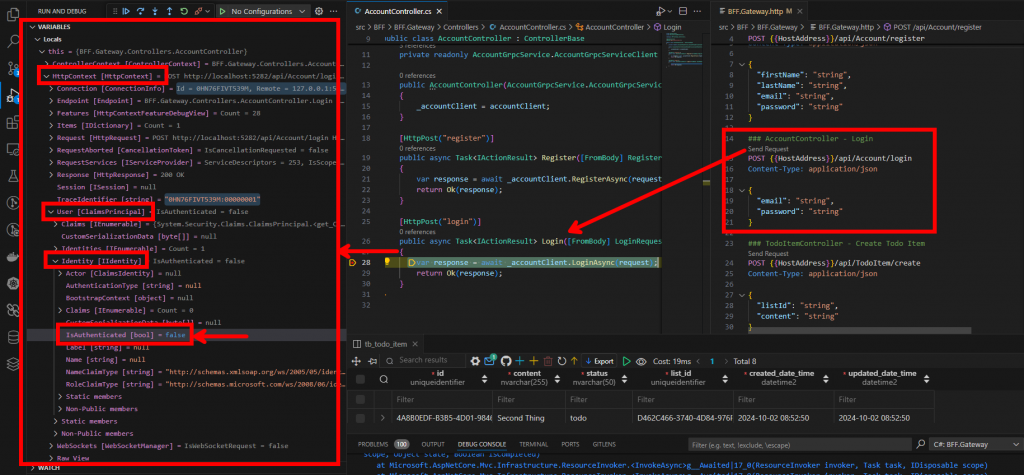
這裡可以發現 HTTPContext 內本身就有 Identity 認證的功能,因為還沒實作,會發現 IsAuthenticated 都會是 False。
之前 JWT 的產生與驗證都有實作在 Account.Infrastructure 內,這邊就直接拿來用吧!
一般來說,我們在 .NET WebAPI DI JWT Authentication 時大致上會這樣做:
builder.Services.AddAuthentication(options =>
{
    options.DefaultAuthenticateScheme = JwtBearerDefaults.AuthenticationScheme; // 預設的身份驗證方案
    options.DefaultChallengeScheme = JwtBearerDefaults.AuthenticationScheme;    // 驗證失敗時應用程式應如何回應
})
.AddJwtBearer(options =>
{
    options.TokenValidationParameters = new TokenValidationParameters
    {
        ValidateIssuer = true,
        ValidateAudience = true,
        ValidateLifetime = true,
        ValidateIssuerSigningKey = true,
        ValidIssuer = "todo-issuer",
        ValidAudience = "todo-audience",
        IssuerSigningKey = new SymmetricSecurityKey(Encoding.UTF8.GetBytes("your-secure-key"))
    };
});
所以我們現在要想辦法把 AddAuthentication 和 AddJwtBearer 包裝到我們的專案內,首先在 Account.Infrastructure 內安裝相依套件 Microsoft.AspNetCore.Authentication.JwtBearer,然後在 AccountInfrastructureRegister 內多寫一個 DI Method AddAccountAuthentication
    public static IServiceCollection AddAccountAuthentication(this IServiceCollection services)
    {
        services.AddAuthentication(options =>
            {
                options.DefaultAuthenticateScheme = JwtBearerDefaults.AuthenticationScheme;
                options.DefaultChallengeScheme = JwtBearerDefaults.AuthenticationScheme;
            })
            .AddJwtBearer(options =>
                options.TokenValidationParameters = new TokenValidationParameters());

        return services;
    }
這時複習一下我們在 JwtProvider 內有實作 ValidateTokenAsync 的方法如下:
public async Task<string?> ValidateTokenAsync(string token)
{
    var secret = GenerateHashSecret(_jwtSettings.Secret);
    var securityKey = new SymmetricSecurityKey(Encoding.UTF8.GetBytes(secret));

    var validationParameters = new TokenValidationParameters
    {
        ValidateIssuer = true,
        ValidIssuer = _jwtSettings.Issuer,

        ValidateAudience = true,
        ValidAudience = _jwtSettings.Audience,

        ValidateLifetime = true,
        ClockSkew = TimeSpan.Zero,

        ValidateIssuerSigningKey = true,
        IssuerSigningKey = securityKey,
    };

    var tokenHandler = new JsonWebTokenHandler();

    var result = await tokenHandler.ValidateTokenAsync(token, validationParameters);

    return result.ClaimsIdentity?.FindFirst(JwtRegisteredClaimNames.Sub)?.Value;
}
這裡可以看到我們想要在 AddJwtBearer 內帶上的 TokenValidationParameters,所以我們可以把產生 TokenValidationParameters 這件事情獨立成一個 GetTokenValidationParameters 方法:
public async Task<string?> ValidateTokenAsync(string token)
{
    var validationParameters = GetTokenValidationParameters();

    var tokenHandler = new JsonWebTokenHandler();

    var result = await tokenHandler.ValidateTokenAsync(token, validationParameters);

    return result.ClaimsIdentity?.FindFirst(JwtRegisteredClaimNames.Sub)?.Value;
}

public TokenValidationParameters GetTokenValidationParameters()
{
    var secret = GenerateHashSecret(_jwtSettings.Secret);
    var securityKey = new SymmetricSecurityKey(Encoding.UTF8.GetBytes(secret));

    var validationParameters = new TokenValidationParameters
    {
        ValidateIssuer = true,
        ValidIssuer = _jwtSettings.Issuer,

        ValidateAudience = true,
        ValidAudience = _jwtSettings.Audience,

        ValidateLifetime = true,
        ClockSkew = TimeSpan.Zero,

        ValidateIssuerSigningKey = true,
        IssuerSigningKey = securityKey,
    };

    return validationParameters;
}
並且把它使用在我們的 AddAccountAuthentication 內,結果如下:
    public static IServiceCollection AddAccountAuthentication(this IServiceCollection services,
        IConfiguration configuration)
    {
        var jwtProvider = new JwtProvider(configuration);

        services.AddAuthentication(options =>
            {
                options.DefaultAuthenticateScheme = JwtBearerDefaults.AuthenticationScheme;
                options.DefaultChallengeScheme = JwtBearerDefaults.AuthenticationScheme;
            })
            .AddJwtBearer(options =>
                options.TokenValidationParameters = jwtProvider.GetTokenValidationParameters());

        return services;
    }
這時候回到 BFF.Gateway 內,先 Reference Account.Infrastructure 專案
  <ItemGroup>
    <ProjectReference Include="..\..\Account\Account.Infrastructure\Account.Infrastructure.csproj" />
  </ItemGroup>
然後在 Program.cs 內加入
builder.Services.AddAccountAuthentication(builder.Configuration);
在 appsettings.json 內加入
{
    "JwtSettings": {
    "Secret": "my-secret",
    "ExpiryInMinutes": 5,
    "Issuer": "todo-issuer",
    "Audience": "todo-audience"
  }
}
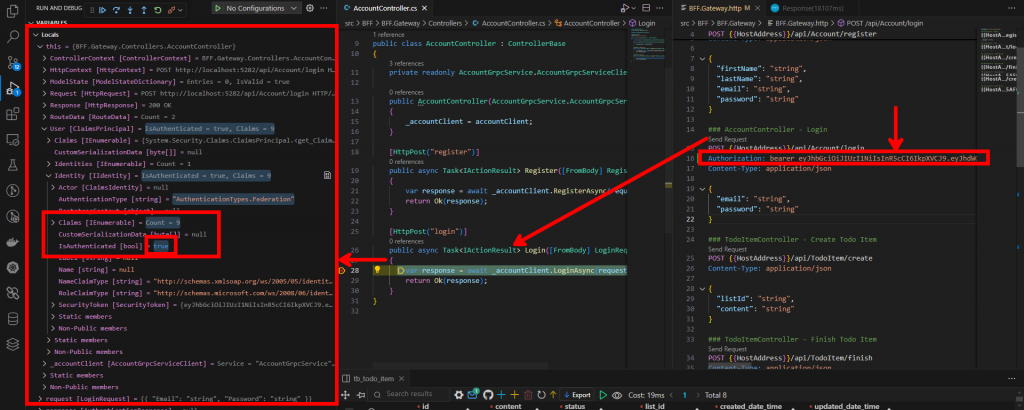
接著就可以來測試一下 Authentication 到底在做甚麼了,一樣用 Debug Mode 開 BFF.Gateway,先 Login 取得一個 Token,把這個 Token 放進我們 BFF.Gateway.http 裡面的 Header 中如下:
### AccountController - Login
POST {{HostAddress}}/api/Account/login
Authorization: bearer eyJhbGciOiJIUzI1NiIsInR5cCI6IkpXVCJ9.eyJhdWQiOiJ0b2RvLWF1ZGllbmNlIiwiaXNzIjoidG9kby1pc3N1ZXIiLCJleHAiOjE3MjgyNzgxNTEsInN1YiI6ImY0ZmY5Yjk5LTJmMjYtNGE5My1hMjk3LWI0YTVlMmRmZmVmMiIsImdpdmVuX25hbWUiOiJzdHJpbmciLCJmYW1pbHlfbmFtZSI6InN0cmluZyIsImp0aSI6IjA2YTIxYWY1LTAzNjAtNDc2Yi04ODk0LWQ1YTlkNmJkMDNjOCIsImlhdCI6MTcyODI3Nzg1MSwibmJmIjoxNzI4Mjc3ODUxfQ.x4WrHTj5JwDx0waMSScf69AGG_2dQC3oMOiI5K8WLhw
Content-Type: application/json

{
  "email": "string",
  "password": "string"
}
設定中斷點後再登入一次,你可以發現這次除了多了許多 Identity 的資料以外,IsAuthenticated 也變成 True 囉!
首先,我們必須在 Program.cs 中加入兩行程式碼:app.UseAuthentication(); 和 app.UseAuthorization();,其結構如下:
var app = builder.Build();

// Middleware
if (app.Environment.IsDevelopment())
{
    app.UseSwagger();
    app.UseSwaggerUI(c => c.SwaggerEndpoint("/swagger/v1/swagger.json", "GrpcRestGateway v1"));
}

app.UseAuthentication();
app.UseAuthorization();

app.MapControllers();
app.Run();
我相信很多人對這兩行不陌生,幾乎每個教學文件都會提到這些中介軟體(Middleware)的順序非常重要,不能隨意改變。但你有想過為什麼順序這麼重要嗎?
首先,我們需要理解這段程式碼中的 var app = builder.Build();。此處的 app 與上方的 builder.Services 其實大不相同:services 的配置階段主要負責註冊與設置應用程式的相依性注入(DI)與設定檔(Configuration)。而 app 的配置階段則負責構建中介軟體管道(Pipeline),並按照順序執行每個中介軟體。
所以,app.UseAuthentication(); 這個 Middleware 會替我們找到正確的 Authentication Handler 來處理 Request Token,在此是 JWT Bearer Handler。
接下來,app.UseAuthorization(); 則會根據已經驗證的身份來執行授權邏輯,確保用戶是否具備執行特定操作的權限。這意味著授權檢查必須在身份驗證之後進行,因為授權檢查依賴於已經通過身份驗證的用戶身份資訊。如果這兩者順序顛倒,應用程式可能會嘗試對未經身份驗證的請求進行授權檢查,從而導致錯誤。
因此,先進行身份驗證 (UseAuthentication()),然後進行授權 (UseAuthorization())。這樣可以確保整個管道的行為是正確的,並且請求在通過授權檢查之前已經驗證了其身份。
當我們加完 app.UseAuthorization(); 後就可以在 Controller 內簡單的加一個 Attribute 就可以達到授權管制的效果。
以我們的案例,我希望在操作 Todo List 和 Todo Item 的時候都要先讓 IsAuthenticated = True 才能訪問,這時只需要加個 [Authorize] 即可。
using Todo.Grpc;
using Microsoft.AspNetCore.Mvc;
using Microsoft.AspNetCore.Authorization;

namespace BFF.Gateway.Controllers;

[ApiController]
[Route("api/[controller]")]
[Authorize]
public class TodoListController : ControllerBase
//...
using Todo.Grpc;
using Microsoft.AspNetCore.Mvc;
using Microsoft.AspNetCore.Authorization;

namespace BFF.Gateway.Controllers;

[ApiController]
[Route("api/[controller]")]
[Authorize]
public class TodoListController : ControllerBase
//...
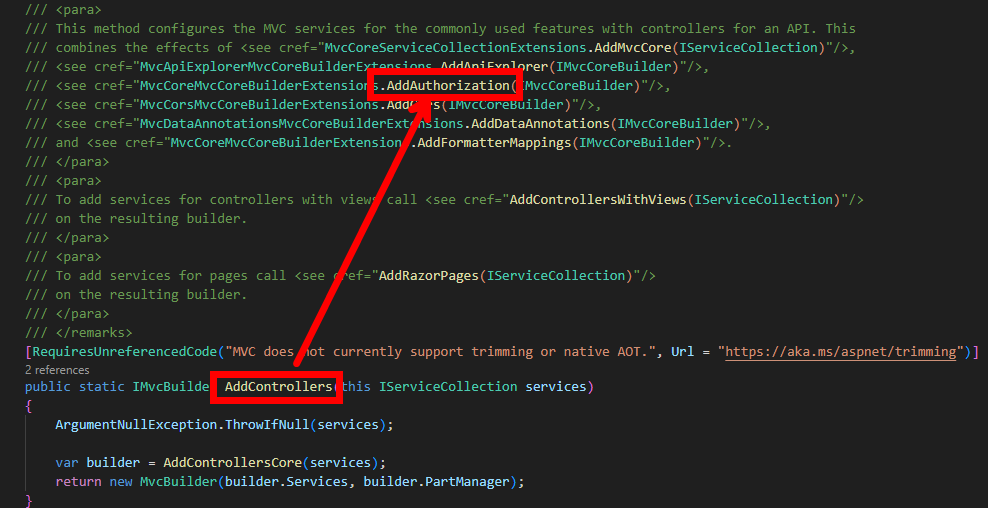
至於為什麼不需要任何配置就可以使用,因為在 'builder.Services.AddControllers();' 這裡已經自動幫你引入了 AddAuthorization
現在我們終於可以來做測試了
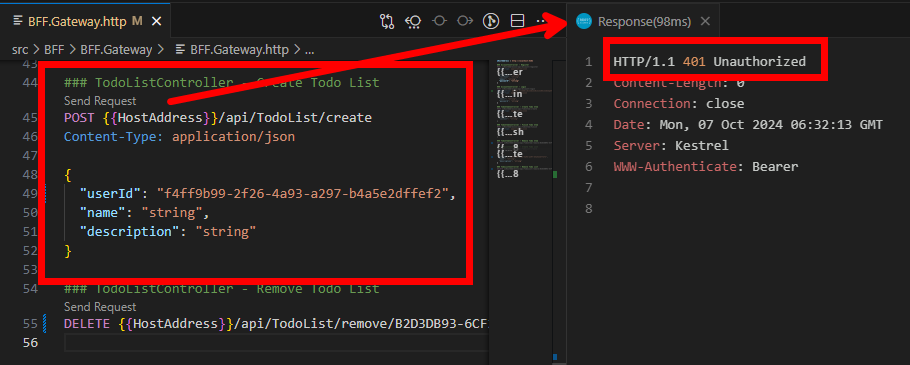
先試一下不加入 JWT,會出現 401 Unauthorized
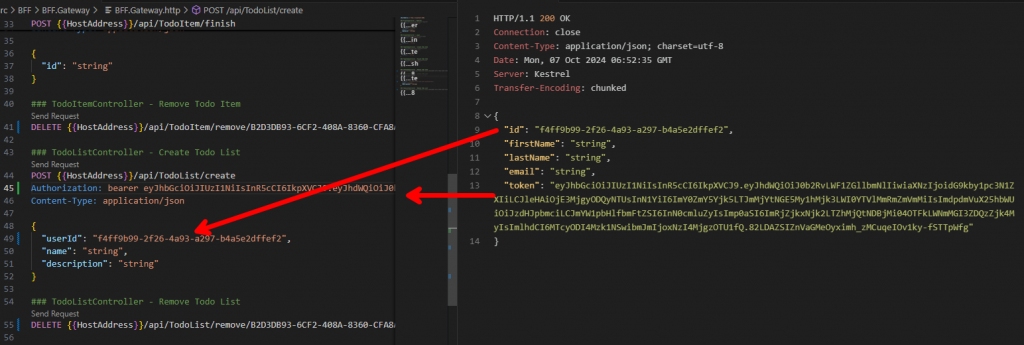
首先我們先 Login 拿到 Token
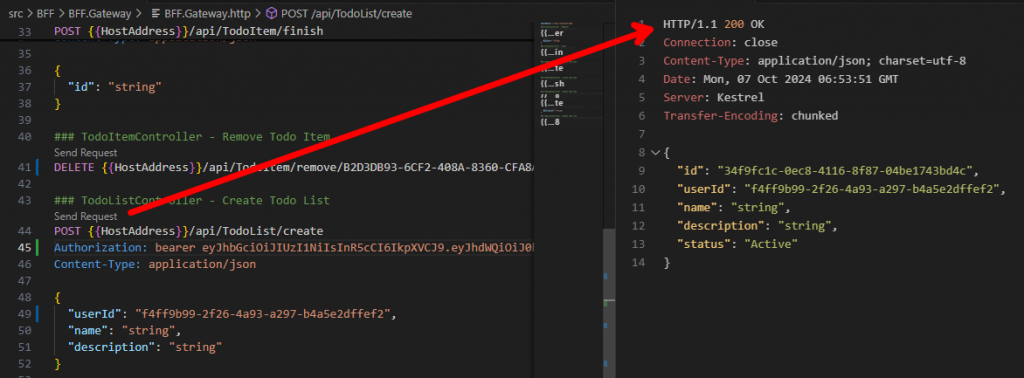
帶入合法 Token 後就可以成功 Create List 囉!
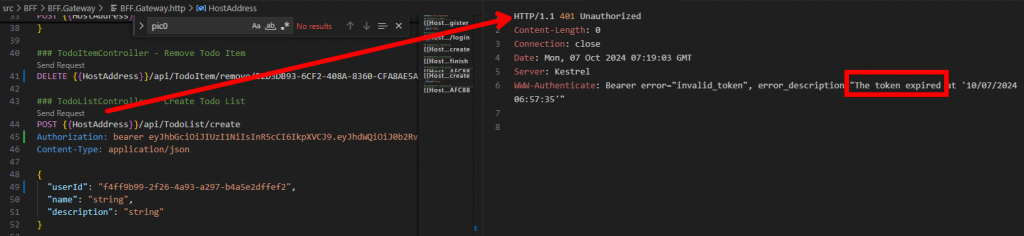
如果我們等一段時間,這裡設定是 5 分鐘後,再送一次 Request 則會告訴你 Token Expired。
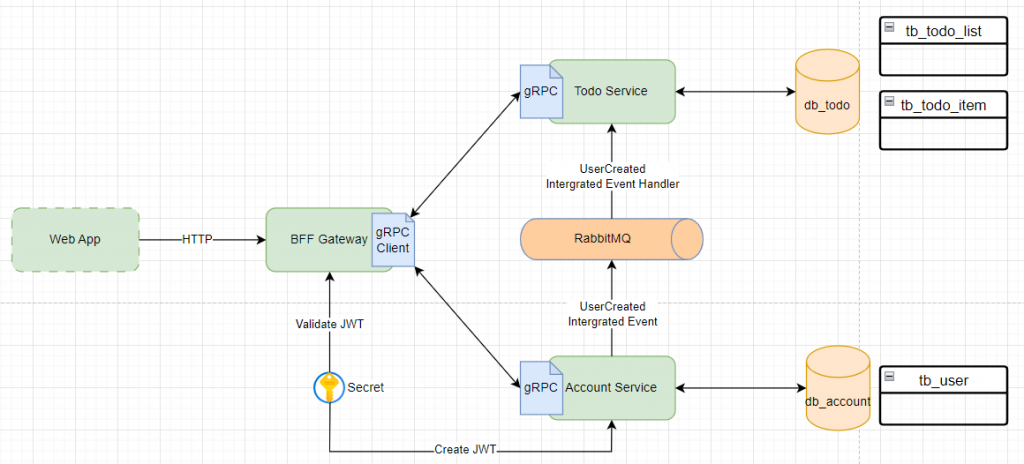
這篇章結束後,一開始設計最基礎的 Microservices 的 Backend 部分終於完成了(?)目前架構大概如下:
事情當然還沒有結束,到目前為止,我們只完成了 Command 的操作,沒有任何資料讀取功能,所以下一篇章將會開始實作 GraphQL 來讀取資料。
