昨天我們已將 Vue 專案推送至 Azure Repo,今天將介紹 Azure Agent 的配置以及建立 Pipeline 的初期設定。內容位於昨日提到的流程步驟 2 到 3 之間的預先配置。以下是今天的主要步驟:
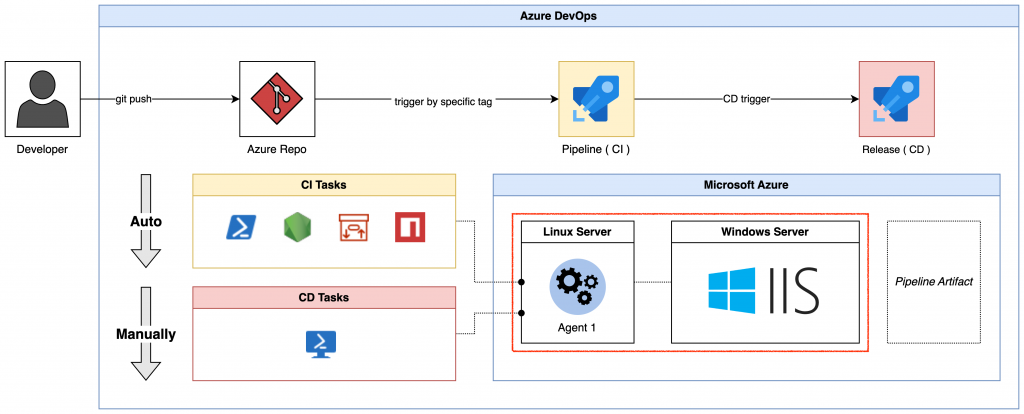
今天的重點集中在下圖中的紅框部分。當 Azure DevOps 需要進行集成(CI)和部署(CD)時,會透過 Agent 來執行具體任務。我今天會使用 Linux 作為 Agent,因此 CI 及 CD 的 Tasks 都會透過該 Agent 來進行操作。在 CI 階段,我們將建立好的靜態資源推送到 Azure Pipeline Artifact;在 CD 階段,我們會將 Artifact 下載到 Windows Server,並透過 PowerShell 進行部署。Azure Pipeline 的 Agent Job 會透過 Agent Pool 決定使用哪一個 Agent 來執行任務。
在 Linux 安裝 Agent 之前,需要先建立一個 PAT,並在運行安裝檔時輸入。
點選 User Settings(位於畫面右上角的人物加齒輪圖示),選擇「Personal access tokens 」。
點選右上角的 New Token。
在浮動視窗 Create a new personal access token 裡,輸入 Token 名稱,將 scope 設定為 Full access 後,點擊 Create 按鍵。
妥善保存顯示的 Token,這個 Token 只會顯示一次,關閉畫面後若未保存,只能重新生成。
確認剛剛建立的 Token 在列表中,且其狀態為 Active。
在 Azure DevOps 的 Project settings 預設會有兩個 Agent Pool,但這次我們將使用自托管的 Linux Server,因此點擊截圖中的 Add pool 藍色按鈕,開啟 Add agent pool 的浮動視窗。
在 Pool type 的下拉式選單中選擇 Self-hosted,並為其命名。
在 Agent pool name 欄位填入名稱,並勾選 Grant access permission to all pipelines,以便專案內所有 Pipeline 都能自動使用此代理池(Agent Pool),無需逐一設定權限。
建立 Pool 後,點擊剛剛建立的 Pool 進行進一步的設定。
在 Pool 設定頁面,點擊右上角的 New agent 按鈕。
在 Get the agent 彈跳視窗中,點擊 Linux 的子頁面,並依循指令在 Linux 上安裝 Agent。
mkdir Downloads
curl https://vstsagentpackage.azureedge.net/agent/3.245.0/vsts-agent-linux-x64-3.245.0.tar.gz --output Downloads/vsts-agent-linux-x64-3.245.0.tar.gz
mkdir myagent && cd myagent
tar zxvf ~/Downloads/vsts-agent-linux-x64-3.245.0.tar.gz
完成後可以使用 ls -lt 指令確認檔案已正確解壓縮。
./config.sh
運行配置腳本,依提示操作,包含輸入 Server URL 及 PAT 等資訊。
完成後,可以到 Agent Pool 查看其成員( ServerA )是否已經加入 Pool,的確是看到了,但是卻是顯示 Offline(紅燈)。
查看了兩篇文章,似乎跟權限有關,我才想起來我在安裝時,並沒有使用到 sudo,兩篇文章都提到了下面的指令,我決定參考 stackoverflow 這篇:
但是在執行之前,還是看一下該 script 內容才是最保險的:
function start()
{
    systemctl start ${SVC_NAME} || failed "failed to start ${SVC_NAME}"
    status
}
看來是要透過 systemctl 去將服務帶起來,可以安心執行了。
sudo ./svc.sh start
結果直接跑失敗,顯示沒有該 service,試試先 install:
再次回頭看 Agent 的狀態,轉變成 Online ( 綠燈 )了。
https://github.com/PowerShell/Win32-OpenSSH/releases
選擇 OpenSSH-Win64.zip。
解壓縮到指定位置,將下載的 ZIP 文件解壓縮到 C:\Program Files\OpenSSH(或你也可以選擇其他目錄,但建議使用此路徑)。
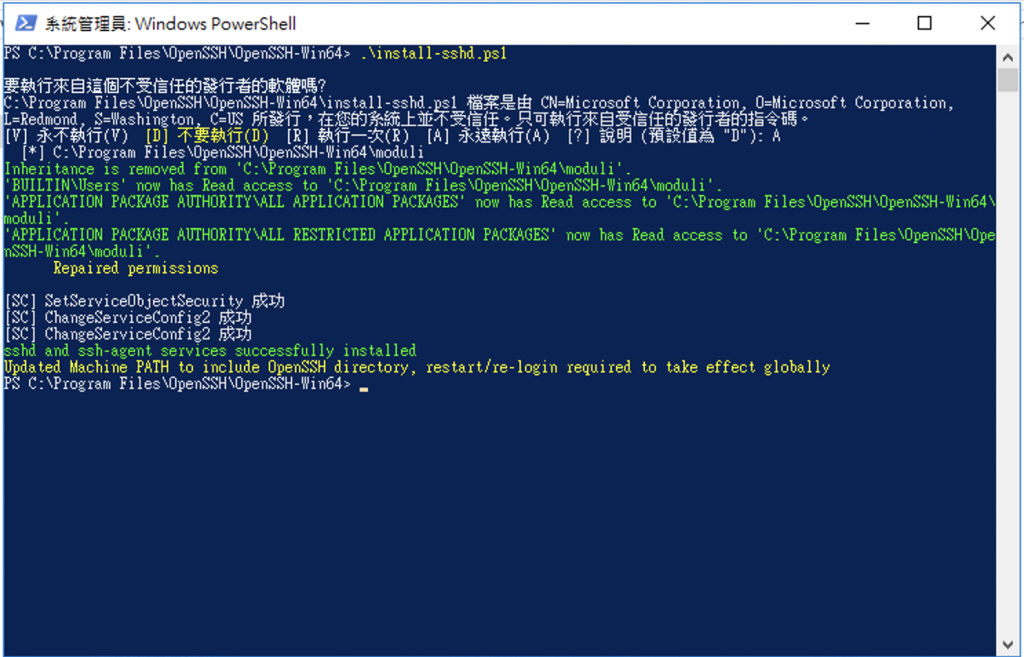
.\install-sshd.ps1

Set-Service sshd -StartupType Automatic
Set-Service ssh-agent -StartupType Automatic
Start-Service sshd
Start-Service ssh-agent

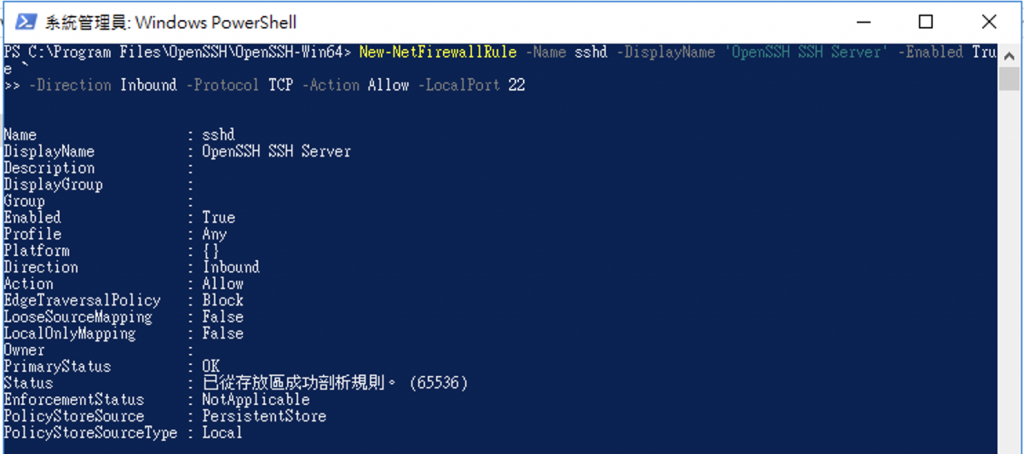
New-NetFirewallRule -Name sshd -DisplayName 'OpenSSH SSH Server' -Enabled True `
-Direction Inbound -Protocol TCP -Action Allow -LocalPort 22

C:\ProgramData\ssh\sshd_config

PasswordAuthentication Yes
AllowUsers your_username
Restart-Service sshd
ssh your_username@192.168.1.203
參考文章:Installing PowerShell on Ubuntu
###################################
# Prerequisites

# Update the list of packages
sudo apt-get update

# Install pre-requisite packages.
sudo apt-get install -y wget apt-transport-https software-properties-common

# Get the version of Ubuntu
source /etc/os-release

# Download the Microsoft repository keys
wget -q https://packages.microsoft.com/config/ubuntu/$VERSION_ID/packages-microsoft-prod.deb

# Register the Microsoft repository keys
sudo dpkg -i packages-microsoft-prod.deb

# Delete the Microsoft repository keys file
rm packages-microsoft-prod.deb

# Update the list of packages after we added packages.microsoft.com
sudo apt-get update

###################################
# Install PowerShell
sudo apt-get install -y powershell

# Start PowerShell
pwsh
Day 29 - 將 CI/CD 流程透過 Azure DevOps 去執行吧 - Part 3
