經過前兩天的初步建置,我們終於可以開始設置 Pipeline 了!這次的目標是使用 Agent 建立前端靜態資源,並將它們推送到 Azure Pipeline Artifact。
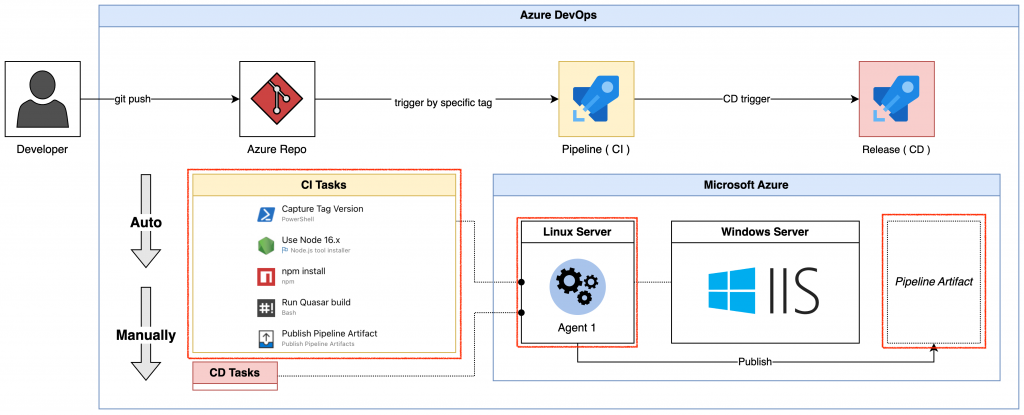
今天的內容聚焦在下圖中紅色框框所示的部分:
在左側導航欄點擊 Pipeline。
點擊頁面中央的藍色按鈕「Create Pipeline」。
該模式能夠提供入門者更好的體驗,因為它能透過圖形化介面去編輯 Pipeline 裡的 Job,但是也能在編輯完後,透過閱讀 Pipeline 的 YAML 了解如何編輯 YAML,但是在功能上,在使用 classic editor 時,有可能會遇到部分功能無法使用,像是 Stage 與 Stage 之間的變數傳遞無法互通等問題,不過我們就先略過這件事吧,這次示範的專案並不需要用到那些功能。
直接選擇最下方的 classic editor。
選擇 Azure Repos Git 並點擊 Continue,我們將使用兩天前推送的 repo。
不選擇 template,直接使用「Empty job」。
在 Tasks 裡的 Pipeline 階層可以選擇 Agent Pool,選擇昨天我們建立的 Agent。
在 Tasks 中的 Get sources 可以選擇預設的分支,並設定清理選項,以確保每次運行都是在乾淨的環境中進行。
預設是 Clean: false,但是可依據需求設定,其說明如下:
每個專案的任務需求不同,以下將根據專案的 package.json 和 Azure DevOps classic editor 的截圖做示範,但細節不多贅述,稍後會分享兩項重點:
Step 1: 暫時停用的「Capture Tag Version」,目的是擷取標籤版本以提升識別度。
Step 5: 「Publish Pipeline Artifact」,用於管理和推送生成的資源。
這邊也將稍後 YAML 來源的階層位置一併標示。
{
  "name": "code",
  "version": "0.0.1",
  "description": "enhance site reliability engineering",
  "productName": "Example Page",
  "author": "",
  "private": true,
  "scripts": {
    "lint": "eslint --ext .js,.vue ./",
    "format": "prettier --write \"**/*.{js,vue,scss,html,md,json}\" --ignore-path .gitignore",
    "test": "echo \"No test specified\" && exit 0"
  },
  "dependencies": {
    "@quasar/extras": "^1.0.0",
    "axios": "^1.2.1",
    "quasar": "^2.12.6",
    "vue": "^3.0.0",
    "vue-i18n": "^9.0.0",
    "vue-router": "^4.0.0",
    "vuex": "^4.1.0"
  },
  "devDependencies": {
    "@intlify/vite-plugin-vue-i18n": "^3.3.1",
    "@quasar/app-vite": "^1.0.0",
    "@quasar/cli": "^1.4.0",
    "autoprefixer": "^10.4.2",
    "eslint": "^8.10.0",
    "eslint-config-prettier": "^8.1.0",
    "eslint-plugin-vue": "^9.0.0",
    "postcss": "^8.4.14",
    "prettier": "^2.5.1"
  },
  "engines": {
    "node": "^18 || ^16 || ^14.19",
    "npm": ">= 6.13.4",
    "yarn": ">= 1.21.1"
  }
}
pool:
  name: 30dayPool
steps:
- powershell: |
   $tag_version=("$(Build.SourceBranch)" -replace 'refs/tags/(qat-','')
   echo "##vso[build.updatebuildnumber]$tag_version"
   write-host "tag:$tag_version"
  displayName: 'Capture Tag Version'
  enabled: false

- task: NodeTool@0
  displayName: 'Use Node 16.x'
  inputs:
    versionSpec: 16.x
    checkLatest: true

- task: Npm@1
  displayName: 'npm install'
  inputs:
    workingDir: '$(Build.SourcesDirectory)'
    verbose: false

- bash: 'npx quasar build'
  workingDirectory: '$(Build.SourcesDirectory)'
  displayName: 'Run Quasar build'

- task: PublishPipelineArtifact@1
  displayName: 'Publish Pipeline Artifact'
  inputs:
    targetPath: '$(Build.SourcesDirectory)/dist'
    artifact: 'quasar-dist'
手動觸發時,可以依據 branch or tag,以目前的截圖來說明,這次運行 Pipeline 時,它所使用的 source repo 將會是在 public_purpose branch 裡的最新版本。
點擊「Run pipeline」的右下角按鈕,並啟用 system diagnostics,以便排查問題。
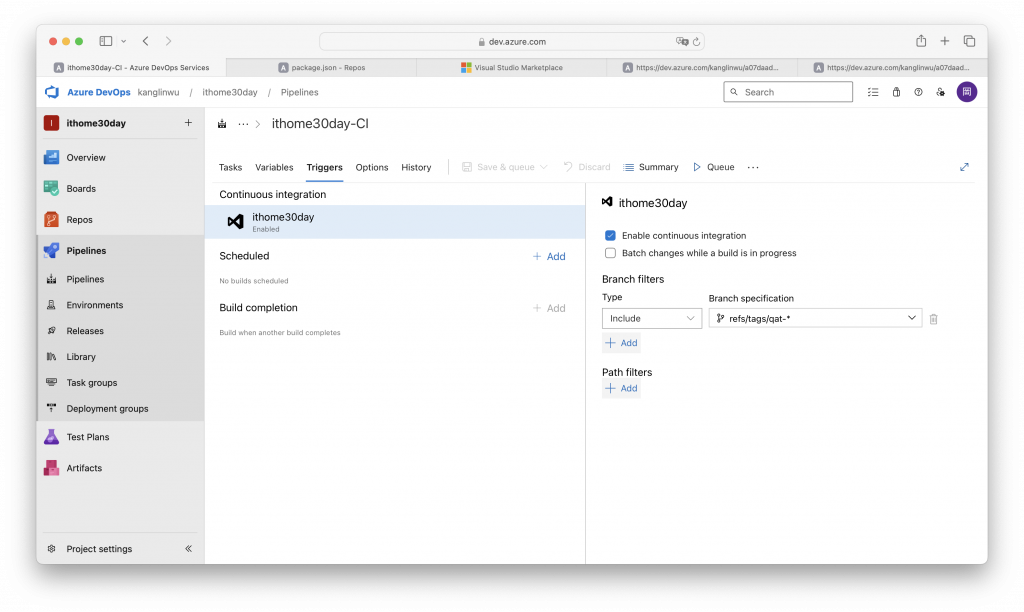
預設下,在 Pipeline 裡的 Triggers 子頁籤裡,「 Enable continuous integration 」的選項並不會被勾選。
可以透過勾選該選項,使當該 branch 有新的 version 時,就自動跑該 CI,勾選完後,點擊 Save。
這個專案裡我所使用的 artifact 是 pipeline artifact,而還有另外兩種在 Azure DevOps 裡,我這邊擷取網路上的文章,將資訊整理如下:
| Build Artifacts | Pipeline Artifacts | Azure Artifacts |
|---|---|---|
| Older | Newer | Different Service |
| Classic and YAML | YAML | Classic and YAML |
| Slow | Fast | Fast |
| Tied to a pipeline run | Tied to a pipeline run | Independent |
| Can trigger CD | Can trigger CD | Can trigger CD |
| Cannot be shared | Cannot be shared | Shareable with teams, organizations, publicly |
| Can store anything | Can store anything | Typed packages |
| Free | Free | 2GB free, then paid |
steps:
- task: PublishPipelineArtifact@1
  displayName: 'Publish Pipeline Artifact'
  inputs:
    targetPath: '$(Build.SourcesDirectory)/dist'
    artifact: 'quasar-dist'
targetPath 很好理解,將 agent build folder 裡透過 quasar build 出來放在 dist folder 裡的靜態資源 push 上去 pipeline artifact,但是看看第二個屬性,artifact,他的值「 quasar-dist 」並不能具有識別目前這個 artifact 是屬於哪個 version,假設,今天 CI 跑了兩個 version,但是 CD 在執行上有時間差時,你實際上無法判斷目前 CD 吃到的到底是哪個 CI 所產生的 pipeline artifact,因此需要讓它具有識別度的值,因此,就會講到剛剛被 disabled 那個 step 1。
$tag_version = "$(Build.SourceBranch)" -replace 'refs/tags/qat-', ''
echo "##vso[build.updatebuildnumber]$tag_version"
write-host "tag: $tag_version"
$(Build.SourceBranch) 是 Azure DevOps 提供的一個系統變數,通常用於表示當前 pipeline 觸發的 Git 分支或標籤名稱。"##vso[build.updatebuildnumber]$tag\_version" 是 Azure DevOps 的一個特殊命令,用於通知 Azure DevOps 代理更改當前 pipeline 的 build number。這段 PowerShell 腳本的主要目的是從 Build.SourceBranch 中提取出 qat- 之後的版本號,然後將其作為當前 Azure DevOps pipeline 的 build number,並且在控制台中顯示提取的 tag 版本號。這樣做可以使構建版本更具可追溯性並與 Git tag 保持一致,接著,我們就可以將該 version 用於 artifact 值內,但是前提是,每次的 CI 都是由 git tag 來 trigger 並且其內容要符合其規範。
原有設定是將 Enable continuous integration 打開,使 branch 有新 version 時自動跑 pipeline。
我們將 trigger 的條件限縮以符合我們希望每次 trigger pipeline 的 tag 都能夠使 step 1 的 powershell 抓取到 version,並將其使用於 artifact 裡,因此我們可以透過 Branch filters 裡,透過點擊 Branch specification 的下拉 button,並將其值規範成:
refs/tags/qat-*
這樣每次 CI 都只會被符合規範的 tag 所 trigger( 當然,代表 * 的 version 其格式要另行自主規範 )。
做完後,我們將其 step 1 給 enable 起來。
修改 step 5 裡的 artifact 值,將其值搭配 build number。
透過在 Azure Repos 裡寫入一筆符合其規範的 tag 後,CI 會自動開始跑,並呈現在 repo 的 commit 頁面上。
並在 pipeline 運行的 log 看到成功抓取 tag version 為 1.0.1。
而 step 5 裡也能看到其 name 已經加上了 version。
到此,整個 CI 流程跑完,而我們 build 的 static resources 也被放進 pipeline artifact 裡,等著我們明天透過 CD 去使用它,明天見。
Day 30 - 將 CI/CD 流程透過 Azure DevOps 去執行吧 - 完結。
