前篇知道了基本架構後,就能開始看懂各種範例與教學了。
官網的教學Feature的Introduction是關於3D世界的基本操作的範例介紹:
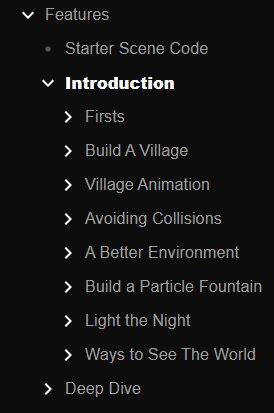
主要有8項,我把學習概念和目標註記在標題後面,以下是整理後的該主軸應該要學會的內容重點。
與之前在playground不同,現在要來在本地端建立檔案看看應要要長什麼樣子。在後面細說react-babylonjs的篇章時,會再來用npm方式引入,這邊先簡單用練習用cdn。
範例一:我只想展示3D模型
這邊babylon.js提供一個非常方便使用的方式,先建一個html檔案,貼上以下內容:
<html>
  <head>
    <title>Babylon Viewer Demo</title>
    <meta charset="UTF-8" />
    <script
      type="module"
      src="https://cdn.jsdelivr.net/npm/@babylonjs/viewer@8.0.0/dist/babylon-viewer.esm.min.js"
    ></script>
    <style>
      html, body { width: 100%; height: 100%; padding: 0; margin: 0; overflow: hidden; }
    </style>
  </head>
  <body>
    <babylon-viewer
      source="https://assets.babylonjs.com/meshes/Demos/shaderBall/BabylonShaderBall_Simple.glb"
      environment="auto"
      camera-auto-orbit
      camera-auto-orbit-speed="0.3"
      camera-auto-orbit-delay="500"
    >
    </babylon-viewer>
  </body>
</html>
在瀏覽器就可以看到展示了,是個3D 模型檢視器,很適合用在展示3D商品,不須互動的情況下。只要放模型的URL在source參數中就可以用了,希望他360旋轉什麼的再設定的參數就好,非常簡易好用。想了解更多參數內容可以參照以下:
https://doc.babylonjs.com/features/featuresDeepDive/babylonViewer/elementInterface/
範例二:我想有個更多控制權的方式引入模型來互動
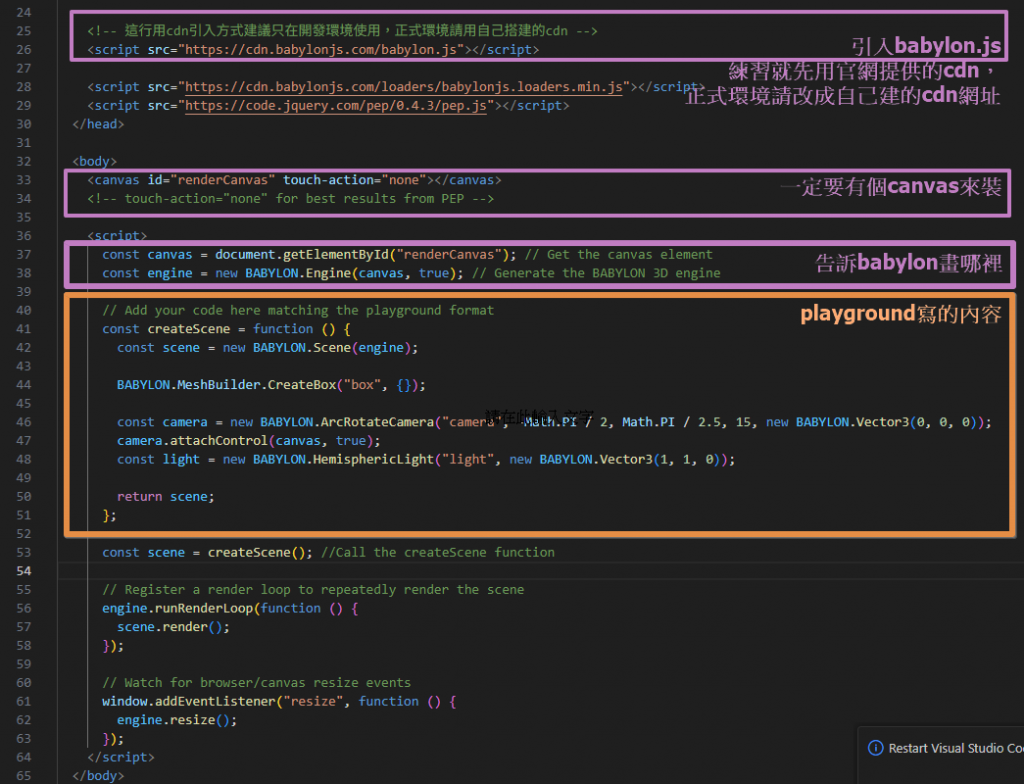
先建一個html檔案,程式碼貼上以下內容:
<!DOCTYPE html>
<html xmlns="http://www.w3.org/1999/xhtml">
  <head>
    <meta http-equiv="Content-Type" content="text/html; charset=utf-8" />
    <title>Babylon Template</title>

    <style>
      html,
      body {
        overflow: hidden;
        width: 100%;
        height: 100%;
        margin: 0;
        padding: 0;
      }

      #renderCanvas {
        width: 100%;
        height: 100%;
        touch-action: none;
      }
    </style>

    <!-- 這行用cdn引入方式建議只在開發環境使用,正式環境請用自己搭建的cdn -->
    <script src="https://cdn.babylonjs.com/babylon.js"></script>

    <script src="https://cdn.babylonjs.com/loaders/babylonjs.loaders.min.js"></script>
    <script src="https://code.jquery.com/pep/0.4.3/pep.js"></script>
  </head>

  <body>
    <canvas id="renderCanvas" touch-action="none"></canvas>
    <!-- touch-action="none" for best results from PEP -->

    <script>
      const canvas = document.getElementById("renderCanvas"); // Get the canvas element
      const engine = new BABYLON.Engine(canvas, true); // Generate the BABYLON 3D engine

      // Add your code here matching the playground format
      const createScene = function () {
        const scene = new BABYLON.Scene(engine);

        BABYLON.MeshBuilder.CreateBox("box", {});

        const camera = new BABYLON.ArcRotateCamera("camera", -Math.PI / 2, Math.PI / 2.5, 15, new BABYLON.Vector3(0, 0, 0));
        camera.attachControl(canvas, true);
        const light = new BABYLON.HemisphericLight("light", new BABYLON.Vector3(1, 1, 0));

        return scene;
      };

      const scene = createScene(); //Call the createScene function

      // Register a render loop to repeatedly render the scene
      engine.runRenderLoop(function () {
        scene.render();
      });

      // Watch for browser/canvas resize events
      window.addEventListener("resize", function () {
        engine.resize();
      });
    </script>
  </body>
</html>
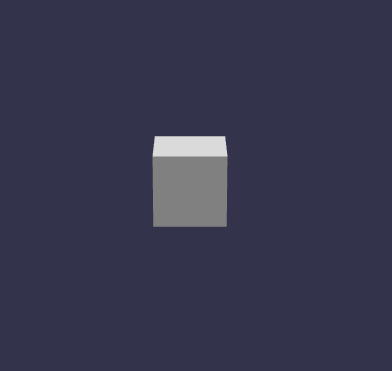
這是在官網教學最後一步的程式碼,在瀏覽器可以看到一個正方體,並可以拖曳變換角度。
這裡整理一下重點以及和playgrround上寫的時候的差別:
這樣我們就有基礎的可以控制又可以看到模型的基本雛型了!


 iThome鐵人賽