我們從 Day 2 ~ Day 6 已經把一些基礎打好,現在可以來探索 Cilium 的世界了!
在 Day 7,我們要從一個簡單的動作來開始探索 — 「建立 Pod」,例如 kubectl run mypod --image=nginx ,當執行這指令之後,背後 Cilium 究竟做了哪些事情呢?
由於這背後牽扯的細節非常多,而且內容會比較深入底層,所以「Pod 被建立時 Cilium 在背後做了什麼?」在本次鐵人賽中會是一個小小系列文,預計會拆解成 3~4 天的文章深入解析:
本鐵人賽系列文預設讀者有 K8s 與 Linux Networking 基礎,若讀者對於 CNI 的詳細內容還不熟悉,可以參考此網站
使用者發送一個創建 Pod 的指令後,K8s Control Plane 會執行一系列標準的生命週期事件。API Server 會驗證並將 Pod 的定義持久化到 etcd 中,接著,Scheduler 會根據資源需求和 Affinity 規則為這個 Pod 挑選一個最合適的 Worker Node,一旦 Node 被選定,Scheduler 會更新 etcd 中的 Pod 物件,將其綁定到該 Node。
Node 上的 kubelet,會持續監控 API Server。當 kubelet 偵測到一個新的 Pod 被指派給自己時,便會觸發本地的容器創建流程:
RunPodSandbox API),指示其下載 Image 並創建 Container。到這裡,才輪到 CNI Plugin 出場,對 Cilium 而言,就是 /opt/cni/bin/cilium-cni 這個 Binary。
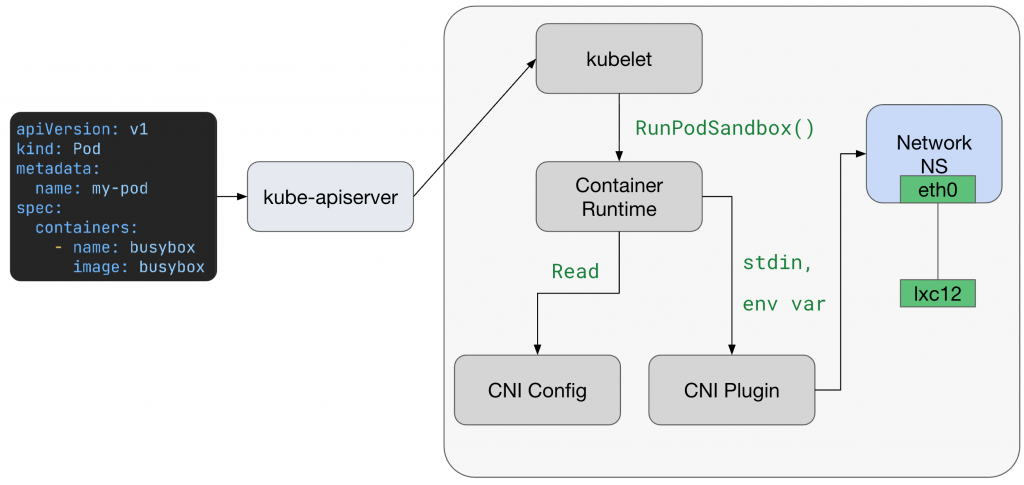
而 Container runtime 會透過 「環境變數 + stdin JSON」來呼叫 CNI Plugin (這種呼叫方式是 CNI 規定的)
環境變數:
CNI_COMMAND=ADD
CNI_CONTAINERID=<container/sandbox id>
CNI_NETNS=/proc/<pid>/ns/net(指向 sandbox 的 netns 路徑)CNI_IFNAME=eth0(Pod 內看到的介面名)CNI_PATH=/opt/cni/bin(plugins 搜尋路徑)CNI_ARGS=K8S_POD_NAMESPACE=...,K8S_POD_NAME=...,K8S_POD_INFRA_CONTAINER_ID=... (K8s 相關上下文)stdin JSON (這會由 /etc/cni/net.d/*.conf 或 .conflist 提供)
實際 JSON 會長這樣:
{
  "cniVersion": "0.3.1",
  "name": "cilium",
  "plugins": [
    {
       "type": "cilium-cni",
       "enable-debug": false,
       "log-file": "/var/run/cilium/cilium-cni.log"
    }
  ]
}
runtime 會把這段 JSON 丟到 cilium-cni 的 stdin,這是 CNI 唯一可信的設定來源。CNI 的 stdout 則必須回傳 JSON 結果 (成功與否、IP、routes 等)
ADD 為例)本文以 Cilium v1.18.1 原始碼為例
cilium-cni 的原始碼可以在 Cilium Repo 的 /cilium/plugins/cilium-cni 目錄下找到
其中 ADD Function 的完整原始碼在這:https://github.com/cilium/cilium/blob/e8a7070f26ca95265dd85ba78f30373d9df0781b/plugins/cilium-cni/cmd/cmd.go#L505-L831
在前面已經知道 Container runtime 已經呼叫了 cilium-cni,接下來我們實際透過原始碼來看一下做了什麼事。
原始碼連結點我
n, err := types.LoadNetConf(args.StdinData) // 從 stdin 載入 NetConf (包含 ipamMode, chainingMode 等設定)
cniArgs := &types.ArgsSpec{}
if err = cniTypes.LoadArgs(args.Args, cniArgs); err != nil { // 解析 K8S_POD_NAMESPACE / K8S_POD_NAME 等參數
    return fmt.Errorf("unable to extract CNI arguments: %w", err)
}
這裡完成兩件事:
stdinData) 解析成 NetConf。CNI_ARGS,例如 Pod namespace、Pod name。原始碼連結點我
c, err := client.NewDefaultClientWithTimeout(defaults.ClientConnectTimeout)
if err != nil {
    return fmt.Errorf("unable to connect to Cilium agent: %w", client.Hint(err))
}
conf, err := getConfigFromCiliumAgent(c) // 從 agent 拉取 cluster 配置
這一步 cilium-cni 會透過 Unix socket 連線到本機的 cilium-agent,取得 cluster 配置(例如 datapath mode, device MTU 等)
關於 CNI plugin chains 的觀念,推薦觀看此影片 Tutorial: From CNI Zero to CNI Hero: A Kubernetes Networking Tutorial Using CNI (從 18:44 開始)
原始碼連結點我
if len(n.NetConf.RawPrevResult) != 0 {
    if chainAction, err := getChainedAction(n, scopedLogger); chainAction != nil {
        res, err := chainAction.Add(context.TODO(), ctx, c) // 呼叫下一個 chained plugin
        return cniTypes.PrintResult(res, n.CNIVersion)
    }
}
如果有 PrevResult,代表這是 chained CNI,Cilium 會嘗試接手 chaining 流程
原始碼連結點我
if conf.IpamMode == ipamOption.IPAMDelegatedPlugin {
    ipam, releaseIPsFunc, err = allocateIPsWithDelegatedPlugin(...)
} else {
    ipam, releaseIPsFunc, err = allocateIPsWithCiliumAgent(scopedLogger, c, cniArgs, epConf.IPAMPool())
}
這裡決定 IPAM 方式:
cilium-agent 分配 Pod IP。關於各個 IPAM 的差異,可以查看這份文件。
原始碼連結點我
hostLink, epLink, tmpIfName, err = connector.SetupVeth(scopedLogger, cniID, linkConfig, sysctl)
// hostLink 在 Host netns,epLink 會被移動到 Pod netns
if err := netlink.LinkSetNsFd(epLink, ns.FD()); err != nil {
    return fmt.Errorf("unable to move veth to netns: %w", err)
}
err = connector.RenameLinkInRemoteNs(ns, tmpIfName, epConf.IfName()) // rename 成 eth0
這裡會建立 veth pair:
eth0
原始碼連結點我
ipConfig, routes, err = prepareIP(ep.Addressing.IPV4, state, int(conf.RouteMTU))

// set the addresses interface index to that of the container-side interface
ipConfig.Interface = cniTypesV1.Int(len(res.Interfaces))
res.IPs = append(res.IPs, ipConfig)
res.Routes = append(res.Routes, routes...)
這裡會把分配好的 Pod IP 和對應 Route 加到 Pod Network Namespace 的 interface (通常是 eth0 )
EndpointCreate原始碼連結點我
ep.SyncBuildEndpoint = true
newEp, err := c.EndpointCreate(ep)
在 Day 6 認識 Cilium 世界的專有名詞時,我們也清楚知道 Endpoint 是什麼了
那還記得 Day 3 介紹 Cilium 核心組件時,我有提到 cilium-cni 其實會透過 REST API 向 cilium-agent PUT /endpoint/{id} 請求來建立 Endpoint 嗎?就是指這裡!
以下是一個簡化後的架構圖 (實際是 container runtime 呼叫 cilium-cni)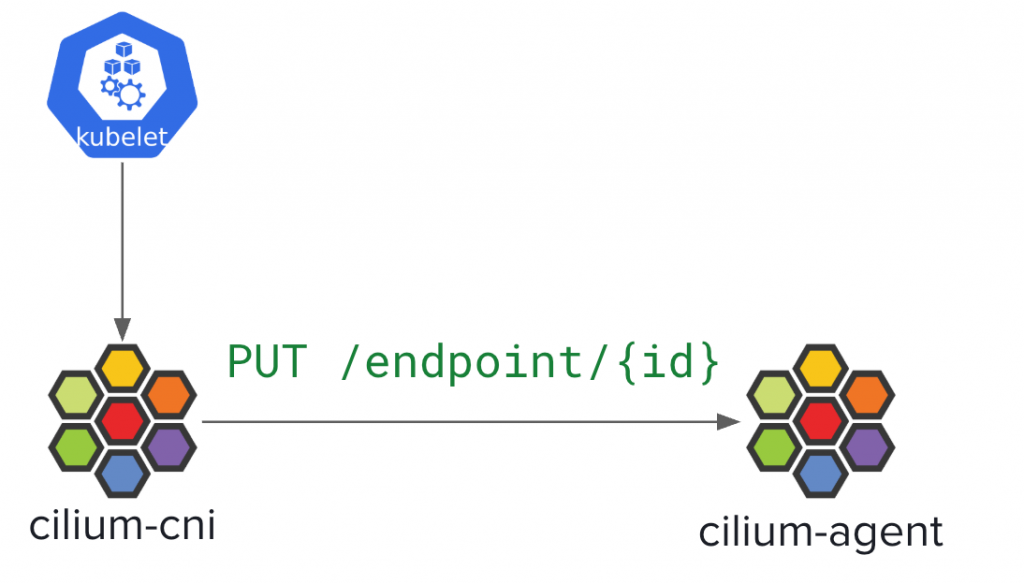
關鍵步驟:
SyncBuildEndpoint = true,代表 cilium-agent 會在接收到請求後 立即執行一次完整的 regeneration 流程(這裡是指 identity 解析、policy 計算、BPF 編譯與 attach)。換句話說,這個 flag 的作用就是強制 cilium-cni → cilium-agent 的 EndpointCreate API 採用 同步模式:只有在 datapath 完全配置完成後,CNI 才會返回成功給 Container runtime。
202 Accepted 會讓 CNI plugin 很快就回 contaienr tuntime「成功」,結果實際上 BPF 程式還沒 attach,Pod 就可能會出現「起來了,但沒網路」的狀況原始碼連結點我
return cniTypes.PrintResult(res, n.CNIVersion)
這裡其實就是根據 CNI 規定的標準,以 stdout 回傳 Result 給 Container runtime
在本日的文章中,我們已經認識了 cilium-cni 的流程,也是在使用者創建 Pod 後,Cilium 任務的起點
比較重點的部分我覺得讀者要知道
typo Accpeted -> Accepted
data path mode 敲碗 netkit l3/l2 的說明
Hi EN,
超感謝你的提醒,已將錯字修正完畢
你提供的 netkit l3/l2 我之前沒在實際工作中玩過 XD
有閒暇之餘我會找時間玩看看!


 iThome鐵人賽