
昨天(Day 25)我們已經成功完成 Cilium Cluster Mesh 的配置,今天這篇,就要真正實際體驗它的威力!
我們會一步步體驗 Cilium Cluster Mesh 帶來的跨 Cluster 通訊能力,包含如何在 不同地區的 Kubernetes Cluster 間互通 Service、如何透過 service.cilium.io/global 與 service.cilium.io/affinity 實現跨 Cluster 的 Service Discovery 與 配置偏好的流量分配,最後還會動手玩玩 跨 Cluster 的 NetworkPolicy。
今天這篇文章過程中有一些些「踩坑紀錄」和觀察心得,讓大家不只是看功能跑起來,而是真正理解它背後的設計理念。
這裡建議先開兩個 Terminal 用來執行 port-forward 以查看 Hubble UI,執行以下指令:
補充說明:我有為我的 EC2 Instance 分配 Public IP,所以我才設定
0.0.0.0,這樣可以讓我在自己電腦瀏覽器上使用http://<public ip>:12000看到 Hubble UI,如果你的環境沒有對外 IP、或只打算在本機測試,建議把0.0.0.0改成127.0.0.1,這樣 port-forward 只會綁定在 localhost,相對更安全。
kubectl port-forward -n kube-system svc/hubble-ui --address 0.0.0.0 12000:80 --context tokyo-cluster
然後我從 tokyo-cluster 的 netshoot Pod 向 hk-cluster 的 hk-nginx Pod 發出 HTTP 請求:
$ kubectl exec netshoot -- curl -s http://10.245.2.118

<!DOCTYPE html>
<html>
<head>
<title>Welcome to nginx!</title>

...
實際觀察 Hubble UI,確定有顯示跨 Cluster 的流量!可以注意下方紅匡處有顯示 clsuter name

另外,建議可以也在額外多開一個 terminal,但是在 hk-cluster 開 port-forward,以便於觀察不同 Cluster 的 hubble UI
然後 Hubble UI 可以就這樣一直開著,方便我們後續的功能可以隨時觀察即時流量
我們一樣會使用 **[Day 22] Cilium Service Mesh 是什麼?實作 Envoy 流量分流** 所使用的 bookstore 應用作為示範,具體 manifest 為了避免篇幅太長,這裡就不附上,敬請讀者直接查看 Day 22 的文章
來查看 tokyo-cluster 的 Service 目前有哪些:
$ kubectl get svc --context tokyo-cluster

NAME                                TYPE           CLUSTER-IP       EXTERNAL-IP   PORT(S)        AGE
bookstore                           ClusterIP      10.109.102.0     <none>        8080/TCP       47h
bookstore-v1                        ClusterIP      10.106.92.242    <none>        8080/TCP       46h
bookstore-v2                        ClusterIP      10.107.99.51     <none>        8080/TCP       46h
cilium-gateway-cilium-gw            LoadBalancer   10.104.14.27     10.13.1.200   80:31917/TCP   3d23h
cilium-gateway-my-example-gateway   LoadBalancer   10.96.117.73     10.13.1.201   80:30715/TCP   2d23h
echo-1                              ClusterIP      10.105.140.182   <none>        8080/TCP       2d23h
echo-2                              ClusterIP      10.97.222.212    <none>        8090/TCP       2d23h
kubernetes                          ClusterIP      10.96.0.1        <none>        443/TCP        24d
nginx-service                       ClusterIP      10.104.210.239   <none>        80/TCP         6d1h
我們已經看到 tokyo-cluster 裡面有很多 Service,包含
# hk-cluster 起一個 netshoot
kubectl run netshoot --image=nicolaka/netshoot -n default --context hk-cluster -- sleep infinity
試著從 hk-cluster 去打 tokyo-cluster 的 bookstore svc:
kubectl exec netshoot --context hk-cluster -- curl -s http://bookstore:8080
你會發現打不通!
實際輸出如下:
command terminated with exit code 7
在之前我們已經學習過 Cilium Pod-to-Service Datapath,我們知道在 Datapath 中,會有一段邏輯會去查找 Service BPF Map,從中決策出 Service 對應的 Backend IP
所以現在來找出管理這個 hk-cluster netshoot Pod 的 Cilium Agent,然後連線進去:
# 嘗試找看看有沒有 tokyo-cluster bookstore svc 的 Cluster IP (10.109.102.0)
# hk-cluster netshoot Pod 的 Cilium Agent
$ cilium-dbg service list
ID   Frontend                  Service Type   Backend
1    10.104.65.103:8080/TCP    ClusterIP
2    10.96.0.10:53/TCP         ClusterIP      1 => 10.245.0.35:53/TCP (active)
                                              2 => 10.245.0.93:53/TCP (active)
3    10.96.0.10:53/UDP         ClusterIP      1 => 10.245.0.35:53/UDP (active)
                                              2 => 10.245.0.93:53/UDP (active)
4    10.96.0.10:9153/TCP       ClusterIP      1 => 10.245.0.35:9153/TCP (active)
                                              2 => 10.245.0.93:9153/TCP (active)
5    10.96.0.1:443/TCP         ClusterIP      1 => 10.14.1.128:6443/TCP (active)
6    0.0.0.0:32379/TCP         NodePort       1 => 10.245.1.124:2379/TCP (active)
8    10.104.159.180:2379/TCP   ClusterIP      1 => 10.245.1.124:2379/TCP (active)
9    10.108.73.198:443/TCP     ClusterIP      1 => 10.14.1.42:4244/TCP (active)
10   10.101.239.227:80/TCP     ClusterIP      1 => 10.245.0.33:4245/TCP (active)
11   10.99.35.68:80/TCP        ClusterIP      1 => 10.245.0.226:8081/TCP (active)
我們知道仔細一看,你會發現找不到 tokyo-cluster bookstore svc 的 Cluster IP (10.109.102.0),所以這也說明為什麼我們會打不到 Service,畢竟根本沒對應的 Service→Backend 的映射
好奇怪,直覺上認為 Cluster 已經打通,照理來說要像同一個 Cluster 一樣通行無阻才對,但是我們務必回歸 Cilium 的底層原理:「Datapath 是重度依賴於 eBPF」,換句話說事情並非你想得那麼簡單,我們剛剛的事實就是看到 Service BPF Map 沒有 tokyo-cluster 的 Service→Backend 映射,理所當然在 Cilium 依賴 eBPF 的場景來說,就是沒有一條 Datapath 能讓你從 hk-cluster netshoot Pod 打到 tokyo-cluster 的 Service
所以我們應該反過來思考:「你要做什麼事,讓 Cilium 控制平面知道要幫你鋪好這條 eBPF-based Datapath?」
先來看看這張昨天我放過的圖,讀者們能注意到什麼端倪嗎?
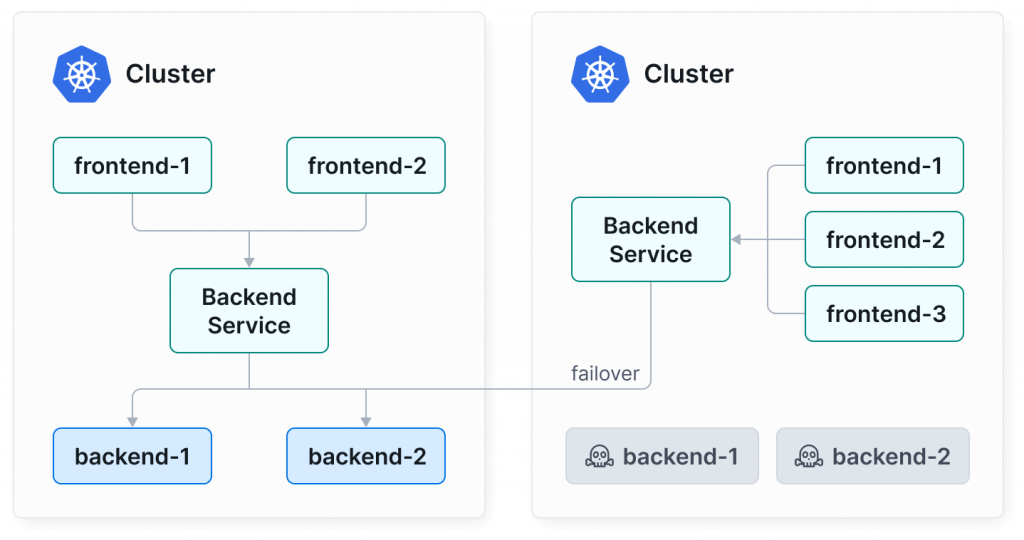
圖片取自:https://cilium.io/use-cases/cluster-mesh/
可以注意到「左右兩個 Cluster 都建立了 Backend Service」、「右邊的 Cluster 是先打自己的 Cluster 內的 Backend Service 但是 Backend Pod 選到的 Pod 是住在左邊的 Cluster」
所以我們在 hk-cluster 內也創創建一個 bookstore svc:
# hk-cluster context
# bookstore-global-svc.yaml
apiVersion: v1
kind: Service
metadata:
  name: bookstore
  annotations:
    service.cilium.io/global: "true"  # 啟用 global service
spec:
  selector:
    app: bookstore  # Service 同時選擇 v1 和 v2
  ports:
  - protocol: TCP
    port: 8080
    targetPort: 8080
你可能會問我,為什麼要加一個 annotation service.cilium.io/global: "true" 呢?
service.cilium.io/global: "true" 是在告訴 Cilium 這是一個「Global Service」,這就是我前面要說的「你要做什麼事」,這會讓 Cilium 控制平面知道要幫你鋪好這條 eBPF-based Datapath,當我們為 Service 配置這 Annotation 意味著:
部署:
kubectl apply -f bookstore-global-svc.yaml --context hk-cluster
部署好之後,目前 hk-cluster 有這些 Services:
$ kubectl get svc --context hk-cluster

NAME         TYPE        CLUSTER-IP      EXTERNAL-IP   PORT(S)    AGE
bookstore    ClusterIP   10.104.65.103   <none>        8080/TCP   21h
kubernetes   ClusterIP   10.96.0.1       <none>        443/TCP    25h
理解了 service.cilium.io/global: "true" 意思之後,你應該也要想到 「tokyo-cluster 的 bookstore svc 也要配置 service.cilium.io/global: "true"」,這樣才可以把他的 Endpoint 同步給其他 Cluster,也代表他不在是本地自己用的 Service,是一個跨 Cluster 共用的 Service
這裡我使用 kubectl edit 加上 service.cilium.io/global: "true" :
$ kubectl edit svc bookstore --context tokyo-cluster

apiVersion: v1
kind: Service
metadata:
  annotations:
    service.cilium.io/global: "true" # 加上這行


    ...
我們來看一下 hk-cluter bookstore svc 有哪些 Endpoints:
$ kubectl describe svc bookstore --context $CLUSTER2_CONTEXT
Name:                     bookstore
Namespace:                default
Labels:                   <none>
Annotations:              service.cilium.io/global: true
Selector:                 app=bookstore
Type:                     ClusterIP
IP Family Policy:         SingleStack
IP Families:              IPv4
IP:                       10.104.65.103
IPs:                      10.104.65.103
Port:                     <unset>  8080/TCP
TargetPort:               8080/TCP
Endpoints:
Session Affinity:         None
Internal Traffic Policy:  Cluster
Events:                   <none>
注意上方並記住這畫面,在 hk-cluster 這裡的 ClusterIP 是 10.104.65.103
ClusterIP 是 10.104.65.103 但是沒有任何 Endpoints
ClusterIP 是 10.104.65.103 但是沒有任何 Endpoints
ClusterIP 是 10.104.65.103 但是沒有任何 Endpoints
很重要,幫我記住上面這句話
現在連線進去 hk-cluster netshoot Pod 的 Cilium Agent,再次查看 Service BPF Map,然後找看看 10.104.65.103 :
# hk-cluster netshoot Pod 的 Cilium Agent
$ cilium-dbg service list
ID   Frontend                  Service Type   Backend
1    10.104.65.103:8080/TCP    ClusterIP      1 => 10.244.2.41:8080/TCP (active)
                                              2 => 10.244.2.209:8080/TCP (active)

...
注意到上方的輸出嗎?我們剛剛一直在念「ClusterIP 是 10.104.65.103 但是沒有任何 Endpoints」,但是在 Service BPF Map 查看 10.104.65.103 所對應到的 Backend 竟然有兩個
👉 這就是因為剛才配置好 Global Service 後,從 tokyo-cluster 同步過來的 Endpoint,也是所謂的 Cilium Cluster Mesh Service Discovery
現在我們從 hk-cluster netshoot Pod 打看看 bookstore service:
$ kubectl exec netshoot --context hk-cluster -- curl -s http://bookstore:8080

Response from v1
接著我來看看 hk-cluster 的 Hubble UI:
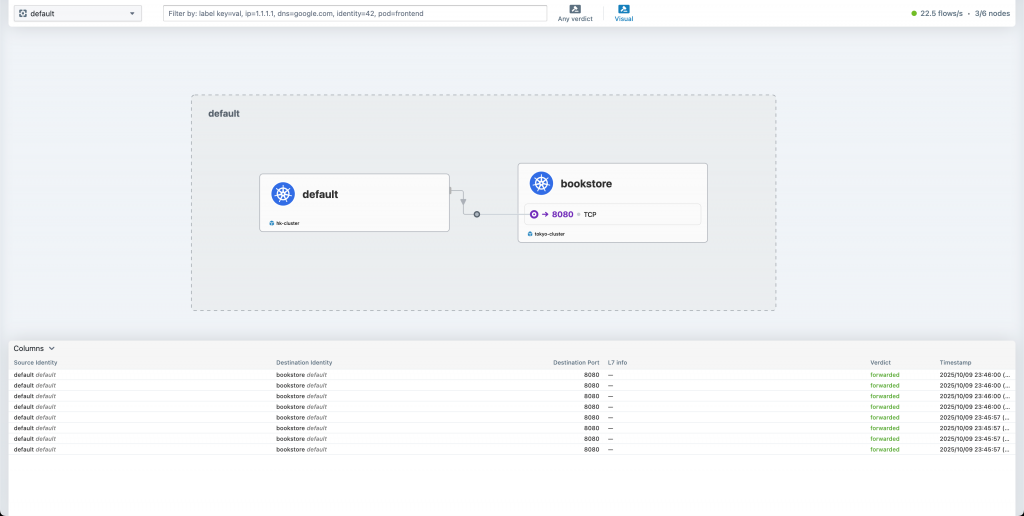
可以很確信地說「Response 絕對是從東京傳回來的」
接著我們可以來部署在 hk-cluster 也部署 bookstore 應用:
# bookstore-hk-v1-v2.yaml
---
apiVersion: apps/v1
kind: Deployment
metadata:
  name: bookstore-v1
spec:
  replicas: 1
  selector:
    matchLabels:
      app: bookstore
      version: v1
  template:
    metadata:
      labels:
        app: bookstore
        version: v1
    spec:
      containers:
      - name: bookstore
        image: busybox:1.36
        ports:
        - containerPort: 8080
        command:
          - /bin/sh
          - -c
          - "while true; do { echo -e 'HTTP/1.1 200 OK\\n\\nResponse from HK v1'; } | nc -l -p 8080; done"
---
apiVersion: apps/v1
kind: Deployment
metadata:
  name: bookstore-v2
spec:
  replicas: 1
  selector:
    matchLabels:
      app: bookstore
      version: v2
  template:
    metadata:
      labels:
        app: bookstore
        version: v2
    spec:
      containers:
      - name: bookstore
        image: busybox:1.36
        ports:
        - containerPort: 8080
        command:
          - /bin/sh
          - -c
          - "while true; do { echo -e 'HTTP/1.1 200 OK\\n\\nResponse from HK v2'; } | nc -l -p 8080; done"
部署:
kubectl apply -f bookstore-hk-v1-v2.yaml --context hk-cluster
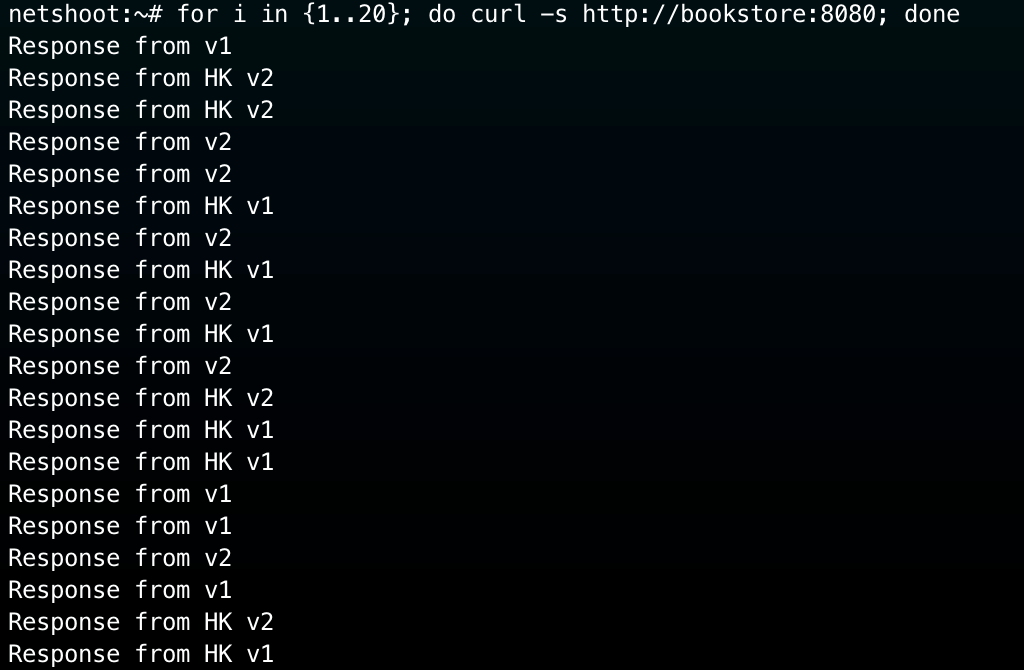
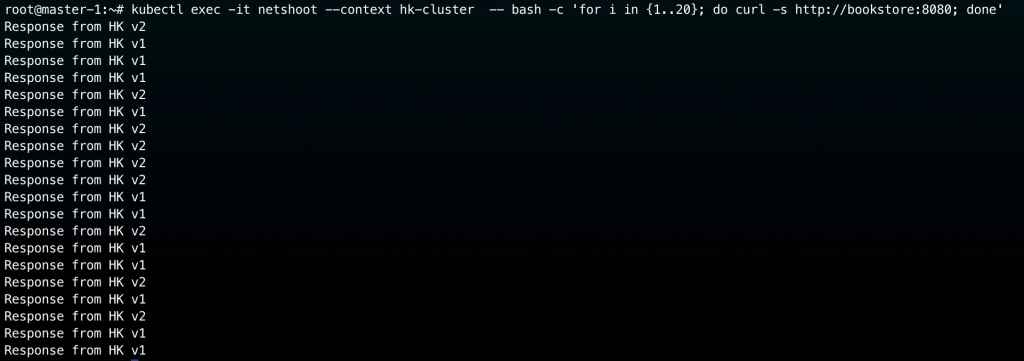
接著我連進去 hk-cluster netshoot Pod 裡面,一次發出多一點請求:
# hk-cluster netshoot Pod
for i in {1..20}; do curl -s http://bookstore:8080; done
實際結果展示:
也來看一下 hk-cluster 的 Hubble UI:
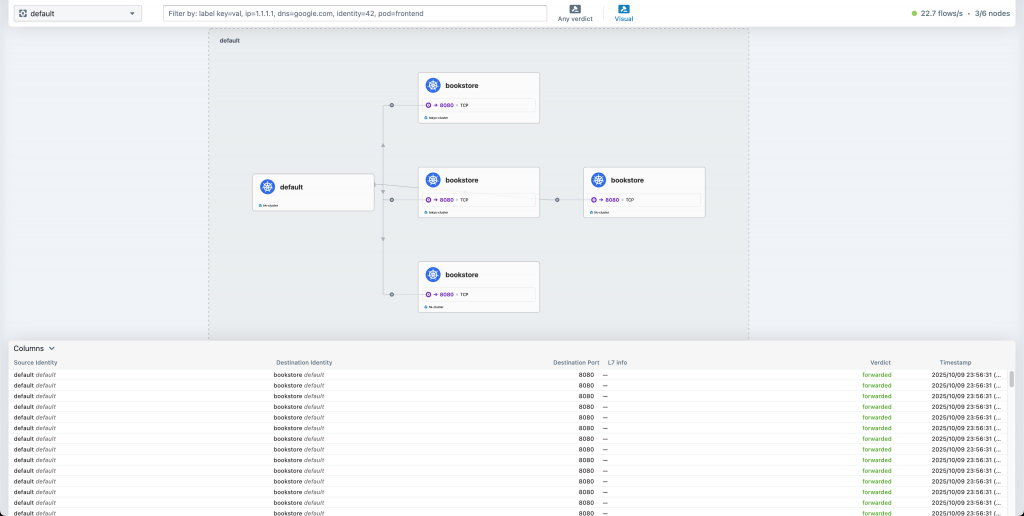
確實打到了 hk-cluster 和 tokyo-clsuter 的各個 bookstore Pods
👉 這邊我們實現出了 Cilium Cluster Mesh Load Balancing
我們已經實現了跨 Cluster 的 Load Balancing,只是這帶來一點點小缺點:
所以我們的訴求是:盡量都打 Local Cluster Endpoints,除非 Local Cluster Endpoints 不可用,那我們再去打 Remote Cluster Endpoints
想要實現這個其實很簡單,可以透過 annotationservice.cilium.io/affinity 來控制流量偏好,三種模式可以配置:
| 值 | 行為 | 說明 |
|---|---|---|
local |
優先使用 Local Cluster 的 Pod;只有在 Local backend 都掛掉時才用 remote | 適合平時運行,確保低延遲與 Region 隔離 |
remote |
優先使用 Remote Cluster 的 Pod;只有在Remote 都掛掉時才 fallback 回 Local | 適合維運切流或災難演練 |
none(預設) |
無偏好,所有 Cluster 的 backend 平均分流。 | 適合單純的 Active-Active Load Balancing |
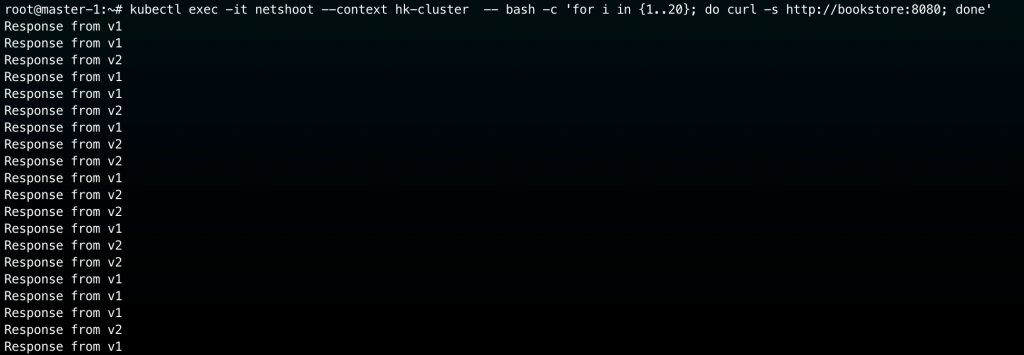
我現在要將 hk-cluster 的 bookstore service 配置成 local service affinity:
kubectl annotate svc bookstore service.cilium.io/affinity=local --overwrite --context hk-cluster
嘗試從 hk-cluster netshoot pod 來測試,預期是回應都要來自 hk-clsuter 的 bookstore:
kubectl exec -it netshoot --context hk-cluster -- bash -c 'for i in {1..20}; do curl -s http://bookstore:8080; done'
實際結果如下圖,很符合我們預期,代表 Service Affinity 確實奏效了:
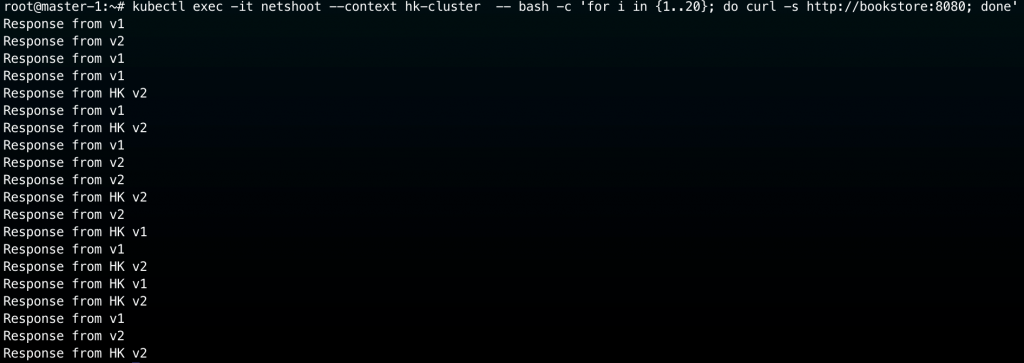
現在我要將 hk-cluster 的 bookstore Pods 都刪除:
$ kubectl delete -f bookstore-hk-v1-v2.yaml --context hk-cluster

deployment.apps "bookstore-v1" deleted
deployment.apps "bookstore-v2" deleted
執行上面指令後,hk-cluster 裡面已經沒有任何 bookstore Pods
我們如果再次從 hk-cluster netshoot pod 來向 bookstore service 發出請求,理應來說不會發生停機,而是會由 tokyo-cluster 的 bookstore pod 來回應,實際測試結果如下:
👉 所以透過將 service.cilium.io/affinity annotation 設定為 local ,成功地滿足我們的需求:
我們接著來試試看跨 Cluster 的 Network Policy 實踐,其實使用起來不會很複雜,基本上寫法就是要多指定 cluster name 而已!
首先,我們知道在 tokyo-cluster 以及 hk-cluster 上都有 netshoot pod 和 bookstrore v1, v2 Pod
我們來試著在上寫一份 CNP,套在 netshoot 上
# cnp-allow-netshoot-pod-to-bookstore.yaml
apiVersion: "cilium.io/v2"
kind: CiliumNetworkPolicy
metadata:
  name: "allow-netshoot-pod-to-bookstore"
spec:
  endpointSelector:
    matchLabels:
      app: netshoot
  egress:
  - toEndpoints:
    - matchLabels:
        app: bookstore
部署至兩個 Clusters:
kubectl apply -f cnp-allow-netshoot-pod-to-bookstore.yaml --context tokyo-cluster
kubectl apply -f cnp-allow-netshoot-pod-to-bookstore.yaml --context hk-cluster
接著試著打看看 bookstore svc:
kubectl exec netshoot -- curl -s http://bookstore:8080
command terminated with exit code 6
結果會發現輸出 exit code 6,這代表 DNS 解析有問題,這是因為請求打出去後,需要先把 bookstore 解析成 IP,這時就會需要跟 k8s cluster 上的 CoreDNS 通信,但是我們目前的 CNP 是沒有一條 egress rule 是允許流量打去 CoreDNS。
所以我們來修改一下 CNP,確保 netshoot 可以跟 CoreDNS 通信:
# cnp-allow-netshoot-pod-to-bookstore.yaml
apiVersion: "cilium.io/v2"
kind: CiliumNetworkPolicy
metadata:
  name: "allow-netshoot-pod-to-tokyo"
spec:
  endpointSelector:
    matchLabels:
      app: netshoot
  egress:
  # 允許 DNS 查詢
  - toEndpoints:
    - matchLabels:
        io.kubernetes.pod.namespace: kube-system
        k8s-app: kube-dns
    toPorts:
    - ports:
      - port: "53"
        protocol: UDP
      rules:
        dns:
          - matchPattern: "*"
  # 允許流量到 bookstore
  - toEndpoints:
    - matchLabels:
        app: bookstore
部署至兩個 Clusters:
kubectl apply -f cnp-allow-netshoot-pod-to-bookstore.yaml --context tokyo-cluster
kubectl apply -f cnp-allow-netshoot-pod-to-bookstore.yaml --context hk-cluster
嘗試從 hk-cluster netshoot pod 來測試:
kubectl exec -it netshoot --context hk-cluster -- bash -c 'for i in {1..20}; do curl -s http://bookstore:8080; done'
實際結果如下圖,現在可以
如果我們想要控制只能存取 tokyo-cluster 的 bookstore 呢?
可以加上 io.cilium.k8s.policy.cluster: cluster-name :
# cnp-allow-netshoot-pod-to-bookstore.yaml
apiVersion: "cilium.io/v2"
kind: CiliumNetworkPolicy
metadata:
  name: "allow-netshoot-pod-to-tokyo"
spec:
  endpointSelector:
    matchLabels:
      app: netshoot
  egress:
  # 允許 DNS 查詢
  - toEndpoints:
    - matchLabels:
        io.kubernetes.pod.namespace: kube-system
        k8s-app: kube-dns
    toPorts:
    - ports:
      - port: "53"
        protocol: UDP
      rules:
        dns:
          - matchPattern: "*"
  # 允許流量到 tokyo-cluster bookstore
  - toEndpoints:
    - matchLabels:
        app: bookstore
        io.cilium.k8s.policy.cluster: tokyo-cluster
部署至兩個 Clusters:
kubectl apply -f cnp-allow-netshoot-pod-to-bookstore.yaml --context tokyo-cluster
kubectl apply -f cnp-allow-netshoot-pod-to-bookstore.yaml --context hk-cluster
這裡我拿 hk-cluster netshoot 作為示範:
kubectl exec -it netshoot --context hk-cluster -- bash -c 'for i in {1..20}; do curl -s http://bookstore:8080; done'
你會很發出去的請求前面可能成功幾次,後面就卡住了,這是因為在進行 Service→Backend 的決策時,選到了 hk-cluster 上的 Pod,而我們 CNP 僅允許流量打去 tokyo-cluster,所以流量被 Drop 了,以下是 hk-cluster Hubble UI 的畫面:
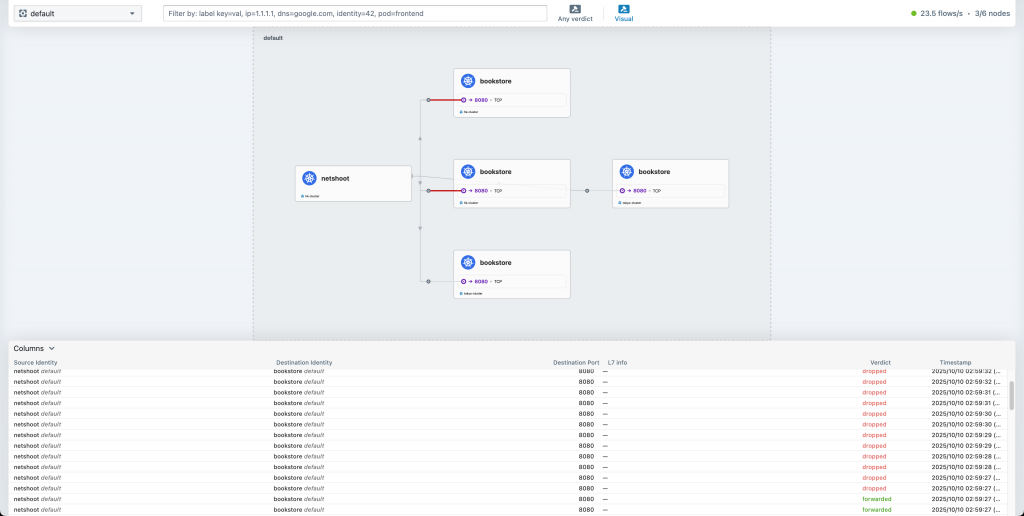
以我們這個情境來說,配置 CNP 前,一定要清楚知道你的 Service 有對應到哪些 Backend 「如果 Service 有機率會選中你不允許的 Backend」,這個 CNP apply 下去,就會不小心讓系統機率性不可用
今天這篇我們算是把 Cilium Cluster Mesh 的核心價值 都體驗了一輪。包括:跨 Cluster 的 Service Discovery、Load Balancing,一直到 Service Affinity 與跨 Cluster 的 NetworkPolicy,Cilium 用 Cluster Mesh 這套機制,把這些原本孤立的網路拓樸重新編織成一個邏輯上統一的網路空間。
再透過 service.cilium.io/global 以及 service.cilium.io/affinity 這兩個簡單但強大的 annotation,我們就能控制跨 Region 的流量偏好,在確保高可用性的同時,也能兼顧延遲與成本。
從 Day 1 一路走到 Day 26,我們從傳統方案的痛點說起,接著學習了 eBPF ,再從最基本的 Pod, Service, Service Mesh 一路走到今天的 Cluster Mesh,透過這樣循序漸進的教學其實已經把 Cilium 該學的都學到了!後續的文章我將開始分享 Cilium 實戰的經驗,讓讀者們除了在鐵人賽中學會 Cilium 的底層原理之外,還能避免在真實戰場中走了很多彎路!
