今天我們會用 Docker 建立 Postgres,然後讓 Java Spring Data JPA 去 access 這個 DB。這篇會同時紀錄 Docker 的配置、DataSource、HikariCP(連線池),並實作一個最小可用的 Entity-Repository-Service 然後再用一個簡單的 Controller 來用 Postman 檢查有沒有成功。
以下是以 JPA 來使用 PostgreSQL 所需要的 dependencies
<dependency>
    <groupId>org.springframework.boot</groupId>
    <artifactId>spring-boot-starter-data-jpa</artifactId>
</dependency>
<dependency>
    <groupId>org.postgresql</groupId>
    <artifactId>postgresql</artifactId>
    <scope>runtime</scope>
</dependency>
runtime ?程式在 compile 時我們不需要 connect to db,但程式在跑的時候,會執行連線,而這時一定要有 driver。就像餐廳開店的廚師(driver),你自己寫菜單(code)時不需要真的請廚師到場,但上菜(runtime)時少不了。
compile:預設,程式編譯、測試、打包都會用到。provided:只在編譯/測試時要,但 runtime 由容器提供(e.g. Servlet API)。runtime:只在執行時需要(e.g. Postgres driver)。test:測試專用。 jpa:
open-in-view: false
hibernate:
ddl-auto: none
properties:
hibernate:
jdbc:
batch_size: 50
order_updates: true
format_sql: true
open-in-view: false:不要把 Hibernate Session 維持到 Web View 層,避免在 Controller/JSON 序列化時不小心觸發 lazy loading。這樣更安全,也能貼近六邊形架構/DDD 的分層界線。ddl-auto: none:不要自動建表或改表(update/create 等),而是交給 Flyway 管理 schema,確保版本可控且可回溯(下一篇會介紹)。hibernate.jdbc.batch_size: 50:批次寫入,讓 INSERT/UPDATE 累積到 50 筆再送出,提升效能。order_updates: true 對 UPDATE 語句排序,搭配上面的批次送出更有效率。format_sql: true:log 時把 SQL 排版漂亮,方便 debug。就像平常去郵局寄信是一封封寄(效率差),批次處理就像把 50 封信先收集起來,一次交給櫃檯 ~
我覺得這個必須看原文才能理解:
https://www.baeldung.com/spring-open-session-in-view
org.hibernate.LazyInitializationException :
https://stackoverflow.com/questions/74546974/what-can-cause-a-lazyinitatializationexception-whereas-spring-open-in-view-is-en
Java Spring OSIV: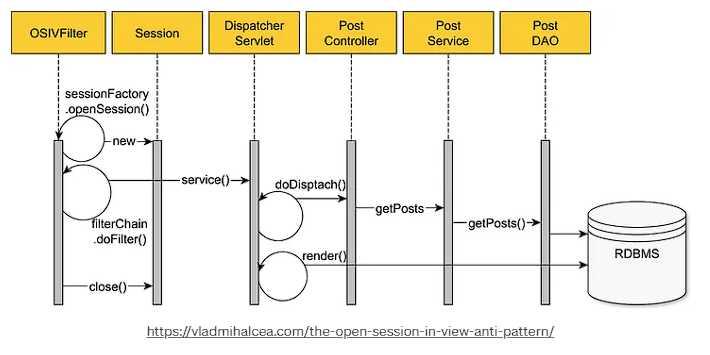
https://blog.devgenius.io/osiv-lazyinitializationexception-46a0b630b421
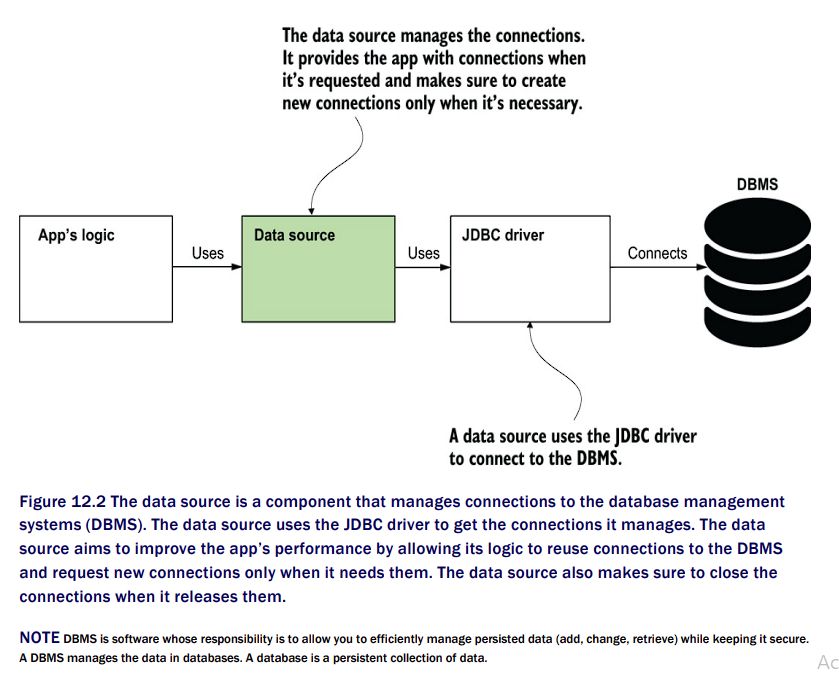
Datasource 是一個中間層,如果沒有這一層,我們對 data 有任何的操作都會要 "重新連線 "。Datasource 讓多個請求可以共用連線,不用每次都 DriverManager.getConnection(...) 重新開 socket,這樣效率差很多。
https://github.com/brettwooldridge/HikariCP
Fast, simple, reliable. HikariCP is a "zero-overhead" production ready JDBC connection pool. At roughly 165Kb, the library is very light.
  hikari:
    maximum-pool-size: 10
    minimum-idle: 2
    connection-timeout: 20000
maximum-pool-size: 最大連線數minimum-idle : 最少保留的閒置連線。當前閒置連線數低於這個值時,連線池會主動建立新連線來補到這個數字(但永遠不會超過 maximum-pool-size)。connection-timeout : 取連線最多等 20s。
docker-compose.yml
version: "3.9"
services:
  db:
    image: postgres:16
    environment:
      POSTGRES_DB: ${POSTGRES_DB}
      POSTGRES_USER: ${POSTGRES_USER}
      POSTGRES_PASSWORD: ${POSTGRES_PASSWORD}
    ports:
      - "5432:5432"
    healthcheck:
      test: ["CMD-SHELL", "pg_isready -U ${POSTGRES_USER} -d ${POSTGRES_DB}"]
      interval: 5s
      timeout: 3s
      retries: 10
.env 檔、docker-compose.yml 的 environment,或 Docker secrets 搭配 Spring 的 configtree。application.yml 用 ${...} access 環境 /secret 的值。在 Spring Boot 裡,PropertySource 就是「configuration properties 的來源 (a source of key-value pairs)」。
config 值 有很多所以會有優先順序把它們整合起來,例如:
這些來源都會被統一收進 Environment 裡,${POSTGRES_USER} 這種 placeholder 的時候,Spring 就會去一個一個 PropertySource 找,找到就替換。
org.springframework.core.env.Environment
SystemEnvironmentPropertySource 代表來自 OS 的環境變數org.springframework.core.env.PropertySource<T>
可以想像 Environment 像是一間圖書館 PropertySource 的相關 instance 則是一本本不同的字典,有些放 .env 的值,有些放 application.yml 的值。
ConfigTree 是 Spring Boot 2.4+ 引進的一個功能,用來讀 Docker/K8s 的 secrets 或 config。
/run/secrets/ 目錄下的檔案當成一個 PropertySource。/run/secrets/
├─ POSTGRES_USER
├─ POSTGRES_PASSWORD
然後你就可以 access in application.yml
spring.datasource.username: ${POSTGRES_USER}
spring.datasource.password: ${POSTGRES_PASSWORD}
@Entity
public class ArticleEntity {

    @Id
    @GeneratedValue
    @Column(columnDefinition = "uuid")
    private UUID id;

    @Enumerated(EnumType.STRING)
    @Column(nullable = false, length = 40)
    private SourceType source;

    @Column(name = "external_id", length = 128)
    private String externalId;

    @Column(nullable = false, columnDefinition = "text")
    private String title;

    @Column(nullable = false, columnDefinition = "text")
    private String url;

    //find digest content for given url
    @Column(name = "url_hash_hex", length = 64, nullable = false)
    private String urlHashHex;

    @Column(name = "author")
    private String author;

    @Column(name = "published_at", columnDefinition = "timestamptz")
    private Instant publishedAt;

    @Column(name = "first_seen_at", nullable = false, columnDefinition = "timestamptz")
    private Instant firstSeenAt = Instant.now();

    // Ommited getter and setter
}
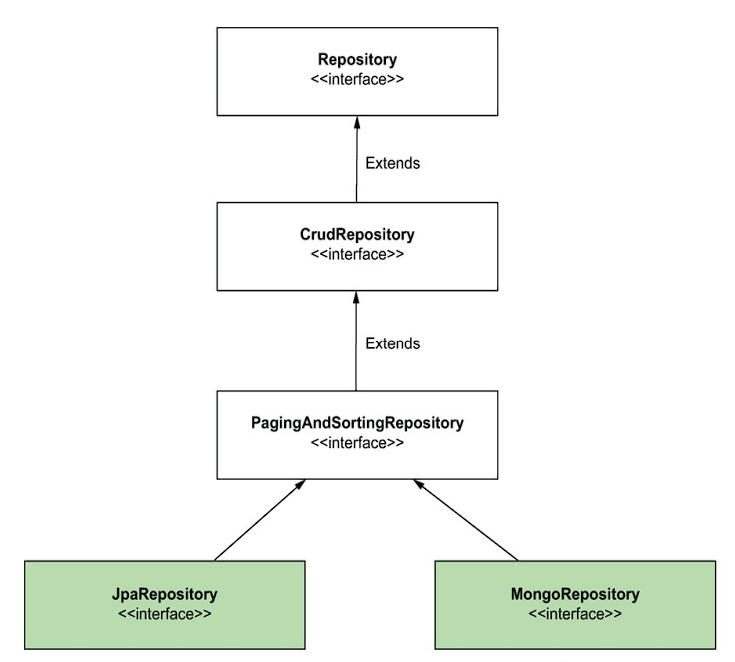
我們先暫時用個簡單的 JPA 例子,注意我們只要繼承 JpaRepository 就好。
Spring Data repository 常常「interface 繼承 interface」。下圖是 Spring Data Repository 的繼承關係,越往下功能越多,根據要操做的需求選合適的介面。(註 Repository 只是 marker interface, no method)
@Repository
public interface ArticleJpaRepository extends JpaRepository<ArticleEntity, UUID> {
    // 繼承 JpaRepository,已經自動有 save(), saveAll(), findAll() ...
}
Day2 我們有提到 Domain 層面收集各個 news api 的 data 統一轉成 FeedItem 處理。所以需要一個 Mapper 把 FeedItem 轉成 ArticleEntity 。
//map FeedItem to ArticleEntity
public class ArticleMapper {
    public static ArticleEntity toNewEntity(FeedItem f) {
        var a = new ArticleEntity();
        a.setSource(f.source());
        a.setExternalId(f.id());
        a.setTitle(f.title());
        a.setUrl(f.url());
        a.setUrlHashHex(Hashes.sha256Hex(Urls.normalize(f.url())));
        a.setAuthor(f.author());
        a.setPublishedAt(f.publishedAt());
        a.setFirstSeenAt(Instant.now());
        return a;
    }

    public static List<ArticleEntity> toNewEntityList(List<FeedItem> fs) {
        return fs.stream()
                 .map(ArticleMapper::toNewEntity)
                 .toList();
    }

    private ArticleMapper() {}
}
@Service
public class ArticleService {

    private final ArticleJpaRepository articleJpaRepository;

    public ArticleService(ArticleJpaRepository articleJpaRepository) {
        this.articleJpaRepository = articleJpaRepository;
    }

    public void saveAllFeedItem(List<FeedItem> feedItems) {
        articleJpaRepository.saveAll(ArticleMapper.toNewEntityList(feedItems));
    }

    public List<ArticleEntity> getAllArticles() {
        return articleJpaRepository.findAll();
    }
}
1 下一篇才提到用 flyway 管理 schema 所以先讓 hibernate 根據 entity 自動建立 table
spring:
  jpa:
    hibernate:
      ddl-auto: update
    show-sql: true
    properties:
      hibernate.format_sql: true
2 把 DB container build 好然後再啟動 Spring Boot 的 app
docker compose -f docker-compose.yml up -d db
3 寫一個簡單的 Controller and test via Postman
@RestController
public class WebService {

    final private ArticleService articleService;

    public WebService(ArticleService articleService) {
        this.articleService = articleService;
    }

    @GetMapping("/articles")
    public ResponseEntity<?> getAllArticles() {
        return ResponseEntity
                .status(HttpStatus.ACCEPTED)
                .body(articleService.getAllArticles());
    }

    @PostMapping(path = "/import", consumes = "application/json")
    public ResponseEntity<Void> saveAllFeedItem(@RequestBody List<FeedItem> items) {
        articleService.saveAllFeedItem(items);
        return ResponseEntity
                .status(HttpStatus.CREATED)
                .build();
    }
}
@RequestBody 告訴 Spring 用 JSON 反序列化 (deserialize) 到 List<FeedItem> 。Spring 會透過 HttpMessageConverter 把 HTTP request 的 body 根據 Content-Type(例如 application/json),JSON array -> Java List。
79.4 Customize the @ResponseBody Rendering
Spring uses HttpMessageConverters to render @ResponseBody (or responses from @RestController). ....
官方文件:
https://docs.spring.io/spring-boot/docs/2.1.1.RELEASE/reference/html/howto-spring-mvc.html
consumes = "application/json":讓 API 規格更明確。如果 client 用了 Content-Type: text/plain 就會 415 Unsupported Media Type。
It specifies the supported media type of the request (consumes), and the media type of the response (produces).
https://stackoverflow.com/questions/33591574/what-is-produce-and-consume-in-request-mapping
確認在 Day2 提到的 FeedItem
public record FeedItem(
        String id,
        SourceType source,
        String title,
        String url,
        String author,
        Integer score,
        java.time.Instant publishedAt
) {}
用 Postman 測試: 在 Post Request 的 Body 用 JSON Array
[
  {
    "id": "424242",
    "source": "HN",
    "title": "Hello Hacker News",
    "url": "https://news.ycombinator.com/item?id=424242",
    "author": "alice",
    "score": 123,
    "publishedAt": "2025-09-19T08:00:00Z"
  },
  {
    "id": "world/2025/sep/20",
    "source": "GUARDIAN",
    "title": "Guardian World",
    "url": "https://www.theguardian.com/world/2025/sep/20/abc",
    "author": "bob",
    "score": 77,
    "publishedAt": "2025-09-20T12:34:56Z"
  }
]
用 curl 測試:
curl -i -X POST http://localhost:8080/articles/import \
  -H 'Content-Type: application/json' \
  -d '[
    {
      "id":"424242",
      "source":"HN",
      "title":"Hello Hacker News",
      "url":"https://news.ycombinator.com/item?id=424242",
      "author":"alice",
      "score":123,
      "publishedAt":"2025-09-19T08:00:00Z"
    }
  ]'
curl -i http://localhost:8080/articles
LAURENŢIU SPILCĂ, Spring Start Here: Learn what You Need and Learn it Well
https://docs.spring.io/spring-boot/docs

