(如火焰、煙霧、雨、雪、爆炸),控制粒子的行為,讓整體更生動。
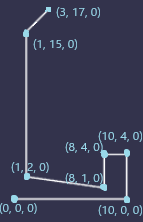
在這個單元中會建立一個有粒子效果的的噴泉,而首先噴泉的主體建築用了BABYLON.MeshBuilder.CreateLathe 這個 Babylon.js 內建的功能,專門用來將一個 2D 輪廓繞著一根軸旋轉,從而生成一個 3D 模型。因此會宣告一個向量座標數組來畫成一張2D圖:
const fountainProfile = [
	new BABYLON.Vector3(0, 0, 0),
	new BABYLON.Vector3(10, 0, 0),
	new BABYLON.Vector3(10, 4, 0),
	new BABYLON.Vector3(8, 4, 0),
	new BABYLON.Vector3(8, 1, 0),
	new BABYLON.Vector3(1, 2, 0),
	new BABYLON.Vector3(1, 15, 0),
	new BABYLON.Vector3(3, 17, 0)
];
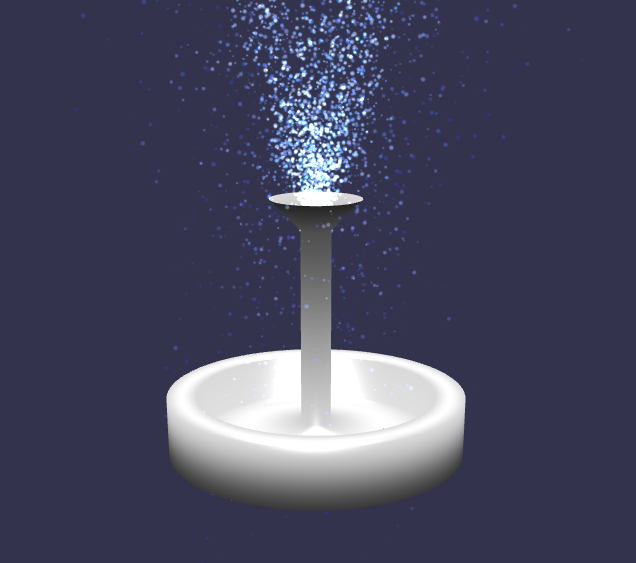
接者用這張圖當輪廓轉一圈
const fountain = BABYLON.MeshBuilder.CreateLathe("fountain", {shape: fountainProfile, sideOrientation: BABYLON.Mesh.DOUBLESIDE}, scene);
就有第一步的噴泉本體了,點此從playground看:

第二步要加上有粒子效果的噴泉
宣告一個可以同時容納 5000 個粒子的系統,來提供夠多的粒子模擬噴水效果。並把噴出來的粒子加上紋理,用在粒子的紋理通常是中間亮、邊緣模糊的光暈來仿真。
const particleSystem = new BABYLON.ParticleSystem("particles", 5000, scene);  //scene is optional
particleSystem.particleTexture = new BABYLON.Texture("textures/flare.png", scene);
接著指定發射的區域和從minEmitBox 發射到maxEmitBox,並給他固定y軸往上噴但x和z是隨機方向的向四周噴射:
particleSystem.emitter = new BABYLON.Vector3(0, 10, 0); // the point at the top of the fountain
particleSystem.minEmitBox = new BABYLON.Vector3(-1, 0, 0); // minimum box dimensions
particleSystem.maxEmitBox = new BABYLON.Vector3(1, 0, 0); // maximum box dimensions
particleSystem.direction1 = new BABYLON.Vector3(-2, 8, 2);
particleSystem.direction2 = new BABYLON.Vector3(2, 8, -2);
然後給他重力讓這個往上噴的水會因為重力而往下掉,就完成了唷!
particleSystem.gravity = new BABYLON.Vector3(0, -9.81, 0);
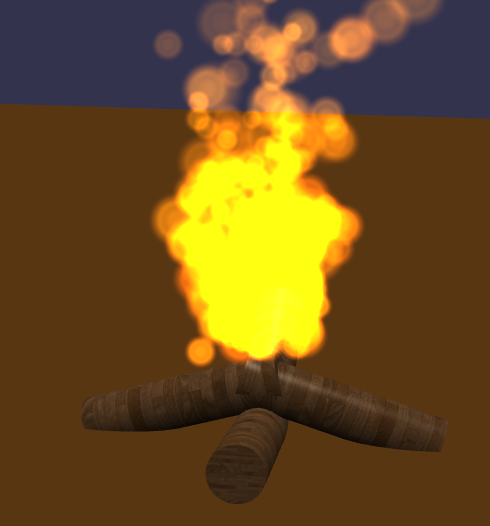
我們學會了Feature的噴泉就能以此類推做出純粒子的火堆:
const createScene = function () {
    const scene = new BABYLON.Scene(engine);

    // --- 基礎場景設定 ---
    const camera = new BABYLON.ArcRotateCamera("Camera", -Math.PI / 2, Math.PI / 2.5, 20, new BABYLON.Vector3(0, 0, 0), scene);
    camera.attachControl(canvas, true);
    camera.lowerRadiusLimit = 5; // 防止攝影機穿透地面
    camera.upperRadiusLimit = 50;

    const light = new BABYLON.HemisphericLight("hemiLight", new BABYLON.Vector3(0, 1, 0), scene);
    light.intensity = 0.7; // 降低環境光強度,讓火焰更明顯

    // 建立一個地面
    const ground = BABYLON.MeshBuilder.CreateGround("ground", { width: 50, height: 50 }, scene);
    const groundMaterial = new BABYLON.StandardMaterial("groundMat", scene);
    groundMaterial.diffuseColor = new BABYLON.Color3(0.5, 0.3, 0.1); // 泥土色
    ground.material = groundMaterial;

    // --- 篝火的實體部分 (木柴) ---
    // 這裡我們用一些圓柱體來模擬木柴
    const woodLog1 = BABYLON.MeshBuilder.CreateCylinder("woodLog1", { diameter: 1, height: 4 }, scene);
    woodLog1.position = new BABYLON.Vector3(1.5, 0.5, 0);
    woodLog1.rotation.z = Math.PI / 2 * 0.8; // 稍微傾斜
    const woodLog2 = BABYLON.MeshBuilder.CreateCylinder("woodLog2", { diameter: 1, height: 4 }, scene);
    woodLog2.position = new BABYLON.Vector3(-1.5, 0.5, 0);
    woodLog2.rotation.z = -Math.PI / 2 * 0.8;
    const woodLog3 = BABYLON.MeshBuilder.CreateCylinder("woodLog3", { diameter: 1, height: 4 }, scene);
    woodLog3.position = new BABYLON.Vector3(0, 0.5, 1.5);
    woodLog3.rotation.x = Math.PI / 2 * 0.8;
    const woodLog4 = BABYLON.MeshBuilder.CreateCylinder("woodLog4", { diameter: 1, height: 4 }, scene);
    woodLog4.position = new BABYLON.Vector3(0, 0.5, -1.5);
    woodLog4.rotation.x = -Math.PI / 2 * 0.8;

    const woodMaterial = new BABYLON.StandardMaterial("woodMat", scene);
    woodMaterial.diffuseTexture = new BABYLON.Texture("https://www.babylonjs-playground.com/textures/wood.jpg", scene);
    woodLog1.material = woodMaterial;
    woodLog2.material = woodMaterial;
    woodLog3.material = woodMaterial;
    woodLog4.material = woodMaterial;

    // --- 火焰粒子系統 ---
    const fireParticleSystem = new BABYLON.ParticleSystem("fireParticles", 2000, scene);
    fireParticleSystem.particleTexture = new BABYLON.Texture("https://www.babylonjs-playground.com/textures/flare.png", scene); // 使用光暈紋理
    fireParticleSystem.emitter = new BABYLON.Vector3(0, 2, 0); // 從木柴中間上方發射
    fireParticleSystem.minEmitBox = new BABYLON.Vector3(-1, 0, -1); // 發射區域較廣
    fireParticleSystem.maxEmitBox = new BABYLON.Vector3(1, 0, 1);

    // 顏色設定:從橙黃到紅色,最後淡出
    fireParticleSystem.color1 = new BABYLON.Color4(1, 0.6, 0, 1.0);// 橙黃色
    fireParticleSystem.color2 = new BABYLON.Color4(0.8, 0.3, 0, 1.0);// 橘紅色
    fireParticleSystem.colorDead = new BABYLON.Color4(0.2, 0.1, 0, 0.0);// 淡出消失

    // 尺寸與生命週期
    fireParticleSystem.minSize = 0.5;
    fireParticleSystem.maxSize = 1.5;
    fireParticleSystem.minLifeTime = 0.5;
    fireParticleSystem.maxLifeTime = 1.5;

    // 發射速度與方向
    fireParticleSystem.emitRate = 300; // 每秒發射 300 個粒子
    fireParticleSystem.minEmitPower = 1;
    fireParticleSystem.maxEmitPower = 3;
    fireParticleSystem.direction1 = new BABYLON.Vector3(-0.5, 2, -0.5); // 向上並稍微向外擴散
    fireParticleSystem.direction2 = new BABYLON.Vector3(0.5, 2, 0.5);
    fireParticleSystem.gravity = new BABYLON.Vector3(0, -0.5, 0); // 輕微的向上浮

    // 旋轉與混合模式
    fireParticleSystem.minAngularSpeed = 0;
    fireParticleSystem.maxAngularSpeed = Math.PI; // 粒子旋轉
    fireParticleSystem.blendMode = BABYLON.ParticleSystem.BLENDMODE_ONEONE;

    fireParticleSystem.start();

    return scene;
};


 iThome鐵人賽