
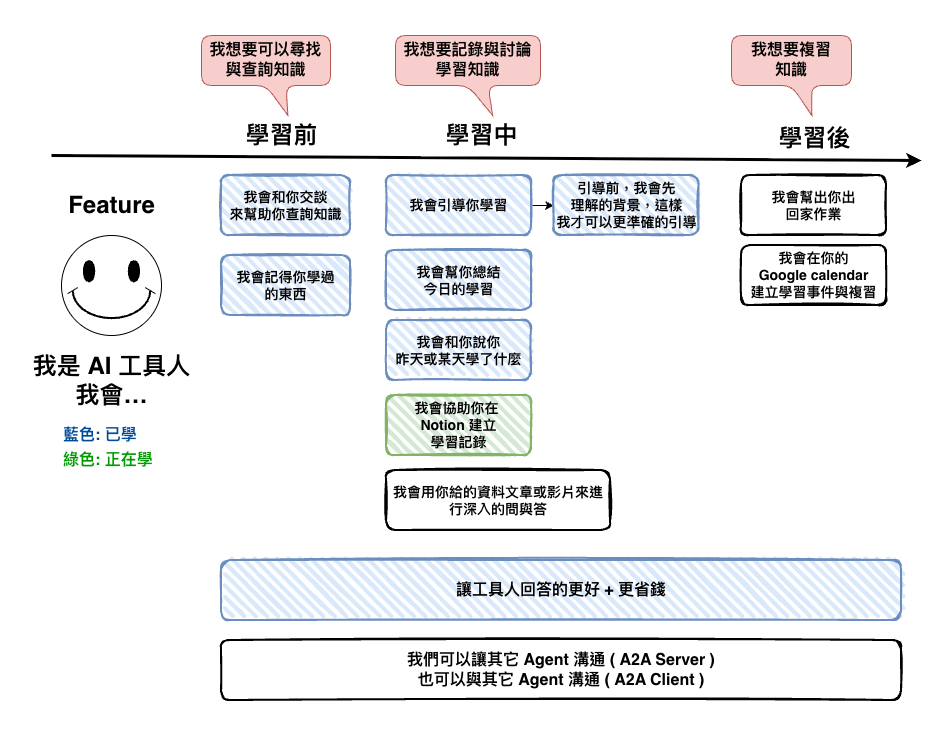
上一篇文章中,我們已經將 MCP 的基本原因已經理解的差不多了,接下來我們將透過 Notion 這個範例來學習一下如何建立 MCP Server 與 MCP Client,然後完成需要 :
當用戶說將學習記錄儲放到 Notion 中,那 AI 工具人就會透過 MCP 來處理這個功能。
當然這個功能事實上用 Function Calling 也可以完成,但這裡是要來學學如果建立 MCP,因此請別以為只有用 MCP 才能完成喔。
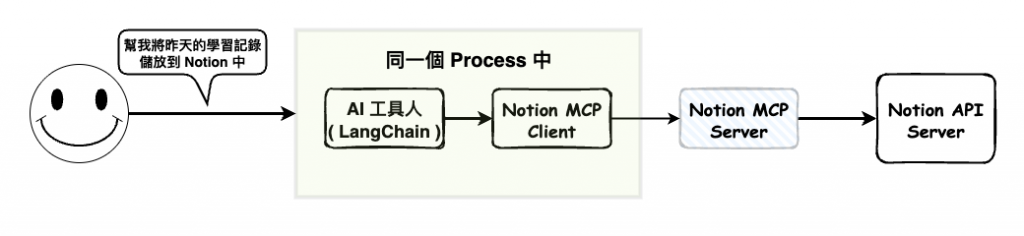
然後整個流程大約如下圖所示。
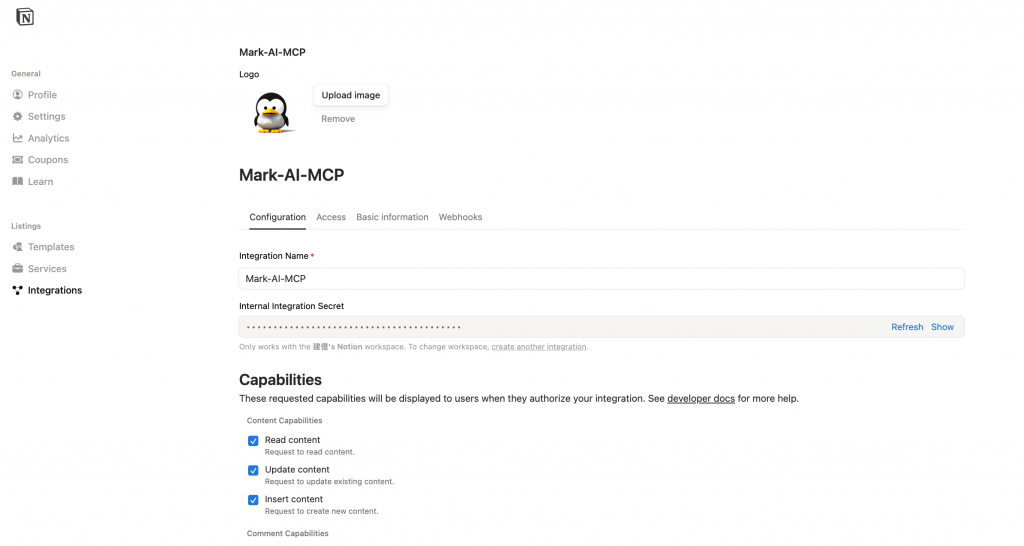
首先我們要先確 notion 中取得到 integration secret key,有了他我們就可以打 api 了。
就進入到這個網站中,然後建立一個新的 integration。
https://www.notion.so/profile/integrations/form/new-integration
然後建立完後會看到如下的畫面,其中 internalintegration secret key 就是我們要的東西。
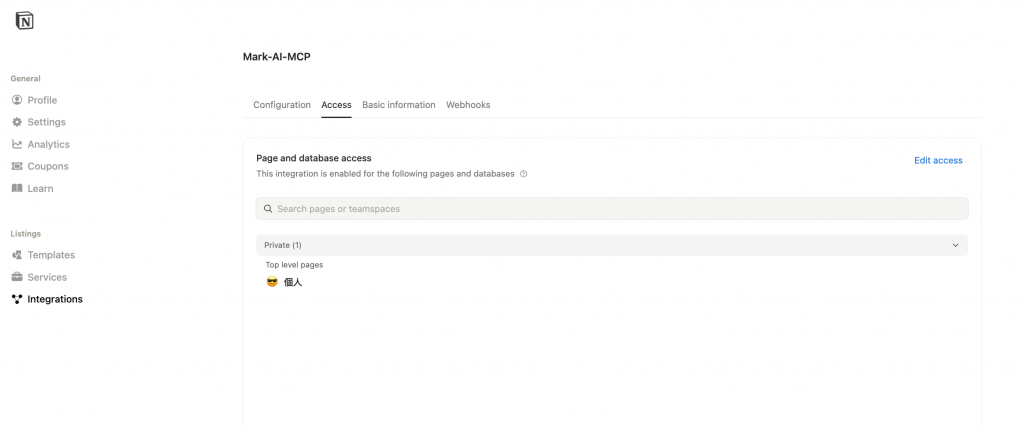
然後還有個地方,我們可以設定這個 integration 的活動範圍,例如下圖我只限制他在這個 page 下。
🤔 驗證,打看看 api 來建立個測試頁面
接下來我只要用以下的 curl 打,然後帶上兩個東西,就可以驗證了。
curl -X POST https://api.notion.com/v1/pages \
  -H 'Authorization: Bearer '"{token}"'' \
  -H "Content-Type: application/json" \
  -H "Notion-Version: 2025-09-03" \
  --data '{
	"parent": { "page_id": "{page_id}" },
	"properties": {
		"title": {
      "title": [{ "type": "text", "text": { "content": "MCP 測試" } }]
		}
	},
	"children": [
    {
      "object": "block",
      "type": "paragraph",
      "paragraph": {
        "rich_text": [{ "type": "text", "text": { "content": "這是 MCP 的前測" } }]
      }
    }
  ]
}'
執行完後你應該會看到這個畫面,這就代表 ok ~

🤔 page_id 要去那拿呢 ?
就是在網址,以下圖的範例來說,我是要帶fac17442ffa94d899332a60f725fb74d。
注意: 前面那個 title 的
Mark-prefix 別帶。

這裡我們是直接用官方的 MCP Server SDK 來建立的,Langchain 看起來還沒有支援 MCP Server。
https://github.com/modelcontextprotocol/typescript-sdk
然後還有使用 notion 的官方的 sdk 套件。
https://github.com/makenotion/notion-sdk-js
npm install @modelcontextprotocol/sdk @notionhq/client --save
主要分兩個部份的程式碼 :
🤔 MCP Server 的程式碼
我這裡就是和官網的寫的差不多,你可以直接貼上使用。
https://github.com/modelcontextprotocol/typescript-sdk?tab=readme-ov-file
然後比較不同的應該是,下面的程式碼是註冊 MCP tool 的地方 setupTools,this.server 就是 MCP Server,因為我這裡是將每個 tool 都建立成一個 tool 類別,然後這裡就只是將這個 tool 註冊而以。
然後 pageId 可以不用這樣處理,可以用環境變數,或是其它方法來取得,我這裡就只先做個簡單版本。其它應該就差不多這樣。
import express from "express";
import { McpServer } from "@modelcontextprotocol/sdk/server/mcp";
import { StreamableHTTPServerTransport } from "@modelcontextprotocol/sdk/server/streamableHttp.js";
import { isInitializeRequest } from "@modelcontextprotocol/sdk/types.js";
import { Client } from "@notionhq/client";
import { z } from "zod";
import crypto from "crypto";
import dotenv from "dotenv";
import cors from "cors";

import { CreatePageTool } from "./tools/createPage";

dotenv.config();

const transports: { [sessionId: string]: StreamableHTTPServerTransport } = {};

export type LearningRecord = {
  _id: string;
  youLearned: string;
  yourOutput: string;
  feedback: string;
  afterThoughtQuestions: string;
  createdAt: string;
};

class NotionMCPServer {
  private server: McpServer;
  private notion: Client;

  constructor() {
    this.notion = new Client({
      auth: process.env.NOTION_API_TOKEN,
      notionVersion: "2022-06-28",
    });
  }

  private setupTools(): void {
    const pageId = "fac17442ffa94d899332a60f725fb74d";
    const createPageTool = new CreatePageTool(this.notion, pageId);
    this.server.registerTool(
      createPageTool.name,
      createPageTool.initialize(),
      createPageTool.handle
    );
  }

  /**
   * Log errors to stderr
   */
  private logError(message: string): void {
    console.error(`[Notion MCP Server] Error: ${message}`);
  }

  /**
   * Start the MCP server
   */
  async start(): Promise<void> {
    const app = express();
    app.use(express.json());
    app.use(
      cors({
        origin: "*",
        exposedHeaders: ["mcp-session-id"],
        allowedHeaders: ["Content-Type", "mcp-session-id"],
        methods: ["GET", "POST", "OPTIONS"],
      })
    );
    app.post("/notion/mcp", async (req, res) => {
      console.log(
        "MCP POST request received:",
        req.body?.method || "unknown method"
      );

      const sessionId = req.headers["mcp-session-id"] as string | undefined;
      let transport: StreamableHTTPServerTransport;

      if (sessionId && transports[sessionId]) {
        console.log("Reusing existing transport for session:", sessionId);
        transport = transports[sessionId];
      } else if (!sessionId && isInitializeRequest(req.body)) {
        console.log("Creating new transport");
        transport = new StreamableHTTPServerTransport({
          sessionIdGenerator: () => crypto.randomUUID(),
          onsessioninitialized: (sessionId) => {
            console.log("Session initialized:", sessionId);
            transports[sessionId] = transport;
          },
        });
        transport.onclose = () => {
          if (transport.sessionId) {
            delete transports[transport.sessionId];
          }
        };

        this.server = new McpServer(
          {
            name: "notion-mcp-server",
            version: "1.0.0",
          },
          {
            capabilities: {
              tools: {
                listChanged: true,
              },
            },
          }
        );
        this.setupTools();
        await this.server.connect(transport);
      } else {
        // Invalid request
        res.status(400).json({
          jsonrpc: "2.0",
          error: {
            code: -32000,
            message: "Bad Request: No valid session ID provided",
          },
          id: null,
        });
        return;
      }

      try {
        console.log("transport handleRequest init");
        await transport.handleRequest(req, res, req.body);
      } catch (error) {
        console.error("Error handling request:", error);
        if (!res.headersSent) {
          res.status(500).json({ error: "Internal server error" });
        }
      }
    });

    app.listen(3002, () => {
      console.log(
        "Notion MCP Server started on http://localhost:3002/notion/mcp"
      );
    });
  }
}

(async () => {
  const notionMCPServer = new NotionMCPServer();
  await notionMCPServer.start();
})();
🤔 Notion Tool 的程式碼
然後下面就是上面註冊的工具程式碼,然後幾個重點 :
import { Client } from "@notionhq/client";
import { z } from "zod";
import moment from "moment";

import { LearningRecord } from "../index";
import BaseTool from "../../interface/baseTool";

export class CreatePageTool implements BaseTool {
  private notion: Client;
  private pageId: string;
  public name = "create_page";

  constructor(notion: Client, pageId: string) {
    this.notion = notion;
    this.pageId = pageId;
  }

  public initialize() {
    return {
      description: `
        ## 使用時機 (Use it when):
          1.當學生想將學習記錄存入 Notion 時使用 (Use it when the student wants to save the learning record to Notion)
        `,
      inputSchema: {
        learningRecords: z
          .array(
            z.object({
              youLearned: z.string().describe("學生學習的內容"),
              yourOutput: z
                .string()
                .describe("學生對學習的回應與產出的教材內容"),
              feedback: z.string().describe("你對學習的回饋"),
              afterThoughtQuestions: z
                .string()
                .describe("學習後的課程思考的問題"),
              createdAt: z.string().describe("學生學習的時間"),
            })
          )
          .describe("學習記錄的陣列"),
      },
    };
  }

  public handle = async (input: { learningRecords: LearningRecord[] }) => {
    let index = 1;
    const promises = input.learningRecords.map(async (learningRecord) => {
      const pageData: any = {
        properties: {
          title: {
            title: [
              {
                text: {
                  content: `${moment(learningRecord.createdAt).format(
                    "YYYY-MM-DD"
                  )}-學習記錄-${index}`,
                },
              },
            ],
          },
        },
        parent: { page_id: this.pageId },
        children: this.convertToNotionBlocks(learningRecord),
      };

      index++;
      return this.notion.pages.create(pageData);
    });

    const result: any = await Promise.all(promises);

    return {
      content: [
        {
          type: "text",
          text: JSON.stringify({
            success: true,
            url: result[0].url,
          }),
        }
      ],
    }
  };

  // notion 的 block 結構參考
  // page: https://developers.notion.com/docs/working-with-page-content
  // block: https://developers.notion.com/reference/block
  private convertToNotionBlocks(learningRecord: LearningRecord): any[] {
    const blocks: any[] = [];

    blocks.push(this.createHeadingBlock("heading_2", "你學習的內容"));
    blocks.push(this.createParagraphBlock(learningRecord.youLearned));
    blocks.push(this.createHeadingBlock("heading_2", "你的產出"));
    blocks.push(this.createParagraphBlock(learningRecord.yourOutput));
    blocks.push(this.createHeadingBlock("heading_2", "回饋"));
    blocks.push(this.createParagraphBlock(learningRecord.feedback));
    blocks.push(this.createHeadingBlock("heading_2", "課後思考的問題"));
    blocks.push(
      this.createParagraphBlock(learningRecord.afterThoughtQuestions)
    );
    blocks.push(this.createHeadingBlock("heading_3", "時間"));
    blocks.push(
      this.createParagraphBlock(
        moment(learningRecord.createdAt).format("YYYY-MM-DD HH:mm:ss")
      )
    );

    return blocks;
  }

  private createHeadingBlock(
    type: "heading_1" | "heading_2" | "heading_3",
    content: string
  ): object {
    return {
      type,
      [type]: {
        rich_text: [
          {
            type: "text",
            text: { content },
          },
        ],
      },
    };
  }

  private createParagraphBlock(content: string): object {
    return {
      type: "paragraph",
      paragraph: {
        rich_text: [
          {
            type: "text",
            text: { content },
          },
        ],
      },
    };
  }
}
先執行以下的程式碼,如果不知道 tsx 的就麻煩自已去 google 一下 ~
tsx watch mcp-server/notion/index.ts

> 2025-ai-mark@1.0.0 notion:dev
> tsx watch mcp-server/notion/index.ts

[dotenv@17.2.2] injecting env (3) from .env -- tip: 🔐 prevent building .env in docker: https://dotenvx.com/prebuild
Notion MCP Server started on http://localhost:3002/notion/mcp
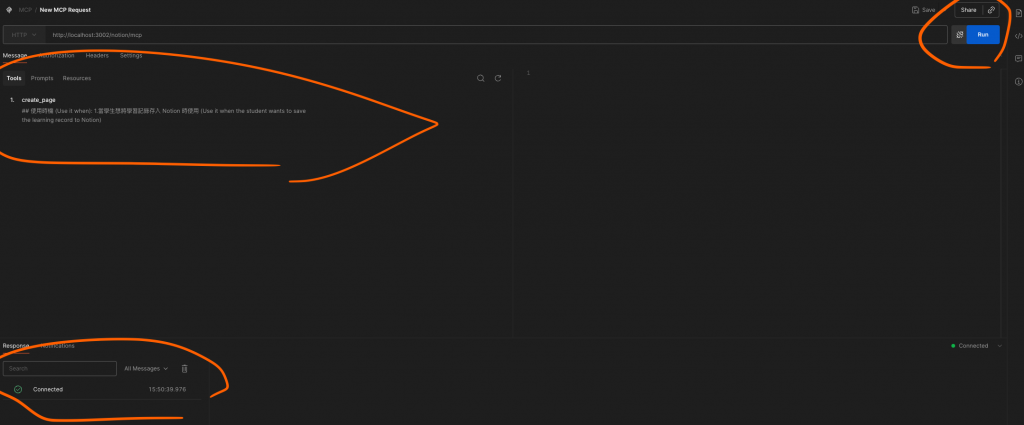
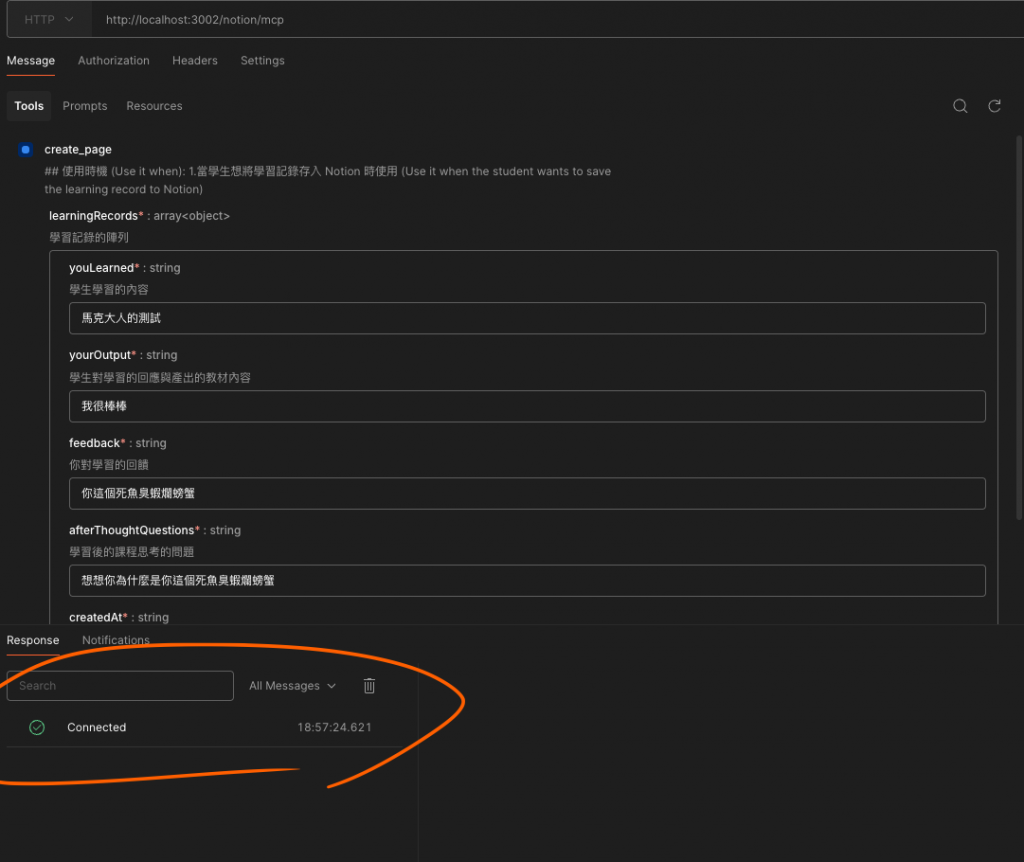
接下來打開你的 Postman 然後選擇這個 MCP。
然後輸入上面看到的 server 位置,然後點 connect,然後看到以下的畫面,那就代表 MCP initialize 成功 ~ 可以用這篇來複習一下 MCP 的 Lifecycle。
30-15: [知識] - 可以讓 AI 工具人知道外面世界的工具 2 - MCP 原理
接下來就是要進行 tool calling,然後你的根據他的欄位輸入,最後看到以下的結果就 ok 囉。
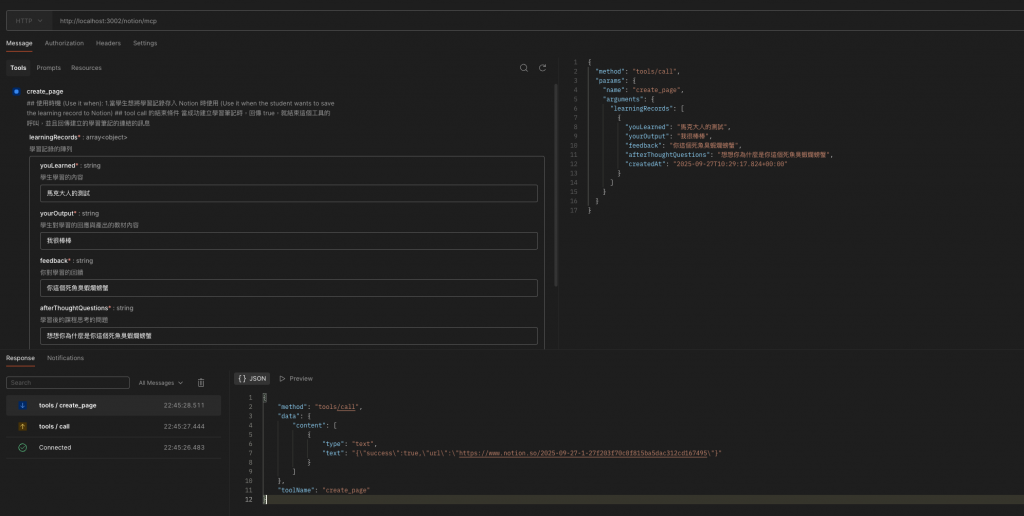
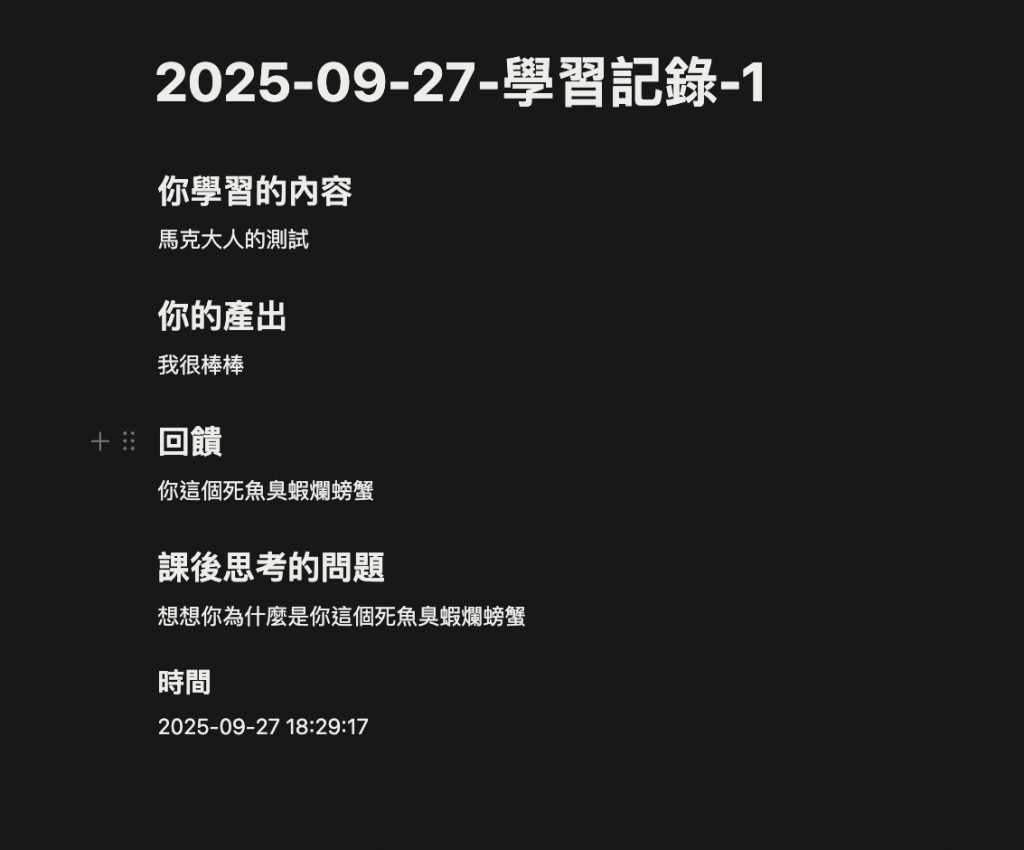
然後最後再去我們的 notion 看一下,到了這裡我們事實上就可以確認我們的 Notion MCP Server 是 work 的囉。
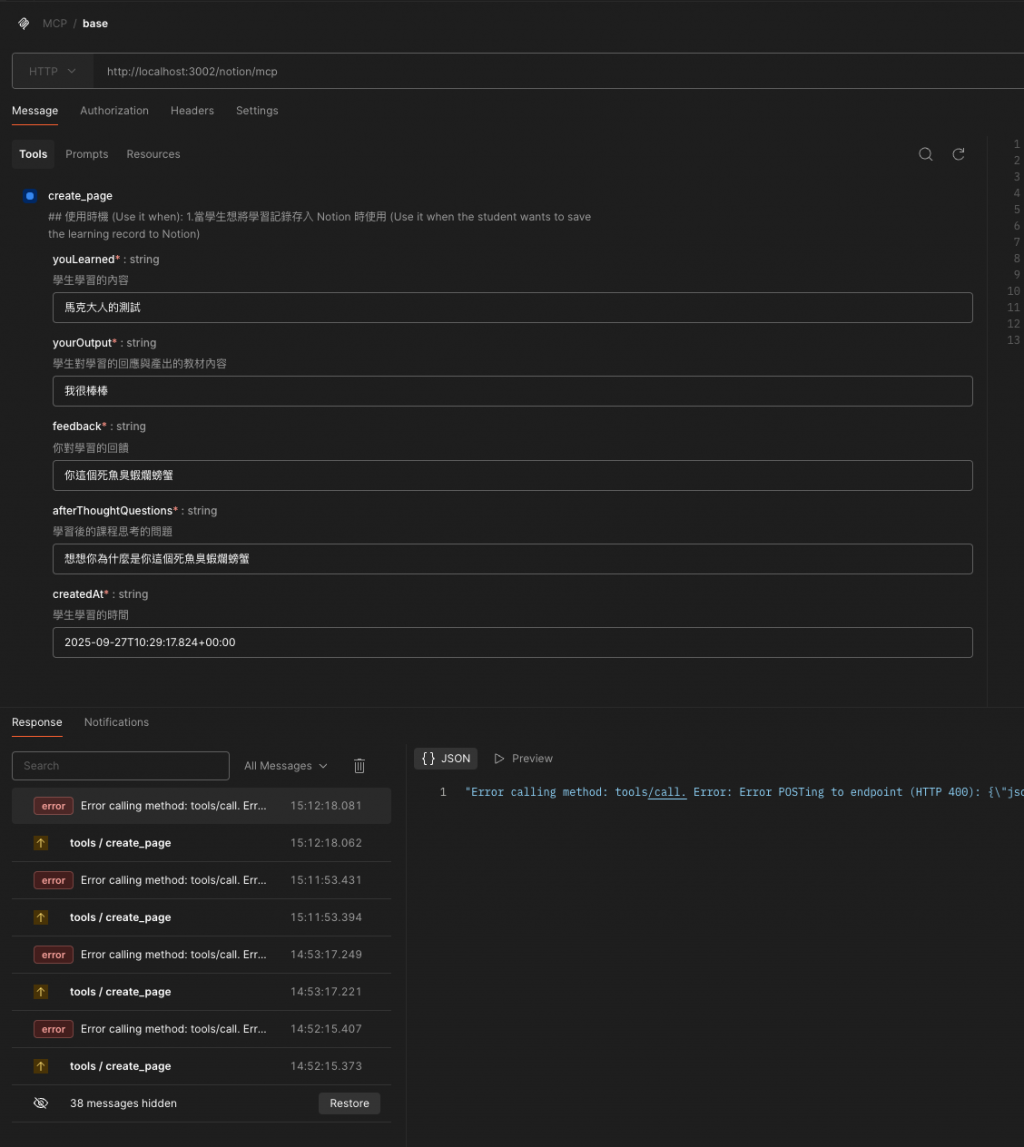
🤔 備註: 有時後你在用 Postman 會看到以下的錯誤,可能原因有 2
"Error calling method: tools/call. Error: Error POSTing to endpoint (HTTP 400): {\"jsonrpc\":\"2.0\",\"error\":{\"code\":-32000,\"message\":\"Bad Request: Server not initialized\"},\"id\":null}"
第一種可能原因在於,你沒有設 cors。但是有些人如果沒有,且是直接用自已寫的 mcp client 來試也會 work,因為 cors 主要是用在瀏覽器上的檢查。
    app.use(
      cors({
        origin: "*",
        exposedHeaders: ["mcp-session-id"],
        allowedHeaders: ["Content-Type", "mcp-session-id"],
        methods: ["GET", "POST", "OPTIONS"],
      })
    );
第二種原因你沒有執行 MCP Initizate,如下圖有 connected 就是 ok。
然後下圖就是沒有執行 MCP Initizate 的樣子。
這篇文章中我們學習到了以下的事情 :
接下來下一篇文章我們將要來說說 LangChain + MCP Client 端的建置。

 iThome鐵人賽