
30-13: [知識] 可以讓 AI 工具人知道外面世界的工具 1 - Funcation Calling
Function Calling 讓我們 AI Agent 知道外部世界後,那接下來我們將來介紹另一個方法,那就是 :
Model Context Protocol
首先我們先來說說他的起源。
MCP ( Model Context Protocol ) 它是在 2024 年 11 月時,由 Anthropic 所提出的一個協定,它的官網寫這 :
MCP (Model Context Protocol) is an open-source standard for connecting AI applications to external systems.
簡單的說就是標準化 AI Application 連到外部系統,這樣只要外部系統有根據這個協定來建立 server,然後這些 AI Application 就可以透過 MCP Client 就可以用串接它了。
🤔 我用 Function Calling 就好了,為啥還要用 MCP 呢?
對沒錯,很多功能你事實上用 Function Calling 就可以完成,那是你想想一個情境 :
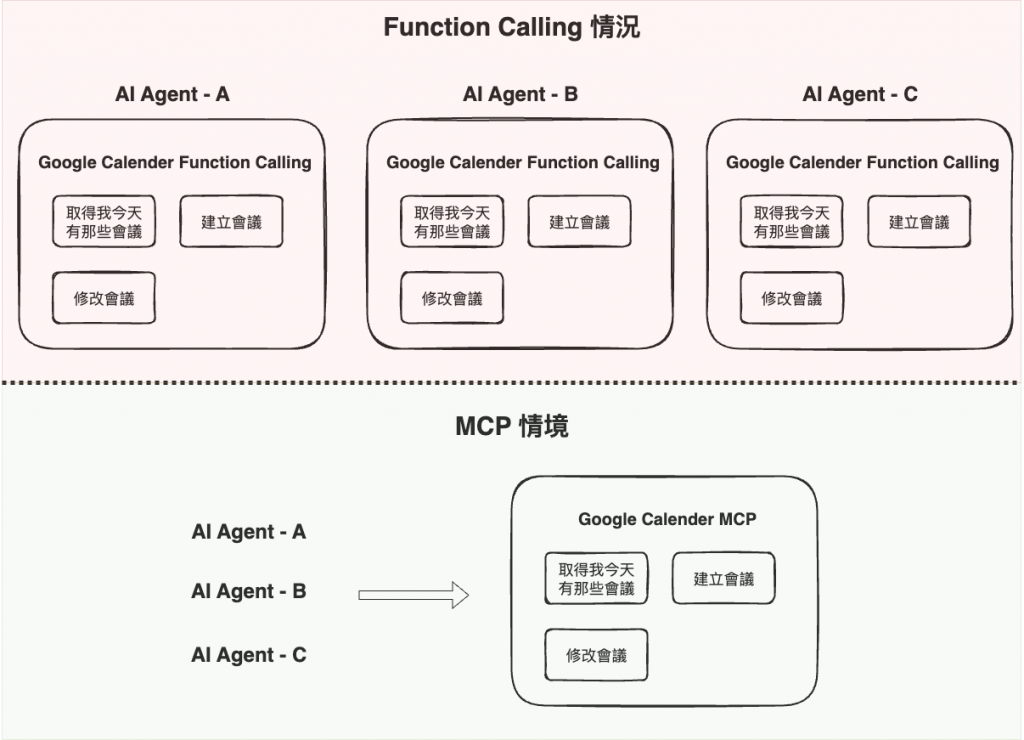
如果其它公司或公司內其它 AI Agent 也想用你寫的 Function Calling 要怎麼辦呢 ?
對,這就是 MCP 的真的目的,它存在的目的就是為了 :
讓其它 Agent 可以更簡單的外接到外部的武器庫,而不用每一個都自已要重寫一次
就以 google calander 為範例,我們的確可以自已寫 function calling 然後裡面來呼叫 google calander api,來完成我們要的需求,但是如果你們公司其它 agent 也需要使用,那你是不是會 copy 一份過去 ?
但這時如果有個 google calander MCP,你只要去串他就好了。
https://modelcontextprotocol.io/specification/2025-06-18/basic/transports
這個就是說 client 與 server 要溝通的通信協定
然後在這裡支援以下兩個 :
目前官方是建議儘量用 Stdio,雖然官網沒說詳細的原因,但主要的原因應該在於 :
我在猜是簡單、可靠、較安全與延遲表現都最好。
但是相對的,它的缺點就是像我們現在的桌面軟體,不論是更新、擴展都會比較慢一點。
然後順到說一下,大約在 2024-11-05 時,MCP 正式將原本的 HTTP + SSE 改成 Streamable HTTP,然後主要的原因應該是在性能,下面這一篇文章我覺得分析的很好,可以參考看看。
整份主要的 protocol 內容在這份連結中 :
https://modelcontextprotocol.io/specification/2025-06-18
然後我們來理解一下協定的詳細內容 ~
首先根據這份連結,這個協定總共分五個部份 :
- Base Protocol: Core JSON-RPC message types
- Lifecycle Management: Connection initialization, capability negotiation, and session control
- Authorization: Authentication and authorization framework for HTTP-based transports
- Server Features: Resources, prompts, and tools exposed by servers
- Client Features: Sampling and root directory lists provided by clients
- Utilities: Cross-cutting concerns like logging and argument completion
然後接下來我們一個一個來看。
整個 protocol 的溝通 payload 結構是以 JSON-RPC 2.0 為主
下面就是 client 與 server 在初次見面時,server 回傳給 client 用 json-rpc 2.0 寫的 message payload 內容範例,內容就是和 client 說我這個 server 有支援那些功能。
{
  "jsonrpc": "2.0",
  "id": 1,
  "result": {
    "protocolVersion": "2024-11-05",
    "capabilities": {
      "logging": {},
      "prompts": {
        "listChanged": true
      },
      "resources": {
        "subscribe": true,
        "listChanged": true
      },
      "tools": {
        "listChanged": true
      }
    },
    "serverInfo": {
      "name": "ExampleServer",
      "title": "Example Server Display Name",
      "version": "1.0.0"
    },
    "instructions": "Optional instructions for the client"
  }
}
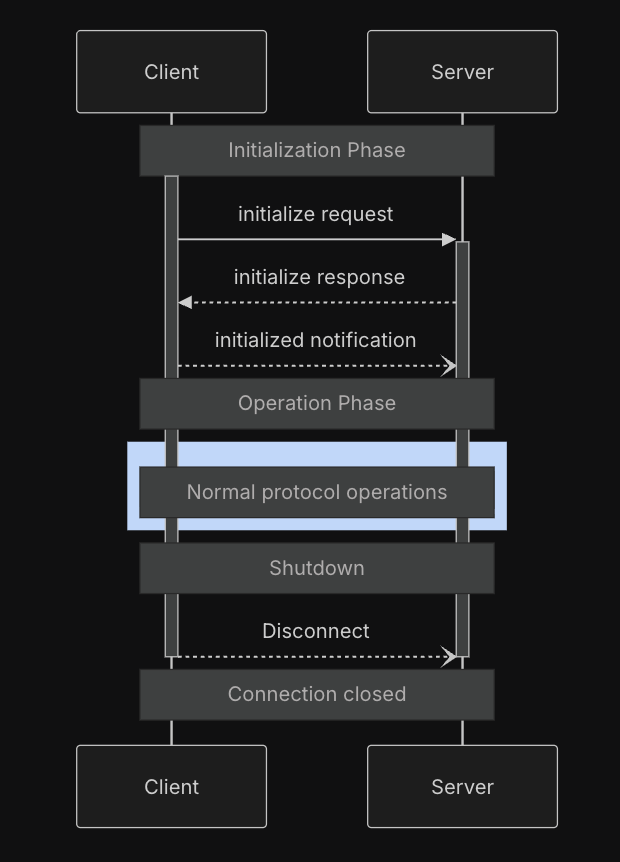
整個溝通流程 ( 生命周期 ),需要如下圖所示。
https://modelcontextprotocol.io/specification/2025-06-18/basic/lifecycle
總共有三個階段 :
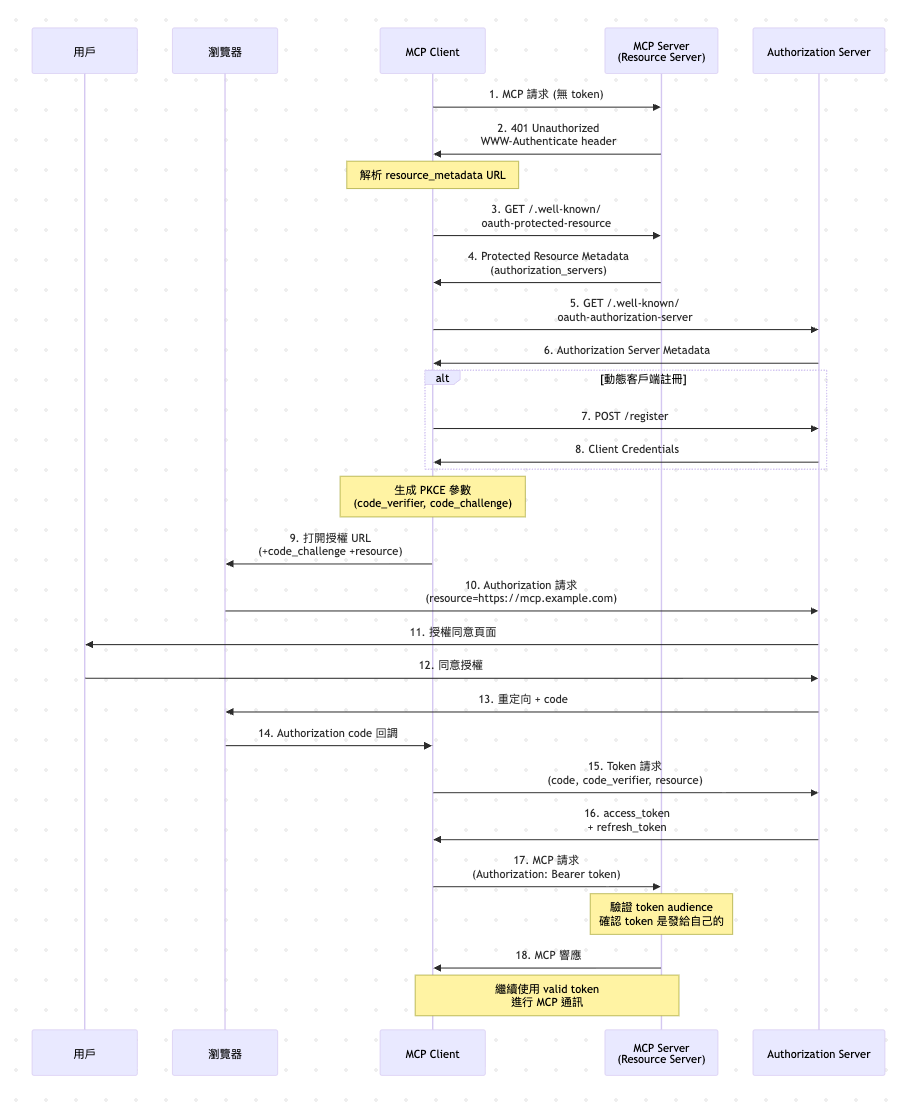
它是可選,如果 MCP 需要實作 Authorization 功能,那要使用 OAuth 2.1 ( 草稿 )
https://modelcontextprotocol.io/specification/2025-06-18/basic/authorization
大概就降 Oauth 2.1 的流程就自已進去看看,然後下圖是我自已透過 AI 產生 Oauth 2.1 的流程,不熟的人可以看看,基本上和官網中的那個差不多,只是因為它不是圖片而且用是黑的,所以才再產一個。
🤔 OAuth 2.0 與 Oauth 2.1 的差別?
簡單的說大概就是 :
OAuth 2.0 + 一些 Secrety Best Practice = 然後整理成 2.1
然後以下列表有提到說和 2.0 的差別,可以參考看看。
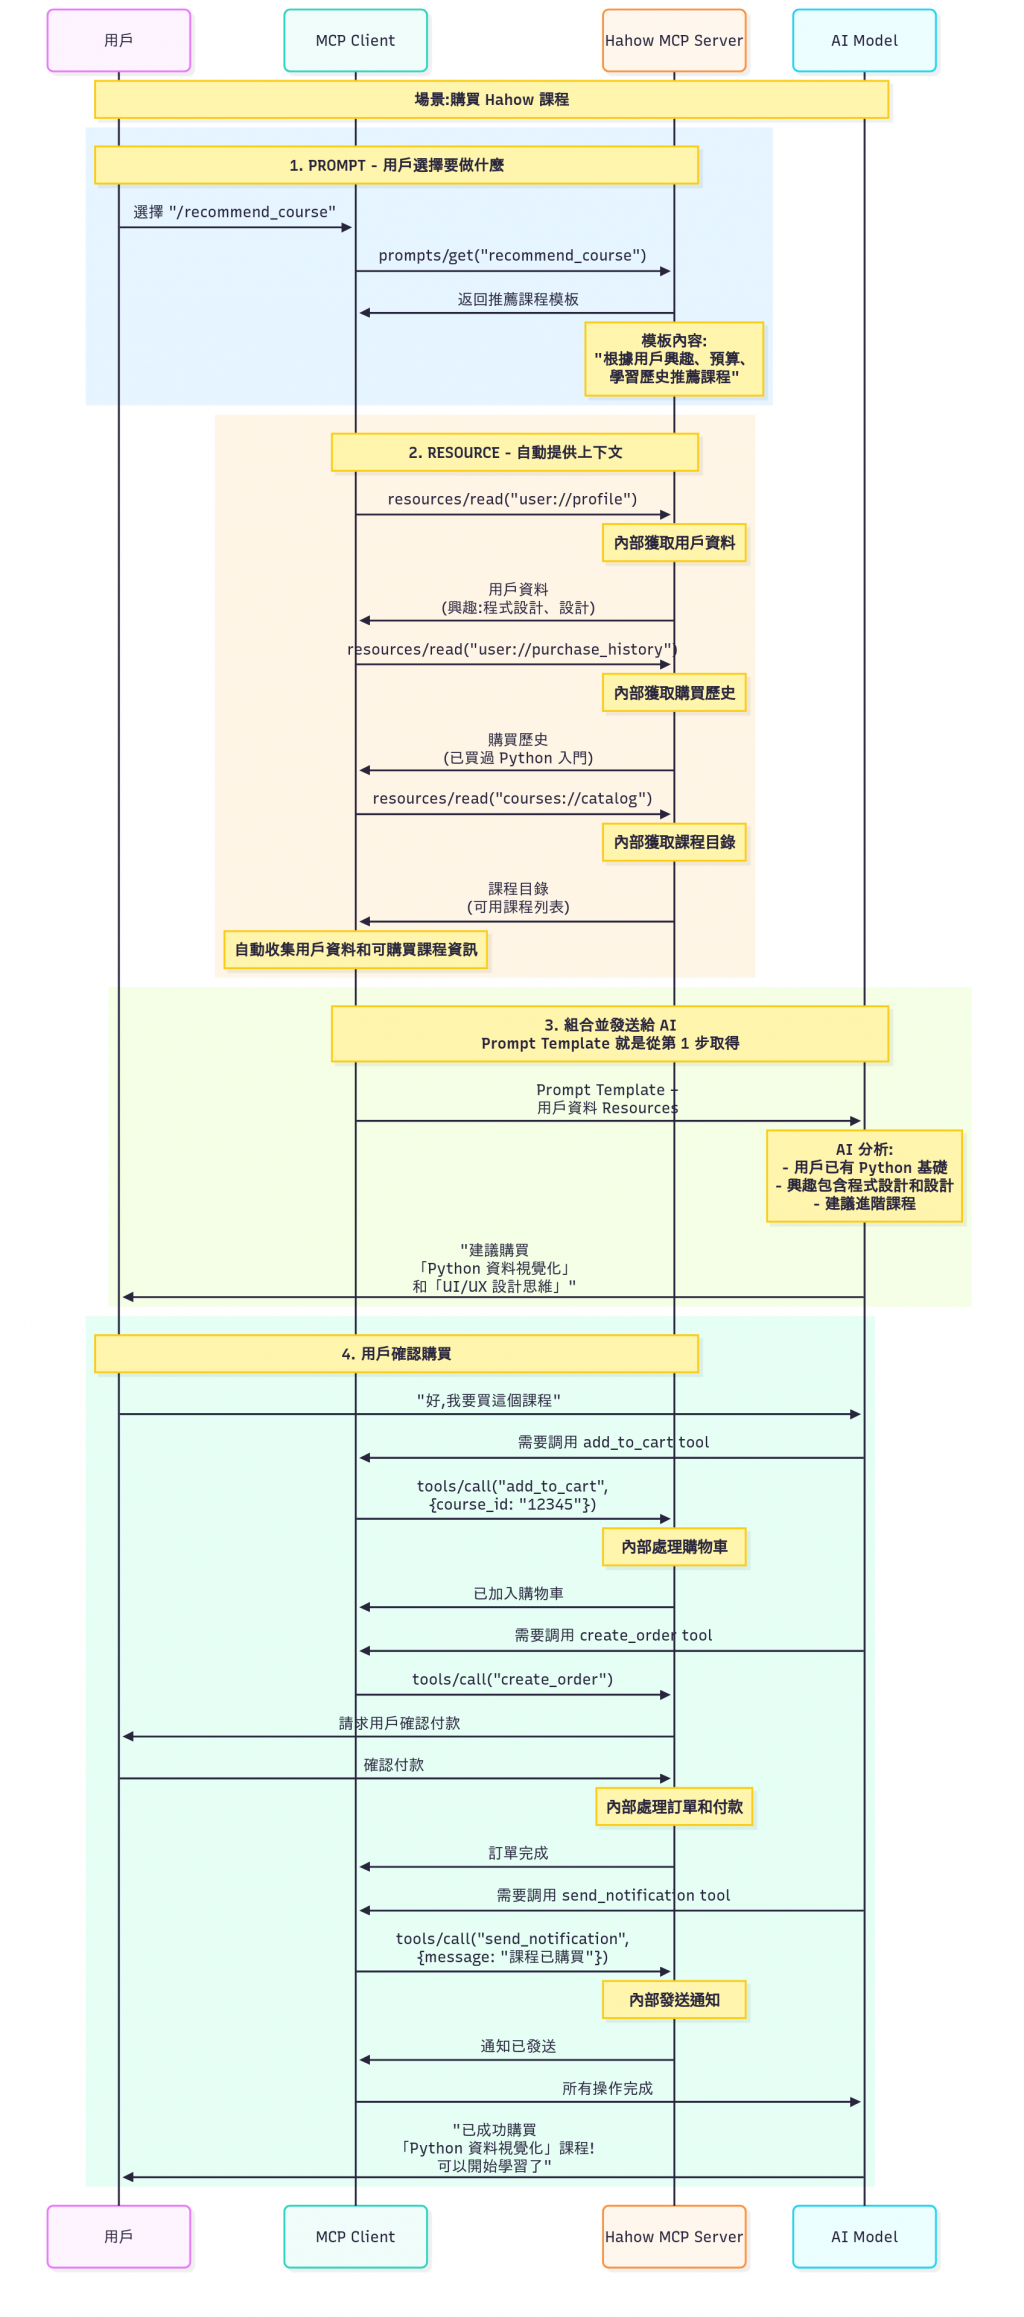
就是 MCP Server 端要實作支援的功能,主要有 Resources、Prompts、Tools
https://modelcontextprotocol.io/specification/2025-06-18/server
主要有三大項 :
然後我們下面假設我們現在要開發一個需求 :
購買 hahow 課程 ( 先說好這個我們家沒做,只是我腦補如果要做了會長什麼樣子 )
然後來看一下,以上三個東西在整個流程的部份,來幫助我們更能理解這三個的實際功用 :
整個 MCP Server 所需支援的三大功能,大概在整個 MCP 流程中就是這樣使用。
就是 MCP Client 要支援的功能,主要有三個 Sampling、Root、Elicitation
下面這個是我以這個範例來當這三個東西的展示。
hahow 課程審核 ( 先說好這個我們家沒做,只是我腦補如果要做了會長什麼樣子 )
先說一下,下面的說明,不是每一個區塊都會說,只會說有用到Root、Sampling與Elicitation的部份才會說說。
橘色開始看,他就是 client 提供給 server 說他有那些 root 你可以用。這裡就是用到。亮綠色的部份,就是 server 去這些地方取得到檔案,這裡應該會有點困惑,為什麼只是給檔案位置 server 就可以取得到呢 ? 因為現在 MCP 實際上支援有種通信模式 Stdio與Streamable HTTP,然後這裡的範例是 Stdio,所以也就是 client 與 server 是在同一個地方,因此可以直接取得到檔案。( 可以想想用 claude desktop 時你使用 MCP 的情況,是不是要指定 MCP Server 的檔案位置 )粉紅色的部份,他就是 MCP Server 請 MCP client 叫 LLM 做些事情 ( MCP Server 事實上裡面可以沒有 LLM 就可以做事了,因為它是做給 LLM 用的 )。亮藍色的部份就是,當 server 發現有些地方要問人類金主時,會用 Elicitation 這個來處理這件事情。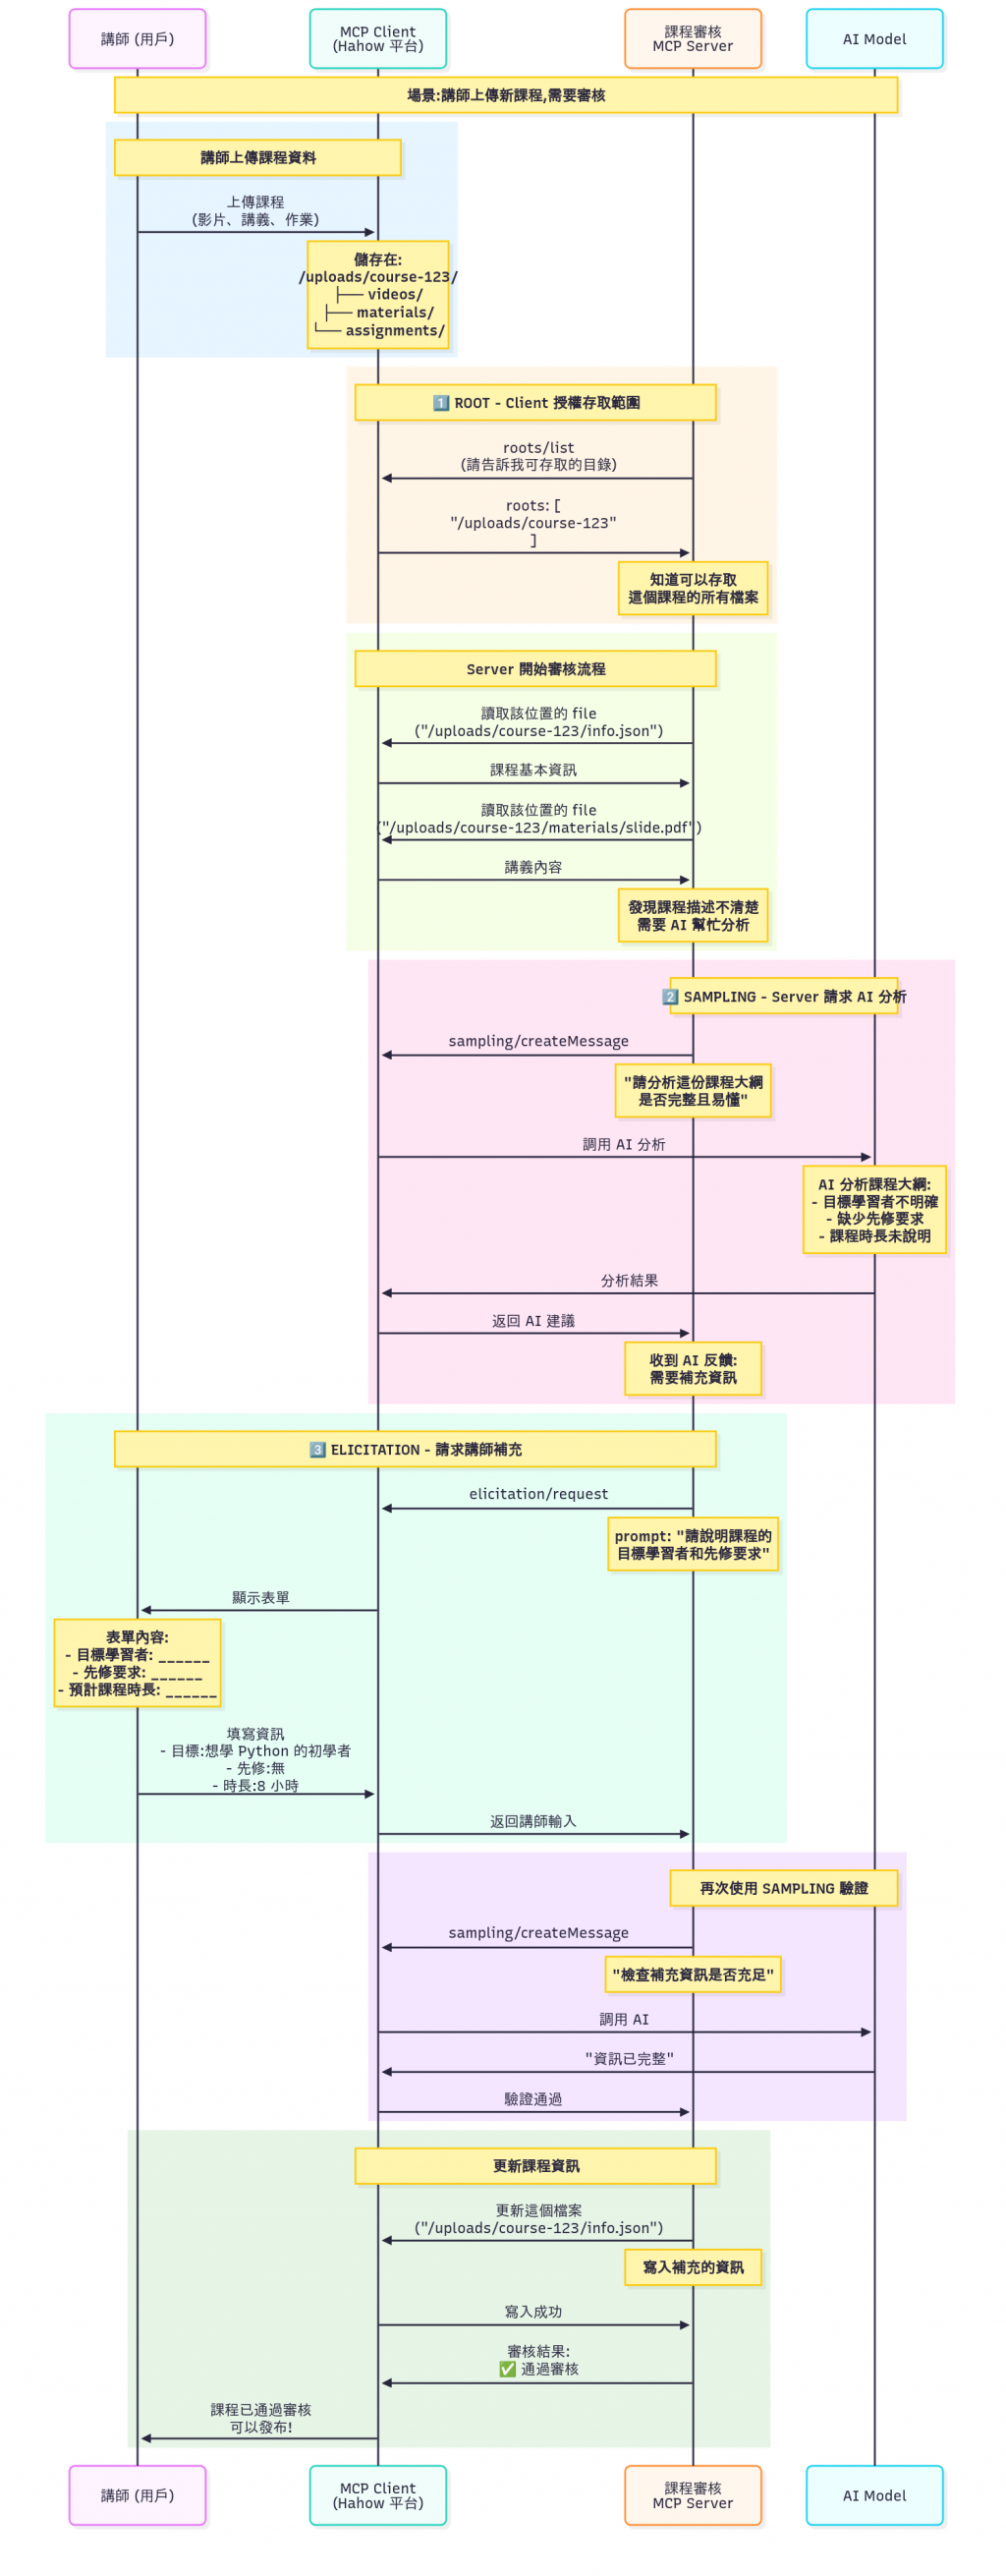
這個程式碼是直接從官網抓來的,事實上與使用 Function Calling 的用法沒差多少,只差在 tools 是自已寫,還是用 MCP Client 產出來的。
import { MultiServerMCPClient } from "@langchain/mcp-adapters";
import { ChatAnthropic } from "@langchain/anthropic";
import { createAgent } from "langchain";

const client = new MultiServerMCPClient({
    math: {
        transport: "stdio",  // Local subprocess communication
        command: "node",
        // Replace with absolute path to your math_server.js file
        args: ["/path/to/math_server.js"],
    },
    weather: {
        transport: "sse",  // Server-Sent Events for streaming
        // Ensure you start your weather server on port 8000
        url: "http://localhost:8000/mcp",
    },
});

const tools = await client.getTools();
const agent = createAgent({
    llm: new ChatAnthropic({ model: "claude-3-7-sonnet-latest" }),
    tools,
});

const mathResponse = await agent.invoke({
    messages: [{ role: "user", content: "what's (3 + 5) x 12?" }],
});

const weatherResponse = await agent.invoke({
    messages: [{ role: "user", content: "what is the weather in nyc?" }],
});
這篇文章中我們學會了整個 MCP 的原本,簡單的總結如下 :
接下來我們明天將來實作看看 MCP 的功能到我們的 AI 工具人上。

 iThome鐵人賽