在自然語言處理的世界裡BERT 可說是近十年來最具代表性的模型之一,它不僅改寫了多項語言任務的表現標準,更奠定了後續各類 Transformer 模型的核心架構。不過儘管許多開發者早已習慣透過 Hugging Face 等工具輕鬆調用 BERT,我們今天要做的則是往原理層更進一步。
今天將帶你一步步手動實作 BERT 的預訓練架構,包括 MLM(Masked Language Modeling)與 NSP(Next Sentence Prediction)兩大訓練任務,並將昨天的BertModel與今天的預訓練head進行官方模型的權重對齊。
BERT 的預訓練階段以 MLM(Masked Language Model) 任務為核心,這是一種讓模型透過遮蔽部分詞彙來學習語境理解的策略。他在處理輸入文本時大約 15% 的 token 會被選中進行遮蔽處理,但這個遮蔽並非單一操作
[MASK] 標記這樣的設計表面上看似無意義,但實際上是一種有意識的安排,目的在於讓模型自訓練初期便能接觸多樣且貼近真實使用情境的語境變化,而非僅在理想化的條件下學習。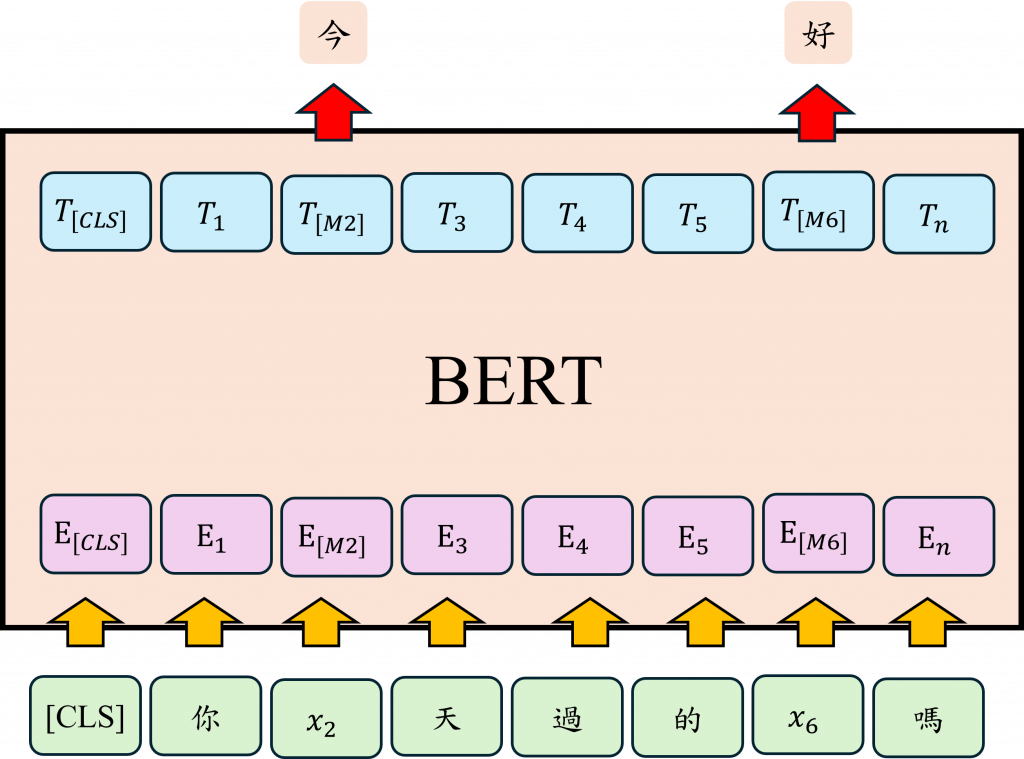
在實際應用中使用者所輸入的語句並不會包含 [MASK] 這類特殊標記。如果模型過度依賴明確的遮蔽提示來進行預測,則在面對完全不具備此類提示的任務時,其推理能力與表現可能會明顯下降。基於此考量,訓練設計中刻意引入隨機詞替換與保留原詞的機制,目的是使模型逐步習慣於在缺乏遮蔽提示的情況下,依然能夠理解語句的語意邏輯,並在此基礎上自主地進行語境推理。
其實這種 MASK 的設計還有一個蠻大的優點。傳統的語言模型像是那種從左讀到右的 RNN,它們只能依靠前面出現的字來預測下一個詞,這樣在理解整個語境的時候就有點受限了。相對來說,BERT 用的是 Transformer 結構,裡面有個叫做 Self-Attention 的機制,這讓它可以做到真正的雙向語境理解。
簡單來說,BERT 在預測被遮起來的字時,不只看前面的詞,連後面的也一起考慮。像我們昨天提到的例子,今天如果輸入這句話:
我今天吃了 [MASK],很好吃。
BERT 的處理方式會先加上一個 [CLS] 的 token,用來做整句話的語意摘要。然後在訓練的時候,它不是只根據「我今天吃了」這段來猜,而是也會看「很好吃」這個線索。這樣一來,它就更有可能猜出像「壽司」或「牛肉麵」這種合理的食物名詞。
除了預測被遮住的token之外BERT 還有另一個蠻關鍵的訓練方法,叫做 NSP(Next Sentence Prediction),意思是「下一句預測」。那這個任務到底是幹嘛用的呢?簡單來說就是要讓模型能夠理解「句子跟句子之間到底有沒有邏輯關係」。這在什麼情況下特別有用?比如說問答系統、文章閱讀理解,甚至是對話生成。這些任務不只是單句理解而已,而是要搞懂句子跟句子之間是不是一脈相承、有沒有邏輯順序。
那 NSP 是怎麼訓練的?在 BERT 的預訓練階段,會拿一對句子給模型判斷,其中有一半是真的連在一起的,比如:
A:我今天去了圖書館。
B:我借了一本關於機器學習的書。
這樣的句子對是正確連續的,而另一半則是硬湊的、不相干的句子比如:
A:我今天去了圖書館。
B:香蕉是黃色的。
這種就完全沒關係,屬於隨機組合。
BERT 在訓練時的任務,就是要學會判斷 B 句到底是不是合理地接在 A 句後面。也就是說,它不只是看單句內容,還要考慮整體語意的銜接。更有意思的是NSP 這個訓練任務也會在某種程度上加強 BERT 做 MLM 的能力。因為為了判斷兩個句子是不是相關的,模型必須更深入地理解語境,甚至得學會抓出潛在的語意線索,這對整體語言理解是很有幫助的。
今天的重點,是透過實作方式來更直觀地理解 BERT 模型的架構。不過在動手編碼之前,我們先快速回顧一下昨天寫過的程式碼,並進一步結合 Hugging Face(HF)上的預訓練模型,來做權重的轉移。這樣的操作不只是為了好玩,而是幫助我們確保自己手動實作的模型,能夠與 HF 官方版本在結構與參數上完全對齊。
在Hugging Face 提供的 bert-base-uncased 模型中,內建了一個 config 檔案,其中包含了模型架構的關鍵設定,例如 Transformer 的層數、每層的神經元維度、hidden size 等。所以等等我們會直接利用這個 config 來初始化我們自己的 BertModel 類別。
在進行權重轉移時,第一步是從 Hugging Face 的 bert-base-uncased 模型讀取已訓練好的參數,並將這些參數載入到我們自己撰寫的 BertModel 類別中。雖然這樣的模型在使用上與直接呼叫 HF 提供的模型沒有功能差異,但重點在於理解與驗證:我們是否成功複製出與官方版本完全一致的結構。這對於未來想要修改模型(例如自訂 Attention 機制或更動 Pooler 結構)特別有幫助。
相較於直接調整 HF 封裝過的模型,我們自己實作一份會更直觀、自由度也更高。當然如果你已經非常熟悉 PyTorch,也可以透過 hook 的方式來動態改變模型的前向傳播邏輯。
from transformers import BertModel as HFBertModel

# 從 Hugging Face 載入 BERT encoder
hf_encoder = HFBertModel.from_pretrained("bert-base-uncased")
而我們現在把昨天的組件組合成一個自己定義的 BertModel 類別,這裡一定要讓參數名稱與 HF 模型對齊,這是成功載入權重的關鍵。只要有任何一個參數名稱不一致,.load_state_dict() 可能就會報錯。
class BertModel(nn.Module):
    """
    State dict keys match Hugging Face's `BertModel`.
    Accepts an HF BertConfig directly. No local Config duplication.
    """
    def __init__(self, config):
        super().__init__()
        self.config = config
        # names: embeddings, encoder, pooler
        self.embeddings = BertEmbeddings(config)
        self.encoder = BertEncoder(config)
        self.pooler = BertPooler(config)

        self.apply(self._init_weights)

    def _init_weights(self, module):
        if isinstance(module, nn.Linear):
            nn.init.normal_(module.weight, mean=0.0, std=self.config.initializer_range)
            if module.bias is not None:
                nn.init.zeros_(module.bias)
        elif isinstance(module, nn.Embedding):
            nn.init.normal_(module.weight, mean=0.0, std=self.config.initializer_range)
        elif isinstance(module, nn.LayerNorm):
            nn.init.ones_(module.weight)
            nn.init.zeros_(module.bias)

    @staticmethod
    def _extend_attention_mask(attention_mask, dtype):
        """
        Input mask: [B, T] with 1 for tokens to keep, 0 for padding
        Output mask: [B, 1, 1, T] with 0 for keep and -inf for mask (same dtype as scores)
        """
        if attention_mask.dim() == 2:
            extended = attention_mask[:, None, None, :]
        elif attention_mask.dim() == 3:
            extended = attention_mask[:, None, :, :]
        else:
            extended = attention_mask
        extended = extended.to(dtype=dtype)
        # 1 -> 0.0, 0 -> -inf
        neg_inf = torch.finfo(dtype).min
        extended = (1.0 - extended) * neg_inf
        return extended

    def forward(
        self,
        input_ids,
        token_type_ids=None,
        attention_mask=None,
        output_hidden_states=False,
        return_dict=False,
    ):
        if token_type_ids is None:
            token_type_ids = torch.zeros_like(input_ids)

        if attention_mask is None:
            attention_mask = (input_ids != self.config.pad_token_id).long()

        embedding_output = self.embeddings(input_ids, token_type_ids)
        # build extended mask in the same dtype as attention scores (float)
        extended_attention_mask = self._extend_attention_mask(attention_mask, embedding_output.dtype)

        sequence_output, all_hidden_states = self.encoder(
            embedding_output, attention_mask=extended_attention_mask, output_hidden_states=output_hidden_states
        )
        pooled_output = self.pooler(sequence_output)

        if return_dict:
            return {
                "last_hidden_state": sequence_output,
                "pooler_output": pooled_output,
                "hidden_states": all_hidden_states,
            }
        return (sequence_output, pooled_output, all_hidden_states if output_hidden_states else None)
在這段程式中使用了我們昨日實作的三大模組,並補上了完整的前向傳播邏輯。特別注意我們對 attention_mask 和 token_type_ids 的處理方式是模仿 Hugging Face 的內部作法,確保計算方式完全一致。
接下來我們建立模型實例,並載入 HF 模型的 state_dict,並檢查有哪些參數對不上。
model_encoder_only = BertModel(hf_encoder.config)
sd_encoder = hf_encoder.state_dict()
missing_e, unexpected_e = model_encoder_only.load_state_dict(sd_encoder, strict=False)
print("[Encoder] Missing:", missing_e)
print("[Encoder] Unexpected:", unexpected_e)
理想情況下,輸出應該是這樣:
[Encoder] Missing: []
[Encoder] Unexpected: []
這表示我們的模型與 HF 提供的 Encoder 架構與參數名稱完全一致,沒有遺漏任何參數,也沒有多餘的設定。這個步驟除了驗證模型正確性之外,也為未來的模型微調與客製化打下基礎。
接下來我們要談的是 BERT 在預訓練任務(如 MLM 和 NSP)中所使用的架構擴充,具體來說,Hugging Face 中的 BertPreTrainingHeads 模組會在原始的 BertModel 上疊加一層額外結構,這層就是針對預訓練目標所設計的head,而整個 BertPreTrainingHeads 的結構如下:
(cls): BertPreTrainingHeads(
    (predictions): BertLMPredictionHead(
      (transform): BertPredictionHeadTransform(
        (dense): Linear(in_features=768, out_features=768, bias=True)
        (transform_act_fn): GELUActivation()
        (LayerNorm): LayerNorm((768,), eps=1e-12, elementwise_affine=True)
      )
      (decoder): Linear(in_features=768, out_features=30522, bias=True)
    )
    (seq_relationship): Linear(in_features=768, out_features=2, bias=True)
  )
從結構上來看,這個 head 分為兩個部分:
BertLMPredictionHead:對應於 MLM 任務。它的邏輯流程很簡單,先經過一個線性變換(Linear),再接 GELU 啟動函數與 LayerNorm 正規化,最後由一個 decoder 層將 hidden state 映射回原始詞彙空間(vocab size = 30522)。seq_relationship:則是用來處理 NSP 任務。這部分直接將 [CLS] token 的表示輸入一個 linear 層,用來分類兩個句子是否相鄰。因此BertLMPredictionHead 本質上其實只是進行一組簡單的線性與非線性轉換,也就是 Linear → GELU → LayerNorm 的運算流程。乍看之下,這部分似乎只是基本的前向傳播組合,沒有特別複雜。不過為了與 Hugging Face 的結構保持一致,我們仍需依照它的定義方式來實作。這不僅是為了能夠順利轉移權重,更能確保我們的自訂模型在功能上完全對齊原始實作。
class BertPredictionHeadTransform(nn.Module):
    """
    HF key path: cls.predictions.transform.{dense, LayerNorm}
    """
    def __init__(self, config):
        super().__init__()
        self.dense = nn.Linear(config.hidden_size, config.hidden_size)
        # BERT 使用 GELU
        self.transform_act_fn = nn.GELU()
        self.LayerNorm = nn.LayerNorm(config.hidden_size, eps=config.layer_norm_eps)

    def forward(self, hidden_states):
        hidden_states = self.dense(hidden_states)
        hidden_states = self.transform_act_fn(hidden_states)
        hidden_states = self.LayerNorm(hidden_states)
        return hidden_states


class BertLMPredictionHead(nn.Module):
    """
    HF key path:
      cls.predictions.transform.{dense,LayerNorm}
      cls.predictions.decoder.weight  (tied with embeddings.word_embeddings.weight)
      cls.predictions.decoder.bias
    """
    def __init__(self, config):
        super().__init__()
        self.transform = BertPredictionHeadTransform(config)
        # decoder 是 Linear,但 weight 會在外部與 embeddings.word_embeddings.weight 綁定
        self.decoder = nn.Linear(config.hidden_size, config.vocab_size, bias=False)
        self.bias = nn.Parameter(torch.zeros(config.vocab_size))
        # 綁定 bias 名稱以符合 HF
        self.decoder.bias = self.bias

    def forward(self, hidden_states):
        hidden_states = self.transform(hidden_states)
        hidden_states = self.decoder(hidden_states) + self.bias
        return hidden_states
至於 NSP 部分,因為它的任務相對單純只需判斷兩個句子是否相鄰,因此我們只需將 [CLS] token 的表示向量輸入一個 linear 層,即可完成分類任務。也就是說,當我們完成 MLM 預測之後,只要額外接上seq_relationship 這個線性分類器,就能同時進行 NSP 的訓練。
class BertPreTrainingHeads(nn.Module):
    """
    HF key path base: cls.{predictions, seq_relationship}
    """
    def __init__(self, config):
        super().__init__()
        self.predictions = BertLMPredictionHead(config)
        self.seq_relationship = nn.Linear(config.hidden_size, 2)

    def forward(self, sequence_output, pooled_output):
        prediction_scores = self.predictions(sequence_output)
        seq_relationship_score = self.seq_relationship(pooled_output)
        return prediction_scores, seq_relationship_score
因此我們的 BertForPreTraining 模型至此也算正式完成了。整體架構其實相當直觀:我們僅需將前面已經建立的 BertModel 主體,與 BertPreTrainingHeads(負責 MLM 和 NSP 任務)結合起來即可。
class BertForPreTraining(nn.Module):
    """
    State dict keys match Hugging Face's `BertForPreTraining`.
    Heads under `cls.predictions.*` and `cls.seq_relationship`.
    """
    def __init__(self, config):
        super().__init__()
        self.config = config
        self.bert = BertModel(config)
        self.cls = BertPreTrainingHeads(config)
接下來我們來看 forward 函式的實作邏輯。在這裡有一個重要的細節需要特別注意,當我們呼叫內部的 BertModel 時,它會同時回傳兩個關鍵輸出:
sequence_output:這是整段輸入的 contextual representation,會被用於 MLM 任務。pooled_output:這是來自 pooler 層的輸出,對應的是 [CLS] token 的表示,主要用於 NSP 任務。def forward(
self,
input_ids,
token_type_ids=None,
attention_mask=None,
labels=None, # MLM labels: [B, T], 使用 -100 忽略
next_sentence_label=None, # NSP labels: [B]
output_hidden_states=False,
return_dict=False,
):
sequence_output, pooled_output, all_hidden_states = self.bert(
input_ids=input_ids,
token_type_ids=token_type_ids,
attention_mask=attention_mask,
output_hidden_states=output_hidden_states,
return_dict=False,
)
prediction_scores, seq_relationship_score = self.cls(sequence_output, pooled_output)
total_loss = None
mlm_loss = None
nsp_loss = None
if labels is not None:
loss_fct = nn.CrossEntropyLoss(ignore_index=-100)
mlm_loss = loss_fct(prediction_scores.view(-1, prediction_scores.size(-1)), labels.view(-1))
if next_sentence_label is not None:
nsp_loss_fct = nn.CrossEntropyLoss()
nsp_loss = nsp_loss_fct(seq_relationship_score.view(-1, 2), next_sentence_label.view(-1))
if (mlm_loss is not None) and (nsp_loss is not None):
total_loss = mlm_loss + nsp_loss
elif mlm_loss is not None:
total_loss = mlm_loss
elif nsp_loss is not None:
total_loss = nsp_loss
if return_dict:
return {
"loss": total_loss,
"prediction_logits": prediction_scores,
"seq_relationship_logits": seq_relationship_score,
"hidden_states": all_hidden_states,
}
return (total_loss, prediction_scores, seq_relationship_score, all_hidden_states)
# 方便與 HF 對齊命名空間
@property
def embeddings(self):
return self.bert.embeddings
因此我們可以看到在程式碼中
sequence_output 作為輸入,傳給 BertLMPredictionHead 以預測遮蔽詞(Masked Language Modeling)。pooled_output 作為輸入,傳給 seq_relationship 分類器以預測句子關聯(Next Sentence Prediction)。這樣的設計不僅讓兩個任務共享底層的 BERT 編碼器,還能針對各自目標使用專屬的輸出 head,體現了經典的「多任務學習」思維一個骨幹、兩個任務並行訓練。最後我們也同樣驗證自定義模型與 Hugging Face 官方版本的參數是否一致,確保整體架構與權重對齊正確:
    # 測試與 HF BertForPreTraining 對齊(含 MLM + NSP)
    hf_full = HFBertForPreTraining.from_pretrained("bert-base-uncased")
    model_full = BertForPreTraining(hf_full.config)
    sd_full = hf_full.state_dict()
    missing_f, unexpected_f = model_full.load_state_dict(sd_full, strict=False)
    print("[PreTraining] Missing:", missing_f)
    print("[PreTraining] Unexpected:", unexpected_f)
理想情況下的輸出為:
[PreTraining] Missing: []
[PreTraining] Unexpected: []
這表示我們的 BertForPreTraining 模型在架構與參數命名上,已與 Hugging Face 官方版本完全對齊,成功重現了整個預訓練模型的設計與實作。這不僅是技術驗證的一環,也為後續進行 fine-tuning 或客製化模型奠定了穩固基礎。
我們終於完成了一個經典預訓練模型的完整拆解與實作。回顧整個過程可以發現 BERT 的架構其實並不算特別複雜。真正的挑戰反而在於如何讓我們自行實作的模型精確對齊 Hugging Face 的權重與設計細節。透過這樣的過程,我們不僅深入理解了 Transformer 的核心結構,也更熟悉了 Hugging Face 模型在模組化與命名上的邏輯。這些知識將對你日後進行模型調整、客製化設計,甚至是 debug 問題時發揮極大作用。
而在明天,我將帶你實際使用 Hugging Face 提供的 API 來進行一次 BERT 的 fine-tuning 實作。當你已經掌握了模型底層架構的細節,這時再進行微調操作,你將更清楚地知道這些高階封裝到底在做些什麼。這不只是使用工具,而是真正理解模型的開始。


 iThome鐵人賽