
昨天我們聊到 L7 Policy,看到了 Cilium 是如何透過內建的 Envoy Proxy 來達成 L7-aware 的管控。
不過在真實世界裡,很多安全需求並不一定要到 L7 才能實現,有時候 只需要知道「我要去哪個網域」 就足夠。
這就是 Cilium 特別強的一點:它支援 DNS 與 FQDN-based Policy
這讓我心中產生一個疑問:
👉 DNS 查詢也會像 HTTP 流量一樣被攔截嗎?
事實上,Cilium 的 DNS Policy 也有自己的幕後功臣 — DNS Proxy
在 Cilium 的世界裡,除了 Cilium Envoy 負責處理 L7 HTTP/gRPC 流量,還有一個更低調但同樣重要的組件,它就藏在 cilium-agent 裡面:DNS Proxy。
DNS Proxy 是一個透明的 DNS 代理服務器,它:
cilium-agent 裡面其實源自於一些痛點:傳統做法只能寫死 IP 清單,但這些 IP 背後可能是動態的 CDN 或雲服務 IP pool:
# 傳統方式:要維護一堆可能變化的 IP
egress:
- toCIDRSet:
  - cidr: "103.21.244.0/22"  # Cloudflare
  - cidr: "54.230.200.0/21" # AWS CloudFront
其他 DNS 相關的 Network Policy 寫法,還請讀者參閱官方文件,這裡不展開所有寫法做介紹
# DNS Policy 方式:直觀又穩定
egress:
- toPorts:
  - ports:
    - port: "53"
      protocol: UDP
    rules:
      dns:
      - matchPattern: "*.amazonaws.com"
DNS Proxy 的存在就能解決上述提到的痛點:
另外,DNS Proxy 有種模式叫做 Transparent Mode ,可以在 cilium-agent 的 --dnsproxy-enable-transparent-mode 參數配置,預設是關閉
相關文件
這裡就是最有趣的部分了!類似於 Day 17 提到的 L7 流量攔截,DNS 查詢也會被 eBPF 程序透明攔截
實際上,DNS 攔截是透過 eBPF + 設置 iptables TPROXY 實現的:
原始碼連結點我
// pkg/datapath/iptables/iptables.go
func (m *Manager) inboundProxyRedirectRule(cmd string) []string {
    toProxyMark := fmt.Sprintf("%#08x", linux_defaults.MagicMarkIsToProxy)
    return []string{
        "-t", "mangle",
        cmd, ciliumPreMangleChain,
        "-m", "socket", "--transparent",
        "!", "-o", "lo",
        "-m", "comment", "--comment", "cilium: any->pod redirect proxied traffic to host proxy",
        "-j", "MARK",
        "--set-mark", toProxyMark}  // iptables 設置 mark = 0x200
}
以下是範例,我們在文末會來驗證真的有 iptables,會試著來看看 CILIUM_PRE_mangle chain 裡面放了什麼,以下是一個簡單的範例:
# 實際的 iptables 大概長這樣
# iptables 設置基礎 mark
-A CILIUM_PRE_mangle -m socket --transparent -j MARK --set-xmark 0x200/0xffffffff

# iptables TPROXY 匹配完整 mark 並重定向
-A CILIUM_PRE_mangle -p tcp -m mark --mark 0x[ENDPOINT_ID]0200 -j TPROXY --on-port [DYNAMIC_PORT] --on-ip 127.0.0.1
-A CILIUM_PRE_mangle -p udp -m mark --mark 0x[ENDPOINT_ID]0200 -j TPROXY --on-port [DYNAMIC_PORT] --on-ip 127.0.0.1
Mark 值的編碼會是多少?
原始碼連結點我
// pkg/datapath/iptables/iptables.go
func (m *Manager) iptProxyRule(..., proxyPort uint16, ...) error {
    // Match
    port := uint32(byteorder.HostToNetwork16(proxyPort)) << 16
    markMatch := fmt.Sprintf("%#x", linux_defaults.MagicMarkIsToProxy|port)
    // ...
}
// bpf/lib/common.h
#define MARK_MAGIC_TO_PROXY     0x0200

// 完整 mark 的組成
完整 mark = (byteorder.HostToNetwork16(proxy_port) << 16) | MARK_MAGIC_TO_PROXY
例如: 0x3f8d0200 = (byteorder.HostToNetwork16(36159) << 16) | 0x0200
--on-port 36159
這種攔截方式有幾個特點:
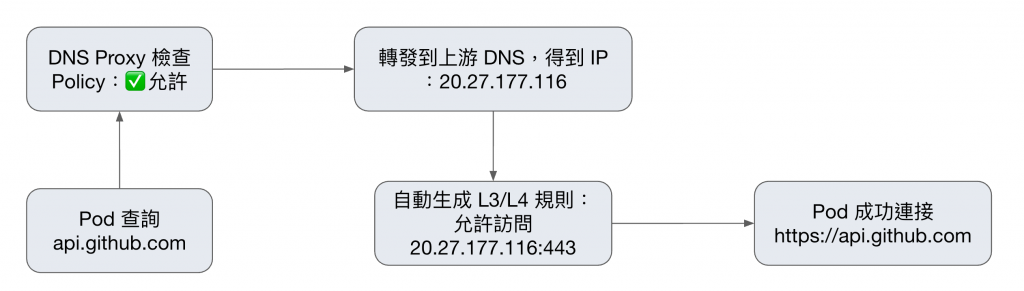
/etc/resolv.conf 中的 DNS 服務器DNS Proxy 不只是用來攔截和檢查 DNS 查詢,它還有一個超重要的功能:動態生成 L3/L4 Policy 規則!
真的在寫 Cilium Network Policy 時你一定會看到兩個很像的東西:
| 類型 | 定義位置 | 作用 | 範例 |
|---|---|---|---|
| DNS Policy | rules.dns |
控制 Pod 可以查哪些網域的 DNS Query | 允許 Pod 查 *.cilium.io |
| FQDN Policy | toFQDNs |
控制 Pod 可以連到哪些 Domain(透過 DNS Proxy 解析出的 IP 比對) | 允許 Pod 連到 github.com |
簡單來說:
rules.dns 像是 “我允許這些 DNS 查詢”,是早期 gatekeeper,在解析階段先過濾 domain 是否允許。toFQDNs 則像是 “我允許去這些 domain 所對應的 IP 建立連線”,是實際的 egress 流量控制(基於 DNS 映射結果)rules.dns 和 toFQDNs 是兩個不同層次/用途的設定,但其實它們會一起合作,但功能與適用時機有差異
以下是兩者怎麼一起工作的簡化流程:
1. Pod 發出 DNS 查詢
2. DNS 回應處理 & 建立 FQDN 映射
3. Pod 建立流量 (toFQDNs 發揮作用)
4. Cache 過期與更新
# DNS Policy + ToFQDNs 的組合 Policy
egress:
- toFQDNs:
  - matchName: "api.github.com"
  toPorts:
  - ports:
    - port: "443"
      protocol: TCP
    rules:
      dns:
      - matchName: "api.github.com"
這個 Policy 的執行流程:
DNS Proxy 還會遵循 DNS TTL 來管理快取:
// DNS 回應處理
func ExtractMsgDetails(msg *dns.Msg) (qname string, responseIPs []netip.Addr, TTL uint32, ...) {
    TTL = math.MaxUint32 // 初始化為最大值

    for _, ans := range msg.Answer {
        switch ans := ans.(type) {
        case *dns.A:
            responseIPs = append(responseIPs, ip)
            if TTL > ans.Hdr.Ttl {
                TTL = ans.Hdr.Ttl // 取最小 TTL
            }
        }
    }

    return qname, responseIPs, TTL, ...
}
這確保了:
讓我們做個實驗來證明 DNS 查詢確實被 DNS Proxy 攔截然後進行檢查!
首先建立一個簡單的測試環境:
# 建立測試 Pod
$ kubectl run test-pod --image=nicolaka/netshoot -n 2025-k8s-summit -- sleep 3600

# 建立 DNS Policy
$ cat <<EOF | kubectl apply -f -
apiVersion: "cilium.io/v2"
kind: CiliumNetworkPolicy
metadata:
  name: "dns-test-policy"
  namespace: "2025-k8s-summit"
spec:
  endpointSelector:
    matchLabels:
      run: test-pod
  egress:
  - toPorts:
    - ports:
      - port: "53"
        protocol: UDP
      rules:
        dns:
        - matchPattern: "*.github.com"  # 只允許 *.github.com
        - matchName: "google.com"       # 只允許 google.com
EOF
接著我們連進去 cilium-agent,開啟 Hubble 來觀察 DNS 流量:
# 連進去 test-pod Node 上的 cilium-agent
# 觀察 DNS 流量
$ hubble observe --pod 2025-k8s-summit/test-pod --protocol dns -f
# 查詢允許的域名
$ kubectl exec test-pod -n 2025-k8s-summit -- dig www.github.com

# Hubble 輸出會顯示類似這樣:
Oct  1 15:32:18.120: 2025-k8s-summit/test-pod:39368 (ID:153368) -> kube-system/node-local-dns-wx57b:53 (ID:183526) dns-request proxy FORWARDED (DNS Query www.github.com. A)
Oct  1 15:32:18.121: 2025-k8s-summit/test-pod:39368 (ID:153368) <- kube-system/node-local-dns-wx57b:53 (ID:183526) dns-response proxy FORWARDED (DNS Answer "20.205.243.166" CNAMEs: "github.com." TTL: 30 (Proxy www.github.com. A))
# 查詢不允許的域名
$ kubectl exec test-pod -n 2025-k8s-summit -- dig shiun.me

# Hubble 輸出會顯示:
Oct  1 15:34:08.096: 2025-k8s-summit/test-pod:56448 (ID:153368) -> kube-system/node-local-dns-wx57b:53 (ID:183526) dns-request proxy DROPPED (DNS Query shiun.me. A)
讀者們也許會注意到 Hubble 的輸出有 TTL 的字眼,其實 Cilium 有幫我們為 DNS 查詢結果實踐 Cache,就很像平常的 DNS Server 會有 TTL 一樣,Cilium 是把這個映射關係儲存到 BPF Map:
# 連進去 test-pod Node 上的 cilium-agent
$  cilium-dbg fqdn cache list

# 輸出如下
Endpoint   Source       FQDN              TTL   ExpirationTime             IPs
3935       lookup       www.github.com.   5     2025-10-01T15:37:25.307Z   20.205.243.166
3935       lookup       google.com.       30    2025-10-01T15:38:00.645Z   142.251.10.138,142.251.10.102,142.251.10.113,142.251.10.139,142.251.10.100,142.251.10.101
3935       connection   google.com.       0     2025-10-01T15:44:02.253Z   142.250.4.100
3935       connection   google.com.       0     2025-10-01T15:44:02.253Z   142.250.4.102
3935       connection   google.com.       0     2025-10-01T15:44:02.253Z   142.250.4.113
3935       connection   google.com.       0     2025-10-01T15:44:02.253Z   142.250.4.139
3935       connection   google.com.       0     2025-10-01T15:44:02.253Z   142.250.4.138
3935       connection   google.com.       0     2025-10-01T15:44:02.253Z   142.250.4.101
可以看到輸出會包含允許的 github.com 和 google.com 的對應 IP
最後,檢查 Node 上的 iptables:
$ iptables-legacy -t mangle -S CILIUM_PRE_mangle

-N CILIUM_PRE_mangle

# 任何往 Pod 的流量,如果要經過 host proxy,就先打上 mark 0x200
-A CILIUM_PRE_mangle ! -o lo -m socket --transparent -m mark ! --mark 0xe00/0xf00 -m mark ! --mark 0x800/0xf00 -m comment --comment "cilium: any->pod redirect proxied traffic to host proxy" -j MARK --set-xmark 0x200/0xffffffff

# 經 eth0 且目標是本機的流量,就在 conntrack 打上 0x80 標記
-A CILIUM_PRE_mangle -i eth0 -m comment --comment "cilium: primary ENI" -m addrtype --dst-type LOCAL --limit-iface-in -j CONNMARK --set-xmark 0x80/0x80

# Pod veth 流量,還原之前的 connmark,保持狀態一致
-A CILIUM_PRE_mangle -i lxc+ -m comment --comment "cilium: primary ENI" -j CONNMARK --restore-mark --nfmask 0x80 --ctmask 0x80

# 攔截 TCP/53 DNS,TPROXY 到本地 cilium-dns proxy (127.0.0.1:36159)
-A CILIUM_PRE_mangle -p tcp -m mark --mark 0x3f8d0200 -m comment --comment "cilium: TPROXY to host cilium-dns-egress proxy" -j TPROXY --on-port 36159 --on-ip 127.0.0.1 --tproxy-mark 0x200/0xffffffff

# 攔截 UDP/53 DNS,TPROXY 到本地 cilium-dns proxy (127.0.0.1:36159)
-A CILIUM_PRE_mangle -p udp -m mark --mark 0x3f8d0200 -m comment --comment "cilium: TPROXY to host cilium-dns-egress proxy" -j TPROXY --on-port 36159 --on-ip 127.0.0.1 --tproxy-mark 0x200/0xffffffff
上面的規則組合起來就是:
CILIUM_PRE_mangle
cilium-dns proxy(隨機 port,例如 36159)另外,在上面的 iptables 規則裡你會看到 0x3f8d0200 ,其實是由 proxy port 編碼而來。我們可以用下面這段 Python 程式模擬 Cilium 的運算邏輯來驗證:
$ python3 -c "
import struct
port = 36159

# 模擬 little-endian 系統上的 HostToNetwork16 行為
# 步驟 1: 將 port 按 little-endian 打包
little_endian_bytes = struct.pack('<H', port)  # [0x3f, 0x8d]
print(f'Port {port} (0x{port:04x}) -> Little-endian bytes: {little_endian_bytes.hex()}')

# 步驟 2: HostToNetwork16 在 little-endian 系統上會反轉字節
network_value = struct.unpack('>H', little_endian_bytes)[0]  # 0x3f8d
print(f'HostToNetwork16 result: 0x{network_value:04x}')

# 步驟 3: 左移 16 位並加上 MAGIC_TO_PROXY
mark = (network_value << 16) | 0x0200
print(f'Final mark: 0x{mark:08x}')
"
python 執行後的輸出:
Port 36159 (0x8d3f) -> Little-endian bytes: 3f8d
HostToNetwork16 result: 0x3f8d
Final mark: 0x3f8d0200
從上面的驗證可以清楚看到:
經過今天的深入探討,我們終於理解了 Cilium DNS Policy 的完整運作機制,也在最後進行了驗證。
我們複習一下今天學到的DNS Proxy 的三大核心功能:
透明攔截
利用 iptables TPROXY 把 Pod 的 DNS Query 導向本地的 cilium-dns proxy,對應用完全透明
Policy 檢查
將查詢的域名與 CiliumNetworkPolicy 中的規則比對,判斷是否允許或拒絕。
動態規則生成
把成功解析到的 IP 動態寫入 L3/L4 Policy,實現 FQDN-based 網路控制。
所以下次當你看到 CiliumNetworkPolicy 中的 DNS 規則時,記住背後有一個 DNS Proxy 在默默地:
Pod DNS 查詢 → eBPF 攔截 → DNS Proxy Policy 檢查 → 允許/拒絕 → 動態生成 L3/L4 規則
就像 Day 17 的 Cilium Envoy 負責 L7 HTTP 流量一樣,DNS Proxy 是 Cilium DNS Policy 背後的幕後功臣!

 iThome鐵人賽