
今天這篇將以 Client 發出請求的封包視角深度追蹤 Cilium 的 Pod-to-Service datapath,並且會抓封包實際驗證 Datapath
另外本篇內容很多會和 Pod-to-Pod Datapath 有重疊,,所以一些重疊的知識內容不會贅述,或多加說明,對於 Pod-to-Pod Datapath 的詳細內容如果想不起來,可以從 Day 12 的文章開始複習
筆者我,覺得今天這篇比較難,我實際在研究 Datapath 時,總是一直回來修修改改文章,有時候驗證完一些細節就會發現我前幾天寫的文章內容有誤,發現有誤的當下我都會立即回去修改文章內容,建議讀者如果有空也可以回去重翻先前我寫的文章。
另外,讀者若發現我提供的資訊有誤,希望能留言告知我或是也可以寄信到 shiunchiu.me@gmail.com,一起交流學習,相互成長!
# Pod 分布
netshoot Pod:    10.244.2.131 @ worker-1  (Client)
nginx Pod 1:     10.244.1.234 @ worker-2  (Backend 1 - 跨節點)
nginx Pod 2:     10.244.2.60  @ worker-1  (Backend 2 - 同節點)

# Service 配置
nginx-service:   ClusterIP 10.104.210.239:80
首先驗證我們的測試環境配置正確:
# 任一個 cilium-agent 內
$ cilium-dbg status

KubeProxyReplacement:    True   [ens5   fe80::457:c3ff:fe7a:f387 10.13.1.129 (Direct Routing)]

Routing:                 Network: Tunnel [vxlan]   Host: BPF
當 netshoot Pod 執行 curl 10.104.210.239:80 時:
# 應用層認知的連接
src IP:      10.244.2.131     (netshoot Pod)
dst IP:    10.104.210.239   (nginx Service ClusterIP)
Protocol:       TCP
可以使用 bpftool 來看 cgroup hook 上有哪些 BPF Program,你會看到很多 cil_ 開頭的就是跟 Cilium 有關的 BPF Program,而從名字其實就會很好猜出用途,例如: cil_sock4_connect → 表示它攔截的是 IPv4 connect()
# 驗證 Socket BPF 程式存在
$ bpftool cgroup tree
# 關鍵輸出:
/sys/fs/cgroup
4508     cgroup_inet_sock_release multi   cil_sock_release
4503     cgroup_inet4_post_bind   multi   cil_sock4_post_bind
4499     cgroup_inet6_post_bind   multi   cil_sock6_post_bind
4501     cgroup_inet4_connect     multi   cil_sock4_connect
4500     cgroup_inet6_connect     multi   cil_sock6_connect
4506     cgroup_inet4_getpeername multi   cil_sock4_getpeername
4507     cgroup_inet6_getpeername multi   cil_sock6_getpeername
4505     cgroup_udp4_sendmsg      multi   cil_sock4_sendmsg
4502     cgroup_udp6_sendmsg      multi   cil_sock6_sendmsg
4498     cgroup_udp4_recvmsg      multi   cil_sock4_recvmsg
4504     cgroup_udp6_recvmsg      multi   cil_sock6_recvmsg

# 查看程式詳情
$ bpftool prog show id 4501
# 輸出:
4501: cgroup_sock_addr  name cil_sock4_connect  tag 80d22a0d6ec332a1  gpl
	loaded_at 2025-09-23T06:44:07+0000  uid 0
	xlated 5608B  jited 3095B  memlock 8192B  map_ids 33,135,24,39,31,34,46,38
	btf_id 3198
原始碼連結點我
__section("cgroup/inet4_connect")
int cil_sock4_connect(struct bpf_sock_addr *ctx)
{
    // 進入 socket LB 流程
    return __sock4_xlate_fwd(ctx, ctx, false);
}

static __always_inline int __sock4_xlate_fwd(struct bpf_sock_addr *ctx,
                                             struct bpf_sock_addr *ctx_full,
                                             const bool udp_only)
{
    struct lb4_key key = {
        .address = ctx->user_ip4,
        .dport   = ctx_dst_port(ctx),
#if defined(ENABLE_SERVICE_PROTOCOL_DIFFERENTIATION)
        .proto   = ctx_protocol(ctx),
#endif
    };
    struct lb4_service *svc;
    struct lb4_backend *backend;
    __u32 backend_id = 0;

    // Step 1: 查找 Service
    svc = lb4_lookup_service(&key, true);
    if (!svc) {
        svc = sock4_wildcard_lookup_full(&key, ctx_in_hostns(ctx_full, NULL));
    }
    if (!svc || svc->count == 0)
        return -EHOSTUNREACH;

    // Step 2: 選擇 Backend
    key.backend_slot = (sock_select_slot(ctx_full) % svc->count) + 1;
    struct lb4_service *backend_slot = __lb4_lookup_backend_slot(&key);
    if (!backend_slot)
        return -EHOSTUNREACH;

    backend_id = backend_slot->backend_id;
    backend = __lb4_lookup_backend(backend_id);
    if (!backend)
        return -EHOSTUNREACH;

    // Step 3: 更新 revNAT (為了回程能還原成 Service IP)
    if (sock4_update_revnat(ctx_full, backend, &key, svc->rev_nat_index) < 0)
        return -ENOMEM;

    // Step 4: !!!關鍵:改寫 socket connect() 的 sockaddr!!!
    ctx->user_ip4 = backend->address;
    ctx_set_port(ctx, backend->port);

    return 0;
}
簡單說一下原始碼大概做以下事情:
拿 Service Map:
把 (ClusterIP, Port, Proto) 當 key 去查 Service Map,看這是什麼 Service
選 Backend:
改寫 sockaddr(超重要!):
ctx->user_ip4 = backend->address;
ctx_set_port(ctx, backend->port);
這就是把「原本 User 想連 ClusterIP」直接改成「實際連 Pod IP」
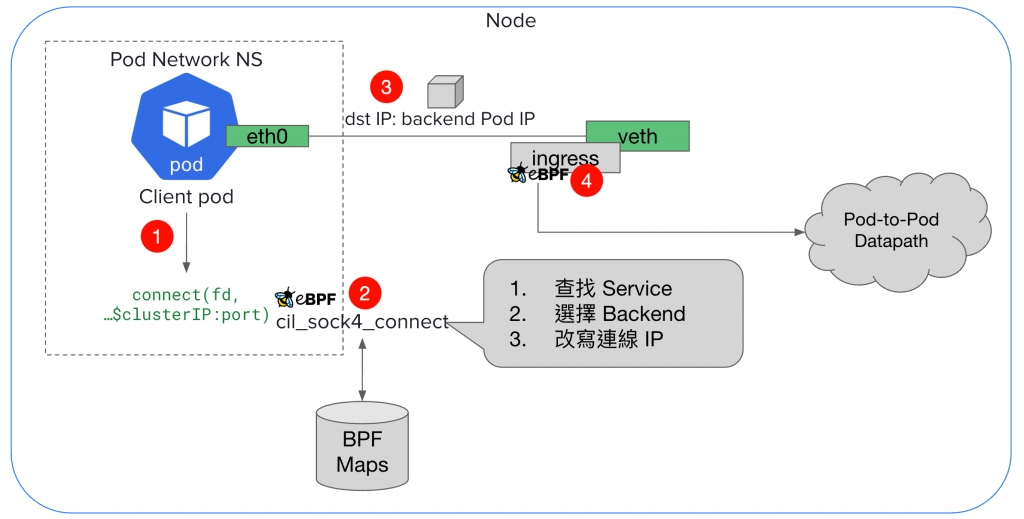
關於 Socket LB,我拆解成以下關鍵步驟,對應到圖片中標的數字:
connect() syscallcil_sock4_connect 被執行,SYN 封包產生前,就已經完成決策,dst IP 已是 backend Pod IP# 在 netshoot Pod 內部抓包
$ tcpdump -i eth0 -nn port 80
# 執行測試
$ kubectl exec netshoot -- curl -s 10.104.210.239:80
# 實際抓包結果:
17:12:44.251312 IP 10.244.2.131.55908 > 10.244.2.60.80: Flags [S], seq 1293322508, win 62377, options [mss 8911,sackOK,TS val 2595306316 ecr 0,nop,wscale 7], length 0
17:12:44.251364 IP 10.244.2.60.80 > 10.244.2.131.55908: Flags [S.], seq 3464783306, ack 1293322509, win 62293, options [mss 8911,sackOK,TS val 336457072 ecr 2595306316,nop,wscale 7], length 0
17:12:44.251374 IP 10.244.2.131.55908 > 10.244.2.60.80: Flags [.], ack 1, win 488, options [nop,nop,TS val 2595306316 ecr 336457072], length 0
17:12:44.251440 IP 10.244.2.131.55908 > 10.244.2.60.80: Flags [P.], seq 1:79, ack 1, win 488, options [nop,nop,TS val 2595306316 ecr 336457072], length 78: HTTP: GET / HTTP/1.1
17:12:44.251451 IP 10.244.2.60.80 > 10.244.2.131.55908: Flags [.], ack 79, win 487, options [nop,nop,TS val 336457072 ecr 2595306316], length 0
17:12:44.251638 IP 10.244.2.60.80 > 10.244.2.131.55908: Flags [P.], seq 1:239, ack 79, win 487, options [nop,nop,TS val 336457072 ecr 2595306316], length 238: HTTP: HTTP/1.1 200 OK
...
關鍵發現:
在原始碼分析,我們有看到原始碼其實會去 Service Map 找到 ClusterIP 背後對應的 Backend IP,我們可以連線進去 K8s Cluster 內任一個 cilium-agent 裡面,透過 cilium-dbg service list 來查看,如下:
# 在任一 cilium-agent 裡面

# 10.104.210.239 是 nginx-service ClusterIP
$ cilium-dbg service list | grep -A1 "10.104.210.239"
18   10.104.210.239:80/TCP     ClusterIP      1 => 10.244.1.234:80/TCP (active)
                                              2 => 10.244.2.60:80/TCP (active)
這裡可以確定,當我們在 K8s Cluster 建立了 Service,真的會有對應的 Entries 被存進去 BPF Map,這是 Cilium 在 Service LB 可以選擇到 Backkend Pod 的關鍵
這裡我們來多觀察一些東西,驗證 Socket LB 的黑魔法,我們會需要連線進去 netshoot Pod
觀察 syscall 調用:
# 連線進去 netshoot pod

# 1. syscall 調用層面 (strace)
$ strace -e connect curl -s 10.104.210.239:80

connect(4, {sa_family=AF_INET, sin_port=htons(80), sin_addr=inet_addr("10.104.210.239")}, 16) = -1 EINPROGRESS (Operation in progress) # 10.104.210.239 是 ClusterIP
使用 nc 來建立連線,接著來觀察 TCP sockets 連線狀況:
# 連線進去 netshoot Pod

# 建立一個 TCP client 連線到 10.104.210.239:80 (ClusterIP)
$ nc 10.104.210.239 80

# 觀察 TCP socket 連線狀態
$ ss -tn

# 會看到連到的是 10.244.1.234,這是 nginx-deployment pod @worker-2
State    Recv-Q    Send-Q         Local Address:Port            Peer Address:Port
ESTAB    0         0               10.244.2.131:55210           10.244.1.234:80
所以這裡可以確定在 pod network namespace 這邊的網卡抓封包,實際的 dstIP 早就已經被改寫成 Backend Pod IP 了,然後被改寫的封包就會這樣被送出 Pod-side veth,接著抵達 host-side veth。
這裡我們來檢查看看 BPF CT (Connection Tracking) Map 裡面是否有 Service ClusterIP 的蹤影,我連線到 worker-1 的 cilium-agent,然後執行以下指令:
# worker-1 cilium-agent

$ cilium-dbg bpf ct list global | grep 10.104.210.239 # 10.104.210.239 是 ClusterIP

# 執行後無任何輸出
然後我們來看一下 backend Pod IP 有沒有任何 entries:
# worker-1 cilium-agent

# 10.244.2.131 是 netshoot@worker-1
# 10.244.2.60 是 nginx-deployment@worker-1
# 10.244.1.234 是 nginx-deployment@worker-2
$ cilium-dbg bpf ct list global | grep -E "(10.244.2.131|10.104.210.239)"

# 看到 netshoot@worker-1 <-> nginx-deployment@worker-1
TCP OUT 10.244.2.131:56410 -> 10.244.2.60:80 expires=1633031 Packets=0 Bytes=0 RxFlagsSeen=0x1b LastRxReport=1633021 TxFlagsSeen=0x1b LastTxReport=1633021 Flags=0x0013 [ RxClosing TxClosing SeenNonSyn ] RevNAT=0 SourceSecurityID=15175 BackendID=0
# TCP IN
TCP IN 10.244.2.131:56410 -> 10.244.2.60:80 expires=1633031 Packets=0 Bytes=0 RxFlagsSeen=0x1b LastRxReport=1633021 TxFlagsSeen=0x1b LastTxReport=1633021 Flags=0x0013 [ RxClosing TxClosing SeenNonSyn ] RevNAT=0 SourceSecurityID=15175 BackendID=0

# 看到 netshoot@worker-1 -> nginx-deployment@worker-2
# 只會找得到 TCP OUT,因為跨 Node,我們現在在 worker-1 cilium-agent 視角
TCP OUT 10.244.2.131:35968 -> 10.244.1.234:80 expires=1634493 Packets=0 Bytes=0 RxFlagsSeen=0x1b LastRxReport=1634483 TxFlagsSeen=0x1b LastTxReport=1634483 Flags=0x0013 [ RxClosing TxClosing SeenNonSyn ] RevNAT=0 SourceSecurityID=15175 BackendID=0
從上面的結果,可以發現 ClusterIP 就像是虛無飄渺般的存在,傳統 DNAT 是對封包 header 做改寫,而這裡 Cilium 直接在 connect() 的參數(struct sockaddr)動手腳,連封包都還沒出來。
抵達 host-side veth 後,基本上就是回到 Pod-to-Pod Datapath 了,因為在 host-side veth 看到的就是「netshoot pod 要去打 nginx-deployment pod @worker-2」
我們這裡驗證一下 host-side veth 和 cilium_vxlan 也是看到 backend Pod IP:
# 在不同介面同時抓包,觀察 NAT 前後差異
# 10.104.210.239 是 nginx service ClusterIP

# Terminal 1: 抓取 netshoot 介面(NAT 前)
# 在 worker-1 Node 執行
$ tcpdump -i lxcb285cbbf51cb -nn # lxcb285cbbf51cb 是 netshoot host-side veth

# lxcb285cbbf51cb tcpdump 輸出:
15:22:48.486641 IP 10.244.2.131.53964 > 10.244.1.234.80: Flags [S], seq 959482869, win 62377, options [mss 8911,sackOK,TS val 170537687 ecr 0,nop,wscale 7], length 0
15:22:48.487015 IP 10.244.2.131.53964 > 10.244.1.234.80: Flags [.], ack 2942356005, win 488, options [nop,nop,TS val 170537688 ecr 1517345566], length 0
15:22:48.487127 IP 10.244.2.131.53964 > 10.244.1.234.80: Flags [P.], seq 0:78, ack 1, win 488, options [nop,nop,TS val 170537688 ecr 1517345566], length 78: HTTP: GET / HTTP/1.1
15:22:48.487360 IP 10.244.2.131.53964 > 10.244.1.234.80: Flags [.], ack 239, win 487, options [nop,nop,TS val 170537688 ecr 1517345566], length 0
15:22:48.487416 IP 10.244.2.131.53964 > 10.244.1.234.80: Flags [.], ack 854, win 483, options [nop,nop,TS val 170537688 ecr 1517345566], length 0
15:22:48.487685 IP 10.244.2.131.53964 > 10.244.1.234.80: Flags [F.], seq 78, ack 854, win 483, options [nop,nop,TS val 170537688 ecr 1517345566], length 0
15:22:48.487893 IP 10.244.2.131.53964 > 10.244.1.234.80: Flags [.], ack 855, win 483, options [nop,nop,TS val 170537689 ecr 1517345567], length 0

# Terminal 2: 抓取 VXLAN 介面(NAT 後)
# 在 worker-1 Node 直接執行
$ tcpdump -i cilium_vxlan -nn 'dst 10.244.1.234'

# cilium_vxlan tcpdump 輸出:
15:22:48.486656 IP 10.244.2.131.53964 > 10.244.1.234.80: Flags [S], seq 959482869, win 62377, options [mss 8911,sackOK,TS val 170537687 ecr 0,nop,wscale 7], length 0
15:22:48.487020 IP 10.244.2.131.53964 > 10.244.1.234.80: Flags [.], ack 2942356005, win 488, options [nop,nop,TS val 170537688 ecr 1517345566], length 0
15:22:48.487137 IP 10.244.2.131.53964 > 10.244.1.234.80: Flags [P.], seq 0:78, ack 1, win 488, options [nop,nop,TS val 170537688 ecr 1517345566], length 78: HTTP: GET / HTTP/1.1
15:22:48.487363 IP 10.244.2.131.53964 > 10.244.1.234.80: Flags [.], ack 239, win 487, options [nop,nop,TS val 170537688 ecr 1517345566], length 0
15:22:48.487418 IP 10.244.2.131.53964 > 10.244.1.234.80: Flags [.], ack 854, win 483, options [nop,nop,TS val 170537688 ecr 1517345566], length 0
15:22:48.487693 IP 10.244.2.131.53964 > 10.244.1.234.80: Flags [F.], seq 78, ack 854, win 483, options [nop,nop,TS val 170537688 ecr 1517345566], length 0
15:22:48.487898 IP 10.244.2.131.53964 > 10.244.1.234.80: Flags [.], ack 855, win 483, options [nop,nop,TS val 170537689 ecr 1517345567], length 0
可以看到,host-side veth 確實看到的都是 Backend Pod IP,看不到 Service ClusterIP ( 10.104.210.239 ) ,而我這邊剛好發出請求選中的是 nginx-deployment Pod @ worker-2,而發出請求的 netshoot Pod 住在 worker-1,也因此這是一個 「跨 Node Pod-to-Pod Datapath」,所以在 cilium_vxlan 這裡會抓到封包,後面的細節我就不多加贅述了,封包會走的路已經在 **[Day 15] 探索 Cilium Pod to Pod Datapath (4) 跨 Node Datapath 與實際驗證** 詳細介紹了
整體實驗下來,Socket LB 的確顛覆了我們對「Service IP → DNAT → Backend Pod」這條路徑的既有印象。
傳統的 kube-proxy 是 修改封包 header 實現 DNAT
但 Cilium 的 Socket LB 直接在 connect() 階段,對 struct sockaddr 下手,讓 封包生成之前就完成目標地址改寫:
connect() 被 BPF hook 攔截,實際建立的就是「Pod-to-Pod」連線這也是為什麼在 Socket LB 模式下,無論你從哪個介面去抓包,都再也找不到 Service IP,因為它在「封包出生前」就已經被替換掉了。
👉 簡單一句話:
Cilium 的 Socket LB 不是把 Service IP NAT 成 Backend IP,而是根本「跳過 NAT」,直接在 socket 層做轉換,讓 Service IP 變成一個對應表,而不再是網路封包中真正會存在的位址。

 iThome鐵人賽