一直以來,我們的鐵人賽系列從最底層的 Pod Level 一路分析到 Service Level,範圍逐步向外擴張,從單一節點內部的網路互動,走向整個 Cluster 內的服務溝通。
今天這篇,我想帶大家繼續往「更外層」走一步 — 進入 Gateway API 的世界。
Gateway API 是 Kubernetes 用來取代傳統 Ingress 的新一代標準,它不只是名稱不同,而是徹底重構了整個 L7 流量管理的邏輯。
比較吸引我的是 Gateway API 引入了 Role-oriented 的概念,讓 Infra 團隊和開發團隊能清楚分工,感覺就很像以前我們在寫 Ingress 現在被拆解成多個 YAML 去寫。
這篇文章我們會從安裝開始,實際在 Cilium 環境中啟用 Gateway API,並體驗它在 North-South 流量(進出 Cluster 的流量)上的行為。
後面我們還會試著用 HTTPRoute 來實作 流量分流(Traffic Splitting),體驗看看 Gateway API 與 Cilium Envoy 整合後能做到的 L7 控制能力。
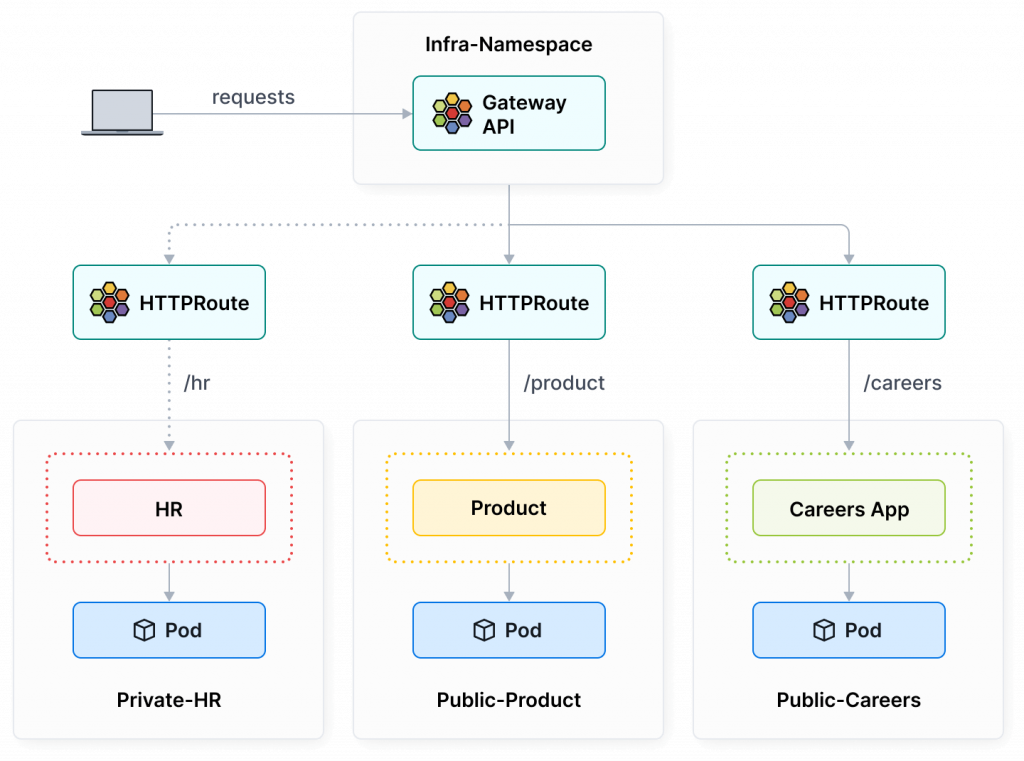
圖片取自:https://cilium.io/use-cases/gateway-api/
安裝 Gateway API CRD
kubectl apply -f https://raw.githubusercontent.com/kubernetes-sigs/gateway-api/v1.2.0/config/crd/standard/gateway.networking.k8s.io_gatewayclasses.yaml
kubectl apply -f https://raw.githubusercontent.com/kubernetes-sigs/gateway-api/v1.2.0/config/crd/standard/gateway.networking.k8s.io_gateways.yaml
kubectl apply -f https://raw.githubusercontent.com/kubernetes-sigs/gateway-api/v1.2.0/config/crd/standard/gateway.networking.k8s.io_httproutes.yaml
kubectl apply -f https://raw.githubusercontent.com/kubernetes-sigs/gateway-api/v1.2.0/config/crd/standard/gateway.networking.k8s.io_referencegrants.yaml
kubectl apply -f https://raw.githubusercontent.com/kubernetes-sigs/gateway-api/v1.2.0/config/crd/standard/gateway.networking.k8s.io_grpcroutes.yaml
kubectl apply -f https://raw.githubusercontent.com/kubernetes-sigs/gateway-api/v1.2.0/config/crd/experimental/gateway.networking.k8s.io_tlsroutes.yaml
安裝好之後,檢查 CRD 安裝成功:
$ kubectl get crd | grep networking.k8s.io

gatewayclasses.gateway.networking.k8s.io     2025-10-05T15:03:25Z
gateways.gateway.networking.k8s.io           2025-10-05T15:03:25Z
grpcroutes.gateway.networking.k8s.io         2025-10-05T15:03:26Z
httproutes.gateway.networking.k8s.io         2025-10-05T15:03:26Z
referencegrants.gateway.networking.k8s.io    2025-10-05T15:03:26Z
tlsroutes.gateway.networking.k8s.io          2025-10-05T15:03:27Z
然後你的 Cilium 有幾個設定要配置好,分別是:
kubeProxyReplacement=true
l7Proxy=true
開 l7proxy,但其實預設就是打開的:
$ helm get manifest -n kube-system cilium | grep -i l7
  # Enables L7 proxy for L7 policy enforcement and visibility
  enable-l7-proxy: "true"
$ helm upgrade cilium cilium/cilium --version 1.18.1 \
    --namespace kube-system \
    --reuse-values \
    --set l7Proxy=true \
    --set kubeProxyReplacement=true
$ kubectl -n kube-system rollout restart deployment/cilium-operator
$ kubectl -n kube-system rollout restart ds/cilium
至於 kubeProxyReplacement=true ,我們鐵人賽系列文本來右有開啟
假如讀者真的沒開啟,請執行以下指令:
原本沒啟用
kubeProxyReplacement的話,千萬不要在 Production 環境照做下方指令將其開啟,會停機!
$ helm upgrade cilium cilium/cilium --version 1.18.1 \
    --namespace kube-system \
    --reuse-values \
    --set l7Proxy=true \
    --set kubeProxyReplacement=true
$ kubectl -n kube-system rollout restart deployment/cilium-operator
$ kubectl -n kube-system rollout restart ds/cilium
如果上面的 Prerequisites 都已滿足,那請執行以下指令:
helm upgrade cilium cilium/cilium --version 1.18.1 \
  --namespace kube-system \
  --reuse-values \
  --set gatewayAPI.enabled=true
執行完之後,重啟 cilium-agent 和 cilium-operator:
$ kubectl -n kube-system rollout restart ds/cilium
$ kubectl -n kube-system rollout restart deployment/cilium-operator
啟用 GatewatAPI 之後,可以執行以下指令,會看到有 cilium GatewayClass 已經被自動創建:
$ kubectl get gatewayclass

NAME     CONTROLLER                     ACCEPTED   AGE
cilium   io.cilium/gateway-controller   True       22h
在剛才啟用了 Cilium Gateway API 後
我們可以 apply 一個很簡單的 Gateway 看看:
apiVersion: gateway.networking.k8s.io/v1
kind: Gateway
metadata:
  name: cilium-gw
  namespace: default
spec:
  gatewayClassName: cilium
  listeners:
    - name: http
      protocol: HTTP
      port: 80
apply 後,我們現在來看看 K8s Cluster 裡面的 Gateway:
$ kubectl get gtw

NAME        CLASS    ADDRESS   PROGRAMMED   AGE
cilium-gw   cilium             True         21h
當 Gateway 被創建後,背後的具體實例是需要一個真實存在的 LoadBalancer,所以我們現在來看一下 Service 有哪些:
$ kubectl get svc

NAME                       TYPE           CLUSTER-IP       EXTERNAL-IP   PORT(S)        AGE
bookstore                  ClusterIP      10.103.95.177    <none>        8080/TCP       23h
bookstore-v1               ClusterIP      10.103.64.148    <none>        8080/TCP       22h
bookstore-v2               ClusterIP      10.104.158.193   <none>        8080/TCP       22h
cilium-gateway-cilium-gw   LoadBalancer   10.104.14.27     <pending>     80:31917/TCP   21h
kubernetes                 ClusterIP      10.96.0.1        <none>        443/TCP        21d
nginx-service              ClusterIP      10.104.210.239   <none>        80/TCP         3d
注意到了嗎?在創建 Gateway cilium-gw 後,有一個 LoadBalancer Type 的 Service cilium-gateway-cilium-gw 被自動創建出來了,但是他還沒有 External IP,上面顯示 <pending>,原因是我們這裡沒有 Cloud Provier 的 Controller 去幫我們建立對應的 LoadBalancer (例如:AWS NLB)。
以我們目前使用 kubeadm 自建的 K8s Cluster,我們可以安裝 MetalLB:
$ kubectl apply -f https://raw.githubusercontent.com/metallb/metallb/v0.15.2/config/manifests/metallb-native.yaml

$ kubectl -n metallb-system wait --for=condition=available deploy/controller --timeout=120s
接著要提供 MetalLB IP CIDR,讓 MetalLB 可以幫我們為 LoadBalancer 分配 IP,下方實際 addresses 請依照你自己 Node 所處 AWS VPC Subnet CIDR 決定:
cat <<'EOF' | kubectl apply -f -
apiVersion: metallb.io/v1beta1
kind: IPAddressPool
metadata:
  name: metallb-ip-pool
  namespace: metallb-system
spec:
  addresses:
  - 10.13.1.200-10.13.1.250
---
apiVersion: metallb.io/v1beta1
kind: L2Advertisement
metadata:
  name: metallb-l2-adv
  namespace: metallb-system
spec:
  ipAddressPools:
  - lan-pool
EOF
以上面為例,我 Node 所處 Subnet CIDR 是 10.13.1.0/24,所以我拿 10.13.1.200-10.13.1.250 給 MetalLB 使用。
apply 後,我們接著再次查看 cilium-gateway-cilium-gw Service:
$ kubectl get svc cilium-gateway-cilium-gw

NAME                       TYPE           CLUSTER-IP     EXTERNAL-IP   PORT(S)        AGE
cilium-gateway-cilium-gw   LoadBalancer   10.104.14.27   10.13.1.200   80:31917/TCP   22h
可以注意到 EXTERNAL-IP 從之前的 <pending> 變成 10.13.1.200 ,這正是 MetalLB 幫我們分配的!
太好了,前面我們光是在「安裝」就花了不少篇幅在講解,現在終於把 Cilium Gateway API 啟用,也安裝了 MetalLB,並看到 LoadBalancer svc 已經可以正常被分配到 External IP。
接下來我們來講講,Cilium Gateway API 和傳統 Ingress Controller 的差異到底在哪裡。
先從傳統架構說起。像 NGINX Ingress Controller 或 AWS Load Balancer Controller,
這些 Controller 通常是以一個 Deployment(或 DaemonSet) 的形式跑在 Cluster 裡面,
並搭配一個 Service(通常是 type=LoadBalancer)對外暴露。
整個流量路徑大致如下:
Client -> LoadBalancer -> Ingress Pod (例如 NGINX) -> Service
在這種架構裡:
這種設計本質上是「Kubernetes 上跑的一個 user-space proxy」。
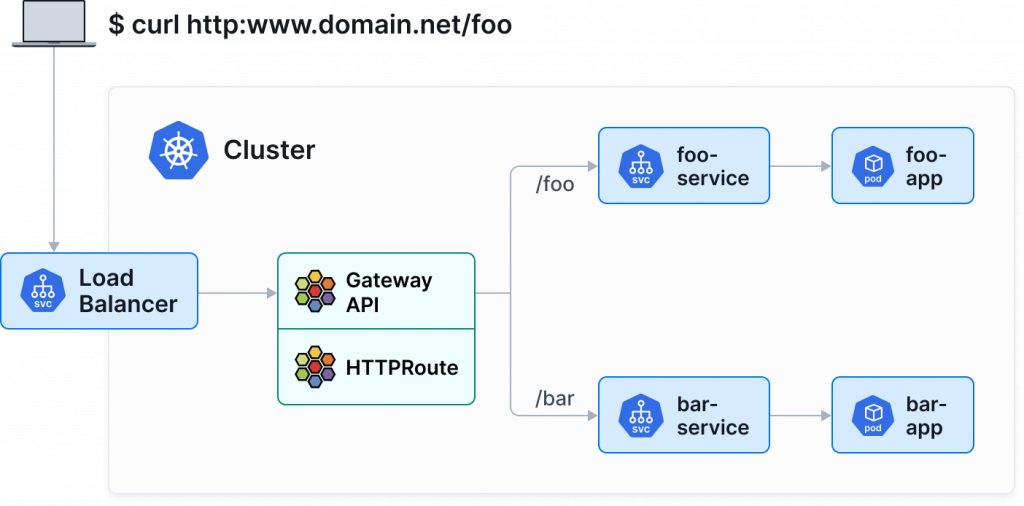
圖片取自:https://cilium.io/use-cases/gateway-api/
Cilium 的 Gateway API 實作方式完全不同。
它不是在 Cluster 裡再跑一個 Deployment 來代理流量,
而是直接在 CNI 層整合 Gateway 能力,讓整個 Gateway 功能變成 Cilium datapath 的一部分。
我們可以先看一下目前的 Deployment 和 DaemonSet:
kubectl -n kube-system get deploy,ds | grep envoy
你會發現:
cilium-envoy DaemonSet,這是每個 Node 上的本地 Envoy。Cilium 的流量路徑大致如下:
Client
-> LoadBalancer / NodePort
-> eBPF hook -> TPROXY -> per-node Envoy (DaemonSet)
-> Envoy 做 L7 routing (HTTPRoute/GRPCRoute)
-> Backend Pod
大部分應用都會需要知道發送請求的用戶 IP,例如:做防火牆、區域/國家分析、或是 rate limit。
在 Cilium 的 Gateway / Ingress 模式下,流量都會先經過 Envoy Proxy,那這樣後端 Pod 看到的 source IP 就不會是原本 client 的 IP,而是 Envoy 的 IP(通常是同 Node 上的 DaemonSet Pod IP):
那你要真的想要看到真實 Client IP 怎辦?Cilium 的 Envoy 會自動在 HTTP Header 裡幫你補上:
X-Forwarded-For
X-Envoy-External-Address
也就是說你不用特別設定啥,你在後端應用裡正常去拿 X-Forwarded-For 最左邊的 IP 就能拿到真實的 client IP。
Cilium 的 Gateway API 功能背後主要有兩個元件在運作:
這兩個角色加起來,決定你的 Gateway / HTTPRoute / GRPCRoute 最後怎麼被 Envoy 實際執行。
我們假設我們創建以下資源:
kubectl apply -f my-gateway.yaml
kubectl apply -f my-route.yaml
Kubernetes API Server 會把這些物件寫進 etcd。
Cilium Operator 會:
Accepted=True
然後 operator 會把這些 Gateway API 的設定「翻譯」成 Cilium 自家的內部格式,叫作 CiliumEnvoyConfig (CEC)
想像成 operator 幫你把 YAML 規格轉成 Envoy 能吃的設定。
每個 Node 上都有一個 Cilium Agent,它會監聽這些新的 CiliumEnvoyConfig(CEC)資源。
當 agent 偵測到新的設定:
流量真正進來(不管是北南向 Gateway 還是東西向 GAMMA)時,就由這些 Envoy 根據設定處理,
像是:
總結上面的內容,你可以把這整個機制想成:
K8s Gateway API YAML
       │
       ▼
Cilium Operator(解析+驗證)
       │
       ▼
CiliumEnvoyConfig (CEC)
       │
       ▼
Cilium Agent(下發設定)
       │
       ▼
Envoy(真正處理 HTTP / gRPC 流量)
昨天 (Day 22) 我們已經在 EnvoyConfig 完了流量分流,今天我們試著在 Gateway API 也嘗試實作流量分流 (流量分流),關於要部署 Application 我將參考這篇 Isovalent 的這篇部落格所提供的範例,此部落格裡面還示範了很多 Gateway API 的用法,像是 **TLS Termination 或是 HTTP Request Header Modification**,推薦讀者還有空閒時間可以去嘗試玩玩看
我們先來部署我們的 echo servers,我們會部署 echo-1 和 echo-2 當作我們的 Application
$ kubectl apply -f https://raw.githubusercontent.com/nvibert/gateway-api-traffic-splitting/main/echo-servers.yml

service/echo-1 created
deployment.apps/echo-1 created
service/echo-2 created
deployment.apps/echo-2 created
接著來建立 Gateway my-example-gateway 和 HTTPRoute example-route-1:
$ kubectl apply -f https://raw.githubusercontent.com/nvibert/gateway-api-traffic-splitting/main/gateway.yaml

gateway.gateway.networking.k8s.io/my-example-gateway created

$ kubectl apply -f https://raw.githubusercontent.com/nvibert/gateway-api-traffic-splitting/refs/heads/main/httpRoute.yml

httproute.gateway.networking.k8s.io/example-route-1 created
可以看一下現在配置的 HTTPRoute:
$ kubectl get httproute example-route-1 -o yaml

spec:
  parentRefs:
  - group: gateway.networking.k8s.io
    kind: Gateway
    name: my-example-gateway
  rules:
  - backendRefs:
    - group: ""
      kind: Service
      name: echo-1
      port: 8080
      weight: 50
    - group: ""
      kind: Service
      name: echo-2
      port: 8090
      weight: 50
    matches:
    - path:
        type: PathPrefix
        value: /echo
接著我們要找出 Gateway IP,可以透過以下方式找到:
# 方式 1:直接找 Gateway
$ kubectl get gtw

NAME                 CLASS    ADDRESS       PROGRAMMED   AGE
my-example-gateway   cilium   10.13.1.201   True         9m59s

# 方式 2:找 Service,然後看 EXTERNAL-IP
$ kubectl get svc cilium-gateway-my-example-gateway

NAME                                TYPE           CLUSTER-IP     EXTERNAL-IP   PORT(S)        AGE
cilium-gateway-my-example-gateway   LoadBalancer   10.96.117.73   10.13.1.201   80:30715/TCP   12m
所以我們知道 Gateway IP 是 10.13.1.201 了,現在可以來發出 HTTP 請求:
$ curl -s http://10.13.1.201/echo

Hostname: echo-1-6555b459d9-ms9sr

Pod Information:
	node name:	worker-2
	pod name:	echo-1-6555b459d9-ms9sr
	pod namespace:	default
	pod IP:	10.244.1.59

Server values:
	server_version=nginx: 1.12.2 - lua: 10010

Request Information:
	client_address=10.244.0.31
	method=GET
	real path=/echo
	query=
	request_version=1.1
	request_scheme=http
	request_uri=http://10.13.1.201:8080/echo

Request Headers:
	accept=*/*
	host=10.13.1.201
	user-agent=curl/8.5.0
	x-envoy-internal=true
	x-forwarded-for=10.13.1.243
	x-forwarded-proto=http
	x-request-id=ded297ae-3da0-421d-ba79-5f03ac96bc28

Request Body:
	-no body in request-
這裡可以從 Hostname 知道是 echo-2 處理我的請求
可以試著多發送幾次請求,會看到 echo-1 也會處請求,比例會是 50:50:
for i in {1..20}; do
  kubectl exec netshoot -- curl -s http://10.13.1.201/echo | head -n 3
done
現在我們來調整權重,改成 90:10:
kubectl edit httproute example-route-1
可以依照以下配置修改:
  - backendRefs:
    - group: ""
      kind: Service
      name: echo-1
      port: 8080
      weight: 90 # 改這裡
    - group: ""
      kind: Service
      name: echo-2
      port: 8090
      weight: 10 # 改這裡
    matches:
    - path:
        type: PathPrefix
        value: /echo
接著我們再次執行一次指令:
for i in {1..20}; do
  kubectl exec netshoot -- curl -s http://10.13.1.201/echo | head -n 3
done
會注意到 echo-1: echo-2 確實是 90:10
今天這篇主要帶大家體驗了 Cilium Gateway API 的安裝流程,並實際看到了它與傳統 Ingress Controller 完全不同的運作模式。
傳統的 Ingress Controller(像 NGINX 或 AWS Load Balancer Controller)是跑在 user space 的 proxy,所有流量都會經過一層額外的 Pod;而 Cilium 的 Gateway API 則是直接在 CNI 層整合 Envoy,利用 eBPF + TPROXY 把封包導入每個 Node 上的 Envoy DaemonSet,讓 Gateway 功能成為 datapath 的一部分。
這樣的架構不但讓 L7 流量管理更貼近網路層,也能結合 Cilium 的 NetworkPolicy 做更細緻的控制。
另外也提到,因為流量會先經過 Envoy,所以後端 Pod 拿到的 source IP 不會是原本的 client IP,不過 Cilium 會自動在 HTTP Header 裡補上 X-Forwarded-For 和 X-Envoy-External-Address,這樣 backend application 還是能取得真實使用者的 IP。
最後我們也透過 HTTPRoute 實作了最經典的流量分流(Traffic Splitting)範例,從 50/50 到 90/10,觀察 Cilium Gateway API 如何讓 Envoy 根據權重分配流量。

