從 CiliumEnvoyConfig 的 L7 流量分流(Day 22),到 Gateway API 處理 North-South 流量(Day 23),我們已經逐漸看見 Cilium 如何把 eBPF、Envoy、Gateway API 整合成一個統一的流量控制平面。
今天,我們要更進一步,踏入 東西向流量(East-West Traffic) 的世界。
這篇要帶大家理解一個近年非常重要的 Kubernetes 標準化計畫:GAMMA(Gateway API for Mesh Management and Administration),以及它如何讓 Cilium Service Mesh 成為第一個真正將 Gateway API 延伸到 Service Mesh 的實作。
在 Kubernetes 的世界裡,我們通常把流量分成兩大類:
Gateway API 的出現,最初是為了取代 Ingress,統一管理南北向流量。
但隨著微服務架構普及,我們越來越需要能控制東西向的流量行為,像是:
而這些功能在 Service Mesh 裡已經很常見,但每個專案(如 Istio、Linkerd、Consul)都用自己的 API。
👉 GAMMA 就是為了「讓 Gateway API 不只是用在南北向,也能用在東西向(Service 間流量),並把這些東西用 Gateway API 標準統一起來」。
define how Gateway API could also be used for inter-service or east/west traffic within the same cluster
…
we strive to advocate for consistency between implementations of Gateway API by service mesh projects, regardless of their technology stack or proxy.
Ref: https://gateway-api.sigs.k8s.io/mesh/gamma/
圖片取自:https://gateway-api.sigs.k8s.io/
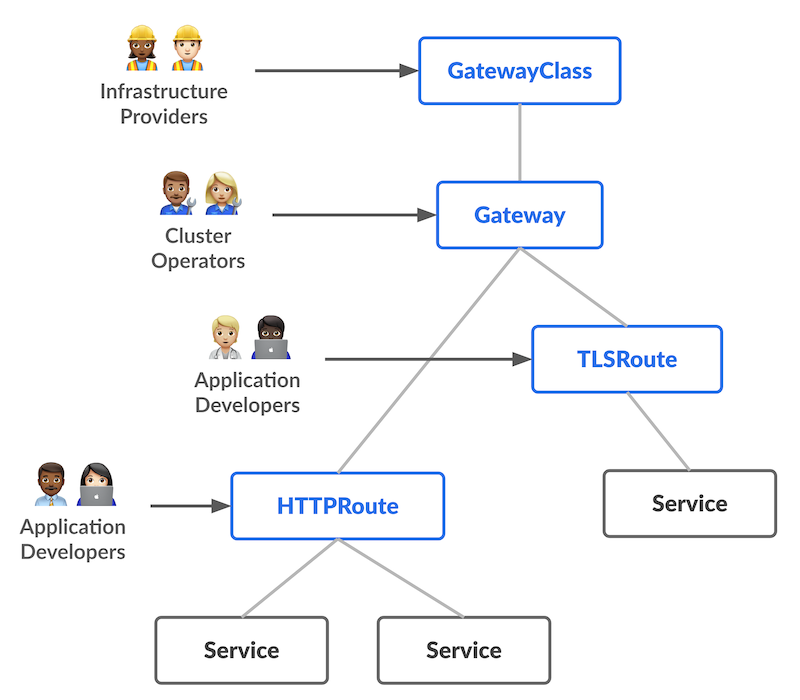
在 Day 23 我們已經講過 Gateway API 是一個 Role-oriented 模型,依照官方文件可以將職責拆成三層:
| 角色 | 職責 | 管理資源 |
|---|---|---|
| Infra Provider | 安裝 Gateway Controller | GatewayClass |
| Cluster Operator | 建立 Gateway、控制入口點 | Gateway |
| App 開發者 | 定義路由規則 | HTTPRoute / GRPCRoute |
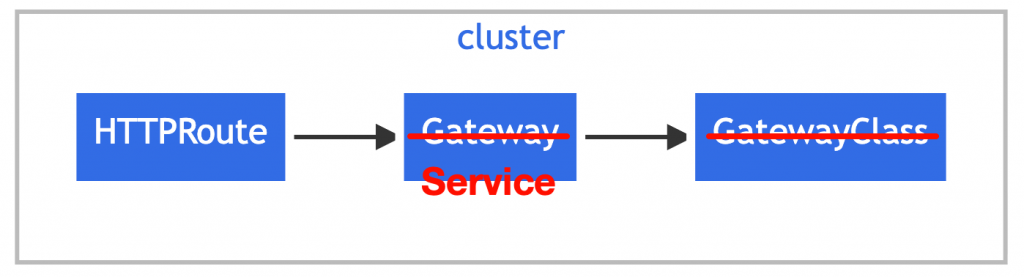
這樣的架構很適合 North-South 流量,但對於 Cluster 內的 Service 間流量,這種「每個 Route 都得掛在 Gateway 上」的模型就顯得過度複雜。
因為在 Mesh 裡根本沒有「外部流量進入」的概念,主要是在描述 Service-to-Service 間的概念,每個 Service 彼此之間要互相呼叫如果還要再掛 Gateway 就顯得多餘 (也很燒錢 XD)。
在 GAMMA 模型中關鍵突破點就是: HTTPRoute 不再只能掛在 Gateway 上,而是可以直接掛在 Service 上:
簡單舉一個範例:
apiVersion: gateway.networking.k8s.io/v1
kind: HTTPRoute
metadata:
  name: details-split
spec:
  parentRefs:
    - name: details       # 指向 Service
      kind: Service
      group: ""
      port: 9080
  rules:
    - backendRefs:
        - name: details-v1
          port: 9080
          weight: 90
        - name: details-v2
          port: 9080
          weight: 10
這個設計看似小改動,但實際上是非常關鍵的轉折。
它讓我們能直接針對 Service-to-Service 流量應用 L7 規則,不需要額外建立 Gateway。
這樣一來:
統一 API、職責分離、語意清晰,這就是 GAMMA 想達成的事。
⚠️ 重要提醒: 官方文件有提到 producer routes 和 consumer routes 目前還沒完全定案,我這裡以 2025/10/07 gateway-api v1.4.0 看到的內容來白話解釋,後續有任何改動請以官方文件為主:

在 GAMMA 裡,Route 可以掛在哪裡其實很重要:
| 類型 | 誰定義 Route | Route 跟 Service 在同一個 namespace? | 控制的是什麼流量 | 是否需要授權 (ReferenceGrant) | Cilium 現況 |
|---|---|---|---|---|---|
| Producer Route | 服務提供者 (Producer) | ✅ 是 | 別人打進我這個 Service 的流量 | ❌ 不需要 | ✅ 支援 |
| Consumer Route | 服務使用者 (Consumer) | ❌ 否 | 我這邊打出去到別人 Service 的流量 | ✅ 需要 | ❌ 尚未支援 |
下面直接來舉例:
team-a:是 服務提供者(Producer),提供一個 API → bookstore
team-b:是 服務使用者(Consumer),會呼叫 bookstore API如果是 Producer Route,意味著:team-a 擁有 bookstore service,它想控制這個服務的流量:
bookstore-v1 和 bookstore-v2
所以 team-a 會在自己 namespace 裡建立這個:
apiVersion: gateway.networking.k8s.io/v1
kind: HTTPRoute
metadata:
  name: bookstore-canary
  namespace: team-a   # 👈 和 Service 在同一個 namespace
spec:
  parentRefs:
    - name: bookstore   # 指向自己的 Service
      kind: Service
  rules:
    - backendRefs:
        - name: bookstore-v1
          weight: 90
        - name: bookstore-v2
          weight: 10
白話重點:
👉 「我是提供服務的人,我決定進來我服務的流量要怎麼走。」
現在 team-b 想要呼叫 team-a 的 bookstore,但它希望在自己的 namespace 裡能設定一些特殊規則,例如:
所以 team-b 會建立一個 Route,指向 team-a 的 Service:
apiVersion: gateway.networking.k8s.io/v1
kind: HTTPRoute
metadata:
  name: use-bookstore-fast
  namespace: team-b    # 👈 不同 namespace
spec:
  parentRefs:
    - name: bookstore
      namespace: team-a   # 👈 指向別人 namespace 的 Service
      kind: Service
  rules:
    - timeouts:
        request: 100ms
但因為跨 namespace 不可直接引用,所以 team-a 必須授權給 team-b :
ReferenceGrant 可參考文件:https://gateway-api.sigs.k8s.io/api-types/referencegrant/
apiVersion: gateway.networking.k8s.io/v1beta1
kind: ReferenceGrant
metadata:
  name: allow-team-b
  namespace: team-a
spec:
  from:
    - group: gateway.networking.k8s.io
      kind: HTTPRoute
      namespace: team-b
  to:
    - group: ""
      kind: Service
白話重點:
👉「我是使用別人服務的人,我想控制我這邊要怎麼打那個服務。」
Cilium 在 Service Mesh 的設計中有個核心理念:不使用 Sidecar (Sidecarless)
傳統 Mesh(像 Istio)是每個 Pod 裡面都塞一個 proxy(通常是 Envoy),所有流量都要經過它,這種方式雖然彈性高,但維運成本很重,會被吃 Sidecar 稅
Cilium 的做法是:
換句話說,每個 Node 一個 Envoy,就能代理整個 Cluster 的流量。
這個架構天然就符合 GAMMA 的需求:
當 HTTPRoute 掛在 Service 上時,Cilium 只要在資料平面(eBPF + Envoy)層改寫 routing 規則即可,完全不需要改應用、也不需要注入 Sidecar。
在 [Day 22] Cilium Service Mesh 是什麼?實作 Envoy 流量分流,我們曾經透過 CiliumEnvoyConfig 來實作流量分流。
今天這篇的重點,就是要讓你能直接拿來與 Day 22 的實作對比。
當時我們必須手動撰寫一份完整的 Envoy Config,理解 Listener、Route、Cluster 三層的邏輯,才能完成流量分流。
而在今天的範例中,我們將用 Gateway API 的 GAMMA,實現與 Day 22 一模一樣的功能,只是這次不再需要寫任何 Envoy 細節。
當這樣的能力被標準化之後,你就能輕鬆地在不同實作之間遷移,而不必重新學一套 API。
確認有 Cilium GatewayClass:
$ kubectl get gatewayclass

NAME     CONTROLLER                     ACCEPTED   AGE
cilium   io.cilium/gateway-controller   True       2d
我們用 Day 22 使用的 bookstore 作為例子,包含兩個版本的 Deployments 以及一個 bookstore Service (同時選擇 v1 和 v1):
# bookstore-v1-v2.yaml
apiVersion: v1
kind: Service
metadata:
  name: bookstore
spec:
  selector:
    app: bookstore  # Service 同時選擇 v1 和 v2
  ports:
  - protocol: TCP
    port: 8080
    targetPort: 8080
---
apiVersion: apps/v1
kind: Deployment
metadata:
  name: bookstore-v1
spec:
  replicas: 1
  selector:
    matchLabels:
      app: bookstore
      version: v1
  template:
    metadata:
      labels:
        app: bookstore
        version: v1
    spec:
      containers:
      - name: bookstore
        image: busybox:1.36
        ports:
        - containerPort: 8080
        command:
          - /bin/sh
          - -c
          - "while true; do { echo -e 'HTTP/1.1 200 OK\\n\\nResponse from v1'; } | nc -l -p 8080; done"
---
apiVersion: apps/v1
kind: Deployment
metadata:
  name: bookstore-v2
spec:
  replicas: 1
  selector:
    matchLabels:
      app: bookstore
      version: v2
  template:
    metadata:
      labels:
        app: bookstore
        version: v2
    spec:
      containers:
      - name: bookstore
        image: busybox:1.36
        ports:
        - containerPort: 8080
        command:
          - /bin/sh
          - -c
          - "while true; do { echo -e 'HTTP/1.1 200 OK\\n\\nResponse from v2'; } | nc -l -p 8080; done"
部署:
$ kubectl apply -f bookstore-v1-v2.yaml

service/bookstore created
deployment.apps/bookstore-v1 created
deployment.apps/bookstore-v2 created
起一個測試用 netshoot pod:
kubectl run netshoot --image=nicolaka/netshoot -it --rm -- bash
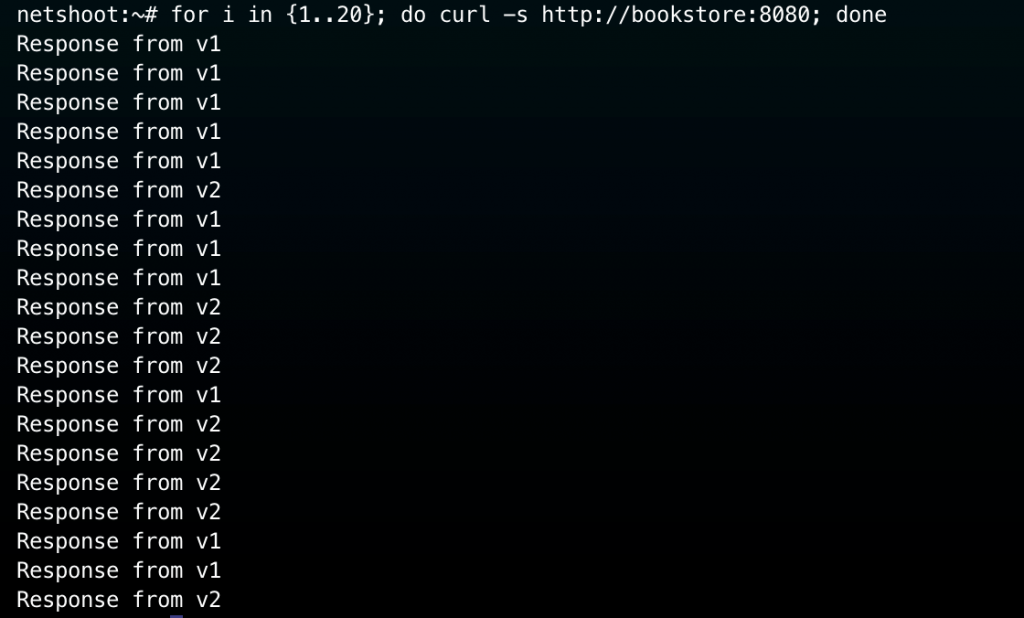
在 netshoot pod 裡面發出請求:
# netshoot pod
for i in {1..20}; do curl -s http://bookstore:8080; done
實際輸出如下,v1 和 v2 的流量大約是 50:50,這是正常的,因為目前 Service selector 同時選 v1 / v2,而且我們還沒有實作流量分流:
接著我們把後端拆成兩個獨立的 Service,分別對應 v1、v2
# bookstore-svc-v1-v2.yaml
apiVersion: v1
kind: Service
metadata:
  name: bookstore-v1
spec:
  selector:
    app: bookstore
    version: v1
  ports:
    - port: 8080
      targetPort: 8080
---
apiVersion: v1
kind: Service
metadata:
  name: bookstore-v2
spec:
  selector:
    app: bookstore
    version: v2
  ports:
    - port: 8080
      targetPort: 8080
部署:
$ kubectl apply -f bookstore-svc-v1-v2.yaml

service/bookstore-v1 created
service/bookstore-v2 created
現在我們要進入重頭戲:「透過 Gateway API (GAMMA) 來實現 90:10 的 Canary 分流」,我們使用 HTTPRoute 不使用 CiliumEnvoyConfig (CEC):
# bookstore-httproute.yaml
apiVersion: gateway.networking.k8s.io/v1
kind: HTTPRoute
metadata:
  name: bookstore-httproute
spec:
  parentRefs:
    - name: bookstore
      kind: Service
      group: ""
      port: 8080
  rules:
    - backendRefs:
        - name: bookstore-v1
          port: 8080
          weight: 90
        - name: bookstore-v2
          port: 8080
          weight: 10
部署:
$ kubectl apply -f bookstore-httproute.yaml

httproute.gateway.networking.k8s.io/bookstore-httproute created
確認 HTTPRoute 被正確接管:
kubectl describe httproute bookstore-httproute
結果如下圖:
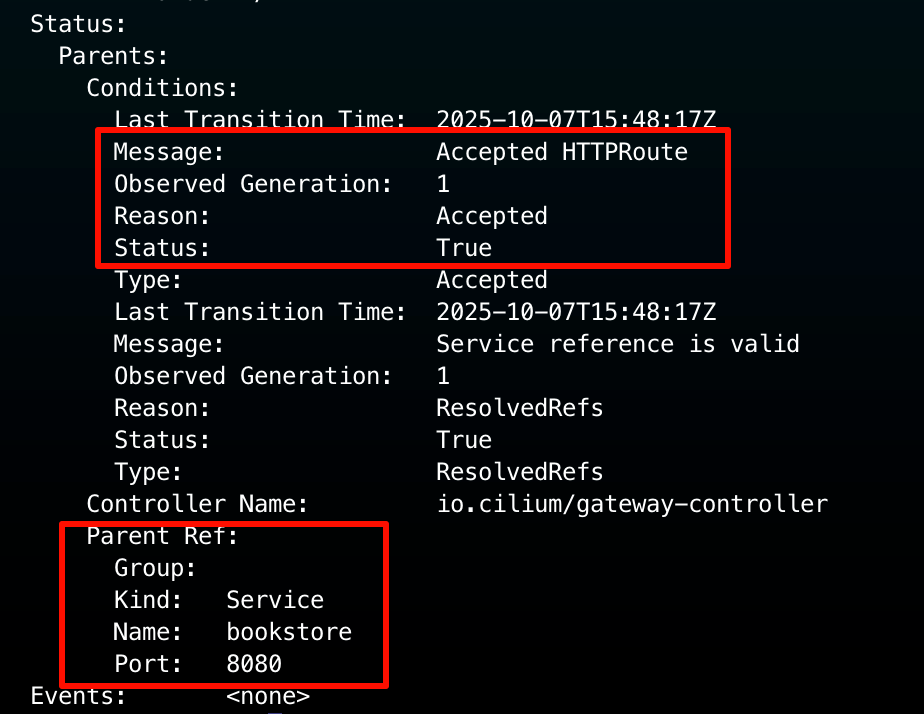
可以注意到 Parent Ref :這條 HTTP Route 是附屬在 Service bookstore 不是 Gateway!
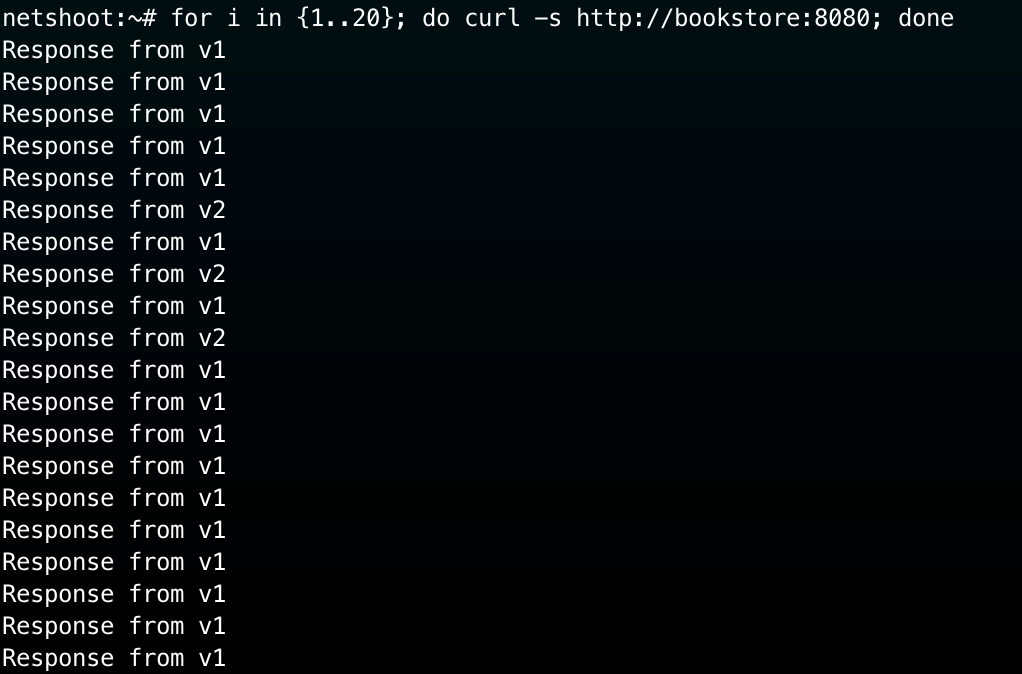
現在回到 netshoot Pod 裡面,我們來驗證是否成功實現 90:10 流量分流:
# netshoot pod
for i in {1..20}; do curl -s http://bookstore:8080; done
實際結果如下圖,v1 的回應明顯比較多,確實實現了 90:10 流量分流:
其實這在昨天 (Day 23) 已經有提到背後的機制了,簡單一句話就是 CiliumOperator 幫我們寫好 CiliumEnvoyConfig (CEC),詳細內容這裡也就不贅述了,建議讀者可以回顧 Day 23 文章!
今天這篇,我們看到 Gateway API 如何透過 GAMMA 延伸到 Service Mesh,讓開發者能用一套一致的 API 管理南北向與東西向流量。
Cilium 憑藉 eBPF + Envoy 的架構,成為最早支援 GAMMA 的 Mesh 實作,它讓 Service-to-Service 流量不再需要 Sidecar,就能享受 L7 控制的彈性與效能。
另外很想提一些感想:在 Day 22 要寫 EnvoyConfig 就讓我很頭痛了,看到這個 GAMMA 能做到同樣效果完全不用碰 EnvoyConfig 真的覺得很讚,因為標準化之後,我就不用每換一個實作就學新的一套寫法。
對我而言,GAMMA 不只是新功能,它象徵著 Gateway API 成為 Kubernetes 流量管理的最終統一語言。
未來不論是 Ingress、Service Mesh、或跨 Cluster 通訊,都能透過同一套 Gateway API 模型進行治理!

