
前面幾章已經讓遊戲能玩、能存檔、比較安全,也知道怎麼觀察效能。現在要處理一個很實際的問題:玩家不一定用你的螢幕、你的鍵盤、你的滑鼠玩。
Roblox 的玩家可能在手機、平板、桌機、筆電、主機、手把上進入同一個 experience。你在 Studio 裡按 Play 覺得沒問題,不代表手機上按得到、不代表商店文字看得清楚、不代表手把能關閉 panel。
這一章的目標是把前面做好的 HUD、WindDash、商店、任務提示拿來做跨裝置檢查。這不是新增大型功能,而是發布前必要整理。
完成本章後,你會得到:
本章的核心句是:
同一個玩法意圖,多種輸入方式;同一個遊戲狀態,多種畫面尺寸。
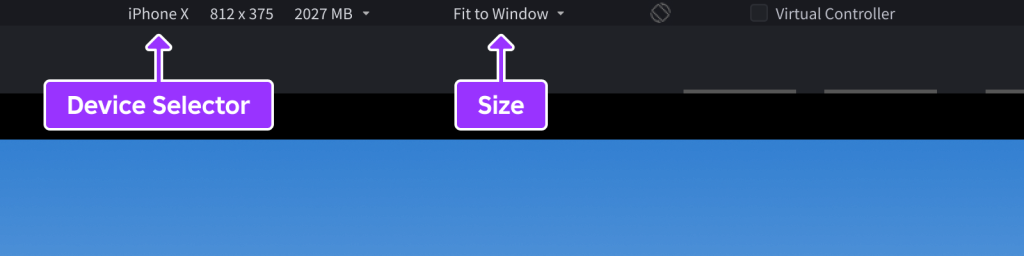
圖 22-1 Device Emulator 可快速檢查不同螢幕比例與安全區域,但仍需在真實裝置驗收觸控與效能。
請先把以下 context 給 Assistant:
【Ch22 Context|檢查跨裝置 UI】
我們正在 Roblox Studio 中製作「AI Adventure Island」。

現有 UI:
- AdventureHUD
- 包含 Gold 與 Crystal labels 的 TopStatusBar
- QuestPanel
- 包含 DashButton 與 CooldownBar 的 AbilityPanel
- 包含 BuyDashCooldownButton 與 BuyDashSpeedButton 的 ShopPanel
- 位於 AdventureHUD.Controllers 下的 HUD controllers

現有 input:
- WindDash 是 ReplicatedStorage.Inputs.PlayContext 下的 InputAction。
- WindDash 支援 keyboard Q、gamepad ButtonX,以及透過 DashButton 操作的 mobile touch。
- Client 將 RequestAbility("WindDash") 傳給 server。
- Server 的 AbilityService 驗證所有權與 cooldown。

目標:
- 稽核跨裝置 UI 與 controls。
- 目前先不要修改 gameplay services。
- 不要更改 RemoteEvent 名稱或 payloads。
- 不要將 cooldown 或購買權威移到 client。
- 讓 UI 在 phone、tablet、desktop 與 gamepad 上都清楚可讀且容易操作。
UserInputService.PreferredInput 可用來判斷目前主要 input type,進而改變 UI hints。UDim2 的 Scale / Offset 決定 UI 如何隨父容器變化。目前 AI Adventure Island 的 UI 大概像這樣:
AdventureHUD
├── TopStatusBar
│   ├── GoldLabel
│   └── CrystalLabel
├── QuestPanel
├── AbilityPanel
│   ├── DashButton
│   └── CooldownBar
└── ShopPanel
    ├── BuyDashCooldownButton
    └── BuyDashSpeedButton
在桌機上,這可能看起來沒問題。螢幕很大,滑鼠很好點,鍵盤 Q 很自然。
但手機上可能出現:
DashButton 太靠中間,右手拇指不容易按。DashButton 擋住預設 jump button。QuestPanel 和 TopStatusBar 重疊。手把上可能出現:
ButtonX 能 Dash,但 UI hint 仍顯示 Q。ButtonB 或等效取消行為。所以本章不是「把 UI 做漂亮」,而是確認所有主要流程都能在不同輸入與螢幕條件下完成。
先請 Assistant 稽核,不要直接改 UI。
【Ch22 主任務|檢查跨裝置 UI】
稽核 AdventureHUD 的跨裝置易用性。

目前先不要修改 instances 或 scripts。

建立一份包含以下欄位的表格:
1. UI element 或 input action
2. Desktop keyboard/mouse 行為
3. Mobile touch 行為
4. Tablet 行為
5. Gamepad 行為
6. 可能的 layout 或 input 問題
7. 建議修正方式
8. 回歸測試

涵蓋:
- TopStatusBar
- QuestPanel
- AbilityPanel
- DashButton
- CooldownBar
- ShopPanel
- BuyDashCooldownButton
- BuyDashSpeedButton
- 關閉商店的行為
- WindDash input hints
- 商店 input hints

規則:
- 玩法 actions 應盡可能使用 InputAction。
- 不要為 touch 建立獨立的玩法路徑。
- 不要將 server authority 移到 client。
- Responsive layout 優先使用 UDim2 Scale,Offset 只用於邊距與最小 touch targets。
- 避開 mobile reserved zones。
- 將常用 touch actions 放在拇指容易觸及的區域。
- 確保文字在小螢幕上仍清楚可讀。
這個 Prompt 有三個目的。
第一,讓 Assistant 把「裝置」拆開看。桌機、手機、平板、手把不是同一個問題。
第二,要求它列 regression tests。UI 改動很容易修好手機、弄壞桌機。
第三,明確保護前面章節建立的 server authority。UI 可以改,Gameplay 的成功判斷不能搬到 client。
Assistant 可能產生類似這樣的表格。
Element: DashButton

Desktop:
- Not required, keyboard Q triggers WindDash.

Mobile:
- Primary touch entry for WindDash.

Tablet:
- Must be reachable by right thumb, not too high.

Gamepad:
- ButtonX triggers WindDash; DashButton can be hidden or show hint.

Problem:
- Current DashButton may overlap the default jump button or sit outside comfortable thumb zone.

Recommended fix:
- Anchor AbilityPanel near bottom-right but offset away from default jump button.
- Use scale-based position and a minimum button size.
- Show input hint based on preferred input.

Regression:
- Keyboard Q still works.
- Gamepad ButtonX still works.
- Touch DashButton still sends RequestAbility("WindDash").
- Cooldown still comes from server AbilityUpdate.
商店 panel 可能是:
Element: ShopPanel

Desktop:
- Wide panel with two purchase buttons.

Mobile:
- Needs narrower layout, readable text, large buttons, close button.

Tablet:
- Can be wider but should not cover all gameplay context.

Gamepad:
- Needs selectable buttons and cancel/close action.

Problem:
- Fixed pixel size may overflow on small phones.
- Text may not wrap.
- Close action may not be available on gamepad.

Recommended fix:
- Use responsive width with max/min size.
- Use UIListLayout for purchase rows.
- Add clear close button.
- Add gamepad focus order.

Regression:
- PurchaseUpgrade remote payload unchanged.
- Gold enough / not enough states still display.
- Duplicate purchase still rejected.
這張表會讓你知道該改哪裡。
Device Emulator 是本章最重要的 Studio 工具。
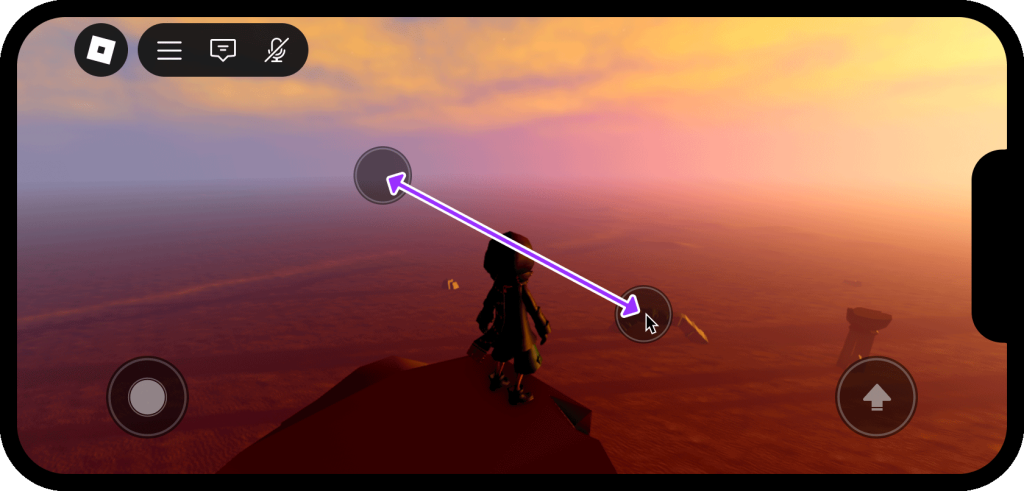
圖 22-2 Device Emulator 可模擬多點觸控;跨裝置驗收不只切換解析度,還要實際操作按鈕、拖曳與手勢。
測試時至少跑這些情境:
Phone landscape
Phone portrait if supported
Tablet landscape
Tablet portrait if supported
Desktop widescreen
Small desktop window
如果你的遊戲只支援 landscape,也要確認 mobile landscape 的左右方向都正常。不要假設玩家的手、鏡頭和按鈕永遠在你想的位置。
測試流程:
1. 開啟 Device Emulator。
2. 選 phone。
3. Play。
4. 檢查 HUD 是否重疊。
5. 走到 Guide NPC。
6. 使用 DashButton。
7. 打開 ShopPanel。
8. 嘗試購買升級。
9. 關閉 ShopPanel。
10. 換 tablet 重測。
11. 換 desktop ratio 重測。
每次不要只看畫面。要真的操作一次主要流程。
Controller Emulator 用來測 gamepad。
本專案至少要測:
Movement: left thumbstick
Camera: right thumbstick
WindDash: ButtonX
UI confirm: ButtonA
UI cancel / close: ButtonB
Shop navigation: D-pad or thumbstick focus
如果玩家用手把打開商店,游標不一定像滑鼠那樣自然。你要確認:
這些細節會讓手把玩家覺得遊戲是「有支援」,而不是「勉強能玩」。
第 16 章已經選擇用 Input Action System 來做 WindDash。第 22 章要確認這條線沒有被 UI 修正破壞。
正確方向:
keyboard Q
gamepad ButtonX
touch DashButton
-> same WindDash action / same client request
-> RequestAbility("WindDash")
-> server AbilityService validates cooldown
-> AbilityUpdate returns result
不好的方向:
keyboard Q -> RequestAbility
touch button -> directly changes WalkSpeed locally
gamepad ButtonX -> separate script with different cooldown
跨裝置不是寫三套 gameplay logic。跨裝置是把不同輸入收斂到同一個 gameplay intent。
玩家需要知道現在該按什麼。
桌機可以顯示:
Dash [Q]
手把可以顯示:
Dash [X]
觸控可以顯示:
Dash
或直接用 touch button,不顯示鍵盤提示。
可以請 Assistant 產生一個 InputHintController,但要限制它只做顯示,不碰 gameplay authority:
【Ch22 實作|建立 Input Hint Controller】
為 AdventureHUD 建立一個 InputHintController。

目標:
- 觀察玩家偏好的 input type。
- 更新 Dash hint 文字:
  - Keyboard/mouse: "Dash [Q]"
  - Gamepad: "Dash [X]"
  - Touch: "Dash"
- 更新商店關閉 hint:
  - Keyboard/mouse: "Close [Esc]"
  - Gamepad: "Close [B]"
  - Touch: "Close"

規則:
- 這個 controller 只能更改 UI 文字與 visibility。
- 不要觸發 gameplay remotes。
- 不要判斷 ability cooldown 或購買是否成功。
- 保持現有 RemoteEvent contracts 不變。
如果 Assistant 用 UserInputService.PreferredInput,要在章節裡提醒:input type 可能在遊戲過程中變化。例如玩家在 PC 上接上 gamepad,或 tablet 同時使用 touch 與 gamepad。UI hints 要能更新,而不是進遊戲時只判斷一次。
UI 跨裝置最常見錯誤是所有位置都用固定 pixel。
不好的方向:
Position = {0, 900}, {0, 520}
Size = {0, 420}, {0, 280}
在某個解析度可能剛好,但換手機就跑掉。
比較好的方向是:
Position = UDim2.new(1, -24, 1, -120)
AnchorPoint = Vector2.new(1, 1)
Size = UDim2.new(0.18, 0, 0.12, 0)
Scale 用來跟著 parent 尺寸變化;Offset 用來做邊距或最小間距。
但也不要迷信全部 Scale。按鈕需要最小可點尺寸,文字需要最小可讀尺寸。實作時常會搭配:
UIScale
UISizeConstraint
UITextSizeConstraint
UIListLayout
UIPadding
AutomaticSize
本章不展開所有 UI class,但要讓讀者知道:跨裝置 UI 不只是改一個 Position。
mobile 上,底部左側通常有 virtual thumbstick,底部右側通常有 jump button。自訂按鈕不要直接蓋上去。
DashButton 是常用動作,適合靠近右手拇指,但要和 jump button 保持距離。
可以用這個 Prompt 讓 Assistant 先提出方案:
【Ch22 規劃|配置 Mobile 操作區】
為 AbilityPanel 與 DashButton 建議一份 mobile layout。

需求:
- 將 DashButton 放在右手拇指容易觸及的區域。
- 避免與預設 jump button 重疊。
- 讓 cooldown 在 DashButton 附近保持可見。
- 確保 QuestPanel 與 TopStatusBar 清楚可讀。
- 使用 scale-based layout 與安全邊距。
- 不要更改 WindDash gameplay logic。

編輯前,先回傳 layout properties 與測試清單。
請注意:Assistant 不會真的看到你的手指。它提出後,你仍然要用 Device Emulator 實際按一次。
mobile 螢幕小,不要永遠顯示所有東西。
例如商店 panel 只需要在玩家打開商店時顯示。Guide hint 只需要靠近 Guide 或任務狀態需要時顯示。能力 cooldown 只有 cooldown 中才需要顯示倒數。
這樣做有兩個好處:
但 context-based UI 不能藏掉必要資訊。例如 Gold 和目前任務狀態仍應有穩定位置,只是可以在小螢幕上縮短或折疊。
商店是跨裝置 UI 的壓力測試。
它有文字、價格、按鈕、狀態、成功/失敗回饋,也要能關閉。
手機版商店應檢查:
手把版商店應檢查:
Prompt:
【Ch22 稽核|檢查商店跨裝置操作】
稽核 ShopPanel 在 mobile 與 gamepad 上的易用性。

不要更改 ShopService 或 PurchaseUpgrade remote。

檢查:
- Phone 與 tablet 上的 responsive size。
- Text wrapping 與清楚可讀的文字大小。
- Button hit target size。
- Close button 是否容易操作。
- Gamepad focus order。
- Confirm/cancel 的 input hints。

先提出修改建議。計畫清楚前不要編輯。
本章的測試要比平常更細。
Device: Desktop widescreen
Input: keyboard / mouse

1. 進入遊戲。
2. 確認 HUD 不遮住視野。
3. 按 Q 使用 WindDash。
4. 確認 hint 顯示 Dash [Q]。
5. 打開 ShopPanel。
6. 用滑鼠購買升級。
7. 關閉 ShopPanel。
8. 縮小 Studio 視窗,再看 UI 是否仍可用。
Device: Phone landscape
Input: touch

1. 用 Device Emulator 選 phone。
2. 進入 Play。
3. 確認 TopStatusBar、QuestPanel、AbilityPanel 不重疊。
4. 用虛擬搖桿移動。
5. 按 DashButton。
6. 確認 DashButton 不擋 jump button。
7. 打開 ShopPanel。
8. 購買升級。
9. 關閉 ShopPanel。
10. 確認 cooldown 和錯誤訊息可讀。
Device: Tablet landscape
Input: touch

1. 確認 DashButton 不放得太高。
2. 確認左右 thumb zone 操作舒服。
3. 確認 ShopPanel 不過小,也不佔滿整個畫面。
4. 確認任務文字可讀。
手機能按,不代表平板舒服。平板螢幕大,拇指能碰到的位置反而不同。
Device: Controller Emulator
Input: gamepad

1. 用 left thumbstick 移動。
2. 用 ButtonX 觸發 WindDash。
3. 確認 hint 顯示 Dash [X]。
4. 打開 ShopPanel。
5. 用 D-pad 或 thumbstick 切換選取。
6. 用 ButtonA 確認。
7. 用 ButtonB 關閉。
8. 確認購買成功 / 失敗訊息可讀。
Device: Desktop with keyboard and gamepad

1. 用鍵盤操作,確認 hint 顯示 Q。
2. 改用 gamepad 操作,確認 hint 改成 X。
3. 用滑鼠點 UI,確認 button 仍可用。
4. 確認切換 input type 不會重置 cooldown 或 shop state。
跨裝置不是只有裝置切換,也包含同一台裝置上輸入方式切換。
如果手機上 HUD 重疊,使用:
【Ch22 修正 1|UI 重疊】
修正 AdventureHUD 在手機橫向畫面上的重疊問題。

觀察到的問題:
- TopStatusBar 與 QuestPanel 或 AbilityPanel 重疊。
- DashButton 太靠近預設 controls。

規則:
- 使用 responsive UDim2 layout。
- 有明確目的地使用 AnchorPoint。
- 將 TopStatusBar 保持在頂部 safe area。
- 讓 QuestPanel 保持清楚可讀且精簡。
- 將 DashButton 放在右手拇指區域,但不要蓋住 jump button。
- 不要更改 gameplay scripts 或 RemoteEvents。

編輯後,列出 phone/tablet/desktop 回歸測試。
【Ch22 修正 2|商店小螢幕不可用】
重構 ShopPanel,使其適用於小螢幕。

觀察到的問題:
- ShopPanel 在手機上超出畫面,或文字被截斷。

規則:
- 使用 responsive panel width。
- 使用 UIListLayout 或同等的 layout structure。
- 確保購買按鈕的文字清楚可讀,且有足夠的點按高度。
- 加入或改善清楚可見的 Close button。
- 保持 PurchaseUpgrade remote payload 不變。
- 不要更改價格、效果或 server validation。

編輯後,列出 mobile 與 gamepad 測試。
【Ch22 修正 3|手把無法操作 UI】
改善 ShopPanel 的 gamepad navigation。

觀察到的問題:
- Gamepad 玩家無法清楚選取或關閉 ShopPanel。

規則:
- 加入清楚可見的 selected/focused state。
- ShopPanel 開啟時,設定合理的初始 selected button。
- 透過一般 button activation 支援使用 ButtonA 確認。
- 支援使用 ButtonB 關閉/取消。
- Preferred input 是 gamepad 時,顯示 gamepad input hints。
- 不要更改 ShopService。
【Ch22 修正 4|Input hints 不會更新】
Preferred input 改變時更新 input hints。

目標:
- Keyboard/mouse: Dash [Q], Close [Esc]
- Gamepad: Dash [X], Close [B]
- Touch: Dash, Close

規則:
- 這項修改只能改變 UI labels。
- 不要從 hint controller 觸發 gameplay remotes。
- 不要更改 InputAction bindings。
- 不要更改 server logic。
【Ch22 修正 5|統一 WindDash 輸入】
統一 WindDash input flow。

觀察到的問題:
- Touch DashButton 與 keyboard/gamepad 使用不同的玩法路徑。

目標:
- Keyboard Q、gamepad ButtonX 與 touch DashButton 都產生相同的 WindDash 意圖。
- Client 傳送 RequestAbility("WindDash")。
- Server AbilityService 繼續負責判定所有權、cooldown、speed 與 duration。

不要讓 touch button 直接改變 Humanoid.WalkSpeed。
不要在 touch UI 中建立獨立的 cooldown。
把這份 checklist 留在專案裡,每次 UI 大改後都跑一次。
Desktop:
- Keyboard shortcut works.
- Mouse click works.
- HUD readable on widescreen.
- HUD usable in smaller window.

Phone:
- Virtual thumbstick not covered.
- Jump button not covered.
- DashButton reachable.
- Quest text readable.
- ShopPanel readable and closable.

Tablet:
- Frequently used buttons reachable.
- UI not too spread out.
- ShopPanel not too tiny.
- Text remains readable.

Gamepad:
- WindDash binding works.
- Selected UI state visible.
- Confirm works.
- Cancel/close works.
- Input hints match gamepad.

Input switching:
- Hints update when preferred input changes.
- State does not reset incorrectly.
- No duplicate ability request.

Authority:
- UI does not decide purchase success.
- UI does not decide cooldown success.
- UI does not modify Gold.
- Server services and RemoteEvent contracts unchanged.
跨裝置 UI 修改很容易讓 Assistant 猜錯,所以給 context 要包含觀察結果。
不要只寫:
讓 UI 適合 mobile 使用。
改成:
在 Device Emulator 使用手機橫向 preset 時:
- QuestPanel 與 TopStatusBar 重疊。
- DashButton 太靠近預設 jump button。
- ShopPanel 在 BuyDashCooldownButton 上的文字被截斷。
- Close button 很難點按。

只修正 layout 與 UI labels。
不要更改 gameplay logic 或 remotes。
觀察越具體,Assistant 越可能做出可驗收的修改。
第 22 章雖然是 UI 章,但不能忘記第 20 章。
可以在 client 做:
不能在 client 決定:
這是本書的重要一致性:AI 可以協助生成 UI,但權威狀態仍由 server 決定。
本章讓 AI Adventure Island 從「在桌機上能玩」往「多數玩家真的能操作」前進。
你現在應該記住:
PreferredInput 可用來更新 UI hints。下一章會進入第六部:用 Assistant 協助 Playtest。第 22 章是手動跨裝置驗收;第 23 章會把測試步驟、Output、截圖與觀察結果整理成可交給 Assistant 分析的測試工作流。
嗨!我是 Wolke,曾任 Google Developer Expert(GDE,2019–2023) 與 LINE API Expert。
我熱衷於研究 AI Agent、n8n 自動化工作流與全端開發架構,致力於將 AI 技術轉化為真正能落地的生產力工具。
如果你喜歡這篇文章,歡迎透過以下方式與我交流:
📚 技術著作
《實用的 Gemini API 開發點子書》:帶你運用 Gemini App、Google AI Studio、Gemini CLI 與 Antigravity IDE,打造 AI Agent 與實用產品。
📝 技術部落格
歡迎追蹤我的 Medium,我會持續分享 Agentic Automation、架構設計與實際開發的踩坑心得。
🎤 技術講座與合作
我持續受邀至技術社群及研討會,分享 AI Agent、自動化工作流、DevOps 與全端開發實戰。
我曾於 DevOpsDays Taipei 2026 主講「不再只是寫腳本!讓 AI 代理人成為你的 SRE 最佳夥伴」工作坊。
如果你的企業、社群或學校正在尋找相關主題講者,歡迎私訊聯繫,洽談講座與工作坊合作!
🎁 免費贈送 OpenAI 或 Claude AI 額度
為了鼓勵大家實際動手打造自己的 Roblox 體驗,我每個月會開放:
參加方式:
確認完成後,我會邀請你加入並設定 50 點額度。名額有限,歡迎把握機會!



 iThome鐵人賽
 看影片追技術