
前面每章都有 Playtest,但大多是針對當章新增的功能。到了這裡,AI Adventure Island 已經不是單一功能原型,而是一個有多個系統互相連動的 Roblox experience。
現在如果你只按 Play、走一走、覺得「好像可以」,其實不夠。
你需要一份可重複的測試清單,也需要一種方式,把測試結果轉成 Assistant 能理解的 context。Assistant 可以協助分析錯誤、整理可能原因、提出修正 Prompt,但前提是你給它的資料夠具體。
這一章的目標是把 Playtest 變成工程流程。
完成本章後,你會得到:
AI Adventure Island 回歸測試清單。本章不新增 gameplay。它把前 22 章累積的功能變成可測、可回報、可修正的專案。

圖 23-1 Playtest 控制列可切換測試模式;交給 Assistant 分析前要記錄模式、步驟、Output 與觀察結果。
請先把以下 context 給 Assistant:
【Ch23 Context|建立回歸 Playtest】
我們正在 Roblox Studio 中測試「AI Adventure Island」。

目前系統:
- 島嶼場景、terrain、greybox 路線、橋樑與裝飾。
- 可收集水晶與玩家 leaderstats。
- 包含 Gold、Crystals、QuestPanel、AbilityPanel、ShopPanel 的 AdventureHUD。
- Guide hint、WindDash 與商店購買的 client/server RemoteEvent 流程。
- QuestService、EnemyAIService、AbilityService、ShopService、SaveService。
- DataStore DEV 存檔流程。
- 主要 gameplay remotes 的安全檢查。
- 效能與跨裝置檢查清單。

目標:
- 建立可重複執行的回歸 Playtest 工作流程。
- 使用 Assistant 分析 Playtest 結果。
- 在 bug 範圍釐清前,不要修改 scripts。
- 除非證據顯示確實必要,否則不要重寫整個系統。
print()、warn()、script errors、engine messages,且可依 type / context / text 過濾。假設你現在 Playtest,發現一個問題:
手機模式下按 DashButton 沒有反應。
桌機按 Q 可以正常 Dash。
Output 沒有紅色錯誤。
如果你只對 Assistant 說:
DashButton 無法運作,請修正。
它可能做出很多猜測:
DashButton。AbilityService。RemoteEvent。這些都有可能讓專案更亂。
比較好的方式是:
【Ch23 診斷|分析 Mobile WindDash 失效】
我在 Device Emulator 使用手機橫向 preset 測試 WindDash。

步驟:
1. 按下 Play。
2. 等待角色生成。
3. 點按 AdventureHUD.AbilityPanel 中的 DashButton。

預期結果:
- Client 傳送 RequestAbility("WindDash")。
- Server 的 AbilityService 驗證 cooldown。
- 玩家速度短暫提升。
- AbilityUpdate 更新 cooldown UI。

實際結果:
- 畫面上沒有發生任何變化。
- 在 desktop 測試中,keyboard Q 仍可正常運作。
- Output 沒有紅色 errors。

證據:
- DashButton 清楚可見,點按範圍看起來也能觸及。
- 使用 keyboard Q 時,AbilityUpdate 可正常運作。
- Output 中沒有出現新的 warning。

請先分析可能原因。
不要重寫 AbilityService。
不要更改 RemoteEvent 名稱。
這樣 Assistant 才能比較準確地判斷:問題可能在 touch button event、InputAction binding、UI controller、或 mobile emulator 操作,而不一定在 server service。
本章先請 Assistant 建立完整測試計畫。
【Ch23 主任務|建立回歸 Playtest】
為「AI Adventure Island」建立一份回歸 Playtest 清單。

不要修改任何 scripts 或 instances。

清單應涵蓋:
1. 場景生成與路線
2. 水晶收集
3. HUD updates
4. Guide hint RemoteEvent
5. 任務完成與獎勵
6. 敵人巡邏與 danger zone
7. WindDash keyboard/gamepad/touch
8. Ability cooldown
9. 商店購買成功
10. 商店失敗狀態
11. 使用 DEV DataStore 保存/載入
12. 安全性負面測試
13. 效能 smoke test
14. Mobile/tablet UI
15. Gamepad UI

每項測試包含:
- 測試模式
- 步驟
- 預期結果
- 要蒐集的證據
- 測試失敗時要提供給 Assistant 的資訊

目前先不要建議程式碼修改。
這個 Prompt 的價值是把測試清單先做出來。測試清單不是只有作者自己看,也可以變成之後每章修改後的回歸驗收。
你可能得到類似這樣的表格。
Test: Crystal collection

Mode:
- Play Solo
- Client/Server toggle

Steps:
1. Press Play.
2. Walk to Crystal_01.
3. Touch it once.
4. Toggle to Server and inspect leaderstats.
5. Toggle to Client and inspect HUD.

Expected:
- Crystal disappears or marks collected.
- Crystals value increases by 1 on server.
- HUD updates on client.
- No duplicate reward from one crystal.

Evidence:
- Output messages with Client/Server context.
- Screenshot of HUD.
- Server Explorer view of leaderstats.

If failed, give Assistant:
- Crystal object path.
- Relevant Output lines.
- Whether server value changed.
- Whether client HUD changed.
商店測試可能像這樣:
Test: Shop purchase success

Mode:
- Play Solo

Steps:
1. Give test player enough Gold through normal quest flow or controlled test setup.
2. Open ShopPanel.
3. Click BuyDashCooldownButton.
4. Observe Gold and upgrade attribute.

Expected:
- PurchaseUpgrade fires with only upgradeId.
- ShopService validates on server.
- Gold decreases by configured cost.
- WindDashCooldownLevel updates.
- ShopUpdate shows success.

Evidence:
- Output lines.
- Server Explorer player attributes.
- HUD screenshot.
- ShopUpdate message state.

If failed, give Assistant:
- upgradeId used.
- current Gold.
- Output error/warning.
- whether server attribute changed.
這種結果比「測試所有功能」更可用,因為每一項都包含步驟、預期與證據。
不同問題要用不同 testing mode。
Play Solo:
- 快速測單人流程。
- 適合晶體、HUD、任務、能力、商店、存檔初測。

Client/Server toggle:
- 檢查 client 和 server state 差異。
- 適合 RemoteEvent、leaderstats、attributes、server-only scripts。

Server & Clients:
- 測多人差異。
- 適合確認一個玩家購買、Dash、任務不會錯影響另一個玩家。

Device Emulator:
- 測 mobile/tablet UI 與 touch。

Controller Emulator:
- 測 gamepad input 與 UI focus。

Network Simulation:
- 測 RemoteEvent、cooldown、UI feedback 在 latency / packet loss 下是否可接受。
不要每個 bug 都用同一種測法。測試模式本身就是 context。
Output 是最基本的證據。
測試前先清空 Output,然後執行步驟。失敗時,記下:
Output context:
- Client or Server

Message type:
- Error
- Warning
- print/info

Message:
- exact line

Source:
- script name
- line number if shown

When it appeared:
- on spawn
- on touch
- on button click
- on player leaving
不要只貼:
It has an error.
要貼:
Output after tapping BuyDashCooldownButton:

[Server] ShopService:42: attempt to index nil with 'Cost'
Context: Server
Expected: purchase rejected or success message
Actual: ShopPanel did not update
有 context,Assistant 才知道該看 ShopService,不是重做整個 UI。
Developer Console 比 Output 更接近 live debugging。
本章至少用它看:
給 Assistant 時可以整理成:
Developer Console evidence:
- Log Client: no errors
- Log Server: warning from SaveService when leaving
- Memory Client: stable during 5-minute test
- Network: one failed DataStore request in Studio
不需要每次都交完整 console;重點是把和問題相關的資料提取出來。
很多 Roblox bug 不是「沒有發生」,而是「只在一邊發生」。
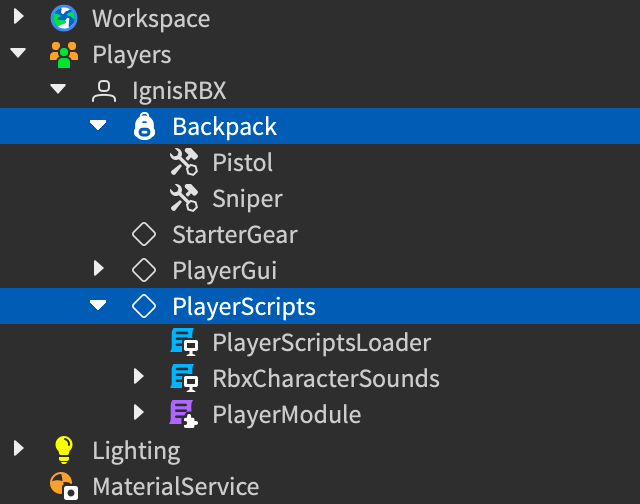
圖 23-2 切到 Client 模式後,Explorer 會顯示該玩家實際擁有的 PlayerGui、Backpack 與 PlayerScripts;用它和 Server 模式比較狀態落差。
例如:
Server Gold = 40
Client HUD GoldLabel = 0
這代表 server state 可能正確,但 HUD 沒有更新。
另一種:
Client button shows success
Server Gold did not change
這代表 client UI 可能過度樂觀,甚至違反 server authority。
測試 RemoteEvent 時,請固定問:
Assistant 的 screen capture subagent 可以協助理解 3D viewport。這對視覺與 UI 問題很有用:
DashButton 是否擋住 jump button。QuestPanel 是否和 TopStatusBar 重疊。但截圖不是萬能。截圖看不到:
所以給 Assistant 的 playtest context 應該同時包含:
Screenshot observation:
- DashButton visible but overlaps default jump button.

Output:
- no red errors.

Expected:
- touch should trigger RequestAbility("WindDash").

Actual:
- tap is unreliable; keyboard Q works.
畫面問題用截圖,流程問題用步驟與 log,狀態問題用 Explorer / Client-Server toggle。
如果 Output 有錯,但原因不明,才進入 debugging。
本書到這裡不要求讀者成為 debugger 專家,但要知道幾個工具:
如果你懷疑 PurchaseUpgrade 收到錯誤 upgradeId,可以先用 logpoint,而不是到處加 print():
Logpoint message:
"PurchaseUpgrade upgradeId:", upgradeId, "player:", player.Name
測完後要移除或停用 debug traces,避免正式發布時 Output 混亂。
以下是本章要建立的完整回歸測試清單。
Mode:
- Play Solo

Steps:
1. Press Play.
2. Confirm player spawns on SpawnLocation.
3. Walk from start to Guide area.
4. Walk to crystal area.
5. Walk to enemy patrol area.

Expected:
- Player does not fall through world.
- Main path is reachable.
- Bridge and terrain collisions work.
- No red Output errors.

Evidence:
- Screenshot if blocked.
- Output lines if character falls or physics errors appear.
Mode:
- Play Solo with Client/Server toggle

Steps:
1. Clear Output.
2. Touch Crystal_01.
3. Toggle to Server and inspect leaderstats.Crystals.
4. Toggle to Client and inspect HUD.
5. Try touching the same crystal again.

Expected:
- Crystals increases once.
- HUD updates.
- Same crystal does not grant duplicate reward.
- Output has no red errors.
Mode:
- Play Solo

Steps:
1. Collect required crystals.
2. Approach Guide NPC.
3. Trigger Guide hint.
4. Observe QuestPanel.

Expected:
- RequestGuideHint goes to server.
- Server validates quest state.
- GuideHintUpdate updates HUD.
- Reward only comes from server.
Mode:
- Play Solo

Steps:
1. Enter enemy patrol area.
2. Watch enemy movement.
3. Walk into danger zone.
4. Leave danger zone.

Expected:
- Enemy patrols without freezing.
- Player receives intended danger feedback.
- No severe frame spike.
- No repeated Output errors.
Mode:
- Desktop, Device Emulator, Controller Emulator

Steps:
1. Press Q on desktop.
2. Tap DashButton on phone.
3. Press ButtonX on gamepad.
4. Try again during cooldown.

Expected:
- All inputs produce same WindDash intent.
- Server validates cooldown.
- Cooldown failure updates HUD.
- Touch does not directly change WalkSpeed locally.
Mode:
- Play Solo

Steps:
1. Ensure test player has enough Gold.
2. Open ShopPanel.
3. Buy DashCooldown1.
4. Try buying it again.
5. Try buying with insufficient Gold.

Expected:
- Valid purchase succeeds.
- Gold is deducted on server.
- Upgrade attribute updates.
- Duplicate purchase fails.
- Insufficient Gold fails.
- UI shows result.
Mode:
- Play Solo with DEV DataStore setup

Steps:
1. Confirm Studio API access setting for test environment.
2. Earn Gold.
3. Complete Guide progress.
4. Buy upgrade.
5. Stop playtest.
6. Play again.

Expected:
- DEV store is used.
- Gold loads.
- GuideQuestState loads.
- WindDash upgrade attributes load.
- Save failures are warned, not silently ignored.
Mode:
- Play Solo controlled test

Steps:
1. Send invalid RequestAbility payload.
2. Send invalid PurchaseUpgrade payload.
3. Spam RequestAbility.
4. Try unknown upgradeId.

Expected:
- Server rejects invalid payloads.
- No reward or purchase from invalid data.
- No red Output errors.
- Rate limit / cooldown holds.
Mode:
- Play Solo

Steps:
1. Walk through dense scene area.
2. Trigger enemy, ability, shop, collection.
3. Open Developer Console.
4. Check Log, Memory, Script Profiler if needed.

Expected:
- No obvious frame stalls.
- Memory does not climb unexpectedly during short test.
- No repeated warnings.
Mode:
- Device Emulator
- Controller Emulator

Steps:
1. Test phone landscape.
2. Test tablet landscape.
3. Test desktop window.
4. Test gamepad.

Expected:
- HUD readable.
- DashButton reachable.
- ShopPanel usable.
- Gamepad focus and close behavior works.
- Input hints match active input.
每次發現問題,使用這個格式給 Assistant:
【Ch23 修正 1|建立 Bug Report】
我在 Playtest 過程中發現一個 bug。

測試名稱:

環境:
- Studio 模式:
- 裝置/emulator:
- Input:
- Client 或 Server 觀察結果:

重現步驟:
1.
2.
3.

預期結果:

實際結果:

證據:
- Output:
- Developer Console:
- Screenshot/viewport 觀察:
- Explorer state:

仍可正常運作的部分:

範圍限制:
- 不要重寫無關的系統。
- 不要更改 RemoteEvent 名稱。
- 除非必要,否則不要更改玩法數值。
- 編輯前先解釋可能原因,並請我確認。
【Ch23 修正 2|Output 錯誤分析】
分析這個 Roblox Studio Output error。

背景:
- 我正在測試 [測試名稱]。
- 執行 [動作] 後出現 error。
- Client/Server context:[Client 或 Server]。

Output:
[貼上完整原文]

預期結果:

實際結果:

請:
1. 解釋這個 error 的意思。
2. 找出最可能涉及的 script 與 data path。
3. 列出需要在 Explorer 中檢查的內容。
4. 提出範圍最小且安全的修正方式。
5. 不要重寫整個功能。
【Ch23 修正 3|截圖 / Viewport 問題】
使用目前的 viewport screenshot 分析這個 Playtest 問題。

問題:
- [描述看起來有問題的地方]

預期結果:
- [預期的 visual/layout/position]

實際結果:
- [實際觀察]

另外考慮:
- Output [沒有 errors/出現以下 errors]。
- 問題發生在 [phone emulator/desktop/gamepad 測試]。

請先找出 visual 或 layout 方面的原因。
不要更改 gameplay scripts。
修完 bug 後,用:
【Ch23 修正 4|回歸測試產生器】
針對剛才提出的修正方式,建立一份聚焦的回歸測試清單。

包含:
- 原本失敗的測試。
- 一條正常成功路徑。
- 一個失敗/edge case。
- 如果相關,加入一項 client/server authority 檢查。
- Output 應該或不應該顯示的內容。

清單應保持簡短,方便每次編輯後執行。
每次較大的修改後,都保留一份簡短報告:
Date:
Build / branch:
Chapter / change:
Tester:

Tested:
- Spawn route
- Crystal collection
- Guide quest
- WindDash
- Shop
- Save/load
- Security negative tests
- Performance smoke test
- Cross-device UI

Failures:
- [test name] [summary]

Evidence:
- Output excerpts
- Screenshot notes
- Developer Console notes

Next fixes:
- [prompt or task]
這份報告不需要很正式,但要能回頭看。
在 Playtest workflow 裡,Assistant 適合做:
Assistant 不適合直接取代:
你要把 Assistant 當成測試分析助手,不是自動保證遊戲正確的工具。
每次修 bug 都要限制範圍。
不好的 Prompt:
商店壞了,修正所有商店程式碼。
比較好的 Prompt:
【Ch23 修正 5|限制商店錯誤範圍】
在「商店購買成功」測試中,BuyDashCooldownButton 已觸發 PurchaseUpgrade,
但 Server Output 顯示 ShopService:42 attempt to index nil with 'Cost'。

請只檢查 ShopService 與 ShopConfig 的 require/path assumptions。
不要更改 ShopPanel layout。
不要更改升級價格。
不要更改 SaveService。
請先解釋可能原因。
這種 Prompt 才能讓 AI 協作維持工程邊界。
本章把 Playtest 從「感覺一下」變成可重複流程。
你現在應該記住:
下一章會處理發布前檢查與內容安全。測試清單讓你知道功能是否能跑;發布前檢查會確認內容、描述、生成素材、資料分享與平台規範是否準備好。
嗨!我是 Wolke,曾任 Google Developer Expert(GDE,2019–2023) 與 LINE API Expert。
我熱衷於研究 AI Agent、n8n 自動化工作流與全端開發架構,致力於將 AI 技術轉化為真正能落地的生產力工具。
如果你喜歡這篇文章,歡迎透過以下方式與我交流:
📚 技術著作
《實用的 Gemini API 開發點子書》:帶你運用 Gemini App、Google AI Studio、Gemini CLI 與 Antigravity IDE,打造 AI Agent 與實用產品。
📝 技術部落格
歡迎追蹤我的 Medium,我會持續分享 Agentic Automation、架構設計與實際開發的踩坑心得。
🎤 技術講座與合作
我持續受邀至技術社群及研討會,分享 AI Agent、自動化工作流、DevOps 與全端開發實戰。
我曾於 DevOpsDays Taipei 2026 主講「不再只是寫腳本!讓 AI 代理人成為你的 SRE 最佳夥伴」工作坊。
如果你的企業、社群或學校正在尋找相關主題講者,歡迎私訊聯繫,洽談講座與工作坊合作!
🎮 我的 Roblox 遊戲
🎁 免費贈送 OpenAI 或 Claude AI 額度
為了鼓勵大家實際動手打造自己的 Roblox 體驗,我每個月會開放:
參加方式:
確認完成後,我會邀請你加入並設定 50 點額度。名額有限,歡迎把握機會!


 iThome鐵人賽
 看影片追技術