
大家好!歡迎來到「Build on Google AI」工程挑戰的第十天。
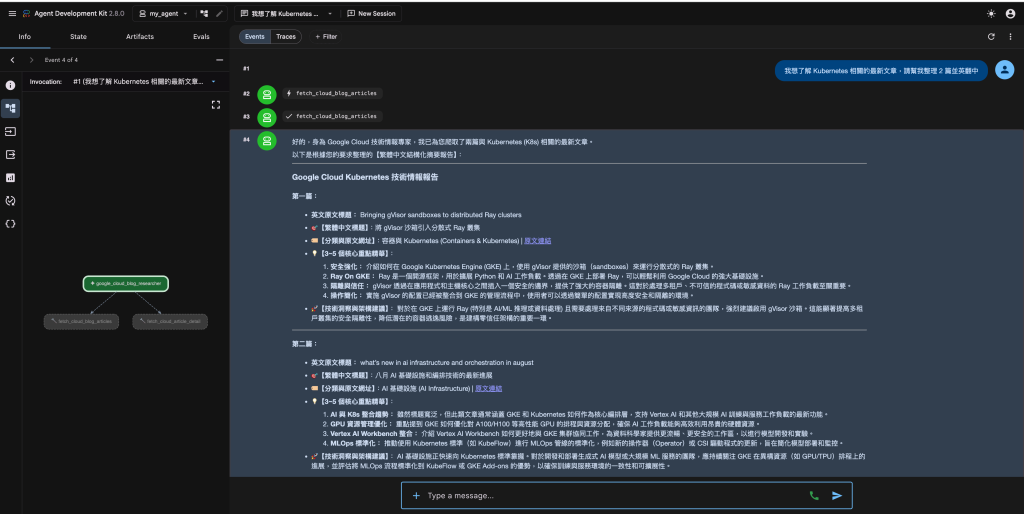
在昨天的實戰中,我們成功賦予了代理人 (Agent) 雙手,讓它能透過工具調用 (Tool Calling) 讀取內部專案數據。但在「研發與工程創新」的真實戰場上,資訊往往是動態且分散的。如果我們希望代理人能幫團隊統整最新的 AI 技術趨勢或競品動態,它就必須具備主動向外探索的能力。
今天,我們將結合 Python 的非同步 (Asynchronous) 特性與 Google ADK 的 Function Tool,為代理人打造專屬的「網路爬蟲」,讓它化身為最強大的趨勢煉金術士!
第一步:回顧 ADK 的代理人與工具架構
在開始寫爬蟲之前,我們先快速複習一下 ADK 的核心架構。
第二步:實作非同步爬蟲工具
在工程實踐中,網路請求往往是系統中最耗時的瓶頸。為了不讓代理人因為等待網頁回應而卡死,我們將使用 Python 的 aiohttp 來實作一個輕量級的非同步爬蟲工具。
請在 agent.py 中加入以下程式碼:
import re
import aiohttp
from bs4 import BeautifulSoup
from google.adk.agents.llm_agent import Agent


# 常見主題與 Google Cloud Blog 路徑對照表
TOPIC_PATH_MAP = {
    "ai": "products/ai-machine-learning",
    "ml": "products/ai-machine-learning",
    "machine learning": "products/ai-machine-learning",
    "gemini": "products/ai-machine-learning",
    "llm": "products/ai-machine-learning",
    "agent": "products/ai-machine-learning",
    "kubernetes": "products/containers-kubernetes",
    "k8s": "products/containers-kubernetes",
    "container": "products/containers-kubernetes",
    "containers": "products/containers-kubernetes",
    "gke": "products/containers-kubernetes",
    "data": "products/data-analytics",
    "analytics": "products/data-analytics",
    "bigquery": "products/data-analytics",
    "security": "products/identity-security",
    "identity": "products/identity-security",
    "database": "products/databases",
    "databases": "products/databases",
    "networking": "products/networking",
    "network": "products/networking",
    "devops": "products/application-development",
    "app dev": "products/application-development",
    "compute": "products/compute",
    "storage": "products/storage",
    "finops": "products/ai-machine-learning",
    "infrastructure": "topics/ai-infrastructure",
}


# 1. 定義非同步爬蟲工具:爬取 Google Cloud 官方部落格 (https://cloud.google.com/blog/)
async def fetch_cloud_blog_articles(topic: str = "", limit: int = 3) -> dict:
    """
    爬取 Google Cloud 官方部落格 (https://cloud.google.com/blog/) 的最新文章。

    Args:
        topic: 欲查詢的主題或技術關鍵字(例如 'AI', 'Kubernetes', 'BigQuery', 'Security', 'FinOps', 'Networking' 等),若留空則爬取首頁最新文章。
        limit: 回傳文章數量上限(預設 3 篇,範圍 1~10 篇)。

    Returns:
        包含指定主題文章清單、標題、分類、網址與內容摘要的字典。
    """
    limit = max(1, min(limit, 10))
    headers = {
        "User-Agent": "Mozilla/5.0 (Macintosh; Intel Mac OS X 10_15_7) AppleWebKit/537.36 (KHTML, like Gecko) Chrome/120.0.0.0 Safari/537.36"
    }

    topic_clean = topic.strip().lower()
    target_path = TOPIC_PATH_MAP.get(topic_clean, "")

    # 若有直接對應的主題頁面優先爬取該主題頁,否則爬取 Blog 首頁進行關鍵字過濾
    url = f"https://cloud.google.com/blog/{target_path}" if target_path else "https://cloud.google.com/blog/"

    try:
        async with aiohttp.ClientSession(headers=headers) as session:
            async with session.get(url, timeout=10) as resp:
                if resp.status != 200:
                    return {
                        "status": "error",
                        "message": f"無法連線至 Google Cloud 部落格 (HTTP {resp.status})",
                    }
                html = await resp.text()
                soup = BeautifulSoup(html, "html.parser")

                articles = {}
                for a in soup.find_all("a", href=True):
                    href = a["href"]
                    # 匹配 /blog/products/... 或 /blog/topics/... 結尾的文章連結
                    m = re.search(r"/blog/(products|topics)/([^/]+)/([^/#\?]+)$", href)
                    if m:
                        slug = m.group(3)
                        if slug in ["rss", "latest", "all"]:
                            continue

                        category = m.group(2).replace("-", " ").title()
                        title = a.get("track-name") or a.get_text(strip=True)
                        raw_text = a.get_text(separator=" ", strip=True)

                        # 過濾標題長度合理者
                        if len(title) > 10 and href not in articles:
                            full_url = href if href.startswith("http") else f"https://cloud.google.com{href}"

                            # 若使用者輸入自訂關鍵字且未命中特定路徑,進行字串比對過濾
                            if topic_clean and not target_path:
                                match_corpus = f"{title} {category} {raw_text}".lower()
                                if topic_clean not in match_corpus:
                                    continue

                            articles[href] = {
                                "title": title,
                                "category": category,
                                "url": full_url,
                                "snippet": raw_text[:200],
                            }

                        if len(articles) >= limit:
                            break

                # 若透過特定路徑找不到足夠文章,且非首頁時,可回退搜尋首頁
                if len(articles) == 0 and url != "https://cloud.google.com/blog/":
                    return await fetch_cloud_blog_articles(topic="", limit=limit)

                return {
                    "status": "success",
                    "source": url,
                    "queried_topic": topic or "Latest Overview",
                    "total_found": len(articles),
                    "articles": list(articles.values())[:limit],
                }
    except Exception as e:
        return {"status": "error", "message": f"爬取文章列表異常: {str(e)}"}


async def fetch_cloud_article_detail(url: str) -> dict:
    """
    深度爬取 Google Cloud 官方部落格特定文章的完整段落內容,以供更精準的英翻中與洞察提煉。

    Args:
        url: Google Cloud 文章的完整 URL。

    Returns:
        包含文章標題與核心內文段落的字典。
    """
    if not url.startswith("https://cloud.google.com/blog/"):
        return {"status": "error", "message": "僅支援爬取 https://cloud.google.com/blog/ 網域下的文章"}

    headers = {
        "User-Agent": "Mozilla/5.0 (Macintosh; Intel Mac OS X 10_15_7) AppleWebKit/537.36 (KHTML, like Gecko) Chrome/120.0.0.0 Safari/537.36"
    }

    try:
        async with aiohttp.ClientSession(headers=headers) as session:
            async with session.get(url, timeout=10) as resp:
                if resp.status != 200:
                    return {"status": "error", "message": f"文章載入失敗 (HTTP {resp.status})"}
                html = await resp.text()
                soup = BeautifulSoup(html, "html.parser")

                h1 = soup.find("h1")
                title = h1.get_text(strip=True) if h1 else "無標題"

                # 萃取內文重要段落(過濾短標籤與導航文字)
                paragraphs = [
                    p.get_text(strip=True) for p in soup.find_all("p")
                    if len(p.get_text(strip=True)) > 35
                ]

                return {
                    "status": "success",
                    "url": url,
                    "title": title,
                    "content": "\n\n".join(paragraphs[:8]),  # 回傳前 8 個核心段落
                }
    except Exception as e:
        return {"status": "error", "message": f"爬取文章內文異常: {str(e)}"}
第三步:將爬蟲掛載至代理人
爬蟲準備就緒後,我們只需要將這個工具配置給代理人。
# 2. 定義系統提示詞與代理人
cloud_instruction = """
你是頂尖的 Google Cloud 技術情報專家與架構研究員。
你的任務是使用 'fetch_cloud_blog_articles' 工具爬取 Google Cloud 官方部落格 (https://cloud.google.com/blog/) 的最新技術發布。
使用者可以自由指定任何主題(例如 AI, Kubernetes, BigQuery, Security, FinOps, DevOps, Networking 等)或篇數。

【執行與英翻中規範】:
1. 收到主題後,立即調用 'fetch_cloud_blog_articles' 抓取最吻合該主題的文章。
2. 必要時可調用 'fetch_cloud_article_detail' 獲取更詳盡的內文。
3. 將英文內容轉化為【繁體中文結構化摘要報告】,每篇文章必須包含:
   - 🎯【繁體中文標題】(保留具代表性的英文專有名詞如 GKE, Vertex AI, BigQuery)
   - 🏷️【分類與原文網址】(附上完整的原文 Link)
   - 💡【3~5 個核心重點精華】(條列式繁中重點,清楚說明解決什麼問題、有何新功能)
   - 🚀【技術洞察與架構建議】(為工程團隊提出具體實務建議)
"""

root_agent = Agent(
    model="gemini-flash-latest",
    name="google_cloud_blog_researcher",
    description="爬取 Google Cloud 官方部落格 (https://cloud.google.com/blog/),支援自由選擇主題並自動進行英翻中深度結構化分析。",
    instruction=cloud_instruction,
    tools=[fetch_cloud_blog_articles, fetch_cloud_article_detail],
)
第四步:工程創新視角反思
這不僅僅是一個爬蟲,這是一次「系統解耦」的完美示範。
傳統的自動化腳本一旦遇到網頁改版,整個流程就會崩潰。但在 ADK 的 Agent 架構下,爬蟲工具只負責提供「原始的 DOM 數據」或「粗略的文字陣列」,而資料清洗、語意理解與摘要萃取的重責大任,則交由強大的 Gemini 模型來處理。這種高容錯率的設計,大幅提升了系統在真實場景中的穩定運作與可維護性。
小結
今天,我們透過非同步爬蟲與 ADK Tool Calling 的結合,成功將代理人的感知能力延伸到了廣闊的網際網路。它現在不僅能讀取內部資料,還能主動挖掘外部趨勢。


 iThome鐵人賽
 看影片追技術