
今天我們會說明怎麼對iframe做測試,本來的 react-admin demo 裡並沒有iframe,所以我們會先加上一個很小的iframe頁面,外層是 React 頁面,裡面嵌入一份獨立的聯絡表單。完成後再用 Playwright 測試它。
先把畫面拆成兩份文件:
react-admin 教學頁面(外層 React 頁面)
└── iframe
    └── 聯絡表單(public 裡的獨立 HTML 文件)
內層表單刻意放在 public/,讓 Vite 以靜態檔案提供它。它不會被 react-admin 的版面、路由或登入流程包住,比較容易看懂他的結構。
建立 demo/public/iframe-contact-form.html:
<!doctype html>
<html lang="zh-Hant">
  <head>
    <meta charset="UTF-8" />
    <title>聯絡表單</title>
  </head>
  <body>
    <form id="contact-form">
      <label>
        姓名
        <input name="name" />
      </label>
      <button type="submit">送出</button>
      <p id="result" role="status"></p>
    </form>

    <script>
      document.querySelector('#contact-form').addEventListener('submit', event => {
        event.preventDefault();
        const name = document.querySelector('[name="name"]').value;
        document.querySelector('#result').textContent = `已收到你的訊息,${name}`;
      });
    </script>
  </body>
</html>
這段 HTML 只保留測試所需的三個功能,具有 label 的輸入框、送出按鈕和顯示結果的 role="status"。這個iframe不需要串後端,因為我們的目標是確認 Playwright 能正確操作 iframe 內的文件。
建立 demo/src/iframe/IframeDemo.tsx:
import { Card, CardContent, Typography } from '@mui/material';

const IframeDemo = () => (
  <Card>
    <CardContent>
      <Typography variant="h5" component="h1" gutterBottom>
        iframe 練習:聯絡表單
      </Typography>
      <iframe
        title="聯絡表單"
        name="contact-form"
        src="/iframe-contact-form.html"
        width="100%"
        height="220"
      />
    </CardContent>
  </Card>
);

export default IframeDemo;
在 demo/src/App.tsx 加入 import:
import IframeDemo from './iframe/IframeDemo';
再在既有的 CustomRoutes 區塊加入一條 route:
<CustomRoutes>
  <Route path="/segments" element={<Segments />} />
  <Route path="/iframe-demo" element={<IframeDemo />} />
</CustomRoutes>
啟動 demo、先登入,然後開啟 http://localhost:8000/#/iframe-demo。你應該會看見後台版面裡有一張卡片,卡片裡又嵌著一份簡單的聯絡表單。
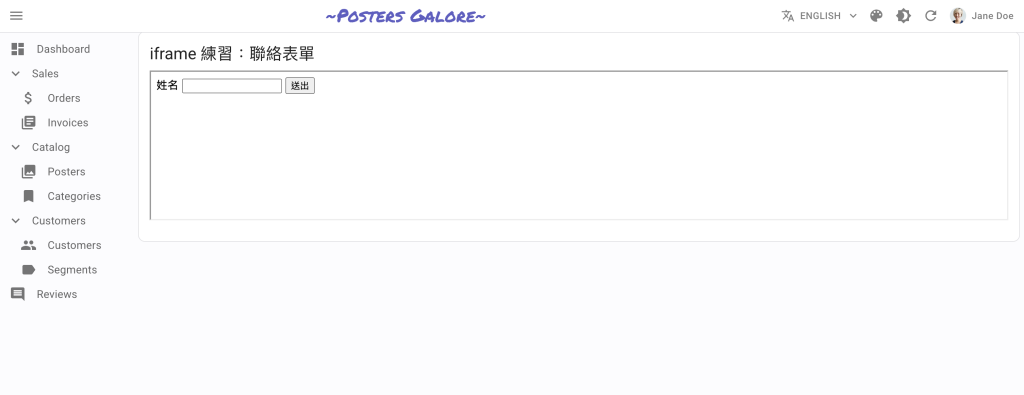
加入頁面後,我們先手動填入名稱、按送出,確認聯絡表單上的文字真的會改變,再開始寫測試。
page 找姓名欄位先前寫一般頁面的測試時,我們都從 page 開始找元素,例如:
await page.getByLabel('姓名').fill('小明');
這個想法很合理,但是在 iframe 頁面會失敗。畫面上雖然看得到姓名欄位,page 卻找不到它。
原因是 page 預設只搜尋外層頁面的主文件;而 <iframe> 標籤本身屬於外層頁面,但它載入的表單是另一份文件。可以想像成書裡夾了一本小冊子:你看得到封面,卻不能直接翻到冊子裡的內容。
Page(外層文件)
├── iframe 標籤 ← page 可以找到
└── Frame(內層文件)
    └── 姓名欄位 ← page 不會直接找到
所以 iframe 測試的關鍵是要 先切換到元素所在的文件範圍,之後才能繼續取得頁面上的元素。
frameLocator() 進入 iframe我們可以利用 frameLocator() 來切換到元素所在的文件範圍,在知道哪一個是iframe的情況下,這是最直接的寫法。
建立 playwright-tests/tests/day18-iframe.spec.ts:
import { test, expect } from '../fixtures/fixtures';

test('可以送出 iframe 裡的聯絡表單', async ({ loggedInPage: page }) => {
  await page.goto('/#/iframe-demo');

  const contactForm = page.frameLocator('iframe[title="聯絡表單"]');

  await contactForm.getByLabel('姓名').fill('小明');
  await contactForm.getByRole('button', { name: '送出' }).click();

  await expect(contactForm.getByRole('status')).toHaveText('已收到你的訊息,小明');
});
frameLocator('iframe[title="聯絡表單"]') 的意思是「接下來從這個 iframe 的內部文件找元素」。因此後面的 getByLabel()、getByRole() 與 assertion 都是對內層表單操作,而不是對外層後台頁面操作。
這邊除了抓取元素的基準點變成 frameLocator外,其餘的元素操作和web-first assertion 基本上都和原本寫法相同,並沒有不同。
執行測試:
npx playwright test day18-iframe --project=chromium
page.frame() 取得 Frame 物件另一種寫法是依 iframe 的 name 或 URL 取得 Frame 物件:
const frame = page.frame({ name: 'contact-form' });

if (!frame) {
  throw new Error('找不到聯絡表單 iframe');
}

await frame.getByLabel('姓名').fill('小明');
當找不到iframe時,page.frame() 會回傳 null,例如 iframe 尚未出現或 name 寫錯。一般來說如果已經確定知道 iframe 在哪裡,且需要操作它上面的元素時,frameLocator() 會比 page.frame() 更簡潔,因為不需要額外使用 if else 語句來判斷是否取得 frame。
如果根本不確定頁面上有沒有 iframe,或要確認載入了哪個 URL,可以用 page.frames() 盤點頁面上所有的 iframe:
for (const frame of page.frames()) {
  console.log({ name: frame.name(), url: frame.url() });
}
它會包含主頁面本身和所有 iframe,當不確定 frame 時,可以使用這個方法來協助定位。
今天我們先自己建立了可控制的 iframe fixture,再測試它:
page 能找到 iframe 標籤,卻不能直接找到 iframe 內的元素。page.frameLocator(...).getBy...()。page.frame() 可依 name 或 URL 取得 Frame,page.frames() 則適合除錯盤點。下一篇的會介紹多分頁情境的測試寫法。



 iThome鐵人賽
 看影片追技術