

在 Day 26 中,我們成功打造了 HTTP 請求解析器,讓伺服器具備了「看懂」客戶端請求的能力。
Browser / curl
      ↓
TCP
      ↓
socket_recv()
      ↓
HTTP Parser
      ↓
GET / HTTP/1.1
今天(Day 27),我們將流程反轉,讓伺服器不只看懂 request,也能組裝並送出 HTTP response:
HTTP Request (GET /)
      ↓
HTTP Web Server (路由判斷)
      ↓
HTTP Response (Status Line + Headers + Body)
      ↓
socket_send()
      ↓
TCP / IPv4 / Ethernet
      ↓
Browser / curl 渲染網頁!
今天我們實作 HTTP Response Builder,並建立基礎的網站路徑路由(Routing),成功讓客戶端收到第一個由自製 TCP Stack 回傳的 HTTP/1.1 200 OK 與 HTML 內容。
Content-Type 如何影響瀏覽器渲染。Content-Length 如何告訴客戶端 Body 長度。http_build_response(),組裝標準 HTTP response 字串。snprintf() 安全寫入 response buffer。req.path 回傳 200 OK 或 404 Not Found。curl -v 驗證 HTTP response header 與 body。當客戶端發送:
GET / HTTP/1.1
Host: 10.0.0.2:8080
伺服器必須回覆符合 RFC 規格的標準結構:
HTTP Response
│
├── Status Line (狀態行)
│   HTTP/1.1 200 OK\r\n
│
├── Headers (標頭清單)
│   Content-Type: text/html\r\n
│   Content-Length: 21\r\n
│
├── 空白行 (CRLF 邊界)
│   \r\n
│
└── Body (實體網頁內容)
    <h1>Hello World</h1>\n
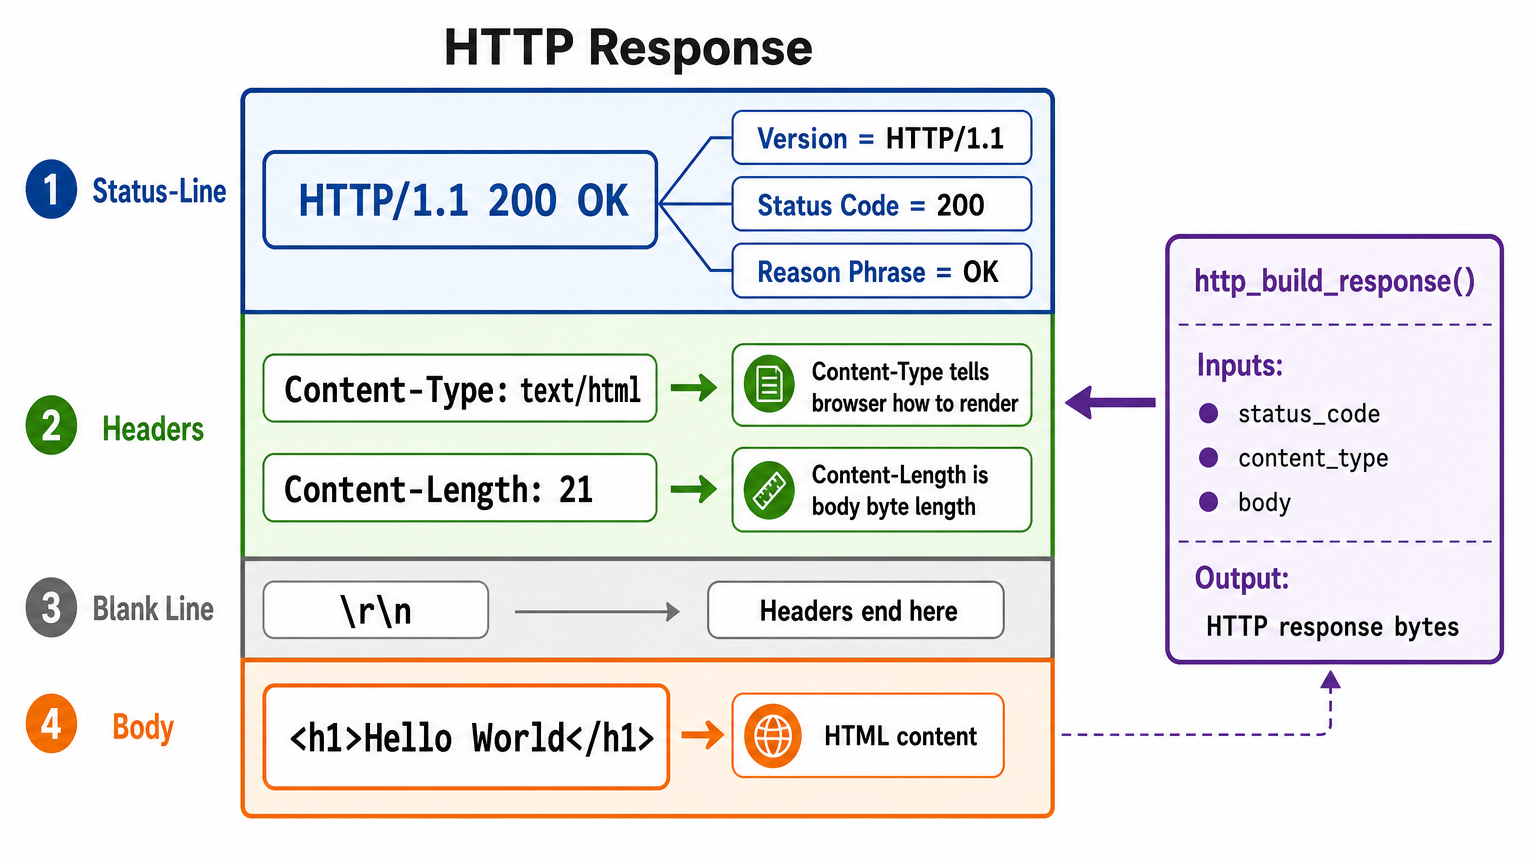
HTTP/1.1         200              OK
─────────     ──────────     ─────────────
 Version      Status Code    Reason Phrase
(協定版本)      (狀態代碼)       (狀態描述短語)
常見狀態碼有(1xx ~ 5xx):
1xx(請稍等):請求已收到,伺服器正在繼續處理或協商協定升級(如 101 WebSocket)。2xx(成功了):請求成功,伺服器準備好並返回資料(如 200 OK、201 Created)。3xx(去別處):資源已搬家或可用快取,引導客戶端重新導向(如 301 永久轉址、304 快取未修改)。4xx(你錯了):客戶端請求有問題,如網址打錯、未登入或無權限(如 400 語法錯誤、401 未認證、404 找不到)。5xx(我壞了):請求合法,但伺服器端發生程式崩潰、超載或上游逾時(如 500 內部錯誤、502 閘道錯誤、503 服務過載)。Content-Type: text/html告訴瀏覽器如何解讀這份二進位位元組:
text/plain:瀏覽器會把標籤當作純文字直接印出(看到 <h1> 字樣)。text/html:瀏覽器引擎會啟動 HTML DOM Parser,把文字渲染成巨大的標題粗體!Content-Length: %zustrlen(body) 計算網頁內容長度。Content-Length 表示 Body 的 byte 數,不是畫面上的字元數。本日 body 皆為 ASCII,因此 strlen() 結果剛好等於 byte 長度。Content-Length 來判定這次回應「何時收完」。如果少了這個標頭,連線可能陷入等待或提早中斷。\r\n\r\n 空白行HTTP 規範中,標頭與內文的唯一界線就是「長度為 0 的空行」(即連續兩組 CRLF:\r\n\r\n)。若缺少這行,瀏覽器會誤把 HTML 內容當作未知的 Header 進行解析。
include/http.h)#include <stddef.h>
#ifndef HTTP_H
#define HTTP_H
struct http_request {
char method[16];
char path[256];
char version[16];
char host[256];
};
struct http_response {
int status_code;
const char *status_text;
const char *content_type;
const char *body;
};
/*
* struct http_response 可視為後續重構時的 response 容器;
* 本日實作先採用直接傳參數的 http_build_response()。
*/
int http_parse_request(char *buffer, struct http_request *req);
void http_print_request(const struct http_request *req);
// 組裝 HTTP Response 字串至 buffer 中
int http_build_response(
char *buffer,
size_t buffer_size,
int status_code,
const char *status_text,
const char *content_type,
const char *body
);
#endif
src/http.c)使用 snprintf 防止緩衝區溢位,並透過 %zu 標準格式化 size_t 型別:
int http_build_response(
    char *buffer,
    size_t buffer_size,
    int status_code,
    const char *status_text,
    const char *content_type,
    const char *body
) {
    if (!body) body = "";

    return snprintf(buffer, buffer_size,
        "HTTP/1.1 %d %s\r\n"
        "Content-Type: %s\r\n"
        "Content-Length: %zu\r\n"
        "\r\n"
        "%s",
        status_code, status_text, content_type, strlen(body), body
    );
}
本日教學版 HTTP Server 採「一請求一連線」模型:回應中提供 Content-Length 讓客戶端知道 Body 長度,伺服器送完 response 後再透過 socket_close() 主動關閉 TCP 連線。若要讓 HTTP 語意更明確,後續也可以補上 Connection: close Header。
教學版限制:本日 response buffer 固定為 1024 bytes,尚未處理
snprintf()回傳值大於 buffer size 的截斷情況,也尚未支援大型 Body 分段傳輸。
src/tap.c)升級原本的伺服器迴圈,根據 req.path 進行分流派送:
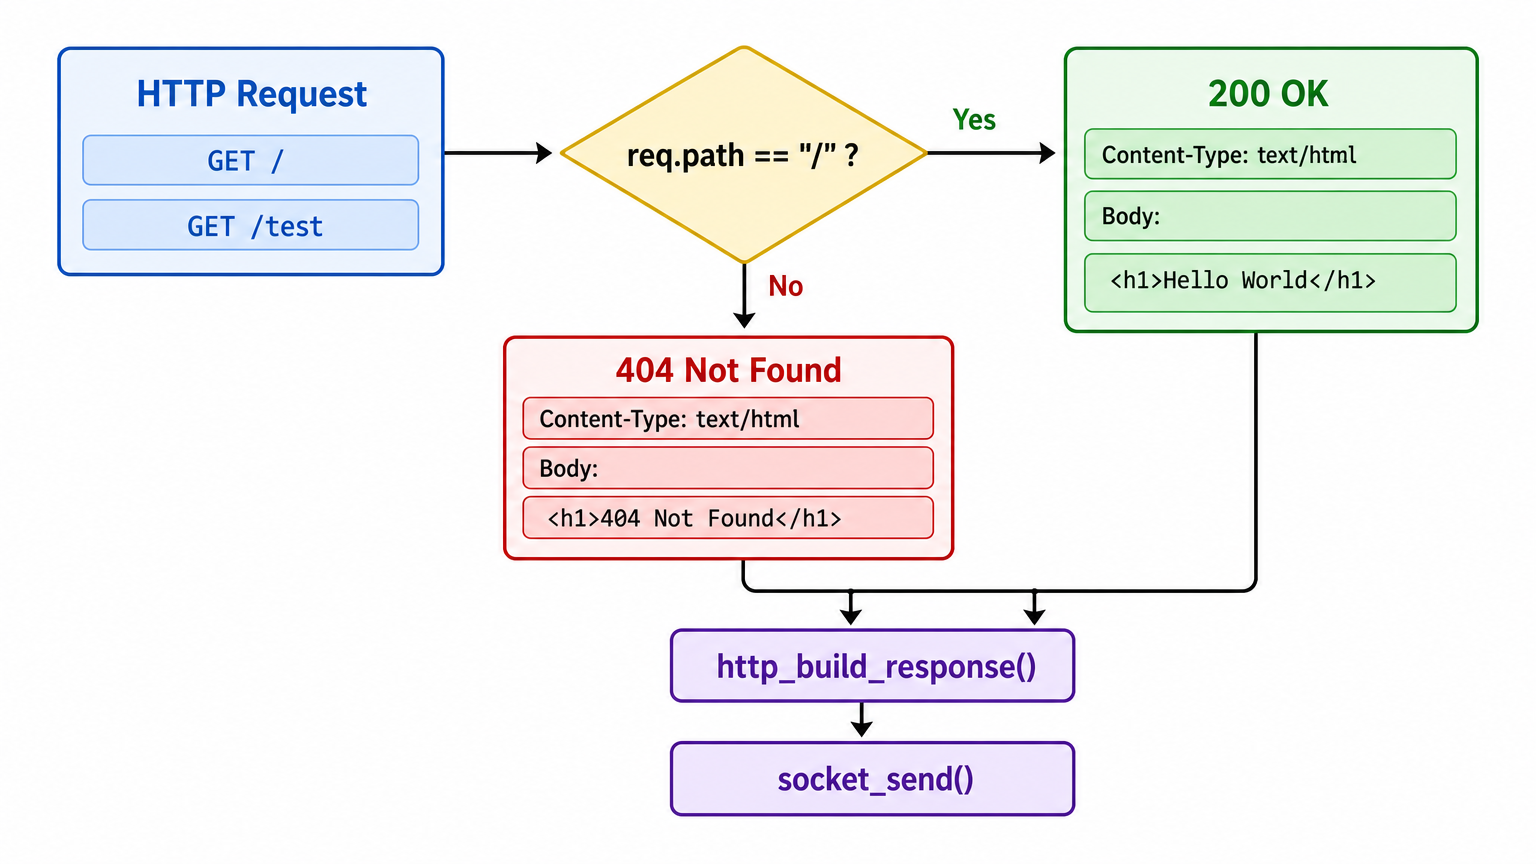
    // 3. HTTP Web Server 主迴圈
    while (1) {
        struct socket *conn = socket_accept(listener);
        if (!conn) continue;

        uint8_t buf[1024];
        int n = socket_recv(conn, buf, sizeof(buf) - 1);
        if (n > 0) {
            buf[n] = '\0';
            printf("\n[Server] Received Request:\n%s\n", buf);

            struct http_request req;
            if (http_parse_request((char *)buf, &req) == 0) {
                http_print_request(&req);

                char resp[1024];
                // 基礎路徑路由 (Routing)
                if (strcmp(req.path, "/") == 0) {
                    http_build_response(resp, sizeof(resp),
                        200, "OK", "text/html", "<h1>Hello World</h1>\n");
                } else {
                    http_build_response(resp, sizeof(resp),
                        404, "Not Found", "text/html", "<h1>404 Not Found</h1>\n");
                }

                // 透過自製 TCP Socket 發送標準 HTTP 回應
                socket_send(conn, (const uint8_t *)resp, strlen(resp));
            }
        }

        socket_close(conn);
    }
make clean && make network
確認專案能成功編譯。
sudo ./network
TAP device: tap0 (UP)
TCP/IP Stack Initialized.
[Socket 0] Listening on Port 8080

========================================
   HTTP Web Server Running on Port 8080
========================================
在客戶端終端機執行:
curl -v http://10.0.0.2:8080/
*   Trying 10.0.0.2:8080...
* Connected to 10.0.0.2 (10.0.0.2) port 8080
> GET / HTTP/1.1
> Host: 10.0.0.2:8080
> User-Agent: curl/8.5.0
> Accept: */*
>
< HTTP/1.1 200 OK
< Content-Type: text/html
< Content-Length: 21
<
<h1>Hello World</h1>
* Connection #0 closed
200 OK 命中!在客戶端終端機執行:
curl -v http://10.0.0.2:8080/test
*   Trying 10.0.0.2:8080...
* Connected to 10.0.0.2 (10.0.0.2) port 8080
> GET /test HTTP/1.1
> Host: 10.0.0.2:8080
> User-Agent: curl/8.5.0
> Accept: */*
>
< HTTP/1.1 404 Not Found
< Content-Type: text/html
< Content-Length: 23
<
<h1>404 Not Found</h1>
* Connection #0 closed
404 Not Found 正確命中。今天我們完成了 HTTP Server 的第一個教學版閉環:
req.path 為基礎進行簡單分流,為後續更多路徑與 API 回應奠定基礎。今天我們回傳的是靜態的 HTML 字串:
GET / ──→ <h1>Hello World</h1>
明天(Day 28),我們將進一步實作 Dynamic JSON API。
伺服器將不再只是回傳固定 HTML 字串,而是會根據當下的時間與請求,動態組裝 JSON 資料:
HTTP/1.1 200 OK
Content-Type: application/json

{
    "message": "Hello from Custom TCP Stack",
    "timestamp": 1727850000
}
讓自製網路協定棧開始具備 API Server 的基本雛形。


 iThome鐵人賽
 看影片追技術