

在 Day 28 中,我們成功打造了 Dynamic JSON API,並將業務邏輯抽離成獨立的 Controller。但當時所有的回傳內容(如 <h1>Hello World</h1> 或 JSON 樣板)都是硬編碼(Hardcoded)在 C 語言程式碼中。
真正的 Web 伺服器(如 Nginx、Apache)的核心任務,是直接從主機磁碟(Disk)讀取真實的網頁檔案(HTML、CSS、JavaScript、圖片與靜態資源),再經由網路協定堆疊封裝回傳給瀏覽器。
Browser / curl
    ↓ GET /index.html 或 GET /logo.png
TCP Stack (Handshake + Socket API)
    ↓
HTTP Parser (req.path)
    ↓
Path Mapping (www/index.html 或 www/logo.png)
    ↓
Disk I/O (fopen -> fseek/ftell -> fread -> fclose)
    ↓
MIME Type Detection (get_mime_type)
    ↓
Binary-Safe HTTP Response Builder (http_build_binary_response)
    ↓
socket_send() (二進位安全發送)
    ↓
瀏覽器成功載入網頁與圖片!
今天(Day 29),我們將伺服器升級為具備真實檔案讀取能力的 Static File Server,並突破二進位檔案(Null-Byte 截斷)的傳統實作陷阱!
www/ 並撰寫 index.html 與 about.html。/ 自動對應至 www/index.html,一般路徑加上 www 前綴。fopen("rb")、fseek()、ftell()、fread() 與 fclose()。fclose)與記憶體(free)。text/html、image/png、text/css、application/javascript 等。0x00(Null Byte)如何導致 strlen() 與 %s 提早截斷。http_build_binary_response(),使用 memcpy 與明確 body_len 解決二進位傳輸問題。tap.c 回應緩衝區至 64KB,並依精確 byte 數呼叫 socket_send()。<img src="/logo.png">,成功在瀏覽器與 curl 驗證!當客戶端發起靜態資源請求時,伺服器經歷的路徑轉換與讀取流程如下:
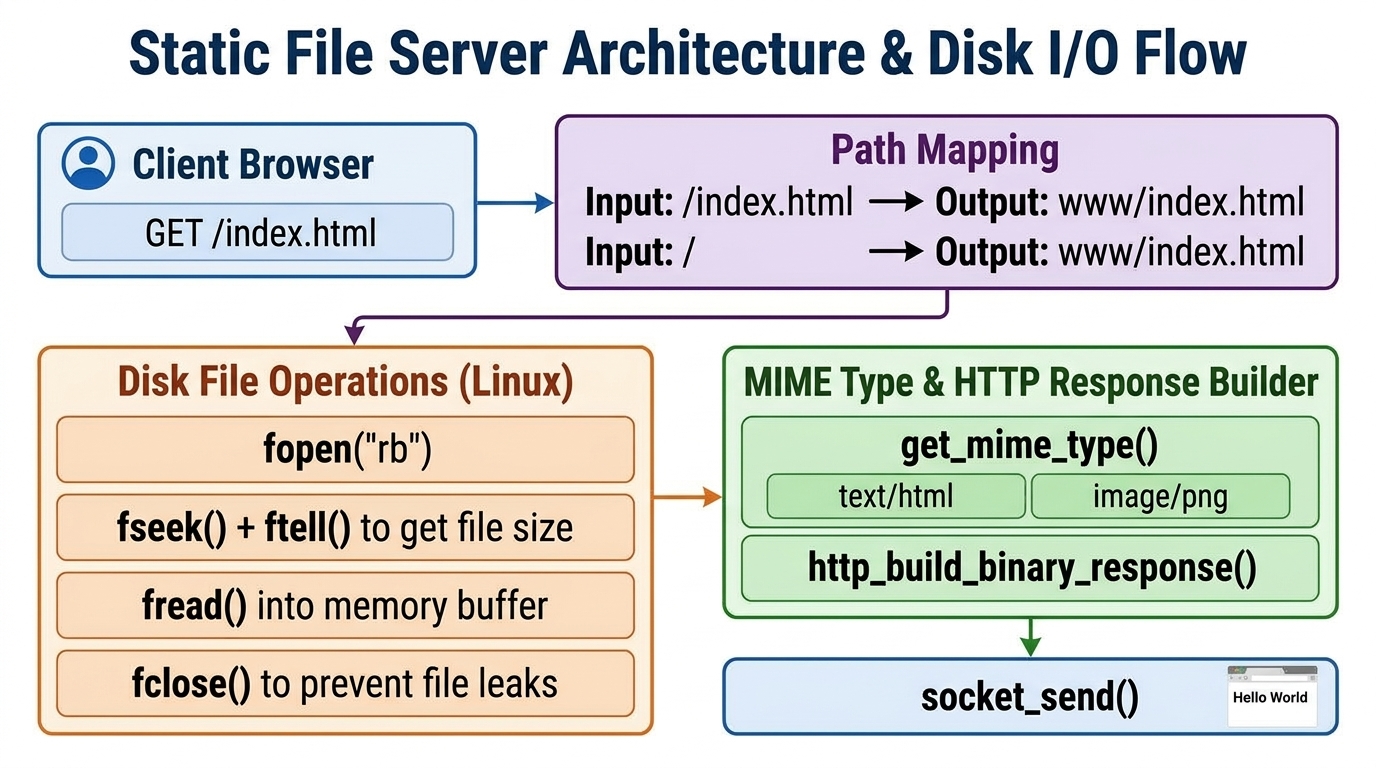
/ ➔ 映射至 www/index.html(預設首頁)。/about.html ➔ 映射至 www/about.html。FILE *fp = fopen(filepath, "rb");。fp == NULL,代表檔案不存在或無讀取權限,直接轉發給 handle_not_found()。fseek(fp, 0, SEEK_END); 移動到檔案尾端。long size = ftell(fp); 取得精準位元組長度。rewind(fp); 回到檔案開頭準備讀取。char *body = malloc(size); 配置緩衝區。fread(body, 1, size, fp); 讀入資料。fclose(fp);,否則高併發下會迅速耗盡系統 File Descriptor!實務安全補充:本日的 path mapping 是教學版實作,目標是說明磁碟 I/O 與二進位回應。真實 Web Server 還必須阻擋
..、URL encoding 後的繞路、symbolic link 逃逸與超大檔案讀取,避免客戶端用/../../etc/passwd這類路徑讀到網站根目錄外的檔案。
許多初學者實作 Web Server 時,HTML 都能正常顯示,但只要載入 .png 或 .jpg 就會嚴重破圖,原因就在於 Null Byte (0x00)!
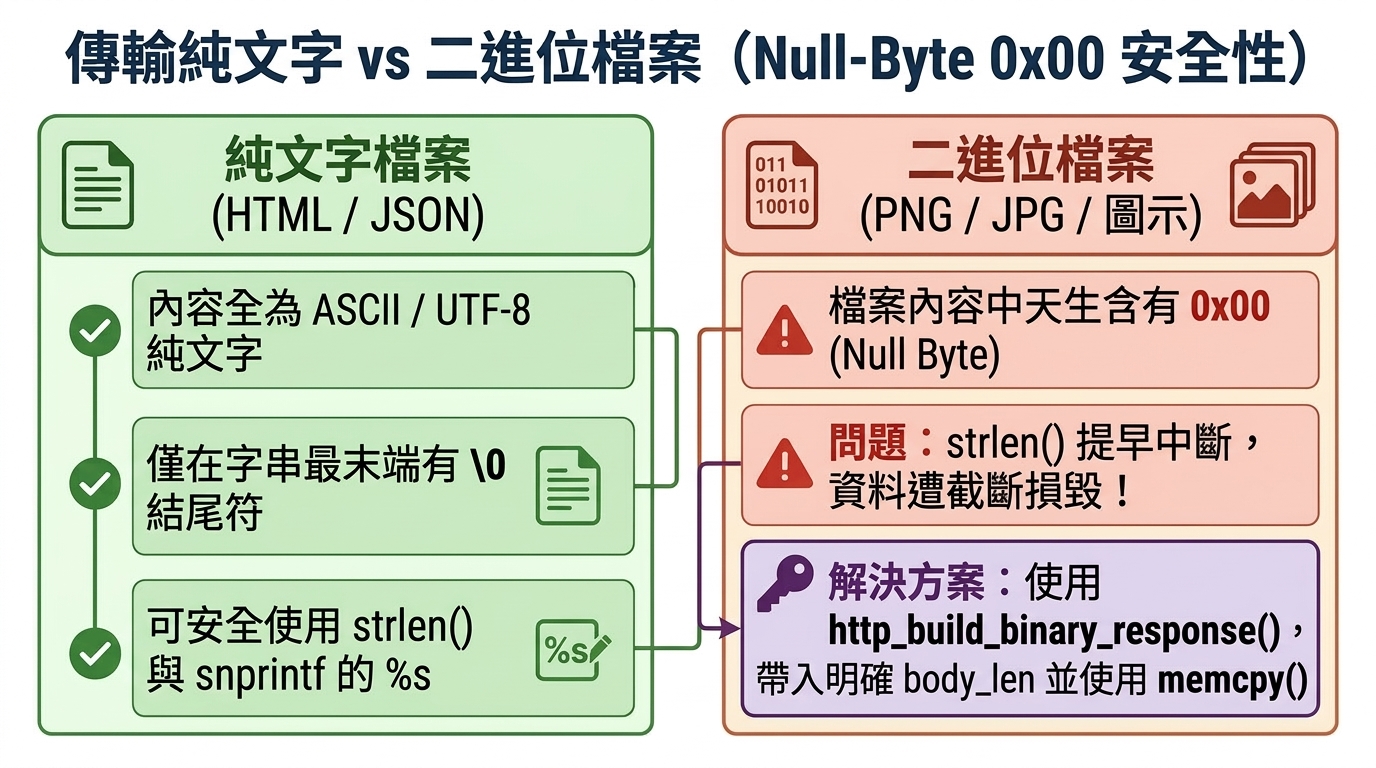
\0 作為結束符:
\0。0x00:
89 50 4E 47 0D 0A 1A 00 ...
strlen() 會過早結束:
strlen(body) 計算圖片長度,結果只會回傳 7 bytes,導致 Content-Length: 7。snprintf("%s") 會截斷資料:
%s 複製到第一個 0x00 就會停下來,整張圖片後面 99.9% 的資料全部遺失!socket_send() 必須使用明確長度:
socket_send(conn, resp, strlen(resp)),同樣會因為 Header 後的二進位內容含 0x00 而提早結束。http_build_binary_response():傳入明確的 size_t body_len,並使用 memcpy() 拷貝資料。http_route_dispatch() 回傳精準組裝的 byte 長度,讓 socket_send() 完整送出每一顆 byte!瀏覽器完全仰賴 Content-Type 來決定用什麼引擎渲染收到的一串 byte:
| 副檔名 | Content-Type | 瀏覽器行為 |
|---|---|---|
.html / .htm |
text/html |
解析 HTML DOM 並排版為網頁畫面 |
.css |
text/css |
作為 CSS 樣式表解析並美化網頁 |
.js |
application/javascript |
交由 V8 / SpiderMonkey 引擎執行 JS 腳本 |
.png |
image/png |
啟動圖片解碼器,渲染點陣圖形 |
.jpg / .jpeg |
image/jpeg |
啟動 JPEG 解碼器,渲染照片圖形 |
.svg |
image/svg+xml |
渲染向量幾何圖形 |
.ico |
image/x-icon |
渲染網址列網站圖示(Favicon) |
| 未知副檔名 | application/octet-stream |
視為未知的二進位串流,通常觸發檔案下載 |
src/http.c)int http_build_binary_response(
char *buffer,
size_t buffer_size,
int status_code,
const char *status_text,
const char *content_type,
const void *body,
size_t body_len
) {
// 1. 組裝文字 Header
int header_len = snprintf(buffer, buffer_size,
"HTTP/1.1 %d %s\r\n"
"Content-Type: %s\r\n"
"Content-Length: %zu\r\n"
"\r\n",
status_code, status_text, content_type, body_len
);
if (header_len < 0 || (size_t)header_len >= buffer_size) {
return -1;
}
// 2. 以 memcpy 安全拷貝二進位資料(不懼怕中間的 0x00)
if (body && body_len > 0) {
if ((size_t)header_len + body_len > buffer_size) {
return -1; // 防止緩衝區溢位
}
memcpy(buffer + header_len, body, body_len);
}
return header_len + body_len;
}
src/controller.c)static const char *get_mime_type(const char *path) {
const char *dot = strrchr(path, '.');
if (!dot) return "text/plain";
if (strcmp(dot, ".html") == 0 || strcmp(dot, ".htm") == 0) return "text/html";
if (strcmp(dot, ".css") == 0) return "text/css";
if (strcmp(dot, ".js") == 0) return "application/javascript";
if (strcmp(dot, ".png") == 0) return "image/png";
if (strcmp(dot, ".jpg") == 0 || strcmp(dot, ".jpeg") == 0) return "image/jpeg";
if (strcmp(dot, ".ico") == 0) return "image/x-icon";
if (strcmp(dot, ".svg") == 0) return "image/svg+xml";
return "application/octet-stream";
}
int handle_static_file(const struct http_request *req, char *resp, size_t resp_len) {
char filepath[512];
if (strcmp(req->path, "/") == 0) {
snprintf(filepath, sizeof(filepath), "www/index.html");
} else {
snprintf(filepath, sizeof(filepath), "www%s", req->path);
}
FILE *fp = fopen(filepath, "rb");
if (!fp) {
return handle_not_found(req, resp, resp_len);
}
fseek(fp, 0, SEEK_END);
long size = ftell(fp);
rewind(fp);
if (size < 0) {
fclose(fp);
return handle_not_found(req, resp, resp_len);
}
char *body = malloc(size);
if (!body && size > 0) {
fclose(fp);
return handle_not_found(req, resp, resp_len);
}
if (size > 0) {
fread(body, 1, size, fp);
}
fclose(fp); // 關閉檔案
const char *content_type = get_mime_type(filepath);
int total_len = http_build_binary_response(resp, resp_len, 200, "OK", content_type, body, (size_t)size);
free(body); // 釋放記憶體
return total_len;
}
可再加強處:更嚴謹的版本會檢查
fseek()、ftell()與fread()的回傳值,確認實際讀到的 byte 數等於檔案大小;若讀取不完整,應回傳500 Internal Server Error或關閉連線,而不是送出半截內容。
src/tap.c)char resp[65536]; // 升級為 64KB 緩衝區支援中大型網頁與圖檔
// 由 Controller 模組統一進行路由分流派送,取得精準位元組長度
int resp_len = http_route_dispatch(&req, resp, sizeof(resp));
if (resp_len > 0) {
socket_send(conn, (const uint8_t *)resp, (size_t)resp_len);
}
make clean && make network
sudo ./network
www/index.html)curl -i http://10.0.0.2:8080/
HTTP/1.1 200 OK
Content-Type: text/html
Content-Length: 167

<!DOCTYPE html>
<html>
<head>
    <title>My TCP Stack</title>
</head>
<body>
    <h1>Hello TCP/IP World</h1>
    <p><img src="/logo.png" alt="Logo"></p>
</body>
</html>
/about.htmlcurl -i http://10.0.0.2:8080/about.html
HTTP/1.1 200 OK
Content-Type: text/html
Content-Length: 262
/logo.pngcurl -i http://10.0.0.2:8080/logo.png
HTTP/1.1 200 OK
Content-Type: image/png
Content-Length: 79

[79 bytes binary PNG data]
curl -i http://10.0.0.2:8080/notfound.html
HTTP/1.1 404 Not Found
Content-Type: text/html
Content-Length: 23

<h1>404 Not Found</h1>
透過轉發橋樑或路由設定,直接在 Windows 瀏覽器(如 Chrome / Edge)輸入 http://localhost:8888/ 或 http://10.0.0.2:8080/:
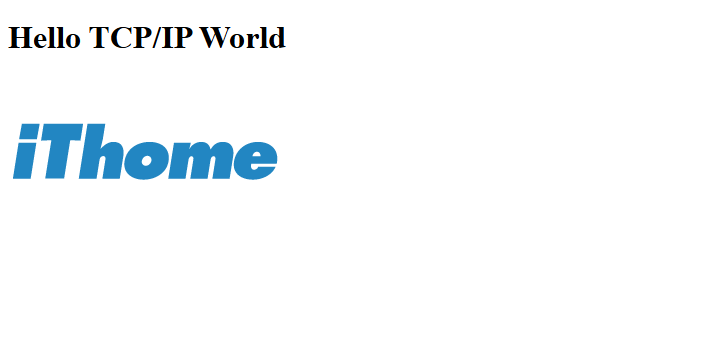
Hello TCP/IP World。/logo.png,並由自製 TCP Stack 完整送出二進位資料,圖片完美顯示(包含 iThome 標誌)!0x00 在二進位協定與記憶體處理中的關鍵細節,成功避免常見的資料截斷 Bug。到今天為止,我們已經從 Ethernet、ARP、IPv4、TCP 一路做到 HTTP Static File Server。明天(Day 30)不再新增單一協定,而是進行畢業總驗收:用 Wireshark 把 ARP、TCP 三向交握、HTTP GET、HTTP 200 OK 與 TCP 關閉流程完整串起來。
最終目標是回答那題經典問題:「在瀏覽器輸入網址後,底層到底發生什麼事?」 但這次不是背答案,而是用自己寫出來的協定棧、封包與時間序列親眼驗證。


 iThome鐵人賽
 看影片追技術