
因為天氣好,因為天氣不好,因為天氣剛剛好
useEffect
來到了 effect,順便換個專案口味吧,建立一個新的「城市天氣看板」專案。
在前面,我們提到 side effect(副作用)指除了計算並回傳結果,還會改變外部狀態或與外部系統互動的操作。
雖然「副作用」描述的是計算結果以外的影響,但有時候這類操作本身是提供正常的功能,例如發送 API 請求、操作 DOM、寫入瀏覽器儲存空間。
React 的 Effect 就是副作用的一種,由元件渲染引起,會在提交畫面後執行,元件渲染時依目前的 props 與 state 描述畫面,當 React 提交畫面後,Effect 再讓外部工作配合目前資料。
以接著要做的天氣看板為例,當城市選擇高雄,就要查高雄的天氣;切換城市或關閉看板時,也要停止已不需要的查詢。
呼叫 useEffect 時,把要執行的函式傳入,以及這份工作讀取的依賴:
useEffect(() => {
  // setup:依目前城市開始查詢

  return () => {
    // cleanup:停止這一輪工作
  };
}, [cityId]);
| 片段 | 意思 |
|---|---|
useEffect(...) |
宣告這個元件需要執行的外部同步工作 |
第一個 () => { ... } |
傳給 React 的 setup 函式,包含開始同步的程式 |
return () => { ... } |
setup 回傳這一輪的 cleanup 函式,交給 React 在清理時呼叫 |
[cityId] |
依賴陣列,列出這份工作使用的城市值 |
setup 與 cleanup 是描述用途的稱呼,由於 useEffect 本身會回傳 undefined,所以這裡不需要像昨天的 useRef 一樣,用變數接住一個物件。
useEffect 的使用和其他 Hook 一樣,在元件最上層呼叫。
React 渲染元件時會先取得 JSX,提交到畫面後再執行需要同步的 setup,把函式傳進 Hook。
以天氣看板來說,初次提交時先顯示載入提示,Effect 才開始取得天氣。收到資料後呼叫 state setter,React 再更新結果,Effect 只在瀏覽器端執行,所以伺服器渲染的初始畫面也是載入提示。
渲染元件、取得 JSX -> 提交畫面 -> setup 開始查詢
  -> 收到資料、更新 state -> 再次渲染與提交結果
[cityId] 放目前依賴的值,React 會使用 Object.is 比較前後的每個依賴。
假設目前是台北,在 Effect 讀取的 cityId 是 "taipei",若使用者改選高雄後,外層更新 state,內層會收到 "kaohsiung"。
React 提交新畫面時會比較依賴陣列中的值,當城市不同就需要重新同步。
Effect 裡讀取的 props、state 會隨渲染改變的值會對應到依賴,例如後面加入溫度單位後,查詢同時使用城市與單位,依賴也會成為 [cityId, temperatureUnit]。
| 依賴寫法 | setup 執行時機 |
|---|---|
| 省略第二個參數 | 初次提交,以及這個元件後續每次提交後 |
[] |
初次掛載後同步,不因 props 或 state 的更新重新同步 |
[cityId] |
初次掛載後同步,之後城市值改變才重新同步 |
Effect 沒有隨渲染改變的資料時,可以使用空陣列,例如查詢要使用城市,就保留城市依賴。
元件移除再掛載會重新開始,StrictMode 在開發模式會額外檢查,因此 [] 在整個程式不會永遠只執行一次。
當城市依賴改變,React 會呼叫上一輪的 cleanup,再執行新城市的 setup。
setup 可以回傳 cleanup,在示意片段中的 return () => { ... },就是把清理函式交給 React,並沒有在這一行執行呼叫。
看板元件從畫面移除時,也會呼叫最後一輪的 cleanup,每輪清理使用的是當次建立的資料,台北的清理不會拿高雄的新控制器來取消。
初次顯示台北 -> 台北 setup
改成高雄    -> 台北 cleanup -> 高雄 setup
關閉看板    -> 高雄 cleanup
元件裡會看到兩種 return,用途不同:
| 段落 | 回傳內容 | 用途 |
|---|---|---|
| Effect 的 setup 裡 | cleanup 函式 | 交代如何停止或解除這輪工作 |
| 元件函式裡 | JSX | 描述這次畫面要顯示什麼 |
清理方式要依實際建立的外部工作處理,例如今天的天氣查詢會使用 AbortController 是瀏覽器提供的取消控制器,可以停止尚未完成的 fetch 請求。
像是台北的查詢還沒完成就改選高雄,cleanup 會用它取消台北的舊查詢,並檢查是否已取消,避免已清理的工作更新結果,再由新的 setup 開始高雄查詢。
| 方法 | 用途 |
|---|---|
new AbortController() |
建立這一輪的取消控制器 |
controller.signal |
傳給 fetch,讓請求接收取消通知 |
controller.abort() |
在 cleanup 中呼叫,取消這輪尚未完成的請求 |
React 會負責呼叫 cleanup,裡面的 abort() 才是負責實際取消請求。
收到天氣後更新查詢 state,會讓內層元件重新渲染,輸入行程備註也可能讓外層與內層重新渲染,但重新渲染與重新同步是兩件事。
今天的依賴只有 [cityId],當城市沒有改變就不會因為這些更新並重新 setup,這讓查詢結果能更新畫面,備註能正常輸入,不必每次都取得新的天氣資料。
Effect 通常是用來讓元件的資料或狀態配合 React 以外的系統:
| 用途 | 範例 | 配合處理的清理 |
|---|---|---|
| 取得外部資料 | 依城市向天氣 API 查詢 | 取消未完成的請求,或忽略已不需要的結果 |
| 建立外部事件訂閱 | 監聽瀏覽器視窗或第三方服務的事件 | 解除這輪建立的監聽或訂閱 |
| 同步第三方工具 | 讓地圖或播放器配合目前設定 | 依工具 API 解除訂閱或釋放建立的資源 |
回到天氣看板,天氣查詢需要配合所選城市,所以使用 Effect。城市名稱與備註摘要則直接從現有資料計算,不需要 Effect。
了解 Effect 後,接著比較各元件應放的內容與位置。
| 動作 | 位置 | 範例 |
|---|---|---|
| 依目前資料計算畫面 | 渲染時的純計算 | 找出城市名稱、整理時間文字 |
| 回應操作 | 事件處理函式 | 選擇城市、輸入備註、開關看板 |
| 隨目前資料與元件存在情況同步外部系統 | Effect | 依城市查詢 API,停止不需要的查詢 |
城市名稱來自固定清單,渲染時直接找出即可,選單中的 onChange 回應使用者操作,把新城市交給 state setter,當需要與外部 API 同步的查詢,再由內層元件的 Effect 處理。
選單事件只更新城市 state,查詢資料會隨著 WeatherPanel 的城市 prop 同步,即使城市將來由網址或其他元件改變,內層元件也能依目前資料查詢。
昨天的聚焦按鈕只要回應那次點擊,所以在事件中呼叫 focus(),今天的天氣區塊需要配合目前城市與元件是否存在,才會把開始與停止查詢交給 Effect。
專案建立的方式就參考前面兩次的指令吧,命名為 weather-dashboard。
建立一個 practice 目錄在 app 底下:
| 檔案 | 用途 |
|---|---|
app/practice/weather.ts |
城市清單、查詢網址、回傳格式檢查 |
app/practice/weather-dashboard.tsx |
外層選擇設定、內層查詢與清理 |
也記得修改 app/routes/home.tsx,把 <WeatherDashboard /> 也加入。
首先是能取得天氣資訊的 API,這次使用的 Open-Meteo Forecast API,是非商業可用公開端點,不需 API key。
建立一份固定清單城市座標,把台北、台中、高雄放進去。
接著是在 weather.ts 建立查詢方法 buildWeatherUrl,主要參數如下:
| 參數 | 設定 |
|---|---|
latitude、longitude |
所選城市的查詢座標 |
current |
temperature_2m,wind_speed_10m |
temperature_unit |
基礎版固定 celsius |
wind_speed_unit |
kmh |
timezone |
Asia/Taipei |
回應會包含 current 數值、時間以及 current_units 的單位。
再建立一個 readWeatherData 檢查必要欄位後轉成畫面資料,因為 response.json() 不會自動驗證格式,TypeScript 型別也不能代替實際檢查。
const [cityId, setCityId] = useState<CityId>("taipei");
const [showWeather, setShowWeather] = useState(true);
const [note, setNote] = useState("");
在外層元件 WeatherDashboard,分別用 state 保存城市、看板開關與備註。
在內層元件WeatherPanel,分別對應,接收城市、保存查詢結果。
整個動作會是:
城市選單事件 -> 更新 cityId -> 傳入新的 prop
  -> 清理上一輪 Effect -> 新 setup 建立控制器
  -> fetch -> 檢查 HTTP 狀態 -> 讀取 JSON
  -> 更新 success 或 error -> 顯示結果
現在來看 fetch 到顯示結果前的片段:
// 示意片段
async function loadWeather() {
  try {
    const response = await fetch(buildWeatherUrl(cityId), {
      signal: controller.signal,
    });
    if (!response.ok) {
      throw new Error(`天氣查詢失敗(HTTP ${response.status}),請稍後再試。`);
    }

    const json: unknown = await response.json();
    if (controller.signal.aborted) return;

    const data = readWeatherData(json);
    setWeather({ status: "success", requestKey, data });
    console.log("[天氣 success]", requestKey);
  } catch (error) {
    if (controller.signal.aborted) return;

    setWeather({
      status: "error",
      requestKey,
      errorMessage: error instanceof Error ? error.message : "暫時無法取得天氣,請稍後再試。",
    });
    console.log("[天氣 error]", requestKey);
  }
}

void loadWeather();
整個 loadWeather 是 Effect 裡的非同步函式,setup 本身是普通函式,只需要回傳 cleanup 就好,不能用 useEffect(async () => ...),這樣會回傳 Promise。
await 等待 fetch 回應,但因為 HTTP 404 或 500 不會讓 fetch 進 catch,所以 response.ok 檢查沒問題之後再用 response.json() 讀內容。
weather.status 區分 loading、success、error,結果附帶 requestKey 並以城市 ID 識別,渲染只呈現目前查詢的資料。當城市變動且下一輪 Effect 還沒設定 loading 時,不會把上個城市的氣溫掛在新標題下。
前面提到 cleanup 會呼叫 abort(),取消還在等待的請求與回應內容讀取,因為已取消的 signal 不能重用到下一輪,我們每一輪 setup 都要建立新的 AbortController,讓 loadWeather() 裡的 fetch 使用當次建立的控制器 signal:
// 示意片段
const controller = new AbortController();
// 在 loadWeather() 裡
const response = await fetch(buildWeatherUrl(cityId), {
  signal: controller.signal,
});
loadWeather() 的成功處理與 catch 分支,都會先執行這個判斷:
if (controller.signal.aborted) return;
已清理的工作會直接結束,不再寫入結果,也不會把主動取消顯示成失敗,因為取消不保證會撤回對查詢天氣 API 伺服器已收到的請求,這樣也確保後續的 state 更新不會被取消的查詢覆蓋。
清理函式交給 React,在這輪依賴改變或元件移除時呼叫:
// 示意片段
return () => {
  controller.abort();
  console.log("[天氣 cleanup]", requestKey);
};
控制器與 cleanup 在同一次的 setup 函式中建立,cleanup 能透過 closure 取得當輪控制器的參照並執行取消請求。
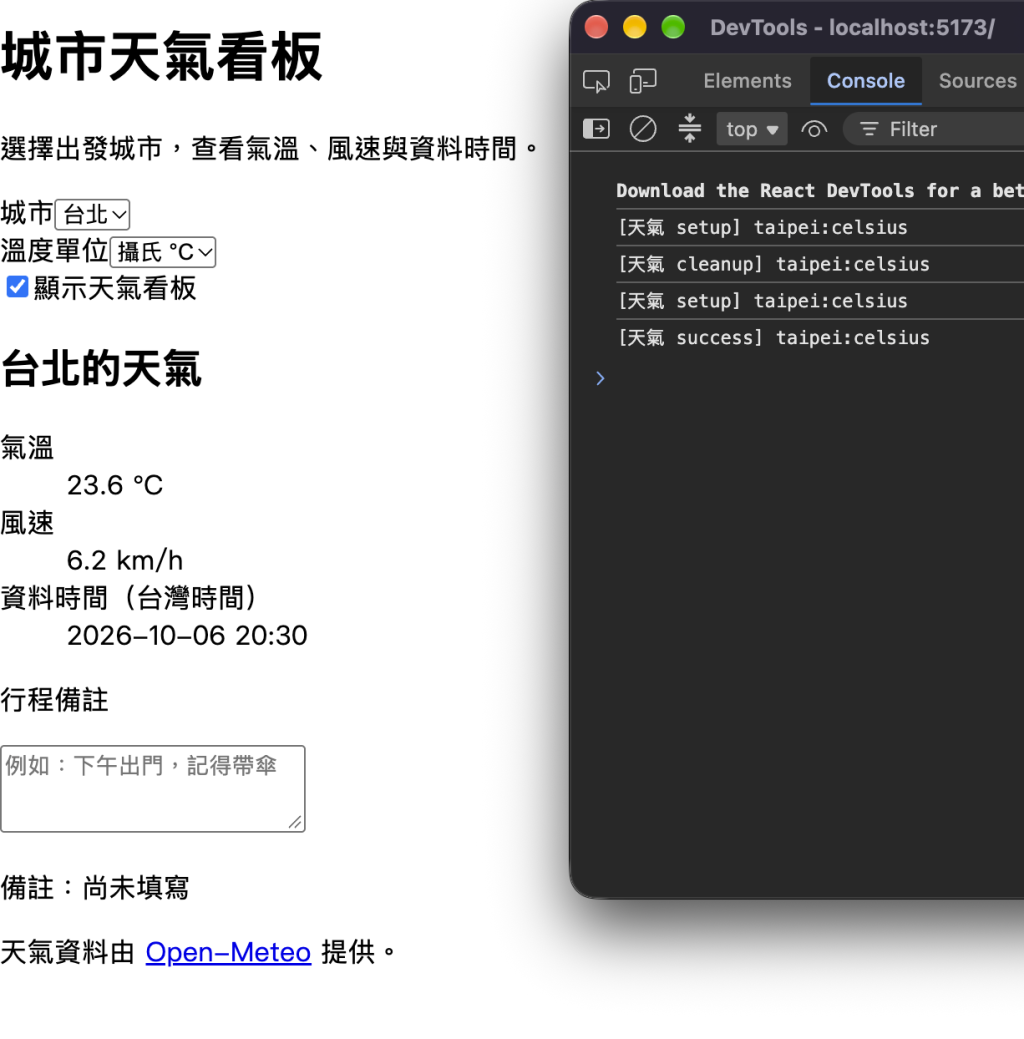
正常連線下應該會取得台北的氣象資料。
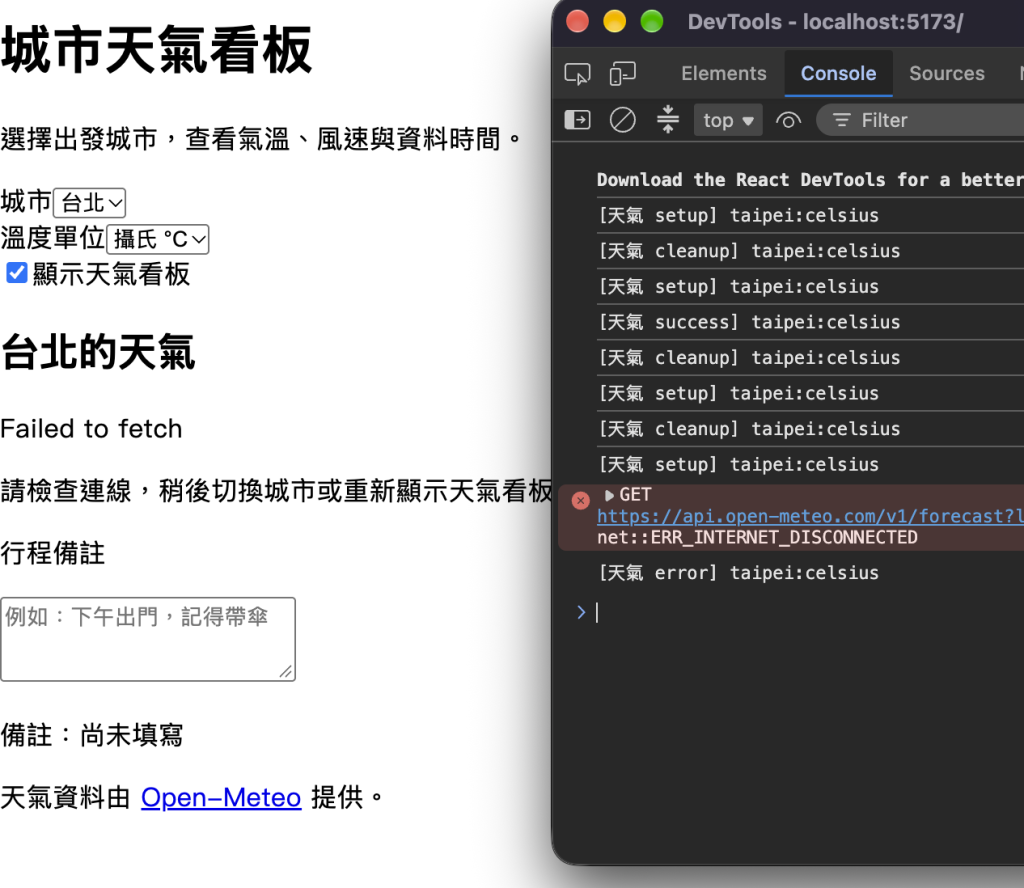
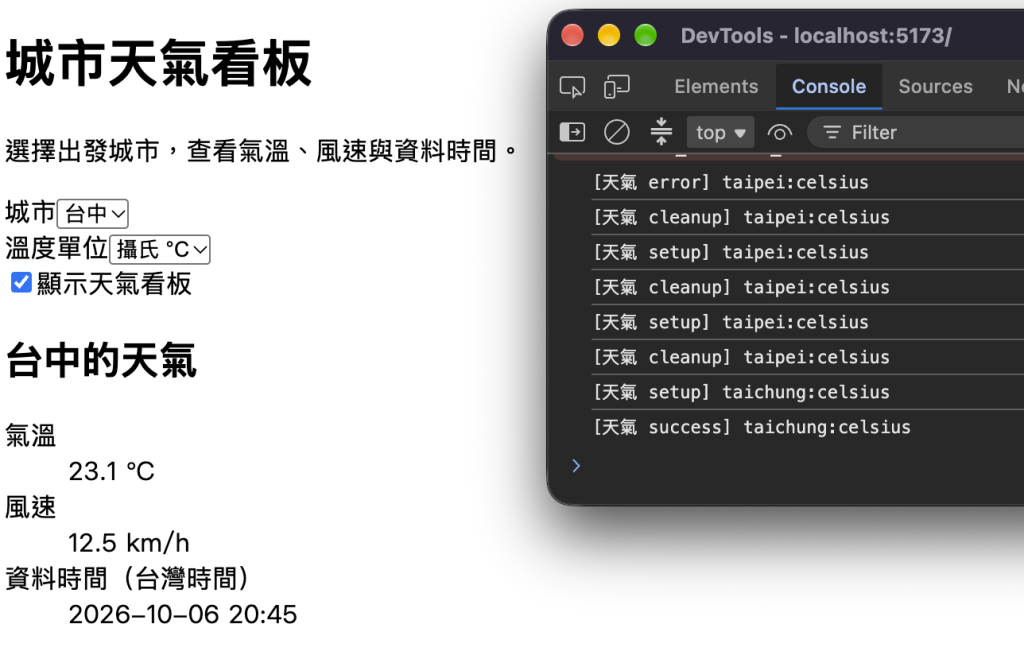
從 console 可以觀察到還沒載入前,切換城市會直接 cleanup 之前的選擇。
說明一下,在資料載入完成之前取消,console 內會直接出現 cleanup 的事件,cleanup 紀錄表示清理函式已執行。
所以畫面上會是看板已關閉。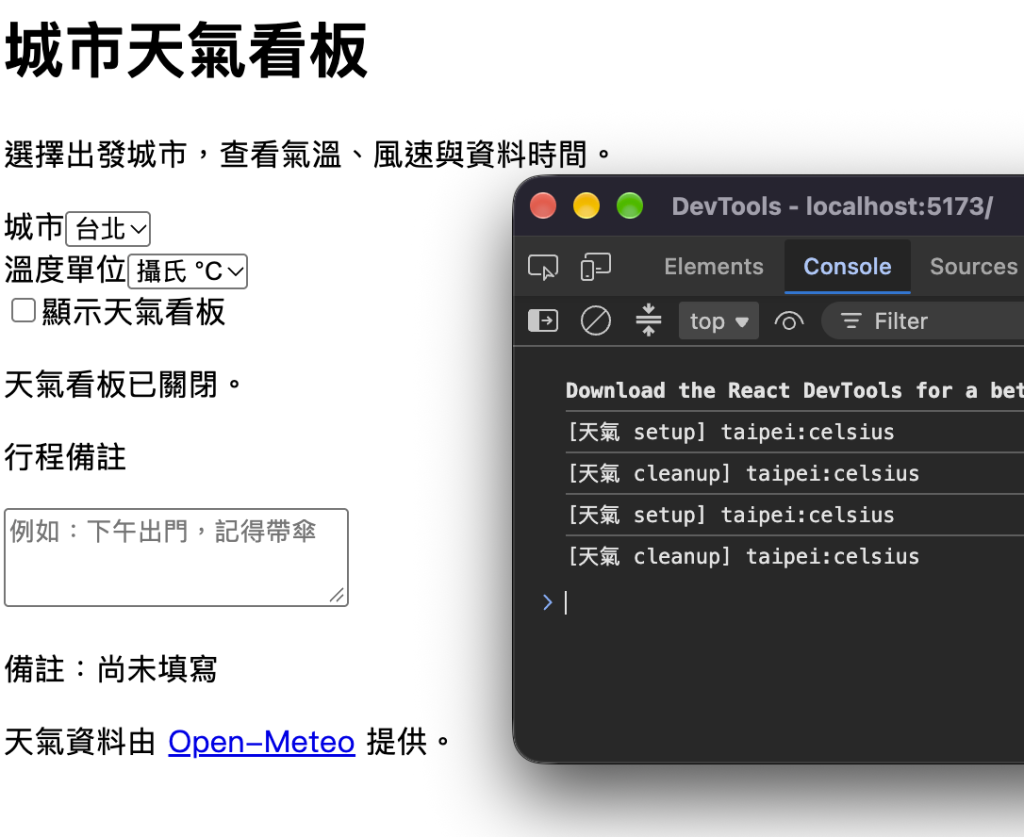
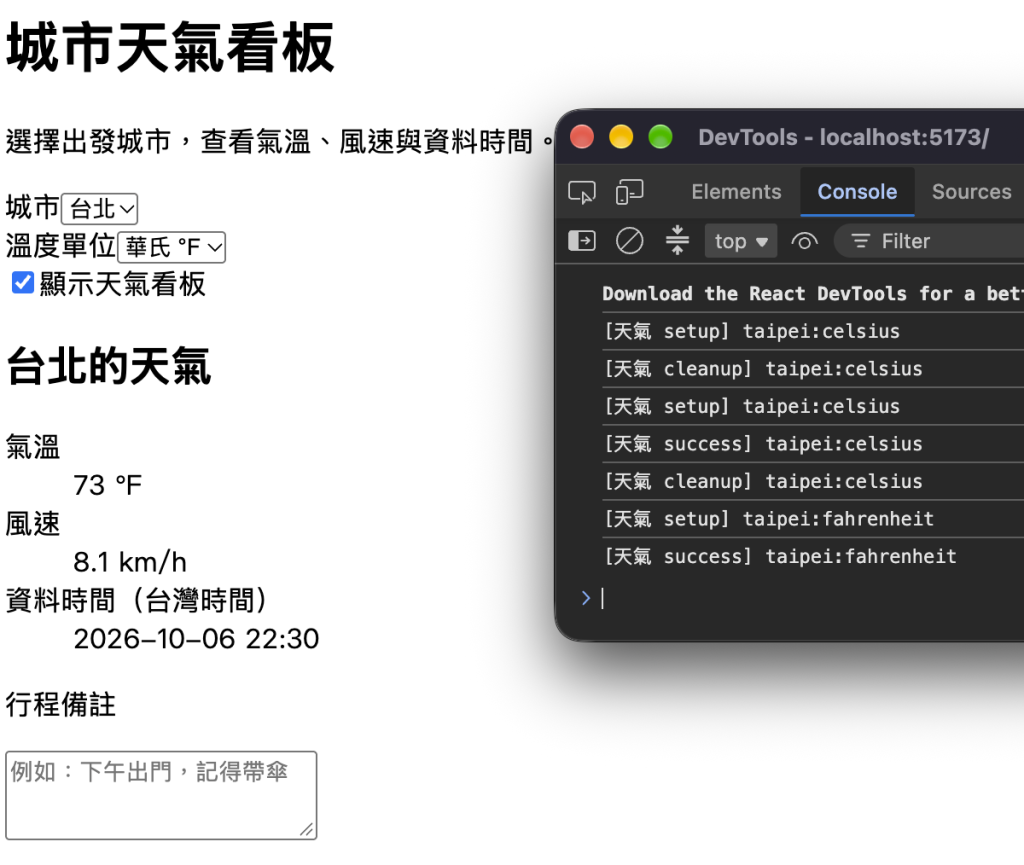
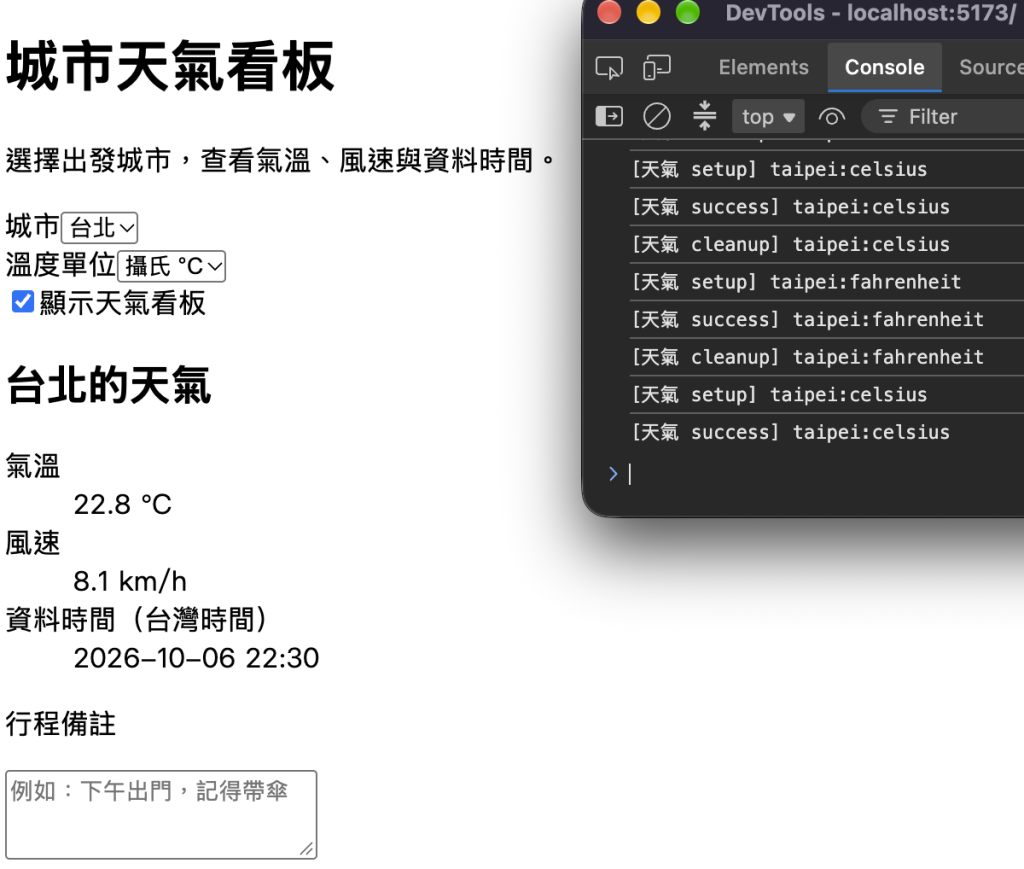
需求改成:「城市保持不變,能切換攝氏/華氏取得對應單位資料。」
首先在 weather-dashboard.tsx 從 ./weather 的 import 新增:
type TemperatureUnit,
在 WeatherDashboard 的 cityId Hook 下一行新增:
const [temperatureUnit, setTemperatureUnit] = useState<TemperatureUnit>("celsius");
在「查詢設定」的城市 <div> 後,顯示勾選框前新增:
// 示意片段
<div>
  <label htmlFor="temperature-unit">溫度單位</label>
  <select
    id="temperature-unit"
    value={temperatureUnit}
    onChange={(event) => setTemperatureUnit(event.target.value as TemperatureUnit)}
  >
    <option value="celsius">攝氏 °C</option>
    <option value="fahrenheit">華氏 °F</option>
  </select>
</div>
選項固定兩個單位,值只會是型別列出的兩個字串,要注意 as 是指 TypeScript 的型別宣告。
將 <WeatherPanel cityId={cityId} /> 替換為:
<WeatherPanel cityId={cityId} temperatureUnit={temperatureUnit} />
把內層函式的開頭替換為:
function WeatherPanel({
  cityId,
  temperatureUnit,
}: {
  cityId: CityId;
  temperatureUnit: TemperatureUnit;
}) {
| 位置 | 修改 |
|---|---|
Effect 中的 requestKey |
改成包含城市與單位的字串,見下方片段 |
buildWeatherUrl(cityId) |
buildWeatherUrl(cityId, temperatureUnit) |
Effect 最後的 [cityId] |
[cityId, temperatureUnit] |
渲染區的 currentKey |
改成相同格式的字串,見下方片段 |
以及兩個查詢身分的位置都要改:
// Effect 裡
const requestKey = `${cityId}:${temperatureUnit}`;

// 渲染區,Effect 外面
const currentKey = `${cityId}:${temperatureUnit}`;
因為 Effect 讀取溫度設定,需要把設定也列入依賴,切換時先 cleanup,再用新設定查詢,在請求身分上也包含單位,避免會短暫顯示上一次設定的結果。
畫面會直接使用 API 回傳的溫度單位和數值,風速固定 km/h,資料時間使用台灣時間。
如果沒有做清理:
return () => {
  //controller.abort();
  console.log("[天氣 cleanup]", requestKey);
};
一樣保留 signal、aborted 判斷與 Log,設定慢速連線後完整重新載入,在請求完成前關閉看板。
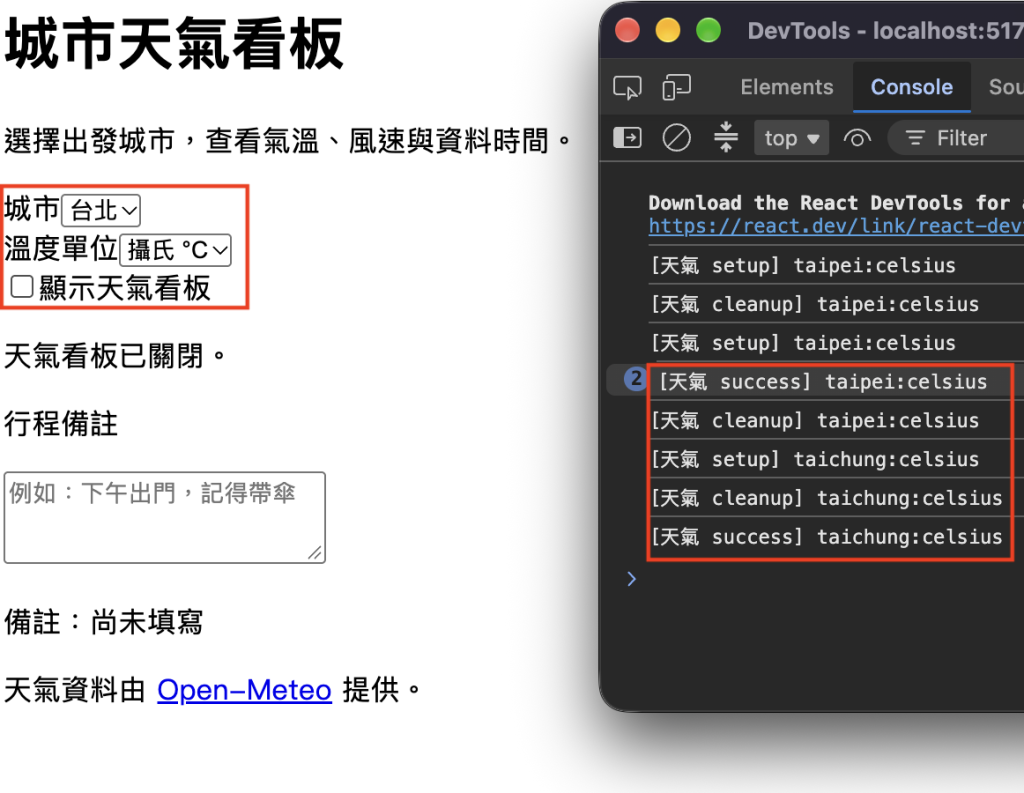
觀察到印出 cleanup,但舊請求繼續完成,之後還可能印出 success,表示區塊雖然移除,但外部工作沒有停止。
requestKey 可避免將不相符資料掛在目前城市下,卻不能取消網路工作,顯示資料的檢查與資源清理,各有各的責任。
還原 controller.abort(),完整重新載入,重做相同操作,等待中的舊請求會被取消。
cleanup 也依賴改變時執行,不只是離開網頁時,當停止這輪仍在進行的工作,不能撤回伺服器已完成的處理。
以下是完整weather-dashboard.tsx。
import { useEffect, useState } from "react";
import {
  CITIES,
  buildWeatherUrl,
  getCity,
  readWeatherData,
  type CityId,
  type WeatherData,
} from "./weather";

type WeatherState = { requestKey: string } & (
  | { status: "loading" }
  | { status: "success"; data: WeatherData }
  | { status: "error"; errorMessage: string }
);

function WeatherPanel({ cityId }: { cityId: CityId }) {
  const [weather, setWeather] = useState<WeatherState>({
    status: "loading",
    requestKey: "",
  });

  useEffect(() => {
    const controller = new AbortController();
    const requestKey = cityId;
    setWeather({ status: "loading", requestKey });
    console.log("[天氣 setup]", requestKey);

    async function loadWeather() {
      try {
        const response = await fetch(buildWeatherUrl(cityId), {
          signal: controller.signal,
        });
        if (!response.ok) {
          throw new Error(`天氣查詢失敗(HTTP ${response.status}),請稍後再試。`);
        }

        const json: unknown = await response.json();
        if (controller.signal.aborted) return;

        const data = readWeatherData(json);
        setWeather({ status: "success", requestKey, data });
        console.log("[天氣 success]", requestKey);
      } catch (error) {
        if (controller.signal.aborted) return;

        setWeather({
          status: "error",
          requestKey,
          errorMessage: error instanceof Error ? error.message : "暫時無法取得天氣,請稍後再試。",
        });
        console.log("[天氣 error]", requestKey);
      }
    }

    void loadWeather();

    return () => {
      controller.abort();
      console.log("[天氣 cleanup]", requestKey);
    };
  }, [cityId]);

  const city = getCity(cityId);
  const currentKey = cityId;
  const visibleWeather: WeatherState = weather.requestKey === currentKey
    ? weather
    : { status: "loading", requestKey: currentKey };

  return (
    <section
      aria-labelledby="weather-heading"
      aria-busy={visibleWeather.status === "loading"}
    >
      <h2 id="weather-heading">{city.name}的天氣</h2>
      {visibleWeather.status === "loading" ? (
        <p role="status">正在載入{city.name}的天氣…</p>
      ) : null}
      {visibleWeather.status === "error" ? (
        <div role="alert">
          <p>{visibleWeather.errorMessage}</p>
          <p>請檢查連線,稍後切換城市或重新顯示天氣看板。</p>
        </div>
      ) : null}
      {visibleWeather.status === "success" ? (
        <dl>
          <div>
            <dt>氣溫</dt>
            <dd>{visibleWeather.data.temperature} {visibleWeather.data.temperatureUnit}</dd>
          </div>
          <div>
            <dt>風速</dt>
            <dd>{visibleWeather.data.windSpeed} {visibleWeather.data.windSpeedUnit}</dd>
          </div>
          <div>
            <dt>資料時間(台灣時間)</dt>
            <dd>{visibleWeather.data.time.replace("T", " ")}</dd>
          </div>
        </dl>
      ) : null}
    </section>
  );
}

export function WeatherDashboard() {
  const [cityId, setCityId] = useState<CityId>("taipei");
  const [showWeather, setShowWeather] = useState(true);
  const [note, setNote] = useState("");

  return (
    <main>
      <header>
        <p>第四階段 · DAY 22</p>
        <h1>城市天氣看板</h1>
        <p>選擇出發城市,查看氣溫、風速與資料時間。</p>
      </header>

      <section aria-label="查詢設定">
        <div>
          <label htmlFor="city">城市</label>
          <select
            id="city"
            value={cityId}
            onChange={(event) => setCityId(event.target.value as CityId)}
          >
            {CITIES.map((city) => (
              <option key={city.id} value={city.id}>{city.name}</option>
            ))}
          </select>
        </div>
        <label>
          <input
            type="checkbox"
            checked={showWeather}
            onChange={(event) => setShowWeather(event.target.checked)}
          />
          顯示天氣看板
        </label>
      </section>

      {showWeather ? (
        <WeatherPanel cityId={cityId} />
      ) : <p>天氣看板已關閉。</p>}

      <section aria-label="行程備註">
        <p><label htmlFor="trip-note">行程備註</label></p>
        <textarea
          id="trip-note"
          rows={3}
          value={note}
          onChange={(event) => setNote(event.target.value)}
          placeholder="例如:下午出門,記得帶傘"
        />
        <p>備註:{note || "尚未填寫"}</p>
      </section>

      <footer>
        <p>天氣資料由 <a href="https://open-meteo.com/">Open-Meteo</a> 提供。</p>
        <p>目前天氣依據氣象模型資料,時間為資料時間。</p>
      </footer>
    </main>
  );
}
用來做資料處理的 weather.tsx:
export const CITIES = [
  { id: "taipei", name: "台北", latitude: 25.033, longitude: 121.5654 },
  { id: "taichung", name: "台中", latitude: 24.1477, longitude: 120.6736 },
  { id: "kaohsiung", name: "高雄", latitude: 22.6273, longitude: 120.3014 },
] as const;

export type CityId = (typeof CITIES)[number]["id"];
export type TemperatureUnit = "celsius" | "fahrenheit";

export type WeatherData = {
  temperature: number;
  temperatureUnit: string;
  windSpeed: number;
  windSpeedUnit: string;
  time: string;
};

export function getCity(cityId: CityId) {
  return CITIES.find((city) => city.id === cityId) ?? CITIES[0];
}

export function buildWeatherUrl(
  cityId: CityId,
  temperatureUnit: TemperatureUnit = "celsius",
) {
  const city = getCity(cityId);
  const params = new URLSearchParams({
    latitude: String(city.latitude),
    longitude: String(city.longitude),
    current: "temperature_2m,wind_speed_10m",
    temperature_unit: temperatureUnit,
    wind_speed_unit: "kmh",
    timezone: "Asia/Taipei",
  });

  return `https://api.open-meteo.com/v1/forecast?${params}`;
}

export function readWeatherData(value: unknown): WeatherData {
  const data = value as {
    current?: {
      temperature_2m?: unknown;
      wind_speed_10m?: unknown;
      time?: unknown;
    };
    current_units?: {
      temperature_2m?: unknown;
      wind_speed_10m?: unknown;
    };
  } | null;
  const current = data?.current;
  const units = data?.current_units;

  if (
    typeof current?.temperature_2m !== "number" ||
    !Number.isFinite(current.temperature_2m) ||
    typeof current.wind_speed_10m !== "number" ||
    !Number.isFinite(current.wind_speed_10m) ||
    typeof current.time !== "string" ||
    typeof units?.temperature_2m !== "string" ||
    typeof units.wind_speed_10m !== "string"
  ) {
    throw new Error("天氣資料格式不符合預期,請稍後重新查詢。");
  }

  return {
    temperature: current.temperature_2m,
    temperatureUnit: units.temperature_2m,
    windSpeed: current.wind_speed_10m,
    windSpeedUnit: units.wind_speed_10m,
    time: current.time,
  };
}



 iThome鐵人賽
 看影片追技術