請問有用Tensorflow的大大
以下是我的物件辨識程式碼
該如何讓我飛機照片得到正確的標籤
(問題)程式碼只能讀取2張圖片,該怎麼修改可以讀取我全部的圖片檔?
#!/usr/bin/env python
# coding: utf-8
###PATH_TO_LABELS = 'D:\TensorFlow\workspace\training_demo\annotations\label_map.pbtxt'

###IMAGE_PATHS=[]
###myBasePath = r'D:\TensorFlow\workspace\training_demo\images\test\RGB'
###myFileNames = ['C130_Test_1.jpg','C130_test_2.jpg']
"""
Object Detection From TF1 Saved Model
=====================================
"""

# %%
# This demo will take you through the steps of running an "out-of-the-box" TensorFlow 1 compatible
# detection model on a collection of images. More specifically, in this example we will be using
# the `Saved Model Format <https://www.tensorflow.org/guide/saved_model>`__ to load the model.

# %%
# Download the test images
# ~~~~~~~~~~~~~~~~~~~~~~~~
# First we will download the images that we will use throughout this tutorial. The code snippet
# shown bellow will download the test images from the `TensorFlow Model Garden <https://github.com/tensorflow/models/tree/master/research/object_detection/test_images>`_
# and save them inside the ``data/images`` folder.
import os
os.environ['TF_CPP_MIN_LOG_LEVEL'] = '2'    # Suppress TensorFlow logging (1)
import pathlib
import tensorflow as tf

tf.get_logger().setLevel('ERROR')           # Suppress TensorFlow logging (2)

# Enable GPU dynamic memory allocation
gpus = tf.config.experimental.list_physical_devices('GPU')
for gpu in gpus:
    tf.config.experimental.set_memory_growth(gpu, True)

def download_images():
    base_url = 'https://raw.githubusercontent.com/tensorflow/models/master/research/object_detection/test_images/'
    filenames = ['image1.jpg', 'image2.jpg']
    image_paths = []
    for filename in filenames:
        image_path = tf.keras.utils.get_file(fname=filename,
                                            origin=base_url + filename,
                                            untar=False)
        image_path = pathlib.Path(image_path)
        image_paths.append(str(image_path))
    return image_paths

#IMAGE_PATHS = download_images()
IMAGE_PATHS=[]
myBasePath = r'D:\TensorFlow\workspace\training_demo\images\test\RGB'


myFileNames = ['P3C_Test_1.jpg','P3C_Test_2.jpg']
for i in myFileNames:
    IMAGE_PATHS.append(os.path.join(myBasePath, i))

# %%
# Download the model
# ~~~~~~~~~~~~~~~~~~
# The code snippet shown below is used to download the pre-trained object detection model we shall
# use to perform inference. The particular detection algorithm we will use is the
# `SSD MobileNet v2`. More models can be found in the `TensorFlow 1 Detection Model Zoo <https://github.com/tensorflow/models/blob/master/research/object_detection/g3doc/tf1_detection_zoo.md>`_.
# To use a different model you will need the URL name of the specific model. This can be done as
# follows:
#
# 1. Right click on the `Model name` of the model you would like to use;
# 2. Click on `Copy link address` to copy the download link of the model;
# 3. Paste the link in a text editor of your choice. You should observe a link similar to ``download.tensorflow.org/models/object_detection/XXXXXXXXX.tar.gz``;
# 4. Copy the ``XXXXXXXXX`` part of the link and use it to replace the value of the ``MODEL_NAME`` variable in the code shown below;
#
# For example, the download link for the model used below is: ``download.tensorflow.org/models/object_detection/ssd_mobilenet_v2_coco_2018_03_29.tar.gz``

# Download and extract model
def download_model(model_name):
    base_url = 'http://download.tensorflow.org/models/object_detection/'
    model_file = model_name + '.tar.gz'
    model_dir = tf.keras.utils.get_file(fname=model_name,
                                        origin=base_url + model_file,
                                        untar=True)
    return str(model_dir)
#這邊修想要的模型,就可以去下載模型
MODEL_NAME = 'faster_rcnn_resnet101_coco_2018_01_28'
PATH_TO_MODEL_DIR = download_model(MODEL_NAME)

# %%
# Download the labels
# ~~~~~~~~~~~~~~~~~~~
# The coode snippet shown below is used to download the labels file (.pbtxt) which contains a list
# of strings used to add the correct label to each detection (e.g. person). Since the pre-trained
# model we will use has been trained on the COCO dataset, we will need to download the labels file
# corresponding to this dataset, named ``mscoco_label_map.pbtxt``. A full list of the labels files
# included in the TensorFlow Models Garden can be found `here <https://github.com/tensorflow/models/tree/master/research/object_detection/data>`__.

# Download labels file
'''
#以下是原本的網路上的label資料,我先用'引號不去使用,我改用自己label檔案的路徑
def download_labels(filename):
    base_url = 'https://raw.githubusercontent.com/tensorflow/models/master/research/object_detection/data/'
    label_dir = tf.keras.utils.get_file(fname=filename,
                                        origin=base_url + filename,
                                        untar=False)
    label_dir = pathlib.Path(label_dir)
    return str(label_dir)

LABEL_FILENAME = 'mscoco_label_map.pbtxt'
PATH_TO_LABELS = download_labels(LABEL_FILENAME)
'''


PATH_TO_LABELS = r'D:\TensorFlow\workspace\training_demo\annotations\label_map.pbtxt'

# %%
# Load the model
# ~~~~~~~~~~~~~~
# Next we load the downloaded model
import time
from object_detection.utils import label_map_util
from object_detection.utils import visualization_utils as viz_utils

PATH_TO_SAVED_MODEL = PATH_TO_MODEL_DIR + "/saved_model"

print('Loading model...', end='')
start_time = time.time()

# Load saved model and build the detection function
model = tf.saved_model.load(PATH_TO_SAVED_MODEL)
detect_fn = model.signatures['serving_default']

end_time = time.time()
elapsed_time = end_time - start_time
print('Done! Took {} seconds'.format(elapsed_time))

# %%
# Load label map data (for plotting)
# ~~~~~~~~~~~~~~~~~~~~~~~~~~~~~~~~~~~
# Label maps correspond index numbers to category names, so that when our convolution network
# predicts `5`, we know that this corresponds to `airplane`.  Here we use internal utility
# functions, but anything that returns a dictionary mapping integers to appropriate string labels
# would be fine.


category_index = label_map_util.create_category_index_from_labelmap(PATH_TO_LABELS,
                                                                    use_display_name=True)

# %%
# Putting everything together
# ~~~~~~~~~~~~~~~~~~~~~~~~~~~
# The code shown below loads an image, runs it through the detection model and visualizes the
# detection results, including the keypoints.
#
# Note that this will take a long time (several minutes) the first time you run this code due to
# tf.function's trace-compilation --- on subsequent runs (e.g. on new images), things will be
# faster.
#
# Here are some simple things to try out if you are curious:
#
# * Modify some of the input images and see if detection still works. Some simple things to try out here (just uncomment the relevant portions of code) include flipping the image horizontally, or converting to grayscale (note that we still expect the input image to have 3 channels).
# * Print out `detections['detection_boxes']` and try to match the box locations to the boxes in the image.  Notice that coordinates are given in normalized form (i.e., in the interval [0, 1]).
# * Set ``min_score_thresh`` to other values (between 0 and 1) to allow more detections in or to filter out more detections.
import numpy as np
from PIL import Image
import matplotlib.pyplot as plt
import warnings
warnings.filterwarnings('ignore')   # Suppress Matplotlib warnings

def load_image_into_numpy_array(path):
    """Load an image from file into a numpy array.

    Puts image into numpy array to feed into tensorflow graph.
    Note that by convention we put it into a numpy array with shape
    (height, width, channels), where channels=3 for RGB.

    Args:
      path: the file path to the image

    Returns:
      uint8 numpy array with shape (img_height, img_width, 3)
    """
    return np.array(Image.open(path))


for image_path in IMAGE_PATHS:

    print('Running inference for {}... '.format(image_path), end='')

    image_np = load_image_into_numpy_array(image_path)

    # Things to try:
    # Flip horizontally
    # image_np = np.fliplr(image_np).copy()

    # Convert image to grayscale
    # image_np = np.tile(
    #     np.mean(image_np, 2, keepdims=True), (1, 1, 3)).astype(np.uint8)

    # The input needs to be a tensor, convert it using `tf.convert_to_tensor`.
    input_tensor = tf.convert_to_tensor(image_np)
    # The model expects a batch of images, so add an axis with `tf.newaxis`.
    input_tensor = input_tensor[tf.newaxis, ...]

    detections = detect_fn(input_tensor)

    # All outputs are batches tensors.
    # Convert to numpy arrays, and take index [0] to remove the batch dimension.
    # We're only interested in the first num_detections.
    num_detections = int(detections.pop('num_detections'))
    detections = {key: value[0, :num_detections].numpy()
                  for key, value in detections.items()}
    detections['num_detections'] = num_detections

    # detection_classes should be ints.
    detections['detection_classes'] = detections['detection_classes'].astype(np.int64)

    image_np_with_detections = image_np.copy()

    viz_utils.visualize_boxes_and_labels_on_image_array(
          image_np_with_detections,
          detections['detection_boxes'],
          detections['detection_classes'],
          detections['detection_scores'],
          category_index,
          use_normalized_coordinates=True,
          max_boxes_to_draw=200,
          min_score_thresh=.30,
          agnostic_mode=False)

#eps, jpeg, jpg, pdf, pgf, png, ps, raw, rgba, svg, svgz, tif, tiff)

    plt.figure()
    plt.imshow(image_np_with_detections)
    plt.savefig(f'{image_path}.test101_2.png')
    print('Done')
plt.show()

# sphinx_gallery_thumbnail_number = 2
已邀請的邦友 {{ invite_list.length }}/5
因為我忽然想起, 在 這裡 看到 froce大 的 拿新版的object dection範例來改 (...) 回應內容, 忽然好奇有沒有你用的範例之 TF-v2 版本。
結果用程式碼比較關鍵性的字串去 Google 一下, 發現 這裡 有你的範例之 TF-v1 (Object Detection From TF1 Saved Model) 與 TF-v2 (Object Detection From TF2 Saved Model) 版本。
好奇問下,你安裝的 Tensorflow 是 v1 還是 v2?
若你是安裝 Tensorflow v2, 為何 TensorFlow Models 與範例不用 v2 版本?
我用 WinMerge 對照 範例v1 與 範例v2 程式碼, 差異性不大啊。
( 而且感覺問題會更少? 吧?? 忽然有種 froce大 點出盲點了我卻無法突破的感覺~? )
你在你的 Python-Script 內提到:
#(問題2)讀書第一個檔案都是 整片空白???
這是因為,你需要把你的 Python-Script 的:
plt.savefig(f'{image_path}.test101_2.png')
plt.figure()
plt.imshow(image_np_with_detections)
改為:
    plt.figure() ## 建立圖形(figure);
    plt.imshow(image_np_with_detections) ## 將資料顯示為影像;
    plt.savefig(f'{image_path}.test101_2.png') ## 多這行而已: 將圖形存入檔案;
( 你沒注意到命令「順序」不同? 還是放錯檔案?? )
以下,是加入 將目錄內的所有檔案作為輸入檔案、 輸出檔案至輸出用目錄 與 修正第一個檔案是空白 的程式碼:
( 想知道差異,可用 WinMerge 能做差異對照之類的程式(或網站)去比對。 )
#!/usr/bin/env python
# coding: utf-8
###PATH_TO_LABELS = 'D:\TensorFlow\workspace\training_demo\annotations\label_map.pbtxt'

###IMAGE_PATHS=[]
###myBasePath = r'D:\TensorFlow\workspace\training_demo\images\test\RGB'
###myFileNames = ['C130_Test_1.jpg','C130_test_2.jpg']
"""
Object Detection From TF1 Saved Model
=====================================
"""

# %%
# This demo will take you through the steps of running an "out-of-the-box" TensorFlow 1 compatible
# detection model on a collection of images. More specifically, in this example we will be using
# the `Saved Model Format <https://www.tensorflow.org/guide/saved_model>`__ to load the model.

# %%
# Download the test images
# ~~~~~~~~~~~~~~~~~~~~~~~~
# First we will download the images that we will use throughout this tutorial. The code snippet
# shown bellow will download the test images from the `TensorFlow Model Garden <https://github.com/tensorflow/models/tree/master/research/object_detection/test_images>`_
# and save them inside the ``data/images`` folder.
import os
os.environ['TF_CPP_MIN_LOG_LEVEL'] = '2'    # Suppress TensorFlow logging (1)
import pathlib
import tensorflow as tf

tf.get_logger().setLevel('ERROR')           # Suppress TensorFlow logging (2)

# Enable GPU dynamic memory allocation
gpus = tf.config.experimental.list_physical_devices('GPU')
for gpu in gpus:
    tf.config.experimental.set_memory_growth(gpu, True)

def download_images():
    base_url = 'https://raw.githubusercontent.com/tensorflow/models/master/research/object_detection/test_images/'
    filenames = ['image1.jpg', 'image2.jpg']
    image_paths = []
    for filename in filenames:
        image_path = tf.keras.utils.get_file(fname=filename,
                                            origin=base_url + filename,
                                            untar=False)
        image_path = pathlib.Path(image_path)
        image_paths.append(str(image_path))
    return image_paths

#IMAGE_PATHS = download_images()
IMAGE_PATHS=[]
myBasePath = r'D:\TensorFlow\workspace\training_demo\images\test\RGB'
## myOutputPath: 用指定輸出檔案用目錄,不然會跟輸入用檔案混雜;
myOutputPath = os.path.join(myBasePath, 'Output')
## 亦可用後面指令指派目錄位置: myOutputPath = r'D:\TensorFlow\workspace\training_demo\images\test\RGB_Out'
"""
#(問題1)下面程式只能讀取兩張圖片,該怎樣能讀取全部???
#(問題2)讀書第一個檔案都是 整片空白???
myFileNames = ['P3C_Test_1.jpg','P3C_Test_2.jpg']
"""
##
def getDirFiles(path):
    """ 取得目錄的所有檔案之列表; """
    return [ i for i in os.listdir(path) if os.path.isfile(os.path.join(path, i)) ]
##
for i in getDirFiles(myBasePath):
    IMAGE_PATHS.append(os.path.join(myBasePath, i))
## 重建輸出檔案用目錄;
import shutil
def reMkDir(path):
    """ 重建(刪除並建立)目錄; """
    if os.path.exists(path): shutil.rmtree(path)
    os.makedirs(path, exist_ok = True)
reMkDir(myOutputPath)
##
# %%
# Download the model
# ~~~~~~~~~~~~~~~~~~
# The code snippet shown below is used to download the pre-trained object detection model we shall
# use to perform inference. The particular detection algorithm we will use is the
# `SSD MobileNet v2`. More models can be found in the `TensorFlow 1 Detection Model Zoo <https://github.com/tensorflow/models/blob/master/research/object_detection/g3doc/tf1_detection_zoo.md>`_.
# To use a different model you will need the URL name of the specific model. This can be done as
# follows:
#
# 1. Right click on the `Model name` of the model you would like to use;
# 2. Click on `Copy link address` to copy the download link of the model;
# 3. Paste the link in a text editor of your choice. You should observe a link similar to ``download.tensorflow.org/models/object_detection/XXXXXXXXX.tar.gz``;
# 4. Copy the ``XXXXXXXXX`` part of the link and use it to replace the value of the ``MODEL_NAME`` variable in the code shown below;
#
# For example, the download link for the model used below is: ``download.tensorflow.org/models/object_detection/ssd_mobilenet_v2_coco_2018_03_29.tar.gz``

# Download and extract model
def download_model(model_name):
    base_url = 'http://download.tensorflow.org/models/object_detection/'
    model_file = model_name + '.tar.gz'
    model_dir = tf.keras.utils.get_file(fname=model_name,
                                        origin=base_url + model_file,
                                        untar=True)
    return str(model_dir)
#這邊修想要的模型,就可以去下載模型
MODEL_NAME = 'faster_rcnn_resnet101_coco_2018_01_28'
PATH_TO_MODEL_DIR = download_model(MODEL_NAME)

# %%
# Download the labels
# ~~~~~~~~~~~~~~~~~~~
# The coode snippet shown below is used to download the labels file (.pbtxt) which contains a list
# of strings used to add the correct label to each detection (e.g. person). Since the pre-trained
# model we will use has been trained on the COCO dataset, we will need to download the labels file
# corresponding to this dataset, named ``mscoco_label_map.pbtxt``. A full list of the labels files
# included in the TensorFlow Models Garden can be found `here <https://github.com/tensorflow/models/tree/master/research/object_detection/data>`__.

# Download labels file
'''
#以下是原本的網路上的label資料,我先用'引號不去使用,我改用自己label檔案的路徑
def download_labels(filename):
    base_url = 'https://raw.githubusercontent.com/tensorflow/models/master/research/object_detection/data/'
    label_dir = tf.keras.utils.get_file(fname=filename,
                                        origin=base_url + filename,
                                        untar=False)
    label_dir = pathlib.Path(label_dir)
    return str(label_dir)

LABEL_FILENAME = 'mscoco_label_map.pbtxt'
PATH_TO_LABELS = download_labels(LABEL_FILENAME)
'''
#(問題3)用自己的LABEL檔,讀出的檔案,並不是正確的飛機標示

PATH_TO_LABELS = r'D:\TensorFlow\workspace\training_demo\annotations\label_map.pbtxt'

# %%
# Load the model
# ~~~~~~~~~~~~~~
# Next we load the downloaded model
import time
from object_detection.utils import label_map_util
from object_detection.utils import visualization_utils as viz_utils

PATH_TO_SAVED_MODEL = PATH_TO_MODEL_DIR + "/saved_model"

print('Loading model...', end='')
start_time = time.time()

# Load saved model and build the detection function
model = tf.saved_model.load(PATH_TO_SAVED_MODEL)
detect_fn = model.signatures['serving_default']

end_time = time.time()
elapsed_time = end_time - start_time
print('Done! Took {} seconds'.format(elapsed_time))

# %%
# Load label map data (for plotting)
# ~~~~~~~~~~~~~~~~~~~~~~~~~~~~~~~~~~~
# Label maps correspond index numbers to category names, so that when our convolution network
# predicts `5`, we know that this corresponds to `airplane`.  Here we use internal utility
# functions, but anything that returns a dictionary mapping integers to appropriate string labels
# would be fine.


category_index = label_map_util.create_category_index_from_labelmap(PATH_TO_LABELS,
                                                                    use_display_name=True)

# %%
# Putting everything together
# ~~~~~~~~~~~~~~~~~~~~~~~~~~~
# The code shown below loads an image, runs it through the detection model and visualizes the
# detection results, including the keypoints.
#
# Note that this will take a long time (several minutes) the first time you run this code due to
# tf.function's trace-compilation --- on subsequent runs (e.g. on new images), things will be
# faster.
#
# Here are some simple things to try out if you are curious:
#
# * Modify some of the input images and see if detection still works. Some simple things to try out here (just uncomment the relevant portions of code) include flipping the image horizontally, or converting to grayscale (note that we still expect the input image to have 3 channels).
# * Print out `detections['detection_boxes']` and try to match the box locations to the boxes in the image.  Notice that coordinates are given in normalized form (i.e., in the interval [0, 1]).
# * Set ``min_score_thresh`` to other values (between 0 and 1) to allow more detections in or to filter out more detections.
import numpy as np
from PIL import Image
import matplotlib.pyplot as plt
import warnings
warnings.filterwarnings('ignore')   # Suppress Matplotlib warnings

def load_image_into_numpy_array(path):
    """Load an image from file into a numpy array.

    Puts image into numpy array to feed into tensorflow graph.
    Note that by convention we put it into a numpy array with shape
    (height, width, channels), where channels=3 for RGB.

    Args:
      path: the file path to the image

    Returns:
      uint8 numpy array with shape (img_height, img_width, 3)
    """
    return np.array(Image.open(path))


for image_path in IMAGE_PATHS:

    print('Running inference for {}... '.format(image_path), end='')

    image_np = load_image_into_numpy_array(image_path)

    # Things to try:
    # Flip horizontally
    # image_np = np.fliplr(image_np).copy()

    # Convert image to grayscale
    # image_np = np.tile(
    #     np.mean(image_np, 2, keepdims=True), (1, 1, 3)).astype(np.uint8)

    # The input needs to be a tensor, convert it using `tf.convert_to_tensor`.
    input_tensor = tf.convert_to_tensor(image_np)
    # The model expects a batch of images, so add an axis with `tf.newaxis`.
    input_tensor = input_tensor[tf.newaxis, ...]

    detections = detect_fn(input_tensor)

    # All outputs are batches tensors.
    # Convert to numpy arrays, and take index [0] to remove the batch dimension.
    # We're only interested in the first num_detections.
    num_detections = int(detections.pop('num_detections'))
    detections = {key: value[0, :num_detections].numpy()
                  for key, value in detections.items()}
    detections['num_detections'] = num_detections

    # detection_classes should be ints.
    detections['detection_classes'] = detections['detection_classes'].astype(np.int64)

    image_np_with_detections = image_np.copy()

    viz_utils.visualize_boxes_and_labels_on_image_array(
          image_np_with_detections,
          detections['detection_boxes'],
          detections['detection_classes'],
          detections['detection_scores'],
          category_index,
          use_normalized_coordinates=True,
          max_boxes_to_draw=200,
          min_score_thresh=.30,
          agnostic_mode=False)

#eps, jpeg, jpg, pdf, pgf, png, ps, raw, rgba, svg, svgz, tif, tiff)
    plt.figure() ## 建立圖形(figure);
    plt.imshow(image_np_with_detections) ## 將資料顯示為影像;
    #plt.savefig(f'{image_path}.test101_2.png') ## 多這行而已: 將圖形存入檔案;
    plt.savefig(os.path.join(
        myOutputPath,
        f'{os.path.basename(image_path)}.png'
    ))
    print('Done')
plt.show()

# sphinx_gallery_thumbnail_number = 2
話說,你的最後一個步驟好漫長的感覺~ XD
再次提醒一下, 避免意外: 「不要」把我的回答標記為最佳解答;
因為你的 TF 辨識問題 (label 標籤) 才是最重要的。
我處理的都只是 Python 的一般操作之類的小問題。
首先, 請先學下 iT邦幫忙 的 Markdown;
不然, 至少, 編輯區快捷功能列, 有個 新增程式碼 (Ctrl-Alt-C) 能用。
另, 在「iT邦幫忙」的語法高亮 Markdown 的自動判斷常錯誤, 建議用下面方式指定語言:
( 話說, 「iT邦幫忙」 的 highlight.js 版本蠻舊的 …… )
    #### this is a markdown script;
    #### next block is a python script;
    ```py
    print('hello, world')
    ```
看到你後面的這段:
plt.savefig(f'{image_path}.test101_2.png')
plt.figure()
plt.imshow(image_np_with_detections)
我猜你沒注意到, 我後來在這裡的回應 (@2023-03-13, 02:03:57, by-Me) 內提出的修正。
( 我以為你後來有回應時, 應該有看到; 算我通知失誤~ )
依你目前上述的程式碼, 要將其改為:
    plt.figure() ## 建立圖形(figure);
    plt.imshow(image_np_with_detections) ## 將資料顯示為影像;
    plt.savefig(f'{image_path}.test101_2.png') ## 多這行而已: 將圖形存入檔案;
關於你的:
(問題1)如何準確依據我的建好的label標籤在圖片顯示正確的呢?
坐等別人, 因為我跟 Tensorflow 不熟~
(問題2)程式碼只能讀取2張圖片, 該怎麼修改可以讀取我全部的圖片檔?
若沒人回答, 晚上有空我會再看看, 不然輸入檔案跟輸出檔案混在同一個資料夾很麻煩。
( 提醒一下, 避免意外: 不要把我的回答標記為最佳解答, 避免別人誤會你已解決問題了~ )
我是第一次用這個IT邦幫忙但是您真的幫我解決問題了,所以您最適合得到最佳解答了~謝謝您
#eps, jpeg, jpg, pdf, pgf, png, ps, raw, rgba, svg, svgz, tif, tiff)
    plt.savefig(f'{image_path}.test101_2.png')
    plt.figure()
    plt.imshow(image_np_with_detections)
有唷這段我有新增到plt.savefig(f'{image_path}.test101_2.png')
只是我貼的位置貼錯而已
@Maggie:
請參閱本回答的 Update#1 部分; OldMsg#1 是舊的不用看~
另,提醒一下,你的 label檔案 內容也能放在程式碼區塊內以方便別人閱讀喔。
你好,讀取到一半圖片時,出現了問題
如圖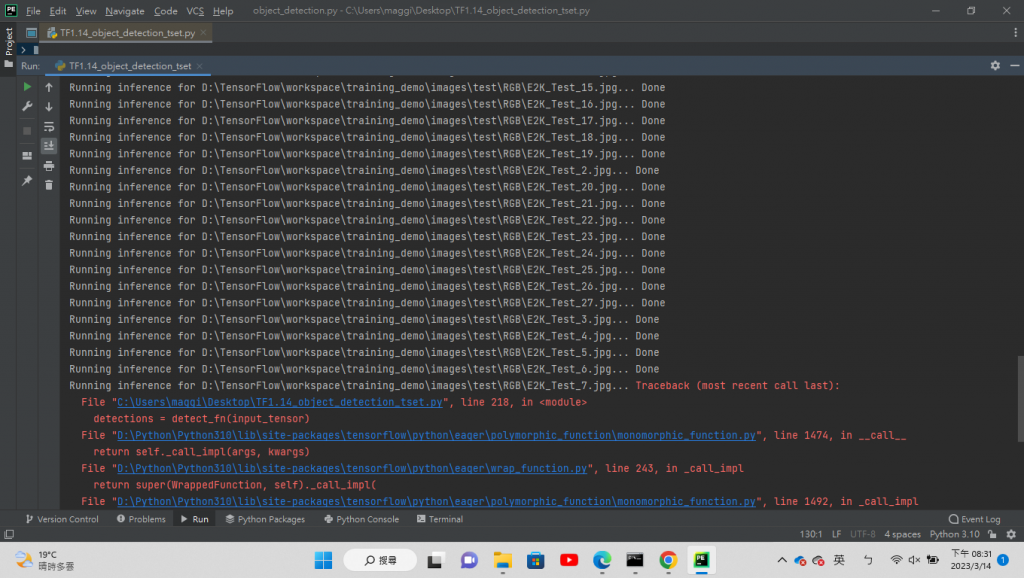
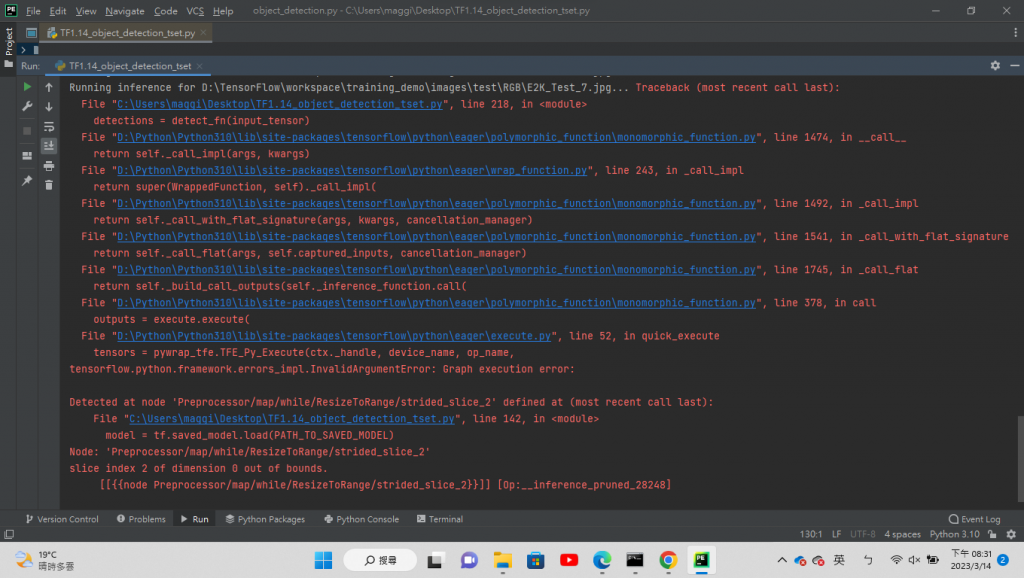
檢查圖片內容,或 移走/略過 該圖檔試試?
因為錯誤訊息看起來像是圖片處理出問題~
發現是灰階圖片,請問也要測試灰階圖片,內容是否要再修改
@ Maggie: TF 我不熟, 對於 TF 對灰階影像的數據處理,我沒辦法~ 你得問別人了~ Sorry~
好的謝謝您這幾天幫助了我~~
我只是幫點基本的小忙, TF 那邊比較麻煩, 祝你研究順利啦~
