經過前面幾天的上、中、下三篇Debug Module的介紹,
相信讀者對於底層Debug System有個基本的了解!!
今天呢!
講點輕鬆的~~~ 看看RISC-V Hart中,如何對應修改,支援Debug Module!
強烈建議配合: The RISC-V Instruction Set Manual Volume II: Privileged Architecture 一起看!
裡面有些架構、概念、指令、Register...會被用到!
基本上就是用最小幅度的修改原本RISC-V的架構,來支援Debug System!
這邊的修改包含加入"Debug Mode"和一些必須的CSRs,其餘的部分,由Debug System來處理!
整體架構:
基本上講解的內容對應RISC-V External Debug Support 0.13的"Chapter 4"
在RISC-V原先架構設計上,Privilege Levels只有U(User) / S(Supervisor) / M(Machine) (*註1),而Debug System在這邊提出一個特別的架構--"Debug Mode"!
針對"Debug Mode"的設計,這邊並沒有提到,留給硬體設計者自由發揮,
這邊只有定義一些Program Buffer在Debug Mode執行時,需要注意的一些規則:
(*註1): Privilege Levels的詳細資料可以參考The RISC-V Instruction Set Manual Volume II: Privileged Architecture中的"1.3 Privilege Levels"
(*註2): 簡單的介紹一下這幾個Register
(*註3): WFI,Wait for Interrupt
這個指令主要是用來暫停Hart直到中斷進來為止,但因為在Debug Mode中,中斷都會被暫停,因此在這邊需要當NOP用!
Single Step顧名思義就是希望正在Halt的Hart能夠執行完一道指令後,
就立刻停下來進入Debug Mode中!
可以參考以下實作內容!(src/target/riscv/riscv-013.c)
static void riscv013_on_step_or_resume(struct target *target, bool step)
{
    struct riscv_program program;
    riscv_program_init(&program, target);
    riscv_program_fence_i(&program);
    if (riscv_program_exec(&program, target) != ERROR_OK)
        LOG_ERROR("Unable to execute fence.i");

    /* We want to twiddle some bits in the debug CSR so debugging works. */
    uint64_t dcsr = riscv_get_register(target, GDB_REGNO_DCSR);
    dcsr = set_field(dcsr, CSR_DCSR_STEP, 1);   ///譯註: 把$dcsr的step設定成1
    dcsr = set_field(dcsr, CSR_DCSR_EBREAKM, 1);
    dcsr = set_field(dcsr, CSR_DCSR_EBREAKS, 1);
    dcsr = set_field(dcsr, CSR_DCSR_EBREAKU, 1);
    riscv_set_register(target, GDB_REGNO_DCSR, dcsr);
}
為了能夠從第一行指令開始執行前就能夠Debug,Debug System要求如果在haltreq(halt request)拉起來的情況下,如果同時進行Reset的話,Hart必須在Reset做完必要的初始化後,在執行第一道指令前,就直接進入Debug Mode中停下!
這部分的實作可以參考「Day 08: RISC-V Debug Module (上篇): Overview & Target Status Control」的"# 2.3 Implemation"中Assert reset的地方!
另外還是要廣告一下,在Andes V3架構中,稱這個功能為: Debug-on-Reset!
終於快講完了XD!
為了支援Debug System,必須要在原先RISC-V的Hart中加入幾個CSRs,作為輔助之用!
這邊挑幾個來說明:
這個Register是最重要的啦!!
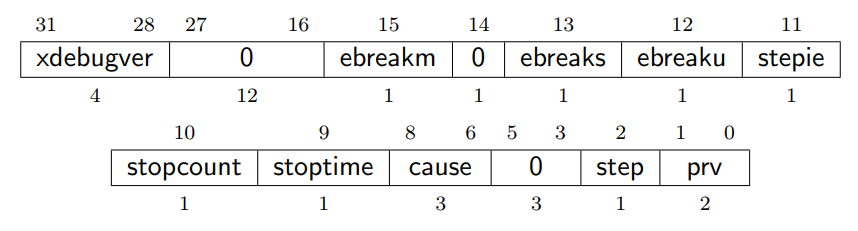
---引用自RISC-V External Debug Support 0.13
簡單說明一下每個欄位的意義:
cause檢測的地方可以參考以下的實作(src/target/riscv/riscv-013.c)
static enum riscv_halt_reason riscv013_halt_reason(struct target *target)
{
    uint64_t dcsr = riscv_get_register(target, GDB_REGNO_DCSR);
    switch (get_field(dcsr, CSR_DCSR_CAUSE)) {
    case CSR_DCSR_CAUSE_SWBP:               ///譯註: cause = 1
    case CSR_DCSR_CAUSE_TRIGGER:            ///譯註: cause = 2
        return RISCV_HALT_BREAKPOINT;
    case CSR_DCSR_CAUSE_STEP:               ///譯註: cause = 4
        return RISCV_HALT_SINGLESTEP;
    case CSR_DCSR_CAUSE_DEBUGINT:           ///譯註: cause = 3
    case CSR_DCSR_CAUSE_HALT:
        return RISCV_HALT_INTERRUPT;
    }

    LOG_ERROR("Unknown DCSR cause field: %x", (int)get_field(dcsr, CSR_DCSR_CAUSE));
    LOG_ERROR("  dcsr=0x%016lx", (long)dcsr);
    return RISCV_HALT_UNKNOWN;
}
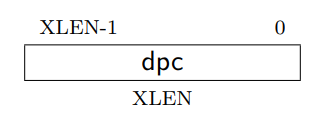
---引用自RISC-V External Debug Support 0.13
在Debug Mode中當作PC來用,在不同情況下,紀錄不同的內容:
另外,值得一提的是,當離開Debug Mode的時候,原先PC裡面的值會被更新成DPC的值,
這就可以讓Debugger設定要從哪邊進行Resume,參考以下實作內容:
(src/target/riscv/riscv.c)
int riscv_openocd_resume(
        struct target *target,
        int current,
        target_addr_t address,
        int handle_breakpoints,
        int debug_execution
) {
    LOG_DEBUG("resuming all harts");

    if (!current)
        riscv_set_register(target, GDB_REGNO_PC, address);  ///譯註: 若不直接進行Resume,則將DPC先設定到那個點!

    int out = riscv_resume_all_harts(target);
    if (out != ERROR_OK) {
        LOG_ERROR("unable to resume all harts");
        return out;
    }

    register_cache_invalidate(target->reg_cache);
    target->state = TARGET_RUNNING;
    target_call_event_callbacks(target, TARGET_EVENT_RESUMED);
    return out;
}
簡單的說完了整個RISC-V原先架構中,如何支援Debug System的問題!
當然,很多實際上的細節還是要參考硬體的設計!
明天將從另一個重要的功能--Trigger Module講起!