
由於在 nightwatch.conf.js 的 "output_folder": "./reports", 設定了測試報告的路徑,因此在專案目錄底下可看到 reports 的資料夾,裡面的 JUnit XML 測試報告檔案即是按 group 所放置,像是這樣...
<?xml version="1.0" encoding="UTF-8" ?>
<testsuites errors="0" failures="0" tests="1">
  <testsuite name="class.testMainCategory" errors="0" failures="0" hostname="" id="" package="class" skipped="0" tests="1" time="20.28" timestamp="Fri, 01 Dec 2017 12:06:52 GMT">
    <testcase name="Demo Ruten MainCategory Page" classname="class.testMainCategory" time="20.28" assertions="0"></testcase>
  </testsuite>
</testsuites>
點此看範例檔案。
這樣的格式難以閱讀,因此我們會希望客製化測試報告(Custom Reporter),例如:產生美美的網頁。
這裡選用 nightwatch-html-reporter。
npm install nightwatch-html-reporter -g
執行指令如下,跑一次測試程式,解析 Nightwatch 所產生的 XML 檔案,最後產生客製化測試報告。
nightwatch test/e2e/
nightwatch-html-reporter -d ./reports
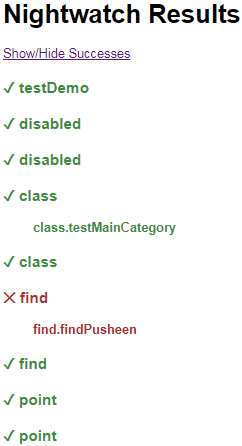
跑完以後會在資料夾 reports 看到 generatedReport.html 這個檔案,打開來會看到如下圖般展示目前的測試結果。
在 nightwatch/html-reporter.js 設定如下。
var HtmlReporter = require('nightwatch-html-reporter');
var reporter = new HtmlReporter({
  openBrowser: true,
  reportsDirectory: __dirname + '/reports'
});

module.exports = {
  reporter: reporter.fn
};
執行指令如下。
nightwatch --reporter ./html-reporter.js
在 nightwatch.config.js 的 reporter 設定測試報告由 HtmlReporter 來產生。
在 globals.js 中放入以下程式碼。
var HtmlReporter = require('nightwatch-html-reporter');
var reporter = new HtmlReporter({
  openBrowser: true,
  reportsDirectory: __dirname + '/reports/'
});

module.exports = {
  write : function(results, options, done) {
    reporter.fn(results, done);
  }
};
在 nightwatch.config.js 中設定如下。
const config = {
  "src_folders": [
    "test/e2e"
  ],
  "output_folder": "./reports", // 測試報告輸出位置
  reporter: globals.reporter // 指定測試報告由 HtmlReporter 產生
}
module.exports = config;
跑完測試即可看到測試結果。
格式如下,相關資料可參考這裡。
nightwatch-html-reporter -d <reports-directory> [--theme (default:'default')] [--output (default:generatedReport.html)]
♡(´∀`)人(´∀`)♡
本系列文章皆使用這個專案,可以拉下來玩玩;有什麼問題都可以提出 issue。
下一篇來看個進階測試範例。
網誌版。