繼 Day14, 我們介紹了一些 Django - Template 的運作原理,目的是為了讓大家瞭解說,Template在背後是依照什麼順序去搜尋路徑的
而今天,我會帶大家實際看一些例子,讓大家了解 Template 與 View 之間是怎麼運作的
就讓我們一起來挖掘 Template 的秘密吧!
我們曾經提到, Models - 就是定義我們資料存放的型態,而且我們可以透過ORM的方式去取得,這個細節我們在 Day6 - 資料庫的創建 及 Day9 - 使用Shell創建資料 都有介紹過
然而我們之所以要存放資料,一部分當然是要拿來做顯示用,而這一些邏輯處理就是要寫在 View 中,也就是說,View會透過ORM的方式,去做存取資料的動作,接著再透過DICT MAPPING,去對應到我們 Template 定義的資料欄位,如此一來我們便能成功將資料顯示
那寫得這麼臭這麼長,還是帶大家看範例,大家會更清楚
昨天我們在 vendor/urls.py 設定好了這一個路徑,並將它指到 views.showtemplate,不過這名稱不太好,而且內容其實不太完整,我們先來修改一下內容
# 修改前
urlpatterns = [
    path('', views.showtemplate),
]

# 修改後
urlpatterns = [
    # 後方的 name 可以先忽略,目前不會用到
    path('', views.vendor_index, name="vendor_index"),
]
然後是今天的主軸之一 views, 我們要將 vendor/views 修改成如下
from django.shortcuts import render
from .models import Vendor
# Create your views here.
def showtemplate(request):
    vendor_list = Vendor.objects.all() # 把所有 Vendor 的資料取出來
    context = {'vendor_list': vendor_list} # 建立 Dict對應到Vendor的資料,
    return render(request, 'test.html', context)
在這裡要先解釋什麼是 render,簡單來說... 就是Django提供你很多方便你操作的函式,而rendor可以將我們要傳達的資料一併打包,再透過 HttpResponse 回傳到瀏覽器
下面提供 rendor 的 source code
def render(request, template_name, context=None, content_type=None, status=None, using=None):
    """
    Return a HttpResponse whose content is filled with the result of calling
    django.template.loader.render_to_string() with the passed arguments.
    """
    content = loader.render_to_string(template_name, context, request, using=using)
    return HttpResponse(content, content_type, status)
from django.shortcuts import render,好shortcuts 不用嗎?
這麼做最主要的原因就是,能讓開發者省掉那些重覆的動作,所以Django就把它都寫在Shortcuts了
還有像是redirect、get_object_or_404...等等,很好用的函式 ^^
若你想要先了也怎麼操作,最單純的使用方法就是 render(request,, context)
而 context 就是我們從資料庫撈回來的資料,並使用 key 去指向這些資料
接著,輪到另一位主角 template,還記得我們創立了一個 test.html,那我們今天要將裡面的程式碼修改成這樣
<!DOCTYPE html>
<html lang="en" dir="ltr">
  <head>
    <meta charset="utf-8">
    <title></title>
  </head>
  <body>
    {% for vlist in vendor_list %}
    <h1> 店家 : {{vlist.vendor_name }} </h1>
    <ul>
      <li>店名 : {{ vlist.store_name }}</li>
      <li>電話 : {{ vlist.phone_number }}</li>
      <li>地址 : {{ vlist.addres }}</li>
    </ul>
    {% endfor %}
  </body>
</html>
相信聰明如你,這段程式碼你一定能看得懂,只是細節不是很理解,這邊請一一聽我訴說
opeoblock : 簡單來說,你可以填入 template tags ,蛤?! 你問我有哪些可以用? 去找吧! 我把 template tag全都放在哪裡! 大秘寶openvariable : 可以填入變數名稱先有這樣的概念,今天的template根本就難不倒你囉!
白話文 : 對於 vendor_list 裡面的每一個物件,去對應到物件的
- vendor_name
- store_name
- phone_number
- address
所以我們便能在 http://127.0.0.1:8000/vendor/ 看到資料,是不是就跟我們建立的資料相同呢!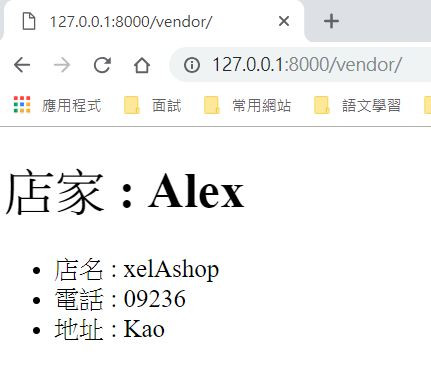
小節 : 用一張圖來說明今天做的事情,並搭配今天說的這段話去看,相信大家都會懂 ^^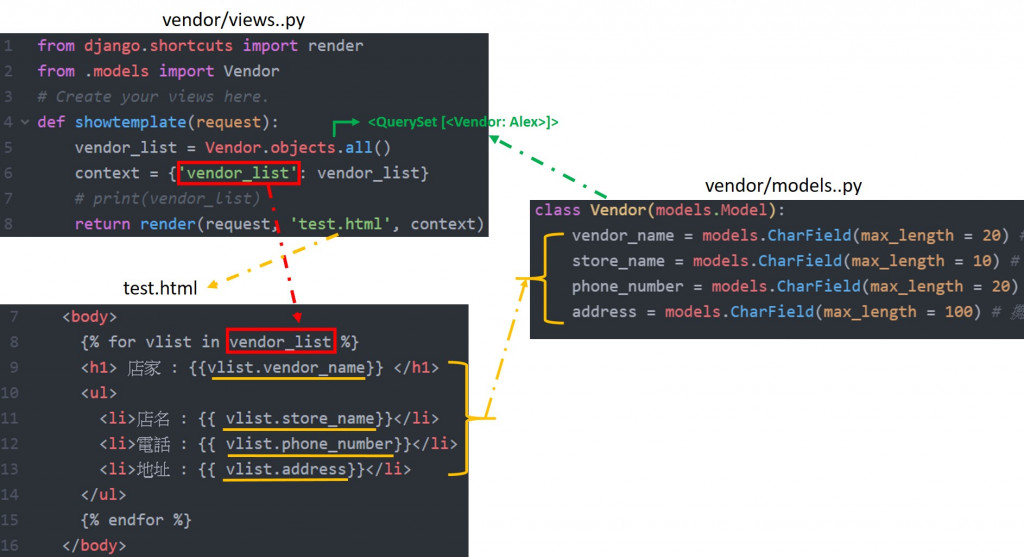
View會透過ORM的方式,去做存取資料的動作,接著再透過DICT MAPPING,去對應到我們 Template 定義的資料欄位,如此一來我們便能成功將資料顯示
今天把最基礎的傳達資料講完囉 ^^
寫文章配煙花 是人生一大享受 From BY
感謝教學,花了兩天看到這邊,覺得受益良多!
https://imgur.com/a/dvWIjCK
這邊卡了一下...
呼叫的function name 是 vendor_index
應該呼叫的function是 vendor_index 而不是showtemplate
為什麼在 vendor/urls.py(第一張圖)urlpatterns內的views.showtemplate修改成views.vendor_index,然後 vendor/views (第二張圖)內的function name一樣是showtemplate?
我這邊測試urlpatterns內的必須與views內的function一樣才可以連接