Hi啊!因為昨天雄心壯志下了決心要完成作品,今天也只能繼續做下去了XD,就從昨天的進度step1開始吧!
ㄛ對了,這時間點看到我還滿神奇的對吧XD,因為小弟我明天要跟著公司的人去露營,好嘛!雖然是題外話,但我只是想分享而已,請各位大大繼續觀賞正文吧!
好的!既然我們昨天處理完三個頁面的路由了,今天就來做這個吧!
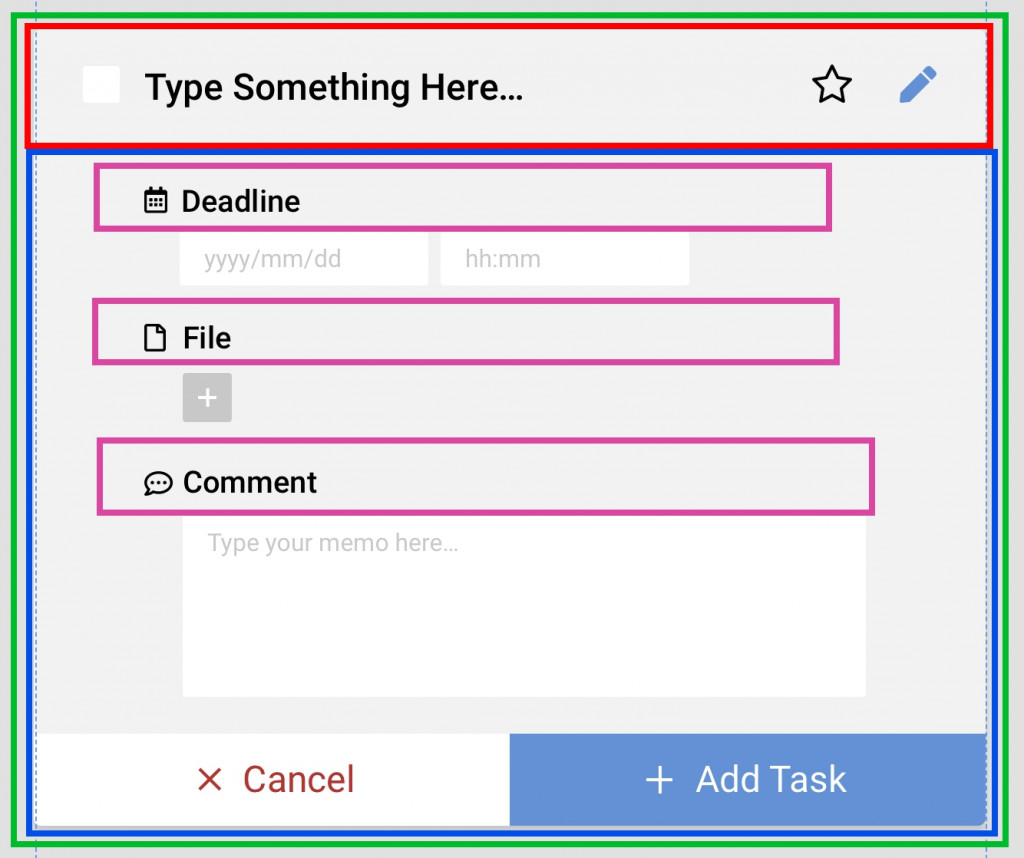
登愣!就是輸入的表單!,因為就我觀察,不只是新增,在編輯時表單也長得一樣,只是差把資料放進去而已!然後我的規劃就如上方那個樣子,分成幾個部分:
AddTasks,代表新增的頁面組件。InputTask,代表輸入事項名稱的輸入框。InputTasksForm,用來放所有的輸入表單。InputName,因為都是一個Icon配一個名稱,所以乾脆就把它組件化了。在做之前先和大家說一下Icon是從fontawesome這裡來的,這裡先簡單用CDN將他的CSS嵌入我們的index.html中:
index.html
<html>
<head>
    <link href="./style/index.css" rel="stylesheet" />
    <!--嵌入fontawesome的CSS-->
    <link rel="stylesheet" href="https://use.fontawesome.com/releases/v5.4.1/css/all.css" integrity="sha384-5sAR7xN1Nv6T6+dT2mhtzEpVJvfS3NScPQTrOxhwjIuvcA67KV2R5Jz6kr4abQsz" crossorigin="anonymous">
</head>

<body>
    <div id="root"></div>
    <script src="./bundle.js" ></script>
</body>
</html>
好的!恭喜完成本篇最簡單的一部份了!現在來處理組件吧!先從最小的組件InputName開始:
InputName.jsx
import React from "react"

class InputName extends React.Component{
    render(){
        return(
            <div class="inputName">
                <i class={this.props.className}></i>  {this.props.inputName}
            </div>
        )
    }
}

export {InputName}
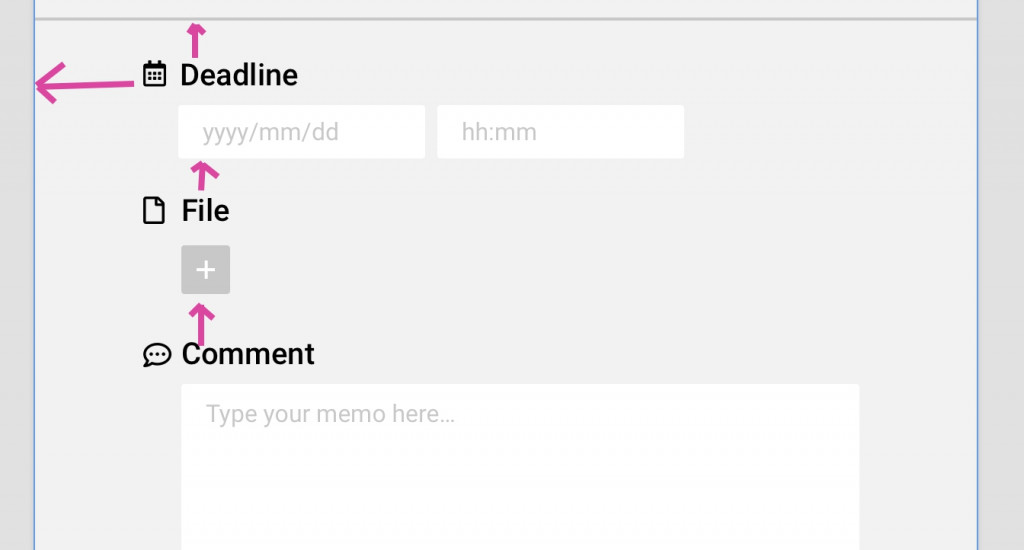
上方用props傳入Icon的class還有表單得填入什麼資料的提示文字,另外可以看到每個輸入框和邊界及上方都是有一點距離的:
所以在CSS內加入左側和上方的邊距:
.inputName{
    padding-left: 50px;
    padding-top: 25px;
}
好的!再來往外處理,輪到InputTasksForm組件:
InputTasksForm.jsx
import React from "react"
import { InputName } from "../InputName"

class InputTasksForm extends React.Component {
    render() {
        return (
            <div class="InputTasksForm">
                <div class="InputTask">
                    <InputName className="fas fa-calendar-alt" inputName="Deadline" />
                    <div class="inputForm">
                        <input type="date" class="inputStyle inputDateTime"
                                value={this.props.date} />

                        <input type="time" class="inputStyle inputDateTime"
                                value={this.props.time}/>
                    </div>
                    <InputName className="fas fa-file" inputName="File" />
                    <div class="inputForm">
                        <input type="file" class="inputStyle" /><br/>
                        <span class="inputStyle">{this.props.fileName}</span>
                    </div>
                    <InputName className="far fa-comment-dots" inputName="Comment" />
                    <div class="inputForm">
                        <textarea rows="7" cols="55" class="inputStyle">
                            {this.props.comment}
                        </textarea>
                    </div>
                </div>
                <div>
                    <button type="button" class="addButton cancelButton"> X Cancel</button>
                    <button type="button" class="addButton saveButton"> + Save</button>
                </div>
            </div>
        )
    }
}

export { InputTasksForm }
InputName,並將這個表單切成兩個部分,第一個是from的部分,第二個是button的部分,並把兩個div都包在最外層的<div class="InputTasksForm">當中。<div class="InputTask">的區塊放置所有的輸入框,包含日期date、時間time、FileBox、textarea等等,並可以看到可控組件上都帶有props傳進來的資料,不可控的FileBox則是用一個span來放資料,另外剛剛做的InputName也在這裡來傳入Icon的class和文字提示inputName。div就比較單純,只是放了兩個按鈕,目前還沒有任何動作。接著來處理CSS:
InputTasksForm設定寬度要620px,並且要顯示在畫面中間。
.InputTasksForm{
    width: 620px;
    margin: 0 auto;
}
InputTask設定高度、對齊方式、背景顏色(不是我偷懶,因為設計稿裡面都有註明XD)。
.InputTask{
    height: 385px;
    background: #F2F2F2;
    text-align: left;
}
/*輸入框的縮排比文字還要裡面*/
.inputForm{
    padding-left: 75px;
}
/*輸入框去除框線和調整字體大小*/
.inputStyle{
    border:none;
    font-size: 16px;
}
/*日期匡要調整長寬,看起來比較順眼*/
.inputDateTime{
    height: 35px;
    width: 162px;
}
cancelButton和取消的saveButton:
/*共同樣式,長、寬、字體大小、對齊、取消框線*/
.addButton{
    width: 310px;
    height: 60px;
    font-size: 24px;
    text-align: center;
    border:none;
}
/*分別設定按鈕顏色及字的顏色*/
.saveButton{
    background: #4A90E2;
    color: #ffffff;
}
.cancelButton{
    background: #fffffd;
    color: #D0021B;
}
到了這個步驟可以先為自己拍拍手,現在表單的InputTasksForm組件已經完成了!接下來要處理的是上方的紅色區塊,有個星星有個藍色鉛筆的InputTask組件:
InputTask.jsx
import React from "react"
import { InputTasksForm } from "../InputTasksForm"

class InputTask extends React.Component {
    render() {
        return (
            <div>
                <div class="inputTaskTitle">
                    <input type="checkbox" class="taskChk" />
                    <input type="text" class="taskTitle" placeholder="Type Something Here…"  />
                    <i class="far fa-star fa-lg icon"></i>
                    <i class="fas fa-pen fa-lg icon icon_edit"></i>
                </div>
                <InputTasksForm />
            </div>)
    }
}

export { InputTask }
InputTasksForm,並將他放在div中,不過這裡的主角並不是他,是上方輸入事項名稱的inputTaskTitle。inputTaskTitle中,分別放入checkbox、input和兩個Icon,並在這個div下放剛剛做的InputTasksForm讓他們上下靠在一起。當然以上那些div和input也要調整一下,讓他們好看一點:
inputTaskTitle作為包覆標題區塊的div,有長、高、背景顏色、用margin置中、裡面的對齊方式和下底線:
.inputTaskTitle{
    width: 620px;
    height: 75px;
    background: #F2F2F2;
    margin:0px auto;
    text-align: left;
    border-bottom:solid 3px #C8C8C8 ;
}
input和勾選的checkbox:
.taskTitle{
    background: #F2F2F2;
    border:none;
    height: 28px;
    width: 380px;
    font-size: 24px;
    margin: 25px;
}
/*要把勾選框變兩倍大,還要距離左邊界一些距離*/
.taskChk{
    margin-left: 20px;
    zoom: 2;
}
Icon記得也要分開,不要擠在一起,然後鉛筆要設定藍色:
.icon{
    margin-left: 20px;
}

.icon_edit{
    color: #4A90E2;
}
到這裡其實我們已經完成了,但是要怎麼看結果呢?嘿嘿,打開根目錄的index.jsx吧!只要把我們之前輸出的Main組件變成剛剛最後做好的InputTask,之後打包就可以了!不過記得要改回來哦!因為我們只是先輸出看結果而已,最後還是要把組件都放在Main中輸出。
import React from "react"
import ReactDOM from "react-dom"
import {InputTask} from "./components/InputTask"

ReactDOM.render(<InputTask />,document.getElementById('root'))
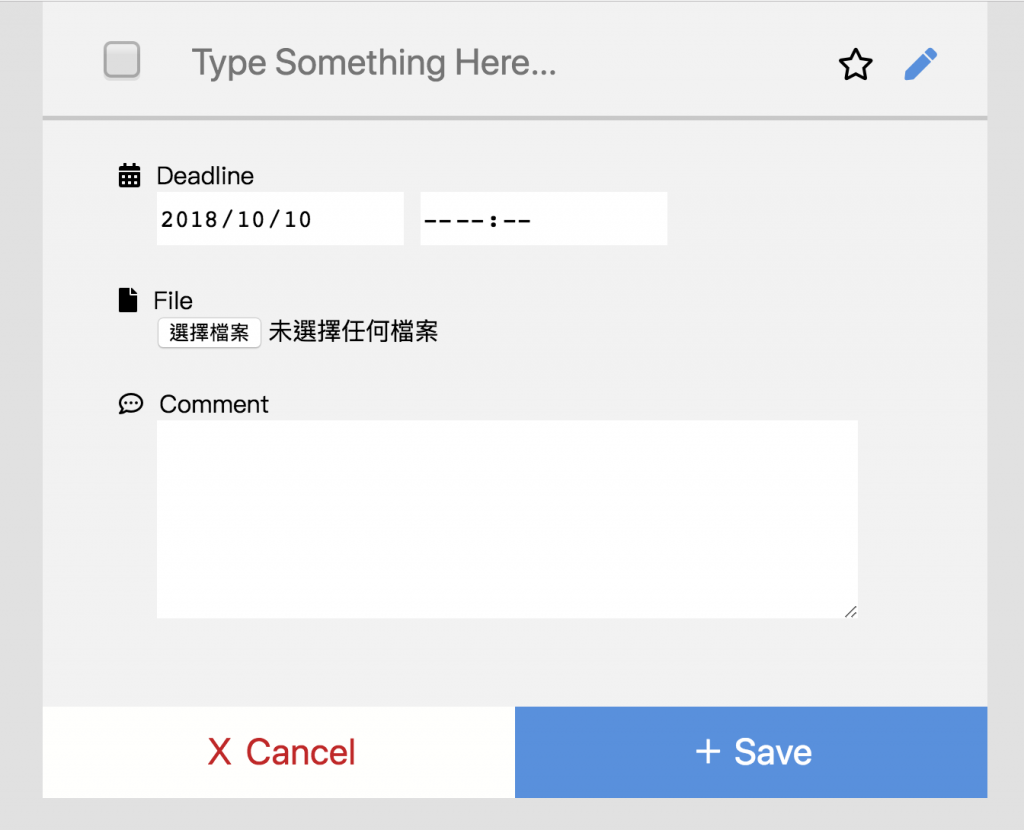
結果如下:
當然也可以直接輸出InputTasksForm組件看看,畢竟所有的組件都是可以單獨使用的!然後到這裡應該會有一些瀏覽器已經跑版了,像我的Safari就跑掉了...而且他也不支援input的date和time類型,不過在這裡我就先不管了,CSS的部分可以使用bootstrap下來排會比較好,但是如果我這麼做,可能再給十篇都講不完XD,所以我就先著重在功能面上了!另外有好的建議再麻煩各位大大留言告訴我!謝謝!
今天的進度就放在這邊:
GitHub程式目錄連結
最後感謝各位大大的觀看,如果文章中有任何問題或是錯誤的地方,再麻煩留言告訴我,小弟會盡快修正或補充文章內容的!謝謝!
