基於教學性,本文選擇實作 Denoising AE,基於 Keras 官方提供的 tutorial 來做演練。
Denoising AE 是一種學習對圖片去噪(denoise)的神經網絡,它可用於從類似圖像中提取特徵到訓練集。實際做法是在 input 加入隨機 noise,然後使它回復到原始無噪聲的資料,使模型學會去噪的能力,這就是 Denoising AE。
這是在 [魔法陣系列] AutoEncoder 之術式解析 中針對 Denoising AE 的說明,希望各位見習魔法使還有一些印象,接下來就正式進入實戰系列了。
from keras.layers import Input, Conv2D, MaxPooling2D, UpSampling2D, ZeroPadding2D
from keras.models import Model
from keras.callbacks import TensorBoard
from keras.datasets import mnist
import numpy as np

(x_train, y_train), (x_test, y_test) = mnist.load_data()
x_train = x_train.astype('float32') / 255.
x_test = x_test.astype('float32') / 255.
x_train = np.reshape(x_train, (len(x_train), 28, 28, 1))  # adapt this if using `channels_first` image data format
x_test = np.reshape(x_test, (len(x_test), 28, 28, 1))  # adapt this if using `channels_first` image data format
noise
noise_factor = 0.5
x_train_noisy = x_train + noise_factor * np.random.normal(loc=0.0, scale=1.0, size=x_train.shape)  # numpy.random.normal 函數裡的三個參數分别代表生成的高斯分布的均值、標準差以及輸出的 size
x_test_noisy = x_test + noise_factor * np.random.normal(loc=0.0, scale=1.0, size=x_test.shape)

x_train_noisy = np.clip(x_train_noisy, 0., 1.)  # 把 array 限制在一定範圍内
x_test_noisy = np.clip(x_test_noisy, 0., 1.)
官方教材中使用的模型是 convolutional denoising autoencoder,使用 CNN 來搭建 Denoising AE 的模型:
encoded 和 decoded ,再用 autoencoder 將二者建在一起,在訓練時用 autoencoder
def train_model():
    input_img = Input(shape=(28, 28, 1))  # adapt this if using `channels_first` image data format

    # Encoder 使用卷積層,激活函數用 relu,輸入的維度就是上面定義的 input_img
    x = Conv2D(16, (3, 3), activation='relu', padding='same')(input_img)
    x = MaxPooling2D((2, 2), padding='same')(x)
    x = Conv2D(8, (3, 3), activation='relu', padding='same')(x)
    x = MaxPooling2D((2, 2), padding='same')(x)
    x = Conv2D(8, (3, 3), activation='relu', padding='same')(x)
    encoded = MaxPooling2D((2, 2), padding='same', name='encoder')(x)  # 這邊與官方有點不同,我們為編碼器設置了一個名稱,以便能夠訪問它

    # at this point the representation is (4, 4, 8) i.e. 128-dimensional: 4*4*8=128

    # Decoder 的過程與 Encoder 正好相反,需要跟 Encoder 的神經網絡層做相對應,相對應的激活函數也是一樣,但這邊在解碼中最後一層使用的激活函數是 sigmoid
    x = Conv2D(8, (3, 3), activation='relu', padding='same')(encoded)
    x = UpSampling2D((2, 2))(x)
    x = Conv2D(8, (3, 3), activation='relu', padding='same')(x)
    x = UpSampling2D((2, 2))(x)
    x = Conv2D(16, (3, 3), activation='relu')(x)
    x = UpSampling2D((2, 2))(x)
    decoded = Conv2D(1, (3, 3), activation='sigmoid', padding='same')(x)

    # 用 Model 來搭建模型,輸入為圖片,輸出是解碼的結果
    autoencoder = Model(input_img, decoded)

    # 編譯模型,optimizer 使用 adam,loss 使用 binary_crossentropy
    autoencoder.compile(optimizer='adadelta', loss='binary_crossentropy')

    # 訓練 Denoising AE ,輸入是加入雜訊的圖片,輸出是原始圖片
    autoencoder.fit(x_train_noisy, x_train,
                    epochs=20,
                    batch_size=128,
                    shuffle=True,
                    validation_data=(x_test_noisy, x_test),
                    callbacks=[TensorBoard(log_dir='/tmp/tb', histogram_freq=0, write_graph=False)])

    autoencoder.save('autoencoder.h5')  # 與官方有點不同的是,多做了保存模型的動作

train_model()
如此一來就完成 Denoising AE 模型搭建了,接下來就是耐心等待訓練完畢。
import numpy as np
from keras.models import Model
from keras.datasets import mnist
import cv2
from keras.models import load_model
from sklearn.metrics import label_ranking_average_precision_score
import time  # 用來紀錄執行時間

print('Loading mnist dataset')
t0 = time.time()
(x_train, y_train), (x_test, y_test) = mnist.load_data()
x_train = x_train.astype('float32') / 255.
x_test = x_test.astype('float32') / 255.
x_train = np.reshape(x_train, (len(x_train), 28, 28, 1))
x_test = np.reshape(x_test, (len(x_test), 28, 28, 1))

# 加入 noise
noise_factor = 0.5
x_train_noisy = x_train + noise_factor * np.random.normal(loc=0.0, scale=1.0, size=x_train.shape)
x_test_noisy = x_test + noise_factor * np.random.normal(loc=0.0, scale=1.0, size=x_test.shape)

x_train_noisy = np.clip(x_train_noisy, 0., 1.)
x_test_noisy = np.clip(x_test_noisy, 0., 1.)
t1 = time.time()
print('mnist dataset loaded in: ', t1-t0)

print('Loading model :')
t0 = time.time()

# Load 先前已訓練好的 Denoising AE 模型
autoencoder = load_model('autoencoder.h5')
t1 = time.time()
print('Model loaded in: ', t1-t0)  # 紀錄模型加載時間
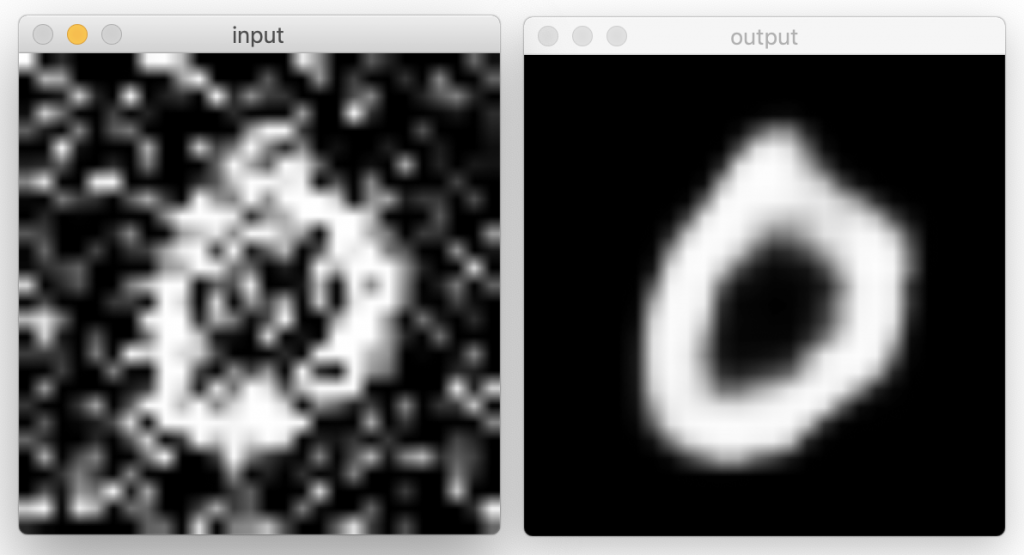
plot_denoised_images() function 來測試模型,進行圖像去噪def plot_denoised_images():
denoised_images = autoencoder.predict(x_test_noisy.reshape(x_test_noisy.shape[0], x_test_noisy.shape[1], x_test_noisy.shape[2], 1))
test_img = x_test_noisy[0]
resized_test_img = cv2.resize(test_img, (280, 280))
cv2.imshow('input', resized_test_img)
cv2.waitKey(0)
output = denoised_images[0]
resized_output = cv2.resize(output, (280, 280))
cv2.imshow('output', resized_output)
cv2.waitKey(0)

對見習魔法使有興趣的同學,官網提到在 Kaggle 裡有這個有趣的數據集可以給大家玩。
謎之 OS:準備前往台南抓寶可夢了~
