使用 Call out 面板取代原有的大頭針吧!
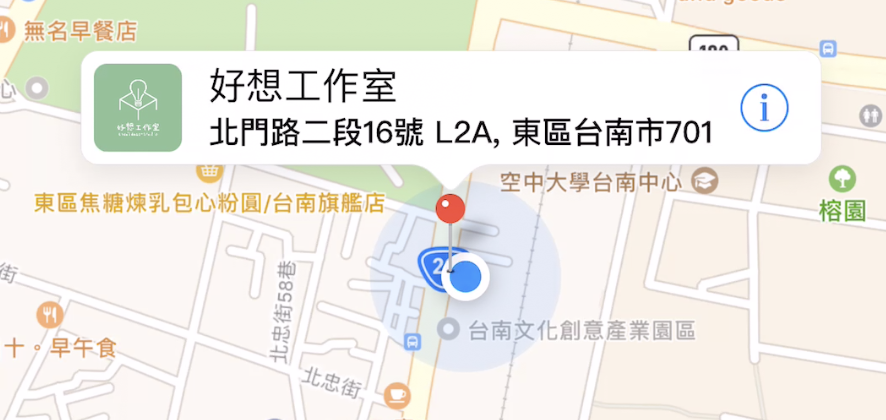
上一次教學我們在 App 新增了一張地圖,並且使用大頭針將我們好想工作室的位子給標記了。這次教學我們會使用 MKAnnotationView 來實作一個 Callout 面板,其中有圖片、說明以及一個按鈕,如此一來這個工作室的資訊就清楚的顯示在畫面上,之後也能透過右方的按鈕進行額外的操作。
首先我們要讓我們 mapView 的 delegate 設為 self ,並且我們讓我們 mapView 的 ViewController 遵循 MKMapViewDelegate 協定:
mapView.delegate = self
接著我們實作 mapView(:viewFor:) 方法,並且返回我們的 Callout 面板:
func mapView(_ mapView: MKMapView, viewFor annotation: MKAnnotation) -> MKAnnotationView? {
    // 判斷標記點是否與使用者相同,若為 true 就回傳 nil
    if annotation is MKUserLocation {
        return nil
    }

    // 創建一個重複使用的 AnnotationView
    var studioAnnotationView = mapView.dequeueReusableAnnotationView(withIdentifier: "Studio")
    if studioAnnotationView == nil {
        // 如果 studioAnnotationView 為 nil,那麼我們就初始化一個 MKPinAnnotationView
        studioAnnotationView = MKPinAnnotationView(annotation: annotation, reuseIdentifier: "Studio")
    }

    // 判斷如果標記的 title 為 “好想工作室”
    if annotation.title == "好想工作室" {
        // 設定左方圖片
        let imageView = UIImageView(image: UIImage(named: "Good-ideas Studio Logo ( Green )"))
        imageView.frame = CGRect(x: 0, y: 0, width: 40, height: 40)
        imageView.layer.cornerRadius = 6
        imageView.clipsToBounds = true
        studioAnnotationView?.leftCalloutAccessoryView = imageView

        // 設定中間描述
        let label = UILabel()
        label.text = "北門路二段16號 L2A, 東區台南市701"
        label.font = UIFont(name: "PingFangTC-Medium", size: 14)
        studioAnnotationView?.detailCalloutAccessoryView = label

        // 設定右方按鈕
        let button = UIButton(type: .detailDisclosure)
        button.addTarget(self, action: #selector(checkDetail), for: .touchUpInside)
        studioAnnotationView?.rightCalloutAccessoryView = button
    }
    studioAnnotationView?.canShowCallout = true
    return studioAnnotationView
}
接著我們在 checkDetail 方法撰寫一個顯示 ActionSheet 的方法,讓我們點選這個 Callout 面板的時候能夠執行這個方法,讓我們實際運行看看:
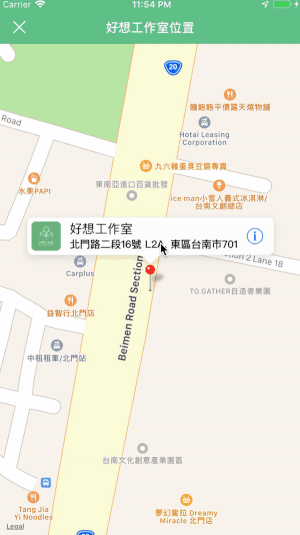
透過 Callout 面板打開 Action Sheet
希望透過這次教學之後,大家學會如何客製地圖上的 MKAnnotationView,也學到如何調整地圖上的縮放跟移動效果,之後我們也會透過我們這次實作的 Callout 面板來實作更多的功能。
你好,想請問你的checkDetail部分程式碼是怎麼建立的,該如何做到點擊callout後可以有視窗跳出來


 iThome鐵人賽